第十五章 nginx七层负载均衡
一、Nginx负载均衡
1.为什么做负载均衡
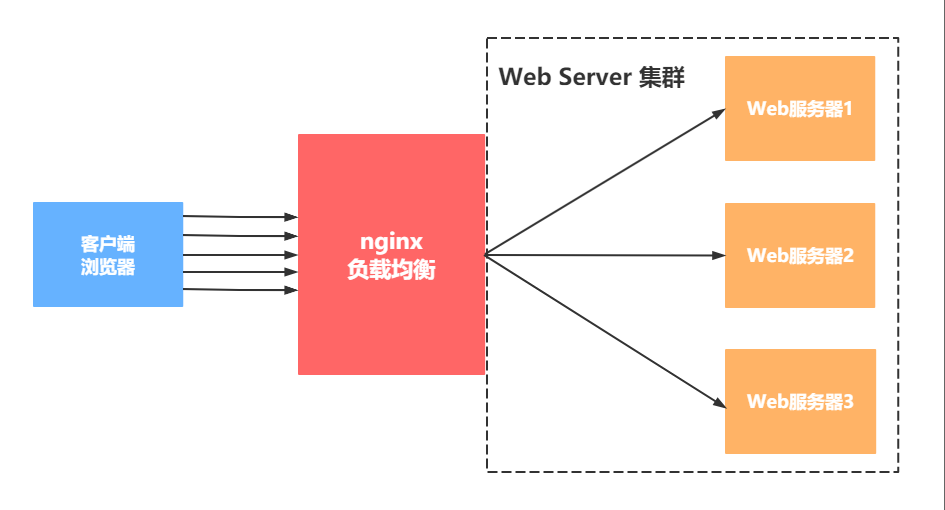
当我们的Web服务器直接面向用户,往往要承载大量并发请求,单台服务器难以负荷,我使用多台Web服务器组成集群,前端使用Nginx负载均衡,将请求分散的打到我们的后端服务器集群中,实现负载的分发。那么会大大提升系统的吞吐率、请求性能、高容灾
往往我们接触的最多的是SLB(Server Load Balance)负载均衡,实现最多的也是SLB、那么SLB它的调度节点和服务节点通常是在一个地域里面。那么它在这个小的逻辑地域里面决定了他对部分服务的实时性、响应性是非常好的。
所以说当海量用户请求过来以后,它同样是请求调度节点,调度节点将用户的请求转发给后端对应的服务节点,服务节点处理完请求后在转发给调度节点,调度节点最后响应给用户节点。这样也能实现一个均衡的作用,那么Nginx则是一个典型的SLB
2.负载均衡的叫法
负载均衡
负载
Load Balance
LB
3.公有云中叫法
1.SLB       阿里云产品
2.LB        青云产品
3.CLB       腾讯云产品
4.ULB       ucloud产品
4.常见的负载均衡软件
Nginx
Haproxy
LVS
#LVS是最快的负载均衡软件
5.负载均衡类型
1.四层负载均衡
所谓四层负载均衡指的是OSI七层模型中的传输层,那么传输层Nginx已经能支持TCP/IP的控制,所以只需要对客户端的请求进行TCP/IP协议的包转发就可以实现负载均衡,那么它的好处是性能非常快、只需要底层进行应用处理,而不需要进行一些复杂的逻辑。
2.七层负载均衡
七层负载均衡它是在应用层,那么它可以完成很多应用方面的协议请求,比如我们说的http应用的负载均衡,它可以实现http信息的改写、头信息的改写、安全应用规则控制、URL匹配规则控制、以及转发、rewrite等等的规则,所以在应用层的服务里面,我们可以做的内容就更多,那么Nginx则是一个典型的七层负载均衡SLB
二、Nginx负载均衡配置
Nginx要实现负载均衡需要用到proxy_pass代理模块配置.
Nginx负载均衡与Nginx代理不同地方在于,Nginx的一个location仅能代理一台服务器,而Nginx负载均衡则是将客户端请求代理转发至一组upstream虚拟服务池.
1.语法模块 ngx_http_upstream_module
Syntax: upstream name { ... }
Default: —
Context: http
upstream backend {
server backend1.example.com weight=5;
server backend2.example.com:8080;
server backup1.example.com:8080 backup;
server backup2.example.com:8080 backup;
}
server {
location / {
proxy_pass http://backend;
}
}
2.环境准备
| 主机 | 外网ip | 身份 |
|---|---|---|
| lb01 | 10.0.0.4,172.16.1.4 | 负载均衡 |
| web01 | 172.16.1.7 | web |
| web03 | 172.16.1.9 | web |
3.操作web01
1)配置nginx
[root@web01 conf.d]# vim linux.node.com.conf
server {
listen 80;
server_name linux.node.com;
charset utf-8;
location / {
root /code/node;
index index.html;
}
}
2)配置站点
[root@web01 conf.d]# mkdir /code/node
[root@web01 conf.d]# echo "我是web01......" > /code/node/index.html
3)配置hosts
10.0.0.7 linux.node.com
#重启访问
[root@web01 conf.d]# systemctl restart nginx
4.操作web03
[root@web03 conf.d]# vim linux.node.com.conf
server {
listen 80;
server_name linux.node.com;
charset utf-8;
location / {
root /code/node;
index index.html;
}
}
2)配置站点
[root@web03 conf.d]# mkdir /code/node
[root@web03 conf.d]# echo "我是web03......" > /code/node/index.html
3)配置hosts
10.0.0.9 linux.node.com
#重启访问
[root@web03 conf.d]# systemctl restart nginx
5.配置负载均衡配置文件
[root@lb01 conf.d]# vim node_proxy.conf
upstream web {
server 172.16.1.7:80;
server 172.16.1.8:80;
}
server {
listen 80;
server_name linux.node.com;
location / {
proxy_pass http://web;
include proxy_params;
}
}
6.配置优化文件
[root@Nginx ~]# vim /etc/nginx/proxy_params
proxy_set_header Host $http_host;
proxy_set_header X-Real-IP $remote_addr;
proxy_set_header X-Forwarded-For $proxy_add_x_forwarded_for;

proxy_connect_timeout 30;
proxy_send_timeout 60;
proxy_read_timeout 60;

proxy_buffering on;
proxy_buffer_size 32k;
proxy_buffers 4 128k;
三、nginx 调度算法
| 调度算法 | 概述 |
|---|---|
| 轮询 | 按时间顺序逐一分配到不同的后端服务器(默认) |
| weight | 加权轮询,weight值越大,分配到的访问几率越高 |
| ip_hash | 每个请求按访问IP的hash结果分配,这样来自同一IP的固定访问一个后端服务器 |
| url_hash | 按照访问URL的hash结果来分配请求,是每个URL定向到同一个后端服务器 |
| least_conn | 最少链接数,那个机器链接数少就分发 |
1.轮询配置方法
upstream node {
    server 172.16.1.7:80;
    server 172.16.1.8:80;
}
2.加权轮询配置方法
#访问根据配置的权重比例进行分配
upstream node {
    server 172.16.1.7:80 weight=5;
    server 172.16.1.8:80 weight=1;
}
3.ip_hash的配置方法
#根据访问的来源IP分配至同一台服务器
upstream node {
    server 172.16.1.7:80;
    server 172.16.1.8:80;
    ip_hash;
}
#经常使用这种方式进行会话保持
四、实战演练
1.需求
1.恢复快照
2.搭建两台博客网站
3.数据库独立
4.使用负载均衡
2.环境准备
| 主机 | 角色 | IP |
|---|---|---|
| webo1 | ngixn服务器 | 10.0.0.7 |
| web02 | nginx服务器 | 10.0.0.8 |
| lb01 | 负载均衡服务器 | 10.0.0.4 |
| db01 | 数据库服务器 | 10.0.0.51 |
3.web01服务器配置
1.搭建nginx服务
1.配置官方源
[root@web01 ~]# vim /etc/yum.repos.d/nginx.repo
[nginx-stable]
name=nginx stable repo
baseurl=http://nginx.org/packages/centos/7/$basearch/
gpgcheck=1
enabled=1
gpgkey=https://nginx.org/keys/nginx_signing.key
module_hotfixes=true
2.安装依赖
[root@web01 ~]# yum install -y gcc gcc-c++ autoconf pcre pcre-devel make automake wget httpd-tools vim tree
3.安装nginx
[root@web01 ~]# yum -y install nginx
4.配置nginx
[root@web01 ~]# vim /etc/nginx/nginx.conf
user www;
client_max_body_size 200m;
5.创建统一用户
[root@web01 ~]# groupadd -g 666 www
[root@web01 ~]# useradd www -u 666 -g 666
6.检查配置
[root@web01 ~]# nginx -t
nginx: the configuration file /etc/nginx/nginx.conf syntax is ok
nginx: configuration file /etc/nginx/nginx.conf test is successful
7.启动服务并设置开机自启
[root@web01 ~]# systemctl start nginx
[root@web01 ~]# systemctl enable nginx
Created symlink from /etc/systemd/system/multi-user.target.wants/nginx.service to /usr/lib/systemd/system/nginx.service.
2.安装PHP
1.创建目录
[root@web01 /code]# mkdir /package
2.上传源码包并解压到指定文件夹
[root@web01 ~]# rz [root@web01 ~]# ll
-rw-r--r-- 1 root root 19889622 2020-08-30 14:01 php.tar.gz
[root@web01 ~]# tar xf php.tar.gz -C /package/
3.安装PHP
[root@web01 /package]# cd /package/
[root@web01 /package]# yum -y localinstall *.rpm
4.配置PHP
[root@web01 /package]# vim /etc/php-fpm.d/www.conf
user = www
group = www
[root@web01 /package]# vim /etc/php.ini
post_max_size = 200M
upload_max_filesize = 200M
4.启动PHP并设置开机自启
[root@web01 /package]# systemctl start php-fpm.service
[root@web01 /package]# systemctl enable php-fpm.service
Created symlink from /etc/systemd/system/multi-user.target.wants/php-fpm.service to /usr/lib/systemd/system/php-fpm.service.
3.配置本地数据库
1.安装数据库
[root@web01 /package]# yum -y install mariadb-server
2.启动服务并设置开机自启
[root@web01 /package]# systemctl start mariadb.service
[root@web01 /package]# systemctl enable mariadb.service
Created symlink from /etc/systemd/system/multi-user.target.wants/mariadb.service to /usr/lib/systemd/system/mariadb.service.
3.设置数据库密码
[root@web01 /package]# mysqladmin -u root password
New password:
Confirm new password:
4.验证密码
[root@web01 /package]# mysql -uroot -p
Enter password:
Welcome to the MariaDB monitor. Commands end with ; or \g.
Your MariaDB connection id is 4
Server version: 5.5.65-MariaDB MariaDB Server
Copyright (c) 2000, 2018, Oracle, MariaDB Corporation Ab and others.
Type 'help;' or '\h' for help. Type '\c' to clear the current input statement.
MariaDB [(none)]>
5.创建数据库
MariaDB [(none)]> show databases;
+--------------------+
| Database |
+--------------------+
| information_schema |
| mysql |
| performance_schema |
| test |
+--------------------+
4 rows in set (0.00 sec)
MariaDB [(none)]> create database wordpress;
Query OK, 1 row affected (0.00 sec)
4.安装wordpress
1.配置wordpress站点目录
[root@web01 ~]# cp /etc/nginx/conf.d/linux.zh.com.conf /etc/nginx/conf.d/linux.wordpress.com.conf
[root@web01 ~]# vim /etc/nginx/conf.d/linux.wordpress.com.conf
server {
listen 80;
server_name linux.wordpress.com;
root /code/wordpress;
location / {
index index.php;
}
location ~* \.php$ {
fastcgi_pass 127.0.0.1:9000;
fastcgi_param SCRIPT_FILENAME $document_root$fastcgi_script_name;
include fastcgi_params;
}
}
2.创建目录
[root@web01 ~]# mkdir /code
3.上传源码包并解压
[root@m01 ~]# scp ./* root@172.16.1.7:/root
[root@web01 ~]# tar xf wordpress-5.0.3-zh_CN.tar.gz -C /code/
[root@web01 /code]# cd /code
[root@web01 /code]# ll
total 4
drwxr-xr-x 5 1006 1006 4096 2019-01-11 18:00 wordpress
4.授权目录
[root@web01 /code]# chown -R www:www /code/
6.检查配置并重启配置
[root@web01 /package]# nginx -t
nginx: the configuration file /etc/nginx/nginx.conf syntax is ok
nginx: configuration file /etc/nginx/nginx.conf test is successful
[root@web01 /package]# systemctl restart nginx
7.配置本地hosts文件
C:\Windows\System32\drivers\etc
10.0.0.7 linux.wordpress.com
4.web02服务配置
1.搭建nginx服务
1.配置官方源
[root@web02 ~]# vim /etc/yum.repos.d/nginx.repo
[nginx-stable]
name=nginx stable repo
baseurl=http://nginx.org/packages/centos/7/$basearch/
gpgcheck=1
enabled=1
gpgkey=https://nginx.org/keys/nginx_signing.key
module_hotfixes=true
2.安装依赖
[root@web02 ~]# yum install -y gcc gcc-c++ autoconf pcre pcre-devel make automake wget httpd-tools vim tree
3.安装nginx
[root@web02 ~]# yum -y install nginx
4.配置nginx
[root@web02 ~]# vim /etc/nginx/nginx.conf
user www;
client_max_body_size 200m;
4.创建统一用户
[root@web02 ~]# groupadd -g 666 www
[root@web02 ~]# useradd www -u 666 -g 666
5.检查配置
[root@web02 ~]# nginx -t
nginx: the configuration file /etc/nginx/nginx.conf syntax is ok
nginx: configuration file /etc/nginx/nginx.conf test is successful
6.启动服务并设置开机自启
[root@web02 ~]# systemctl start nginx
[root@web02 ~]# systemctl enable nginx
Created symlink from /etc/systemd/system/multi-user.target.wants/nginx.service to /usr/lib/systemd/system/nginx.service.
7.配置nginx站点目录
[root@web02 /package]# scp root@172.16.1.7:/etc/nginx/conf.d/* /etc/nginx/conf.d/
The authenticity of host '172.16.1.7 (172.16.1.7)' can't be established.
ECDSA key fingerprint is SHA256:g6buQ4QMSFl+5MMAh8dTCmLtkIfdT8sgRFYc6uCzV3c.
ECDSA key fingerprint is MD5:5f:d7:ad:07:e8:fe:d2:49:ec:79:2f:d4:91:59:c5:03.
Are you sure you want to continue connecting (yes/no)? yes
Warning: Permanently added '172.16.1.7' (ECDSA) to the list of known hosts
root@172.16.1.7's password:
linux.wordpress.com.conf 100% 282 185.9KB/s 00:00
8.检查服务并重启服务
[root@web02 /package]# nginx -t
nginx: the configuration file /etc/nginx/nginx.conf syntax is ok
nginx: configuration file /etc/nginx/nginx.conf test is successful
[root@web02 /package]# systemctl restart nginx
[root@web02 /package]#
[root@web02 /package]# systemctl restart nginx
9.创建目录
[root@web02 /package]# mkdir /code
10.授权目录
[root@web02 /package]# chown -R www:www /code/
11.推送web01站点文件
[root@web02 /package]# scp -r root@172.16.1.7:/code/* /code/
12.配置本地hosts
C:\Windows\System32\drivers\etc
10.0.0.8 linux.wordpress.com
2.安装PHP
1.创建目录

[root@web02 ~]# mkdir /package

2.上传源码包并解压到指定目录

[root@web02 ~]# ll

-rw-r--r--  1 root root 19889622 2020-08-30 15:33 php.tar.gz

[root@web02 ~]# tar  xf php.tar.gz -C /package/

3.安装PHP

[root@web02 ~]# cd /package/

[root@web02 /package]# yum -y localinstall *.rpm

4.配置php

[root@web02 /package]# vim /etc/php-fpm.d/www.conf

user = www

group = www

[root@web02 /package]# vim /etc/php.ini

post_max_size = 200M

upload_max_filesize = 200M

5.启动PHP并设置开机自启

[root@web02 /package]# systemctl  start php-fpm.service

[root@web02 /package]# systemctl  enable php-fpm.service

Created symlink from /etc/systemd/system/multi-user.target.wants/php-fpm.service to /usr/lib/systemd/system/php-fpm.service.
5.分离数据库
1.db01安装数据库
1.安装数据库
[root@db01 ~]# yum -y install mariadb-server.x86_64
2.启动数据库并设置开机自启
[root@db01 ~]# systemctl start mariadb.service
[root@db01 systemctl enable mariadb.servicevice
Created symlink from /etc/systemd/system/multi-user.target.wants/mariadb.service to /usr/lib/systemd/system/mariadb.service.
3.设置数据密码
[root@db01 ~]# mysqladmin -uroot password
New password:
Confirm new password:
4.验证密码
[root@db01 ~]# mysql -uroot -p
Enter password:
Welcome to the MariaDB monitor. Commands end with ; or \g.
Your MariaDB connection id is 3
Server version: 5.5.65-MariaDB MariaDB Server
Copyright (c) 2000, 2018, Oracle, MariaDB Corporation Ab and others.
Type 'help;' or '\h' for help. Type '\c' to clear the current input statement.
MariaDB [(none)]>
2.web01导出旧数据
1.导出web01数据
[root@web01 /code]# mysqldump -uroot -proot -B wordpress >/tmp/wordpress.sql
2.推送web01数据
[root@web01 /code]# scp /tmp/wordpress.sql root@172.16.1.51:/tmp
root@172.16.1.51's password:
wordpress.sql 100% 868KB 7.9MB/s 00:00
3.配置wordpresss连接数据库文件
[root@web01 /code]# vim /code/wordpress/wp-config.php
/** WordPress数据库的名称 */
define('DB_NAME', 'wordpress');
/** MySQL数据库用户名 */
define('DB_USER', 'wp');
/** MySQL数据库密码 */
define('DB_PASSWORD', 'wp123');
/** MySQL主机 */
define('DB_HOST', '172.16.1.51');
/** 创建数据表时默认的文字编码 */
define('DB_CHARSET', 'utf8mb4');
/** 数据库整理类型。如不确定请勿更改 */
define('DB_COLLATE', '');
3.web02配置连接远程数据库
1.配置wordpresss连接数据库文件
[root@web01 /code]# vim /code/wordpress/wp-config.php
/** WordPress数据库的名称 */
define('DB_NAME', 'wordpress');
/** MySQL数据库用户名 */
define('DB_USER', 'wp');
/** MySQL数据库密码 */
define('DB_PASSWORD', 'wp123');
/** MySQL主机 */
define('DB_HOST', '172.16.1.51');
/** 创建数据表时默认的文字编码 */
define('DB_CHARSET', 'utf8mb4');
/** 数据库整理类型。如不确定请勿更改 */
define('DB_COLLATE', '');
4.db01导入web01鸠数据
1.导入旧数据
[root@db01 ~]# mysql -uroot -p </tmp/wordpress.sql
Enter password:
2.检验数据库
[root@db01 ~]# mysql -uroot -p
Enter password:
Welcome to the MariaDB monitor. Commands end with ; or \g.
Your MariaDB connection id is 8
Server version: 5.5.65-MariaDB MariaDB Server
Copyright (c) 2000, 2018, Oracle, MariaDB Corporation Ab and others.
Type 'help;' or '\h' for help. Type '\c' to clear the current input statement.
MariaDB [(none)]> show databases;
+--------------------+
| Database |
+--------------------+
| information_schema |
| mysql |
| performance_schema |
| test |
| wordpress | |
+--------------------+
6 rows in set (0.00 sec)
3.数据库授权
MariaDB [(none)]> grant all on wordpress.* to wp@'172.16.1.%' identified by 'wp123';
Query OK, 0 rows affected (0.00 sec)
4.刷新数据库
MariaDB [(none)]> flush privileges;
Query OK, 0 rows affected (0.00 sec)
5.页面刷新正常登陆
6.lb01实现负载均衡
1.配置负载均衡配置文件
[root@lb01 ~]# vim /etc/nginx/conf.d/linux.daili.com.conf
upstream web {
server 172.16.1.7:80;
server 172.16.1.8:80;
}
server {
listen 80;
server_name linux.wordpress.com;
location / {
proxy_pass http://web;
include /etc/nginx/proxy_params;
}
}
2.配置优化文件
[root@lb01 ~]# vim /etc/nginx/proxy_params

proxy_set_header Host $http_host;

proxy_set_header X-Real-IP $remote_addr;

proxy_set_header X-Forwarded-For $proxy_add_x_forwarded_for;

proxy_connect_timeout 30;

proxy_send_timeout 60;

proxy_read_timeout 60;

proxy_buffering on;

proxy_buffer_size 32k;

proxy_buffers 4 128k;
五、负载均衡后端状态
| 状态 | 概述 |
|---|---|
| down | 当前的server暂时不参与负载均衡 |
| backup | 预留的备份服务器 |
| max_fails | 允许请求失败的次数 |
| fail_timeout | 经过max_fails失败后, 服务暂停时间 |
| max_conns | 限制最大的接收连接数 |
1.down状态配置测试
[root@lb01 ~]# vim /etc/nginx/conf.d/proxy.conf

upstream web {

    server 172.16.1.7:80 down;

    server 172.16.1.9:80;

}

#一般在代码上线或维护服务器时使用该状态
2.backup状态测试
[root@lb01 ~]# vim /etc/nginx/conf.d/proxy.conf

upstream web {

    server 172.16.1.7:80;

    server 172.16.1.9:80;

    server 172.16.1.10:80 backup;

    server 172.16.1.11:80 backup;

}
3.max_fails配置
[root@lb01 ~]# vim /etc/nginx/conf.d/proxy.conf

upstream web {

    server 172.16.1.7:80 max_fails=3 fail_timeout=10s;

    server 172.16.1.9:80;

}
4.测试max_conns最大TCP连接数
[root@lb01 ~]# vim /etc/nginx/conf.d/proxy.conf

upstream web {

    server 172.16.1.7:80 max_conns=10;

    server 172.16.1.9:80;

}
六、负载均衡结合项目
1.配置blog的负载均衡
[root@lb01 ~]# vim /etc/nginx/conf.d/blog.conf

upstream blog {

    server 172.16.1.7:80;

    server 172.16.1.9:80;

}

server {

    listen 80;

    server_name linux.blog.com;

    location / {

        proxy_pass http://blog;

        include /etc/nginx/proxy_params;

    }

}

[root@lb01 ~]# systemctl restart nginx

#配置hosts,访问测试
2.配置wecenter的负载均衡
[root@lb01 ~]# vim /etc/nginx/conf.d/zh.conf

upstream zh {

    server 172.16.1.7:80;

    server 172.16.1.9:80;

}

server {

    listen 80;

    server_name linux.zh.com;

    location / {

        proxy_pass http://zh;

        include /etc/nginx/proxy_params;

    }

}
3.负载均衡常见错误
1.错误
如果后端服务器返回报错,负载均衡仍然会将请求分配到出错的web服务器,
因为负载均衡只会根据调度算法将请求分配到后端,不会进行判断后端是否正常
2.解决错误的模块语法
Syntax: proxy_next_upstream error | timeout | invalid_header | http_500 | http_502 | http_503 | http_504 | http_403 | http_404 | http_429 | non_idempotent | off ...;
Default:    proxy_next_upstream error timeout;
Context:    http, server, location
3.配置方法
[root@lb01 ~]# vim /etc/nginx/conf.d/zh.conf
upstream zh {
server 172.16.1.7:80;
server 172.16.1.9:80;
}
server {
listen 80;
server_name linux.zh.com;
location / {
proxy_pass http://zh;
include /etc/nginx/proxy_params;
proxy_next_upstream http_502 error timeout;
}
}
七、nginx负载均衡健康检查
1.概述
在Nginx官方模块提供的模块中,没有对负载均衡后端节点的健康检查模块,但可以使用第三方模块。

`nginx_upstream_check_module`来检测后端服务的健康状态。
2.安装依赖包
[root@lb02 ~]# yum install -y gcc glibc gcc-c++ pcre-devel openssl-devel patch
3.下载nginx源码包以及nginx_upstream_check模块第三方模块
[root@lb02 ~]# wget http://nginx.org/download/nginx-1.14.2.tar.gz

[root@lb02 ~]# wget https://github.com/yaoweibin/nginx_upstream_check_module/archive/master.zip
4.解压nginx源码包以及第三方模块
[root@lb02 ~]# tar xf nginx-1.14.2.tar.gz

[root@lb02 ~]# unzip master.zip
5.进入nginx目录,打补丁(nignx的版本是1.14,补丁就选择1.14的,p1代表在nginx目录,po表示不在nginx目录)
[root@lb02 ~]# cd nginx-1.14.2/

[root@lb02 nginx-1.14.2]# patch -p1 <../nginx_upstream_check_module-master/check_1.14.0+.patch

[root@lb02 nginx-1.14.2]# ./configure --prefix=/etc/nginx --sbin-path=/usr/sbin/nginx --modules-path=/usr/lib64/nginx/modules --conf-path=/etc/nginx/nginx.conf --error-log-path=/var/log/nginx/error.log --http-log-path=/var/log/nginx/access.log --pid-path=/var/run/nginx.pid --lock-path=/var/run/nginx.lock --http-client-body-temp-path=/var/cache/nginx/client_temp --http-proxy-temp-path=/var/cache/nginx/proxy_temp --http-fastcgi-temp-path=/var/cache/nginx/fastcgi_temp --http-uwsgi-temp-path=/var/cache/nginx/uwsgi_temp --http-scgi-temp-path=/var/cache/nginx/scgi_temp --user=nginx --group=nginx --with-compat --with-file-aio --with-threads --with-http_addition_module --with-http_auth_request_module --with-http_dav_module --with-http_flv_module --with-http_gunzip_module --with-http_gzip_static_module --with-http_mp4_module --with-http_random_index_module --with-http_realip_module --with-http_secure_link_module --with-http_slice_module --with-http_ssl_module --with-http_stub_status_module --with-http_sub_module --with-http_v2_module --with-mail --with-mail_ssl_module --with-stream --with-stream_realip_module --with-stream_ssl_module --with-stream_ssl_preread_module --add-module=/root/nginx_upstream_check_module-master --with-cc-opt='-O2 -g -pipe -Wall -Wp,-D_FORTIFY_SOURCE=2 -fexceptions -fstack-protector-strong --param=ssp-buffer-size=4 -grecord-gcc-switches -m64 -mtune=generic -fPIC' --with-ld-opt='-Wl,-z,relro -Wl,-z,now -pie'

[root@lb02 nginx-1.14.2]# make && make install
5.在已有的负载均衡上增加健康检查的功能
[root@lb02 /etc/nginx]# vim /etc/nginx/nginx.conf
http {
include conf.d/*.conf;
... ...
}
[root@lb02 /etc/nginx]# mkdir /etc/nginx/conf.d
[root@lb01 conf.d]# cat proxy_web.conf
upstream web {
server 172.16.1.7:80 max_fails=2 fail_timeout=10s;
server 172.16.1.8:80 max_fails=2 fail_timeout=10s;
check interval=3000 rise=2 fall=3 timeout=1000 type=tcp;
#interval 检测间隔时间,单位为毫秒
#rise 表示请求2次正常,标记此后端的状态为up
#fall 表示请求3次失败,标记此后端的状态为down
#type 类型为tcp
#timeout 超时时间,单位为毫秒
}
server {
listen 80;
server_name linux.web.com;
location / {
proxy_pass http://web;
include proxy_params;
}
location /upstream_check {
check_status;
}
}
#编辑优化文件
[root@lb02 /etc/nginx]# vim /etc/nginx/proxy_params
proxy_set_header Host $http_host;
proxy_set_header X-Forwarded-For $proxy_add_x_forwarded_for;
proxy_connect_timeout 60s;
proxy_read_timeout 60s;
proxy_send_timeout 60s;
proxy_buffering on;
proxy_buffer_size 32k;
proxy_buffers 8 128k;
6.创建用户和目录
[root@lb02 /etc/nginx]# groupadd nginx -g 666
[root@lb02 /etc/nginx]# useradd nginx -u 666 -g 666
[root@lb02 /etc/nginx]# mkdir /var/cache/nginx/
7.启动并访问
[root@lb02 /etc/nginx]# /usr/sbin/nginx
#配置hosts
10.0.0.5 linux.web.com
八、nginx负载均衡会话保持
1.概述
在使用负载均衡的时候会遇到会话保持的问题,可通过如下方式进行解决。
1.使用nginx的ip_hash,根据客户端的IP,将请求分配到对应的IP上
2.基于服务端的session会话共享(file+NFS,MySQL,redis)
2.session共享的方法
1.把多台机器的session文件挂载到NFS
2.通过程序将session存储到mysql数据库
3.通过程序将session存储到redis
3.搭建第一台phpmyadmin
1.上传源码包
[root@web01 ~]# cd /code/
[root@web01 /code]# rz phpMyAdmin-4.9.0.1-all-languages.zip
2.解压源码包
[root@web01 /code]# unzip phpMyAdmin-4.9.0.1-all-languages.zip
[root@web01 /code]# mv phpMyAdmin-4.9.0.1-all-languages php
3.配置代码
[root@web01 /code]# cp php/config.sample.inc.php php/config.inc.php
[root@web01 /code]# vim php/config.inc.php
$cfg['Servers'][$i]['host'] = '172.16.1.51';
4.配置nginx
[root@web01 /code]# vim /etc/nginx/conf.d/linux.php.com.conf
server {
listen 80;
server_name linux.php.com;
root /code/php;
location / {
index index.php;
}
location ~* \.php$ {
fastcgi_pass 127.0.0.1:9000;
fastcgi_param SCRIPT_FILENAME $document_root$fastcgi_script_name;
include fastcgi_params;
}
}
5.重启访问
[root@web01 /code]# nginx -t
nginx: the configuration file /etc/nginx/nginx.conf syntax is ok
nginx: configuration file /etc/nginx/nginx.conf test is successful
[root@web01 /code]# systemctl restart nginx
#配置hosts
10.0.0.7 linux.php.com
6.访问页面错误
#报错
session_start(): open(SESSION_FILE, O_RDWR) failed: Permission denied (13)
session_start(): Failed to read session data: files (path: /var/lib/php/session)
#解决:
[root@web01 /code]# chown -R www.www /var/lib/php/session
7.再次访问测试
#如果忘记数据库远程连接密码
[root@db01 ~]# mysql -uroot -pLinhd@123
MariaDB [(none)]> grant all on *.* to root@'172.16.1.%' identified by '123';
Query OK, 0 rows affected (0.00 sec)
MariaDB [(none)]> select user,host,password from mysql.user;
4.同步配置到第二台服务器
1.推送配置和站点
#推送站点目录
[root@web01 /code]# scp -r /code/php 172.16.1.9:/code/
#推送nginx配置
[root@web01 /code]# scp /etc/nginx/conf.d/linux.php.com.conf 172.16.1.9:/etc/nginx/conf.d/
2.重启访问
[root@web03 ~]# systemctl restart nginx
#配置hosts
10.0.0.9 linux.php.com
3.授权目录
#报错
session_start(): open(SESSION_FILE, O_RDWR) failed: Permission denied (13)
session_start(): Failed to read session data: files (path: /var/lib/php/session)
#解决:
[root@web03 /code]# chown -R www.www /var/lib/php/session
5.配置负载均衡
1.配置
[root@lb01 ~]# cp /etc/nginx/conf.d/blog.conf /etc/nginx/conf.d/php.conf
[root@lb01 ~]# vim /etc/nginx/conf.d/php.conf
upstream php {
server 172.16.1.7:80;
server 172.16.1.9:80;
}
server {
listen 80;
server_name linux.php.com;
location / {
proxy_pass http://php;
include /etc/nginx/proxy_params;
}
}
2.重启并访问
[root@lb01 ~]# systemctl restart nginx
#配置hosts
10.0.0.4 linux.php.com
6.使用redis实现session共享
1.安装redis
[root@db01 ~]# yum install -y redis
2.配置redis
[root@db01 ~]# vim /etc/redis.conf
bind 127.0.0.1 172.16.1.51
3.启动1redis
[root@db01 ~]# systemctl start redis
#检查启动
[root@db01 ~]# netstat -lntp
tcp 0 0 172.16.1.51:6379 0.0.0.0:* LISTEN 29104/redis-server
tcp 0 0 127.0.0.1:6379 0.0.0.0:* LISTEN 29104/redis-server
4.配置PHP服务将session存储到redis
[root@web01 /code]# vim /etc/php.ini
#原配置 session.save_handler = files
session.save_handler = redis
session.save_path = "tcp://172.16.1.51:6379"
[root@web01 /code]# vim /etc/php-fpm.d/www.conf
#最下面几行注释
;php_value[session.save_handler] = files
;php_value[session.save_path] = /var/lib/php/session
5.重启PHP
[root@web01 /code]# systemctl restart php-fpm
[root@web03 /code]# systemctl restart php-fpm
6.访问测试
7.redis查看session
[root@db01 ~]# redis-cli
127.0.0.1:6379> keys *
1) "PHPREDIS_SESSION:8b8721df0b5736149ea0c716f05773e9"
2) "PHPREDIS_SESSION:b59336d7a1a053c6d26c2550032c1609
127.0.0.1:6379> TTL PHPREDIS_SESSION:b59336d7a1a053c6d26c2550032c1609
(integer) 1199
第十五章 nginx七层负载均衡的更多相关文章
- Linux架构之Nginx 七层负载均衡
第50章 Nginx七层负载均衡 一.Nginx负载均衡基本概述 1)为什么要使用负载均衡 当我们的Web服务器直接面向用户,往往要承载大量并发请求,单台服务器难以负荷.使用多台Web服务器组成集群, ...
- nginx 七层负载均衡
[tcp] nginx 七层负载均衡 nginx负载均衡概述 当我们的Web服务器直接面向用户,往往要承载大量并发请求,单台服务器难以负荷,我使用多台Web服务器组成集群,前端使用Nginx负载均衡, ...
- Nginx七层负载均衡的几种调度算法
Nginx是一款轻量级的高性能web服务器,同时也是一款非常优秀的负载均衡器和反向代理服务器.由于支持强大的正则匹配规则.动静分离.URLrewrite功能及安装配置简单且对网络稳定性依赖非常小等 ...
- 13、Nginx七层负载均衡
1.Nginx负载均衡基本概述 1.1为什么需要使用负载均衡 当我们的Web服务器直接面向用户,往往要承载大量并发请求,单台服务器难以负荷,我使用多台WEB服务器组成集群,前端使用Nginx负载均衡, ...
- 四层和七层负载均衡的特点及常用负载均衡Nginx、Haproxy、LVS对比
一.四层与七层负载均衡在原理上的区别 图示: 四层负载均衡与七层负载均衡在工作原理上的简单区别如下图: 概述: 1.四层负载均衡工作在OSI模型中的四层,即传输层.四层负载均衡只能根据报文中目标地址和 ...
- windows第七层负载均衡--基于IIS的ARR负载均衡
载均衡有很多种方法,有硬件负载均衡,软件负载均衡,还可以从域名解析下手. 不过,今天只讲软件负载均衡 软件负载均衡一般分两种,从网络协议来讲(tcp/ip),主要集中在第四层和第七层进行负载均衡. 第 ...
- Web负载均衡学习笔记之四层和七层负载均衡的区别
0x00 简介 简单理解四层和七层负载均衡: ① 所谓四层就是基于IP+端口的负载均衡:七层就是基于URL等应用层信息的负载均衡:同理,还有基于MAC地址的二层负载均衡和基于IP地址的三层负载均衡. ...
- 四层and七层负载均衡
四层负载/七层负载 在常规运维工作中,经常会运用到负载均衡服务.负载均衡分为四层负载和七层负载,那么这两者之间有什么不同? 废话不多说,详解如下: 1. 什么是负载均衡 1)负载均衡(Load ...
- 高可用 & 七层负载均衡与四层负载均衡
内容概要 高可用 七层负载均衡 和 四层负载均衡 内容详细 一.高可用 1.什么是高可用 一般是指2台机器启动着完全相同的业务系统,当有一台机器down机了,另外一台服务器就能快速的接管,对于访问的用 ...
随机推荐
- 第2课 - 搭建Lua开发环境
第2课 - 搭建Lua开发环境 1. Lua 的优点 (1)Lua 使用标准的 ANSI C 进行开发,可以无缝集成到宿主程序,且几乎支持所有平台. (2)Lua 是开源且免费的软件,以源码的方式直接 ...
- JVM_02 类加载子系统
JVM细节版架构图 本文针对Class Loader SubSystem这一块展开讲解类加载子系统的工作流程 类加载子系统作用 1.类加载子系统负责从文件系统或者网络中加载class文件,class文 ...
- k8s集群监控(十一)
Weave Scope 在我之前的docker监控中<Docker容器监控(十)–技术流ken>就已经提到了weave scope. Weave Scope 是 Docker 和 Ku ...
- 小白的springboot之路(十八)、i18n多语言支持(后端篇)
0-前言 在有些系统中,比如网站,往往需要支持多国语言,英文版中文版什么的,这个其实也不难: 今天我们就来介绍spring boot中用i18n在后端支持多语言: 当然,也可以直接在前端用i18n直接 ...
- CSS常用布局技巧 实例
末尾用省略号! white-space: nowrap; overflow: hidden; text-overflow: ellipsis; ######################## 两个i ...
- 关于JSON的零碎小知识
1.ali的fastjson在将实体类转成jsonString的时候,一些首字母大写的字段会自动修改为小字母,这种字段加 @JsonProperty(value = "DL_id" ...
- spring mvc(2) spring mvc初体验
前面讲到随着前端技术的发展,web的开发已经实现了前后分离,并且spring mvc经过多个版本的更新,使用上也变得不一样,并且提供了很多便捷的功能.但是为了便于理解,我们使用比较原始的方式搭建spr ...
- ribbon源码(2) 负载均衡器
负载均衡器对外提供负载均衡的功能,本质上是是维护当前服务的服务器列表和服务器状态,通过负载均衡算法选取合适的服务器地址. 用户可以通过实现ILoadBalancer来实现自己的负载均衡器,ribbon ...
- python常用os模块
OS 模块 #os模块就是对操作系统进行操作,使用该模块必须先导入模块: import os #getcwd() 获取当前工作目录(当前工作目录默认都是当前文件所在的文件夹) result = os. ...
- powershell中使用Get-FileHash计算文件的hash值
今天在公司一台windows服务器上.需要对两个文件进行比对,笔者首先就想到了可以使用md5校验 但是公司服务器上又不可以随意安装软件,于是笔者想到了可以试试windows自带的powershell中 ...