
用GPU来运行Python代码
简介
前几天捣鼓了一下Ubuntu,正是想用一下我旧电脑上的N卡,可以用GPU来跑代码,体验一下多核的快乐。
还好我这破电脑也是支持Cuda的:
$ sudo lshw -C display

  *-display

       description: 3D controller

       product: GK208M [GeForce GT 740M]

       vendor: NVIDIA Corporation

       physical id: 0

       bus info: pci@0000:01:00.0

       version: a1

       width: 64 bits

       clock: 33MHz

       capabilities: pm msi pciexpress bus_master cap_list rom

       configuration: driver=nouveau latency=0

       resources: irq:35 memory:f0000000-f0ffffff memory:c0000000-cfffffff memory:d0000000-d1ffffff ioport:6000(size=128)
安装相关工具
首先安装一下Cuda的开发工具,命令如下:
$ sudo apt install nvidia-cuda-toolkit
查看一下相关信息:
$ nvcc --version

nvcc: NVIDIA (R) Cuda compiler driver

Copyright (c) 2005-2021 NVIDIA Corporation

Built on Thu_Nov_18_09:45:30_PST_2021

Cuda compilation tools, release 11.5, V11.5.119

Build cuda_11.5.r11.5/compiler.30672275_0
通过Conda安装相关的依赖包:
conda install numba & conda install cudatoolkit
通过pip安装也可以,一样的。
测试与驱动安装
简单测试了一下,发觉报错了:
$ /home/larry/anaconda3/bin/python /home/larry/code/pkslow-samples/python/src/main/python/cuda/test1.py

Traceback (most recent call last):

  File "/home/larry/anaconda3/lib/python3.9/site-packages/numba/cuda/cudadrv/driver.py", line 246, in ensure_initialized

    self.cuInit(0)

  File "/home/larry/anaconda3/lib/python3.9/site-packages/numba/cuda/cudadrv/driver.py", line 319, in safe_cuda_api_call

    self._check_ctypes_error(fname, retcode)

  File "/home/larry/anaconda3/lib/python3.9/site-packages/numba/cuda/cudadrv/driver.py", line 387, in _check_ctypes_error

    raise CudaAPIError(retcode, msg)

numba.cuda.cudadrv.driver.CudaAPIError: [100] Call to cuInit results in CUDA_ERROR_NO_DEVICE

During handling of the above exception, another exception occurred:

Traceback (most recent call last):

  File "/home/larry/code/pkslow-samples/python/src/main/python/cuda/test1.py", line 15, in <module>

    gpu_print[1, 2]()

  File "/home/larry/anaconda3/lib/python3.9/site-packages/numba/cuda/compiler.py", line 862, in __getitem__

    return self.configure(*args)

  File "/home/larry/anaconda3/lib/python3.9/site-packages/numba/cuda/compiler.py", line 857, in configure

    return _KernelConfiguration(self, griddim, blockdim, stream, sharedmem)

  File "/home/larry/anaconda3/lib/python3.9/site-packages/numba/cuda/compiler.py", line 718, in __init__

    ctx = get_context()

  File "/home/larry/anaconda3/lib/python3.9/site-packages/numba/cuda/cudadrv/devices.py", line 220, in get_context

    return _runtime.get_or_create_context(devnum)

  File "/home/larry/anaconda3/lib/python3.9/site-packages/numba/cuda/cudadrv/devices.py", line 138, in get_or_create_context

    return self._get_or_create_context_uncached(devnum)

  File "/home/larry/anaconda3/lib/python3.9/site-packages/numba/cuda/cudadrv/devices.py", line 153, in _get_or_create_context_uncached

    with driver.get_active_context() as ac:

  File "/home/larry/anaconda3/lib/python3.9/site-packages/numba/cuda/cudadrv/driver.py", line 487, in __enter__

    driver.cuCtxGetCurrent(byref(hctx))

  File "/home/larry/anaconda3/lib/python3.9/site-packages/numba/cuda/cudadrv/driver.py", line 284, in __getattr__

    self.ensure_initialized()

  File "/home/larry/anaconda3/lib/python3.9/site-packages/numba/cuda/cudadrv/driver.py", line 250, in ensure_initialized

    raise CudaSupportError(f"Error at driver init: {description}")

numba.cuda.cudadrv.error.CudaSupportError: Error at driver init: Call to cuInit results in CUDA_ERROR_NO_DEVICE (100)
网上搜了一下,发现是驱动问题。通过Ubuntu自带的工具安装显卡驱动:
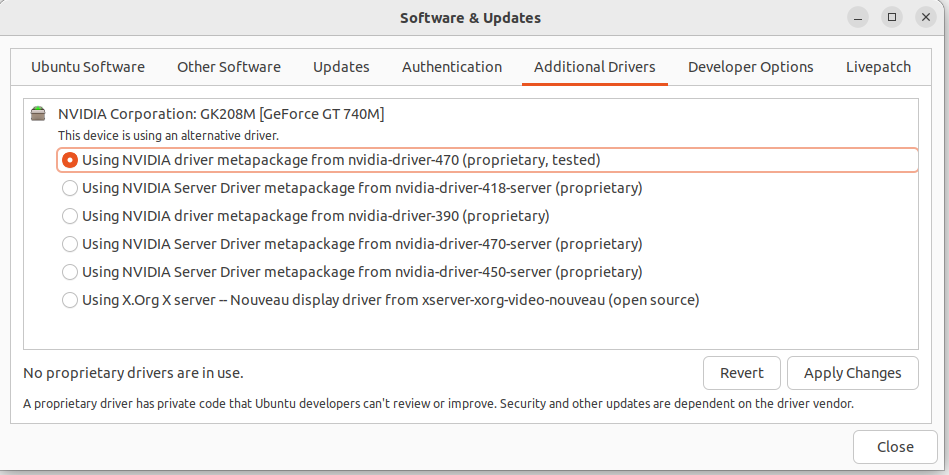
还是失败:
$ nvidia-smi

NVIDIA-SMI has failed because it couldn't communicate with the NVIDIA driver. Make sure that the latest NVIDIA driver is installed and running.
最后,通过命令行安装驱动,成功解决这个问题:
$ sudo apt install nvidia-driver-470
检查后发现正常了:
$ nvidia-smi

Wed Dec  7 22:13:49 2022

+-----------------------------------------------------------------------------+

| NVIDIA-SMI 470.161.03   Driver Version: 470.161.03   CUDA Version: 11.4     |

|-------------------------------+----------------------+----------------------+

| GPU  Name        Persistence-M| Bus-Id        Disp.A | Volatile Uncorr. ECC |

| Fan  Temp  Perf  Pwr:Usage/Cap|         Memory-Usage | GPU-Util  Compute M. |

|                               |                      |               MIG M. |

|===============================+======================+======================|

|   0  NVIDIA GeForce ...  Off  | 00000000:01:00.0 N/A |                  N/A |

| N/A   51C    P8    N/A /  N/A |      4MiB /  2004MiB |     N/A      Default |

|                               |                      |                  N/A |

+-------------------------------+----------------------+----------------------+

+-----------------------------------------------------------------------------+

| Processes:                                                                  |

|  GPU   GI   CI        PID   Type   Process name                  GPU Memory |

|        ID   ID                                                   Usage      |

|=============================================================================|

|  No running processes found                                                 |

+-----------------------------------------------------------------------------+
测试代码也可以跑了。
测试Python代码
打印ID
准备以下代码:
from numba import cuda

import os

def cpu_print():

    print('cpu print')

@cuda.jit

def gpu_print():

    dataIndex = cuda.threadIdx.x + cuda.blockIdx.x * cuda.blockDim.x

    print('gpu print ', cuda.threadIdx.x, cuda.blockIdx.x, cuda.blockDim.x, dataIndex)

if __name__ == '__main__':

    gpu_print[4, 4]()

    cuda.synchronize()

    cpu_print()
这个代码主要有两个函数,一个是用CPU执行,一个是用GPU执行,执行打印操作。关键在于@cuda.jit这个注解,让代码在GPU上执行。运行结果如下:
$ /home/larry/anaconda3/bin/python /home/larry/code/pkslow-samples/python/src/main/python/cuda/print_test.py

gpu print  0 3 4 12

gpu print  1 3 4 13

gpu print  2 3 4 14

gpu print  3 3 4 15

gpu print  0 2 4 8

gpu print  1 2 4 9

gpu print  2 2 4 10

gpu print  3 2 4 11

gpu print  0 1 4 4

gpu print  1 1 4 5

gpu print  2 1 4 6

gpu print  3 1 4 7

gpu print  0 0 4 0

gpu print  1 0 4 1

gpu print  2 0 4 2

gpu print  3 0 4 3

cpu print
可以看到GPU总共打印了16次,使用了不同的Thread来执行。这次每次打印的结果都可能不同,因为提交GPU是异步执行的,无法确保哪个单元先执行。同时也需要调用同步函数cuda.synchronize(),确保GPU执行完再继续往下跑。
查看时间
我们通过这个函数来看GPU并行的力量:
from numba import jit, cuda

import numpy as np

# to measure exec time

from timeit import default_timer as timer

# normal function to run on cpu

def func(a):

    for i in range(10000000):

        a[i] += 1

# function optimized to run on gpu

@jit(target_backend='cuda')

def func2(a):

    for i in range(10000000):

        a[i] += 1

if __name__ == "__main__":

    n = 10000000

    a = np.ones(n, dtype=np.float64)

    start = timer()

    func(a)

    print("without GPU:", timer() - start)

    start = timer()

    func2(a)

    print("with GPU:", timer() - start)
结果如下:
$ /home/larry/anaconda3/bin/python /home/larry/code/pkslow-samples/python/src/main/python/cuda/time_test.py

without GPU: 3.7136273959999926

with GPU: 0.4040513340000871
可以看到使用CPU需要3.7秒,而GPU则只要0.4秒,还是能快不少的。当然这里不是说GPU一定比CPU快,具体要看任务的类型。
代码
代码请看GitHub: https://github.com/LarryDpk/pkslow-samples
用GPU来运行Python代码的更多相关文章
- Python--day02(编程语言、运行python代码、变量)
day01主要内容回顾 1.进制转换: 二进制: 1111 0101 1010 十六进制 f 5 a 2.内存分布:堆区 和 栈区 外来人只能访问栈区的数据 ...
- 在notepad++中运行python代码
#在notepad++中运行python代码 ''' 1.安装插件pyNPP, 2.允许插件pyNPP中的第一个和第二个选项即可,如果代码过少代码执行一闪而过,可能无法看到,可加入少量sleep时间即 ...
- SAE部署Python-让云端自动运行Python代码
之前写过模拟登录新浪微博的帖子,然而我并没有去爬过微博的数据,觉得有点浪费,于是就想写一个代码来发微博.写完之后觉得如果能自动发微博就好了,但是我又不可能24小时开始(晚上12点后还会断网),也没有v ...
- 转-Pycharm中运行Python代码的几种方式
转自:Pycharm中运行Python代码的几种方式 在pycharm中的Python代码运行会出现各种奇葩的问题,比如,密码输入时不显示或没有提示,给我们带来一些麻烦,下面介绍几种代码运行的几种方式 ...
- shell脚本命令 运行python文件&python命令行运行python代码
单独的python文件运行的时候 报错: 在shell脚本中,运行shell脚本命令:在Python命令行中,运行Python代码.然而,“python hello.py”是一个脚本命令,不是pyth ...
- 无需操作系统和虚拟机,直接运行Python代码
Josh Triplett以一个“笑点”开始了他在PyCon 2015上的演讲:移植Python使其无需操作系统运行:他和他的英特尔同事让解释器能够在GRUB引导程序.BIOS或EFI系统上运行.连演 ...
- 无需操作系统直接运行 Python 代码
Josh Triplett以一个“笑点”开始了他在PyCon 2015上的演讲:移植Python使其无需操作系统运行:他和他的英特尔同事让解释器能够在GRUB引导程序.BIOS或EFI系统上运行.连演 ...
- jython实现java运行python代码
Jython是一种完整的语言,而不是一个Java翻译器或仅仅是一个Python编译器,它是一个Python语言在Java中的完全实现.最近的一个项目需要将python代码转换成java实现,所以用了一 ...
- Python入门2(Python与C语言语法的不同、Notepad++运行Python代码)
本篇博客主要介绍Python的基本语法与C语言不同的地方 [不同] 一.Python代码需要有严格的缩进,即C语言中所谓的良好的编码习惯.缩进不正确就会报错. 二.C语言需要圆括号 三.C语言每个语句 ...
- 命令行下设置 PYTHONPATH 来正确运行Python代码
写Python程序,总要使用一些自己使用的库:在运行此类程序的时候,就需要先配置好 PYTHONPATH 环境变量:否则会导致找不到库错误. Windows下,可以写一个bat来简化配置: @ECHO ...
随机推荐
- <一>类,对象,this指针
C++ 类:实体的抽象类型 实体(属性,行为) ->ADT(abstract data type) 类(属性->成员变量,行为->成员方法) OOP语言4大特征 抽象 封装/隐藏(通 ...
- Sqlite 安装操作使用
一.什么是 SQLite 数据库 SQLite 是嵌入式SQL数据库引擎.与大多数其他 SQL 数据库不同,SQLite 没有单独的服务器进程.SQLite 直接读取和写入普通磁盘文件.具有多个表,索 ...
- springboot集成支付宝的支付(通用版)
[1.引依赖] <dependency> <groupId>com.alipay.sdk</groupId> <artifactId>alipay-sd ...
- c#显示和隐藏另外一个进程
1 /// <summary> 2 /// 0-关闭窗口 1-正常大小显示 2最小化窗口 3-最大化窗口 3 /// </summary> 4 /// <param na ...
- windows查看端口和杀掉端口
//执行下面命令 netstat --help 获取netstat的所有命令参数 //例如查看8080端口占用 netstat -ano | findstr 8080 //查看该端口是什么 taskl ...
- Java判断质数/素数的三种方法
介绍 质数:在大于1的整数中,如果只包含1和本身这两个约数,就被称为质数(素数) 解法 解法一:暴力枚举 枚举从2 ~ N的每一个数 实际上不用枚举到N,只需要枚举到√N就行 注意: 不要使用sqrt ...
- 新版的Eureka已经移除了基于Ribbon的客户端的负载均衡
启用一个EurekaServer和一个服务调用方,两个copy的服务提供方. 本次测试用Springcloud 2021.0.1版本 客户端使用RestTemplate 的负载均衡 @LoadBala ...
- GKCTF2021 MISC
1.签到 当时没签上┭┮﹏┭┮: 追踪http流,发现依次执行[ls][ls/][whoami] 发现存在[fl4g],同时发现破解的规则为hex decode->base64 decode-& ...
- mq中如何保证消息的顺序性
先说结论 不建议在mq当中使用消息的投递顺序来保证消息的顺序一致性 反思为什么需要保留消息的顺序性 日常思维中,顺序大部分情况会和时间关联起来,即时间的先后表示事件的顺序关系.消息队列中的若干消息如果 ...
- 【每日一题】【回溯】【StringBuilder】2021年12月7日-17. 电话号码的字母组合
给定一个仅包含数字 2-9 的字符串,返回所有它能表示的字母组合.答案可以按 任意顺序 返回. 给出数字到字母的映射如下(与电话按键相同).注意 1 不对应任何字母. 来源:力扣(LeetCode)链 ...