
Vue中组件化编码使用(实战练习一)
Vue中组件化编码的大致流程(初接触)、组件之间的参数传递(最基础的形式)、组件之间的配合完成一个需求
1、在Vue中进行组件化编码
1.1、组件化编码流程:
(1)、拆分静态组件:组件要按照功能点拆分,命名不要与html元素冲突。
(2)、实现动态组件:考虑好数据的存放位置,数据是一个组件在用,还是一些组件在用:
1)、一个组件在用:放在组件自身即可。
2)、 一些组件在用:放在他们共同的父组件上(状态提升)。
(3)、实现交互:从绑定事件开始。
1.2、props适用于:
(1)、父组件 ==> 子组件 通信
(2)、子组件 ==> 父组件 通信(要求父先给子一个函数)
1.3 、注意事项
使用v-model时要切记:v-model绑定的值不能是props传过来的值,因为props是不可以修改的
props传过来的若是对象类型的值,修改对象中的属性时Vue不会报错,但不推荐这样做。
2、任务需求(需要实现的效果)
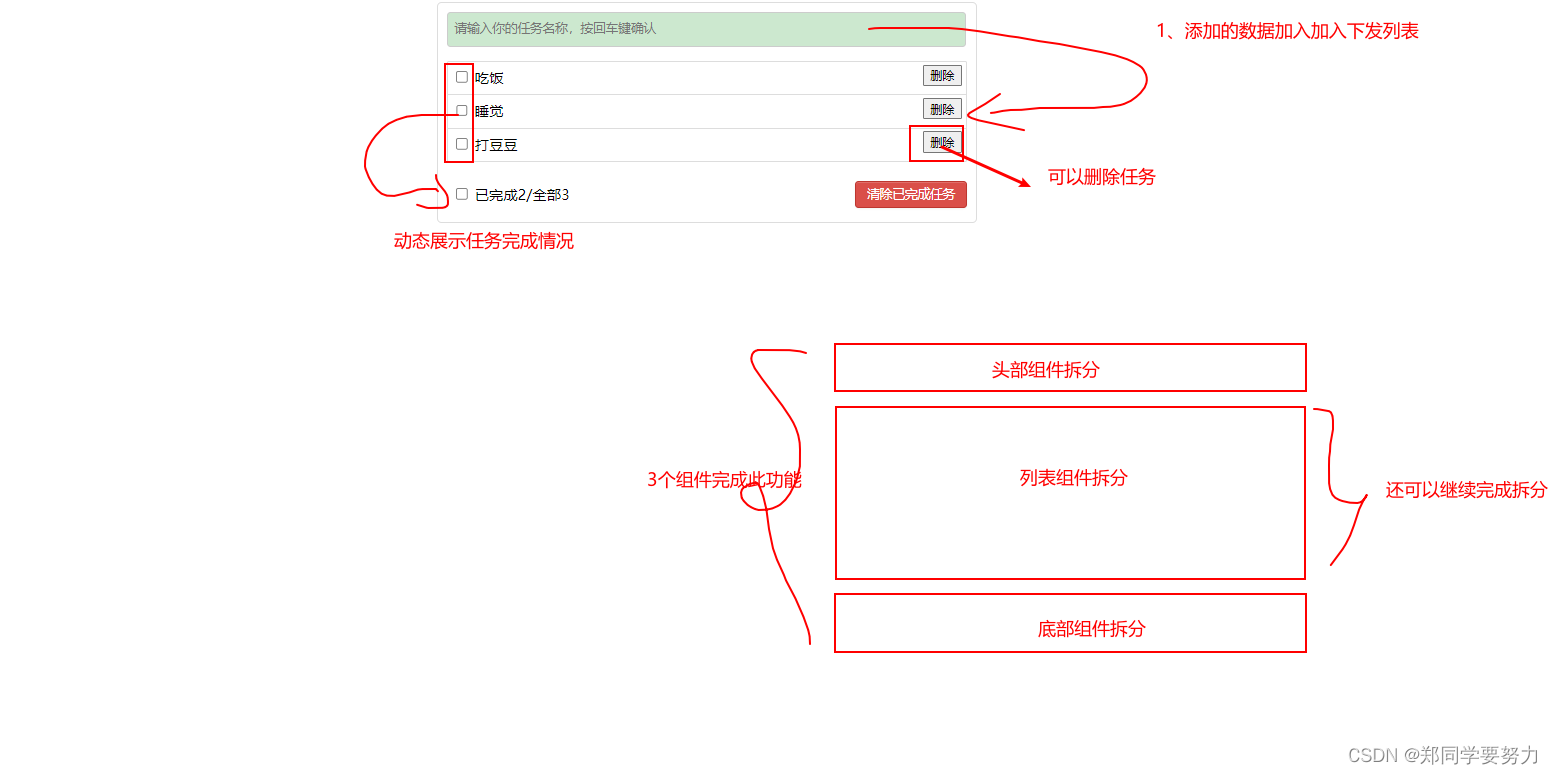
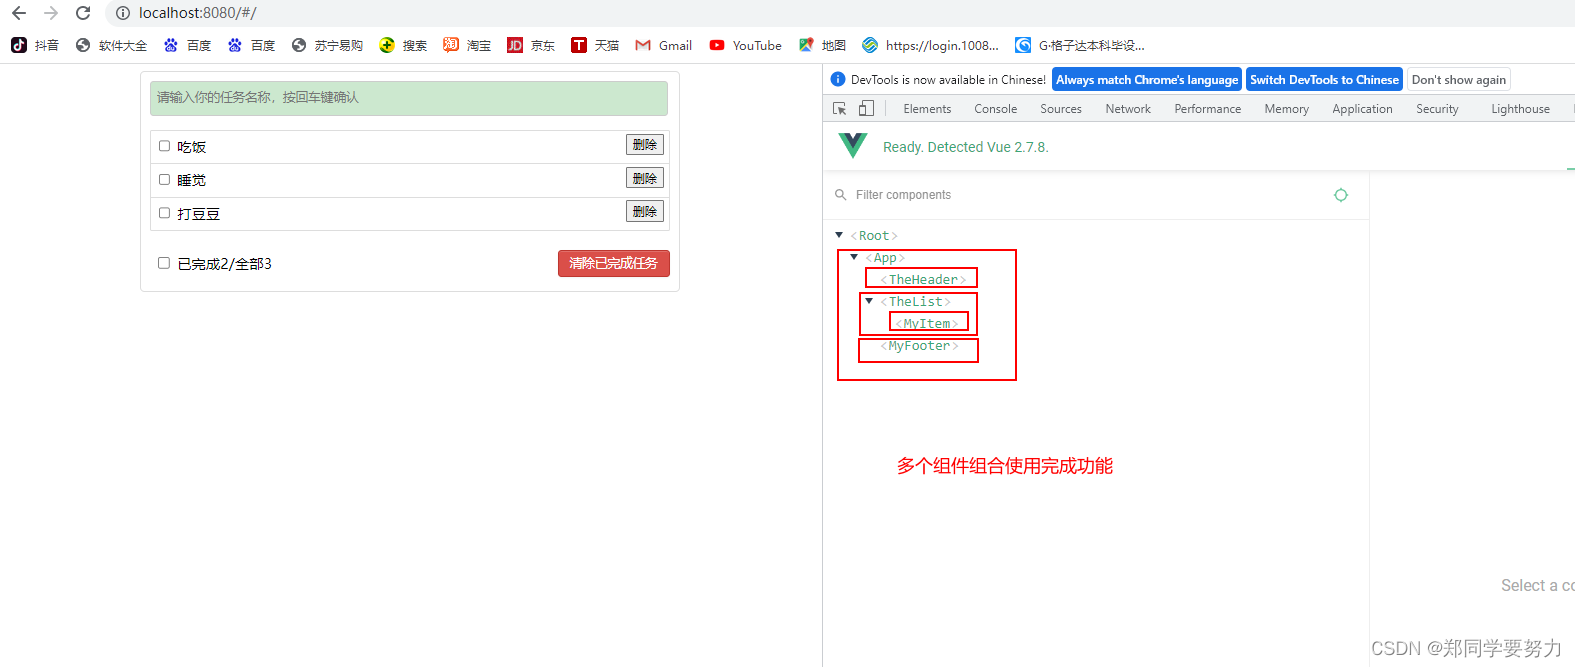
3、项目结构
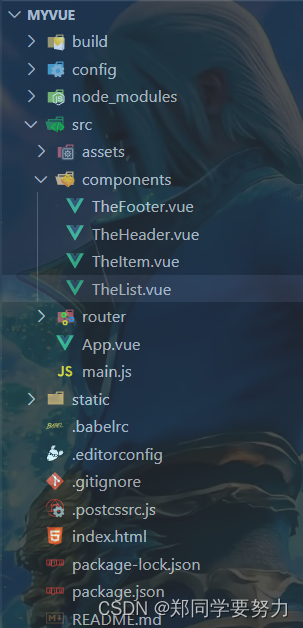
4、代码实例
4.1 TheFooter.vue
<template>

  <div class="todo-footer" >

      <!-- <input type="checkbox" :checked="isAll" @change="checkAll"/> -->

      <input type="checkbox" />

    <span> 已完成2/全部3</span>

    <button class="btn btn-danger">清除已完成任务</button>

  </div>

</template>

<script>

export default {

  name: "TheFooter",

  methods: {},

};

</script>

<style scoped>

/*footer*/

.todo-footer {

  height: 40px;

  line-height: 40px;

  padding-left: 6px;

  margin-top: 5px;

}

.todo-footer label {

  display: inline-block;

  margin-right: 20px;

  cursor: pointer;

}

.todo-footer label input {

  position: relative;

  top: -1px;

  vertical-align: middle;

  margin-right: 5px;

}

.todo-footer button {

  float: right;

  margin-top: 5px;

}

</style>
4.2 TheHeader.vue
<template>

  <div class="todo-header">

    <input type="text" placeholder="请输入你的任务名称,按回车键确认" />

  </div>

</template>

<script>

export default {

  name: "TheHeader",

  data() {

    return {};

  },

  methods: {},

};

</script>

<style scoped>

/*header*/

.todo-header input {

  width: 560px;

  height: 28px;

  font-size: 14px;

  border: 1px solid #ccc;

  border-radius: 4px;

  padding: 4px 7px;

}

.todo-header input:focus {

  outline: none;

  border-color: rgba(82, 168, 236, 0.8);

  box-shadow: inset 0 1px 1px rgba(0, 0, 0, 0.075),

    0 0 8px rgba(82, 168, 236, 0.6);

}

</style>
4.3 TheItem.vue
<template>

  <div>

    <li>

      <label>

        <input type="checkbox" />

        <span>吃饭</span>

      </label>

      <button>删除</button>

    </li>

    <li>

      <label>

        <input type="checkbox" />

        <span>睡觉</span>

      </label>

      <button>删除</button>

    </li>

    <li>

      <label>

        <input type="checkbox" />

        <span>打豆豆</span>

      </label>

      <button>删除</button>

    </li>

  </div>

</template>

<script>

export default {

  name: "MyItem",

  data() {},

  methods: {},

};

</script>

<style scoped>

/*item*/

li {

  list-style: none;

  height: 36px;

  line-height: 36px;

  padding: 0 5px;

  border-bottom: 1px solid #ddd;

}

li label {

  float: left;

  cursor: pointer;

}

li label li input {

  vertical-align: middle;

  margin-right: 6px;

  position: relative;

  top: -1px;

}

li button {

  float: right;

  margin-top: 3px;

}

li:before {

  content: initial;

}

li:last-child {

  border-bottom: none;

}

li:hover {

  background-color: #ddd;

}

li:hover button {

  display: block;

}

</style>
4.4 TheList.vue
<template>

  <ul class="todo-main">

    <TheItem />

  </ul>

</template>

<script>

import TheItem from "./TheItem";

export default {

  name: "TheList",

  components: { TheItem },

};

</script>

<style scoped>

/*main*/

.todo-main {

  margin-left: 0px;

  border: 1px solid #ddd;

  border-radius: 2px;

  padding: 0px;

}

.todo-empty {

  height: 40px;

  line-height: 40px;

  border: 1px solid #ddd;

  border-radius: 2px;

  padding-left: 5px;

  margin-top: 10px;

}

</style>
4.5 App.vue
<template>

  <div id="root">

    <div class="todo-container">

      <div class="todo-wrap">

        <TheHeader />

        <TheList />

        <TheFooter />

      </div>

    </div>

  </div>

</template>

<script>

import TheHeader from "./components/TheHeader";

import TheList from "./components/TheList";

import TheFooter from "./components/TheFooter.vue";

export default {

  name: "App",

  components: { TheHeader, TheList, TheFooter },

  data() {

    return {};

  },

  methods: {},

};

</script>

<style>

/*base*/

body {

  background: #fff;

}

.btn {

  display: inline-block;

  padding: 4px 12px;

  margin-bottom: 0;

  font-size: 14px;

  line-height: 20px;

  text-align: center;

  vertical-align: middle;

  cursor: pointer;

  box-shadow: inset 0 1px 0 rgba(255, 255, 255, 0.2),

    0 1px 2px rgba(0, 0, 0, 0.05);

  border-radius: 4px;

}

.btn-danger {

  color: #fff;

  background-color: #da4f49;

  border: 1px solid #bd362f;

}

.btn-danger:hover {

  color: #fff;

  background-color: #bd362f;

}

.btn:focus {

  outline: none;

}

.todo-container {

  width: 600px;

  margin: 0 auto;

}

.todo-container .todo-wrap {

  padding: 10px;

  border: 1px solid #ddd;

  border-radius: 5px;

}

</style>
4.6 main.js
// The Vue build version to load with the `import` command

// (runtime-only or standalone) has been set in webpack.base.conf with an alias.

import Vue from 'vue'

import App from './App'

import router from './router'

Vue.config.productionTip = false

/* eslint-disable no-new */

new Vue({

  el: '#app',

  router,

  components: { App },

  template: '<App/>'

})
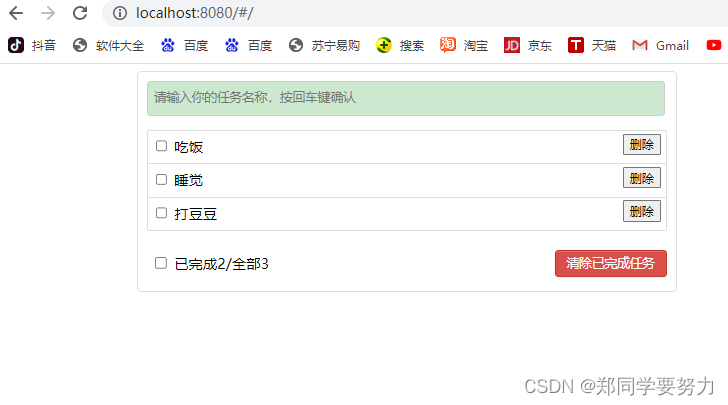
5、静态页面效果(功能还未添加)
Vue中组件化编码使用(实战练习一)的更多相关文章
- Vue中组件化编码使用、实现组件之间的参数传递(实战练习二)
上一章节实现的是静态页面的设计.这一章节实现将数据抽取出来.通过组件间参数的传递来实现 上一章节链接地址:https://blog.csdn.net/weixin_43304253/article/d ...
- Vue中组件化编码 完成任务的添加、删除、统计、勾选需求(实战练习三完结)
上一个章节实现数据在组件之间的传递 .这一章主要是完成添加任务到任务栏.删除任务栏.统计任务完成情况.主要还是参数在各个组件之间的传递. 上一章节的链接地址:https://blog.csdn.net ...
- 4.VUE前端框架学习记录四:Vue组件化编码2
VUE前端框架学习记录四:Vue组件化编码2文字信息没办法描述清楚,主要看编码Demo里面,有附带完整的代码下载地址,有需要的同学到脑图里面自取.脑图地址http://naotu.baidu.com/ ...
- 3.VUE前端框架学习记录三:Vue组件化编码1
VUE前端框架学习记录三:Vue组件化编码1文字信息没办法描述清楚,主要看编码Demo里面,有附带完整的代码下载地址,有需要的同学到脑图里面自取.脑图地址http://naotu.baidu.com/ ...
- VUE.JS组件化
VUE.JS组件化 前言 公司目前制作一个H5活动,特别是有一定统一结构的活动,都要码一个重复的轮子.后来接到一个基于模板的活动设计系统的需求,便有了下面的内容.借油开车. 组件化 需求一到,接就是怎 ...
- vue的组件化运用(数据在两个组件互传,小问题总结)
一.vue的组件化应用 首先,知道有哪些相关的属性需要用到,再慢慢去理解,运用. 1.两个vue页面 2. slot占位符(可用可不用) 3.props内置属性 4.watch监听函数 5.impor ...
- 【06】Vue 之 组件化开发
组件其实就是一个拥有样式.动画.js逻辑.HTML结构的综合块.前端组件化确实让大的前端团队更高效的开发前端项目.而作为前端比较流行的框架之一,Vue的组件和也做的非常彻底,而且有自己的特色.尤其是她 ...
- Vue中组件
0828自我总结 Vue中组件 一.组件的构成 组件:由 template + css + js 三部分组成(.vue文件) 1)组件具有复用性 2) 复用组件时,数据要隔离 3) 复用组件时,方法不 ...
- vue中组件之间的通信
一.vue中组件通信的种类 父组件向子组件的通信 子组件向父组件的通信 隔代组件之间的通信 兄弟 组件 之间的通信 二.实现通信的方式 props vue自定义的事件 消息订阅与发布 vuex sl ...
随机推荐
- 技术分享 | 为什么MGR一致性模式不推荐AFTER
GreatSQL社区原创内容未经授权不得随意使用,转载请联系小编并注明来源. 1.引子 2.AFTER 的写一致性 3.AFTER 的读一致性 4.AFTER 执行流程 5.BEFORE 执行流程 6 ...
- Python自学教程1-安装pycharm和执行环境
Python虽然简单,但是很多没有接触过的学起来还是比较困难的.因此很多人会报班去学,我觉得不需要花那个钱,只要方向正确,加上核心知识点的提炼,自学一个月左右就能上手. 我尝试写下这个自学教程,只讨论 ...
- 持久化-Word库加载项劫持
持久化-Word库加载项劫持 利用wll.xll和dll的特性来利用的 重点利用office word的信任文件来进行加载恶意代码
- AtCoder Beginner Contest 260 (D-E)
AtCoder Beginner Contest 260 - AtCoder D - Draw Your Cards 题意:N张卡牌数字 1-n,以某种顺序排放,每次拿一张,如果这一张比前面某一张小( ...
- 第八十八篇:Vue keep-alive的使用 让组件"活下去""
好家伙, 1.关于keep-alive 这是一个用于阻止组件自行销毁的插件 <!-- keep-alive可以把内部组件进行缓存,而不是销毁组件 --> 那么我们什么时候会用到他呢? 举个 ...
- Android同屏、摄像头RTMP推送常用的数据接口设计探讨
前言 好多开发者在调用Android平台RTMP推送或轻量级RTSP服务接口时,采集到的video数据类型多样化,如420sp.I420.yv12.nv21.rgb的,还有的拿到的图像是倒置的,如果开 ...
- 如何从零开始参与 Apache 顶级开源项目?| 墙裂推荐
写在开头 从 2021 开始,有一个很有意思的说法经常在各大技术媒体或开源论坛中出现,「开源正在吞噬一切」.不论是否言过其实,从一个行业从业者的切身感知来看,开源确实从少数极客的小众文化成为主流的 ...
- Linux 常用脚本命令
Linux 常用(脚本)命令 1. 统计目录下文件个数 ll |grep "^-"|wc -1 解释 grep "^-"表示抓取以-开头的行(其他忽略)
- QT的字符编码
QString编码:UTF-16 QString内部保存的数据就是QChar数组,是Unicode编码(utf16),在字符显示,操作的时候都是基于Unicode. QString构造时默认采用Lat ...
- Linux使用密钥登录SSH
输入命令和上传密钥时需要注意当前目录.账号和读写权限 生成密钥 使用服务器生成(方法一,推荐) 1.1生成密钥 #ssh-keygen(这里pwd为当前账号的home目录) 1.2下载密钥 .id_r ...