Android学习笔记④——页面的布局方式
FrameLayout(帧布局)
这个布局的特点是简单的默认把每一个视图组件都放在边框内且放在左上角,即使添加多个视图组件,他们也都是重叠在左上角,新的视图会遮挡住旧的视图。可以根据gravity来改变他所在的位置。
android:layout_gravity="XXX" XXX可以为 bottom、center、center_horizontal、center_vertical、end、left、right…… 简单的来说就是上下左右、居中、水平、垂直居中等等等。
在布局的文件中,添加如下代码:
 <?xml version="1.0" encoding="utf-8"?>

 <FrameLayout xmlns:android="http://schemas.android.com/apk/res/android"

     xmlns:app="http://schemas.android.com/apk/res-auto"

     xmlns:tools="http://schemas.android.com/tools"

     android:id="@+id/activity_main"

     android:layout_width="match_parent"

     android:layout_height="match_parent"

     tools:context="com.doliao.helloworld.MainActivity">

     <ImageView

         android:layout_width="300px"

         android:layout_height="300px"

         app:srcCompat="@android:color/holo_orange_dark"

         android:id="@+id/imageView1" />

     <ImageView

         android:layout_width="200px"

         android:layout_height="200px"

         app:srcCompat="@android:color/holo_blue_dark"

         android:id="@+id/imageView2" />

     <ImageView

         android:layout_width="100px"

         android:layout_height="100px"

         app:srcCompat="@android:color/holo_red_dark"

         android:id="@+id/imageView3" />

 </FrameLayout>
上面是布局的代码 ,执行的 图像如下图所示:

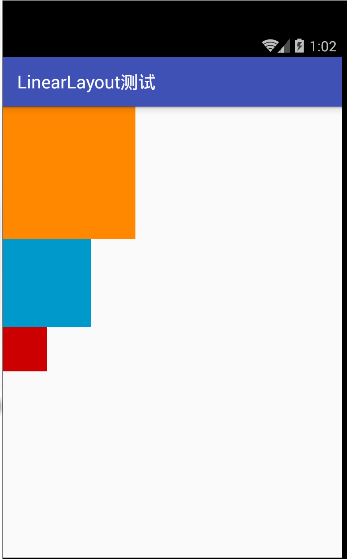
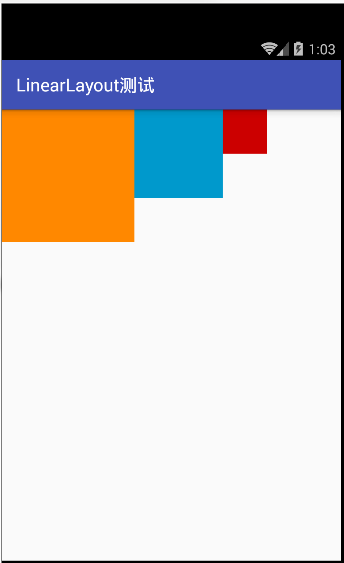
LinearLayout(线性布局)
LinearLayout是相对布局,其按照垂直的方向、或者是水平的方向来对其每一个视图,简单的来说,就是如果你是垂直的方向,那么你的视图就是呈竖着的方向依次排下来,如果你的是水平的方向的话,那么你的视图就会呈水平的方向一次排下来。线性布局管理器允许为每一个子视图指定一个weight属性,以控制每一个子视图在空间内的大小
在布局内文件内,添加代码:
 <?xml version="1.0" encoding="utf-8"?>

 <LinearLayout xmlns:android="http://schemas.android.com/apk/res/android"

     xmlns:app="http://schemas.android.com/apk/res-auto"

     android:layout_width="match_parent"

     android:layout_height="match_parent"

     android:orientation="vertical">

     <ImageView

         android:id="@+id/imageView1"

         android:layout_width="300px"

         android:layout_height="300px"

         app:srcCompat="@android:color/holo_orange_dark" />

     <ImageView

         android:id="@+id/imageView2"

         android:layout_width="200px"

         android:layout_height="200px"

         app:srcCompat="@android:color/holo_blue_dark" />

     <ImageView

         android:id="@+id/imageView3"

         android:layout_width="100px"

         android:layout_height="100px"

         app:srcCompat="@android:color/holo_red_dark" />

 </LinearLayout>
根据上面的测试代码,运行的截图如下左所示,如果改变 android:orientation="vertical" 的属性,改成horizontal 得到的为下右边的截图
在java代码中设置垂直或者水平的布局方式是 调用 组件的 setorientation(int );方法 参数1 为垂直布局,参数0为水平布局。
RelativeLayout(相对布局)
相对布局,跟线性布局已经简单布局比较来说,是一种较灵活性的布局,简单来说就是,相对于上一个控件,或者相当于上下左右的边界的某一个位置,假如有一个视图控件的ID为A,还有一个视图控件ID为B,B可以设置为相对A的上、下、左、右的位置,相对的属性有 layout_above、layout_below、layout_toRightOf、layout_toRightOf 等等等。
 <?xml version="1.0" encoding="utf-8"?>

 <RelativeLayout xmlns:android="http://schemas.android.com/apk/res/android"

     xmlns:app="http://schemas.android.com/apk/res-auto"

     android:layout_width="match_parent"

     android:layout_height="match_parent">

     <ImageView

         android:id="@+id/imageView1"

         android:layout_width="200px"

         android:layout_height="200px"

         android:layout_centerInParent="true"

         app:srcCompat="@android:color/holo_blue_dark" />

     <ImageView

         android:id="@+id/imageView2"

         android:layout_width="200px"

         android:layout_height="200px"

         android:layout_toRightOf="@id/imageView1"

         app:srcCompat="@android:color/holo_orange_dark" />

     <ImageView

         android:id="@+id/imageView4"

         android:layout_width="200px"

         android:layout_height="200px"

         android:layout_below="@id/imageView1"

         app:srcCompat="@android:color/holo_purple" />

     <ImageView

         android:id="@+id/imageView3"

         android:layout_width="200px"

         android:layout_height="200px"

         android:layout_toLeftOf="@id/imageView1"

         app:srcCompat="@android:color/holo_red_dark" />

 </RelativeLayout>
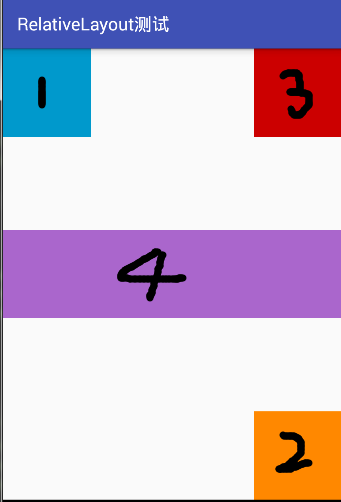
执行的截图为下图所示:


看了上面的运行截图,肯定想,运行的图片跟我想要的不一样啊、按道理如我想的 以1为中心点,2在1的右边,3在1的上方,4在1的下方,理想的应该是上面右图所示,但是为什么不是呢,那是因为视图控件1中 有 android:layout_centerInParent="true" 属性,只要在其他控件中添加这个属性就可以了。
除了有相对于已存在的视图组件,还有相对于当前的布局边框的,属性有layout_alignParentRight(相对与大边框的右边)、layout_alignParentLeft(相对与大边框的左边)、layout_alignParentBottom(相对与大边框的底部)、layout_alignParentTop="true"(相对与大边框的顶部)、layout_centerInParent="true"(相对于大边框的中间)等等等,属性也可以同时用,但是如果同时用相反的属性,比如用了left又用right,那么这个视图将会变成左右平铺。
在布局文件中,添加如下代码:
 <?xml version="1.0" encoding="utf-8"?>

 <RelativeLayout xmlns:android="http://schemas.android.com/apk/res/android"

     xmlns:app="http://schemas.android.com/apk/res-auto"

     android:layout_width="match_parent"

     android:layout_height="match_parent">

     <ImageView

         android:id="@+id/imageView1"

         android:layout_width="200px"

         android:layout_height="200px"

         android:layout_alignParentLeft="true"

         app:srcCompat="@android:color/holo_blue_dark" />

     <ImageView

         android:id="@+id/imageView2"

         android:layout_width="200px"

         android:layout_height="200px"

         android:layout_alignParentRight="true"

         android:layout_alignParentBottom="true"

         app:srcCompat="@android:color/holo_orange_dark" />

     <ImageView

         android:id="@+id/imageView3"

         android:layout_width="200px"

         android:layout_height="200px"

         android:layout_alignParentRight="true"

         app:srcCompat="@android:color/holo_red_dark" />

     <ImageView

         android:id="@+id/imageView4"

         android:layout_width="200px"

         android:layout_height="200px"

         android:layout_centerInParent="true"

         android:layout_alignParentLeft="true"

         android:layout_alignParentRight="true"

         app:srcCompat="@android:color/holo_purple" />

 </RelativeLayout>
运行的截图为下面所示,对于控件的id与数字对应。
相对布局除了上面列出来的一些属性之外,还有其他很多的属性如下所示(参照 http://www.miui.com/thread-574167-1-1.html )
相对于兄弟元素
android:layout_below="@id/aaa":在指定View的下方
android:layout_above="@id/xxx":在指定View的上方
android:layout_toLeftOf="@id/bbb":在指定View的左边
android:layout_toRightOf="@id/cccc":在指定View的右边
相对于父元素
android:layout_alignParentLeft="true":在父元素内左边
android:layout_alignParentRight="true":在父元素内右边
android:layout_alignParentTop="true":在父元素内顶部
android:layout_alignParentBottom="true":在父元素内底部
对齐方式
android:layout_centerInParent="true":居中布局
android:layout_centerVertical="true":水平居中布局
android:layout_centerHorizontal="true":垂直居中布局
android:layout_alignTop="@id/xxx":与指定View的上边界一致
android:layout_alignBottom="@id/xxx":与指定View下边界一致
android:layout_alignLeft="@id/xxx":与指定View的左边界一致
android:layout_alignRight="@id/xxx":与指定View的右边界一致
间隔
android:layout_marginBottom=""; 离某元素底边缘的距离
android:layout_marginLeft=""; 离某元素左边缘的距离
android:layout_marginRight ="";离某元素右边缘的距离
android:layout_marginTop=""; 离某元素上边缘的距离
android:layout_paddingBottom=""; 离父元素底边缘的距离
android:layout_paddingLeft=""; 离父元素左边缘的距离
android:layout_paddingRight ="";离父元素右边缘的距离
android:layout_paddingTop=""; 离父元素上边缘的距离
GridLayout(网格布局)
网格布局是在androd4.0中引入的,它是使用一个由细线构成的矩形网络,在一系列行和列中添加布局的视图。
在布局文件中,添加如下代码:
 <?xml version="1.0" encoding="utf-8"?>

 <GridLayout xmlns:android="http://schemas.android.com/apk/res/android"

     android:layout_width="match_parent"

     android:layout_height="300px"

     android:orientation="horizontal"

     android:rowCount="3"

     android:columnCount="3"

     >

     <Button

         android:id="@+id/b1"

         android:width="20px"

         android:height="20px"

         android:text="1"

         />

     <Button

         android:id="@+id/b2"

         android:width="20px"

         android:height="20px"

         android:text="2"

         />

     <Button

         android:id="@+id/b3"

         android:width="20px"

         android:height="20px"

         android:text="3"

         />

     <Button

         android:id="@+id/b4"

         android:layout_row="2"

         android:layout_columnSpan="2"

         android:width="20px"

         android:height="20px"

         android:text="4"

         />

     <Button

         android:id="@+id/b5"

         android:width="20px"

         android:height="20px"

         android:text="5"

         />

 </GridLayout>
运行的截图如下图所示:
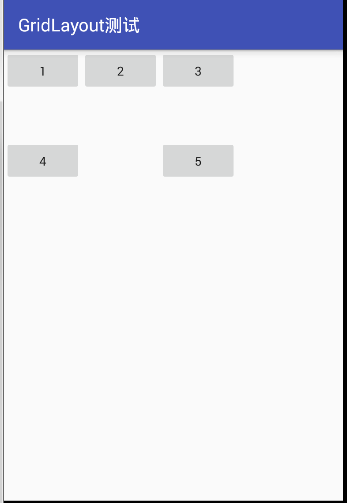
因为在gridlayout的头部设置了 android:orientation="horizontal" 即按照行的方式来依次显示控件,所以顺序为 1、2、3… 依次从左到右,其中的4占用了2个格子,因为参数 android:layout_columnSpan="2" 表示该控件占2行。它和 android:layout_columnSpan类似;而 android:layout_row="2" 表示在第3行显示该控件;android:layout_row="2",表示在第3行显示该控件。它和 android:layout_column类似,行的基数是从0开始的。
AbsoluteLayout(绝对布局)
绝对布局是给视图组件指定一个左边,就是 当前的布局内 x 、 y 轴的坐标,但是现在已经基本不用了,所以这里就不记录了。
TableLayout(表格布局) 参考了 传送门
对于表格布局来说,与网格布局是有一定的相似的。属性有
android:stretchColumns
设置可伸展的列。该列可以向行方向伸展,最多可占据一整行。
android:shrinkColumns
设置可收缩的列。当该列子控件的内容太多,已经挤满所在行,那么该子控件的内容将往列方向显示。
android:collapseColumns
设置要隐藏的列。
android:layout_column
指定该单元格在第几列显示
android:layout_span
指定该单元格占据的列数(未指定时,为1)
<?xml version="1.0" encoding="utf-8"?>
<LinearLayout xmlns:android="http://schemas.android.com/apk/res/android"
android:layout_width="match_parent"
android:layout_height="match_parent"
android:orientation="vertical"
> <TextView
android:id="@+id/text1"
android:layout_width="wrap_content"
android:layout_height="wrap_content"
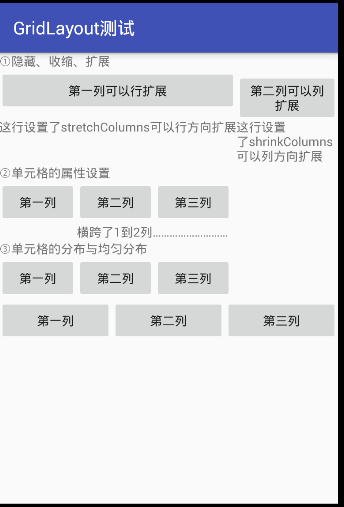
android:text="①隐藏、收缩、扩展" /> <TableLayout
android:layout_width="match_parent"
android:layout_height="wrap_content"
android:collapseColumns="2"
android:shrinkColumns="1"
android:stretchColumns="0">
<TableRow>
<Button
android:id="@+id/b1"
android:text="第一列可以行扩展" />
<Button
android:id="@+id/b2"
android:text="第二列可以列扩展" />
<Button
android:id="@+id/b3"
android:text="第三列是被隐藏的列" />
</TableRow>
<TableRow>
<TextView android:text="这行设置了stretchColumns可以行方向扩展"/>
<TextView android:text="这行设置了shrinkColumns可以列方向扩展"/>
</TableRow>
</TableLayout>
<TextView
android:id="@+id/text2"
android:layout_width="wrap_content"
android:layout_height="wrap_content"
android:text="②单元格的属性设置" />
<TableLayout
android:layout_width="wrap_content"
android:layout_height="wrap_content">
<TableRow>
<Button
android:id="@+id/b11"
android:text="第一列" />
<Button
android:id="@+id/b22"
android:text="第二列" />
<Button
android:id="@+id/b33"
android:text="第三列" />
</TableRow>
<TableRow>
<TextView android:text="横跨了1到2列………………………"
android:layout_span="2"
android:layout_column="1"/>
</TableRow>
</TableLayout> <TextView
android:id="@+id/text3"
android:layout_width="wrap_content"
android:layout_height="wrap_content"
android:text="③单元格的分布与均匀分布" />
<TableLayout
android:layout_width="match_parent"
android:layout_height="wrap_content">
<TableRow>
<Button
android:id="@+id/b111"
android:text="第一列" />
<Button
android:id="@+id/b222"
android:text="第二列" />
<Button
android:id="@+id/b333"
android:text="第三列" />
</TableRow>
<TableRow>
<Button
android:id="@+id/b1111"
android:layout_weight="1"
android:text="第一列" />
<Button
android:id="@+id/b2222"
android:layout_weight="1"
android:text="第二列" />
<Button
android:id="@+id/b3333"
android:layout_weight="1"
android:text="第三列" />
</TableRow>
</TableLayout>
</LinearLayout>
运行之后的截图如下:
以上布局就是常见的布局,当然还有其他的布局,等学到了在做笔记吧,从简到难,慢慢来!
Android学习笔记④——页面的布局方式的更多相关文章
- 【Android学习】四种布局方式
一.LinearLayout 线性布局,即一行展开或者一列展开,也可以嵌套,需要注意的属性如下: android:orentation //对齐方式 二.FrameLayout 帧布局,即一层层叠起 ...
- Android学习笔记:FrameLayout布局基础
FrameLayout布局的特点是:所有放在布局里的视图组件,都按照层次堆叠在屏幕的左上角,后面的视图组件覆盖前面的. 当然,组件本身是可以控制自己的内部布局的. 一种常见的场景是可以在FrameLa ...
- Android学习笔记(11):线性布局LinearLayout
线性布局LinearLayout是指在横向或是竖向一个接一个地排列.当排列的组件超出屏幕后,超出的组件将不会再显示出来. LinearLayout支持的XML属性和相应方法如表所看到的: Attrib ...
- Android学习笔记(14):相对布局RelativeLayout
相对布局RelativeLayout,继承自ViewGroup.相对布局的子组件的位置总是相对于兄弟组件或者父容器决定的. RelativeLayout支持的XML属性: android:gravit ...
- android学习笔记三--Activity 布局
1.线性布局 标签 :<LinearLayout></LinearLayout> 方向:android:orientation, 垂直:vertical 水平:Horizont ...
- [Android学习笔记]页面布局
线性布局:LinearLayout 1.集成ViewGroup,故可容纳多个View 2.线性布局,可设置水平或者垂直方向 相对布局:RelativeLayout
- Android学习笔记36:使用SQLite方式存储数据
在Android中一共提供了5种数据存储方式,分别为: (1)Files:通过FileInputStream和FileOutputStream对文件进行操作.具体使用方法可以参阅博文<Andro ...
- 【转】 Pro Android学习笔记(三五):Menu(6):XML方式 & PopUp菜单
目录(?)[-] 利用XML创建菜单 XML的有关属性 onClick事件 Pop-up菜单 利用XML创建菜单 在代码中对每个菜单项进行设置,繁琐且修改不灵活,不能适配多国语言的要求,可以利用资源进 ...
- 【转】 Pro Android学习笔记(四十):Fragment(5):适应不同屏幕或排版
目录(?)[-] 设置横排和竖排的不同排版风格 改写代码 对于fragment,经常涉及不同屏幕尺寸和不同的排版风格.我们在基础小例子上做一下改动,在横排的时候,仍是现实左右两个fragment,在竖 ...
随机推荐
- 2013-2014集训之DP
第一周: 经过漫长的时间,终于有时间来写一下结题报告. 地址http://acm.hust.edu.cn/vjudge/contest/view.action?cid=36180#overview A ...
- HDU1150Machine Schedule(二分图最大匹配的DFS解法)
题目大意就是说有两台机器,分别有n,m种模式可以调节,有k个工作,某一个工作i可以在第一台机器的a[i]模式下或第二台机器的b[i]模式下工作,两台机器的初始模式为0,问如何分配这K件工作使得两台机器 ...
- 建立ODBC数据源(基于windows)
1. win+r 2. control 3. 打开数据源 4. 点击添加 5. 选择Oracle in OraClient11g_home1 ,点击完成 6. 填写,查看具体参数信息点击Help 7. ...
- 计算直线的交点数(hdu1466简单的dp)
题意:平面上有n条直线,且无三线共点,问这些直线能有多少种不同交点数.比如,如果n=2,则可能的交点数量为0(平行)或者1(不平行). 思路:动态规划,想办法记忆化搜索,当前状态和之前状态结合起来 d ...
- Android 保存联系人,包括部门\职位\传真\地址\照片
private void toSaveContactInfo() { ContentValues values = new ContentValues(); // 首先向RawContacts.CON ...
- Js 基本数据类型、引用数据类型
数据类型 1. ECMAScript变量包含两种不同类型的值:基本类型值.引用类型值: 2. 基本类型值:指的是保存在栈内存中的简单数据段: 3. 引用类型值:指的是那些保存在堆内存中的对 ...
- HTML第二天学习笔记
今天看视频学习的第一个知识是HTML中的块元素<div>和行内元素<span>. <!doctype html> <html lang="en&qu ...
- C语言中结构体 自引用 和 相互引用
http://blog.163.com/modingfa_002/blog/static/11092546620133193264579 结构体的自引用(self reference),就是在结构体内 ...
- wpa_supplicant 移植及 linux 命令行模式配置无线上网
本文涉及内容为linux 命令行模式配置无线上网 及 wpa_supplicant 移植到开发板的过程,仅供参考. 1.源码下载 wpa_supplicant 源码下载地址 :http://hosta ...
- c# 轻量级ORM框架 之 WhereHelper (二)
上篇文章发布了一些设计orm框架基层的和实现,有朋友提出WhereHelper是亮点,能被认可我表示高兴. 我就把WhereHelper设计思想和代码公开下. WhereHelper 的概念就是再拼接 ...