【Android-ListView控件】显示信息
效果图
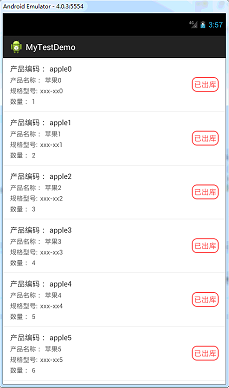
布局文件
layout - activity_main.xml
在主布局添加一个listview控件
<?xml version="1.0" encoding="utf-8"?>

<LinearLayout xmlns:android="http://schemas.android.com/apk/res/android"

    android:layout_width="match_parent"

    android:layout_height="match_parent"

    android:orientation="vertical" >

    <ListView

        android:id="@+id/lv_list"

        android:layout_width="match_parent"

        android:layout_height="wrap_content" >

    </ListView>

</LinearLayout>
layout - list_item.xml
<?xml version="1.0" encoding="utf-8"?>

<LinearLayout xmlns:android="http://schemas.android.com/apk/res/android"

    android:layout_width="fill_parent"

    android:layout_height="wrap_content"

    android:background="@drawable/app_click_white_grey"

    android:orientation="horizontal" >

    <LinearLayout

        android:layout_width="0dp"

        android:layout_height="wrap_content"

        android:layout_marginBottom="12.0dip"

        android:layout_marginLeft="15.0dip"

        android:layout_marginTop="12.0dip"

        android:layout_weight="1.0"

        android:orientation="vertical" >

        <LinearLayout

            android:layout_width="fill_parent"

            android:layout_height="wrap_content"

            android:orientation="horizontal" >

            <TextView

                android:layout_width="wrap_content"

                android:layout_height="wrap_content"

                android:text="产品编码:"

                android:textColor="#ff333333"

                android:textSize="16.0sp" />

            <TextView

                android:id="@+id/tv_code"

                android:layout_width="wrap_content"

                android:layout_height="wrap_content"

                android:layout_marginLeft="5.0dip"

                android:textColor="#ff333333"

                android:textSize="16.0sp" />

        </LinearLayout>

        <LinearLayout

            android:layout_width="fill_parent"

            android:layout_height="wrap_content"

            android:layout_marginTop="4.0dip"

            android:orientation="horizontal" >

            <TextView

                android:layout_width="wrap_content"

                android:layout_height="wrap_content"

                android:text="产品名称:"

                android:textColor="#ff666666"

                android:textSize="14.0sp" />

            <TextView

                android:id="@+id/tv_name"

                android:layout_width="wrap_content"

                android:layout_height="wrap_content"

                android:layout_marginLeft="5.0dip"

                android:textColor="#ff666666"

                android:textSize="14.0sp" />

        </LinearLayout>

        <LinearLayout

            android:layout_width="fill_parent"

            android:layout_height="wrap_content"

            android:layout_marginTop="4.0dip"

            android:orientation="horizontal" >

            <TextView

                android:layout_width="wrap_content"

                android:layout_height="wrap_content"

                android:text="规格型号:"

                android:textColor="#ff666666"

                android:textSize="14.0sp" />

            <TextView

                android:id="@+id/tv_spec"

                android:layout_width="wrap_content"

                android:layout_height="wrap_content"

                android:layout_marginLeft="5.0dip"

                android:textColor="#ff666666"

                android:textSize="14.0sp" />

        </LinearLayout>

        <LinearLayout

            android:layout_width="fill_parent"

            android:layout_height="wrap_content"

            android:layout_marginTop="4.0dip"

            android:orientation="horizontal" >

            <TextView

                android:layout_width="wrap_content"

                android:layout_height="wrap_content"

                android:text="数量:"

                android:textColor="#ff666666"

                android:textSize="14.0sp" />

            <TextView

                android:id="@+id/tv_qty"

                android:layout_width="wrap_content"

                android:layout_height="wrap_content"

                android:layout_marginLeft="5.0dip"

                android:textColor="#ff666666"

                android:textSize="14.0sp" />

        </LinearLayout>

    </LinearLayout>

    <TextView

        android:id="@+id/tv_status"

        android:layout_width="wrap_content"

        android:layout_height="wrap_content"

        android:layout_gravity="center_vertical"

        android:layout_marginRight="15.0dip"

        android:background="@drawable/shape22_rad_frame"

        android:gravity="center"

        android:padding="5.0dip"

        android:text="已出库"

        android:textColor="#ffff5757"

        android:textSize="16.0sp" />

</LinearLayout>
drawable - app_click_white_grey.xml
点击ListView的item ,按下变灰
<?xml version="1.0" encoding="utf-8"?>

<selector

  xmlns:android="http://schemas.android.com/apk/res/android">

    <item android:state_pressed="true" android:drawable="@color/click_grey" />

    <item android:state_pressed="false" android:drawable="@color/white" />

</selector>
drawable - shape22_rad_frame.xml
给textview 加上圆角边框 如:

<?xml version="1.0" encoding="utf-8"?>

<shape android:shape="rectangle"

  xmlns:android="http://schemas.android.com/apk/res/android">

    <corners android:radius="10.0px" />

    <stroke android:width="2.0px" android:color="#ffff5757" />

    <solid android:color="@color/white" />

</shape>
values - color.xml
用到的颜色
<?xml version="1.0" encoding="utf-8"?>

<resources>

    <color name="white">#ffffffff</color>

    <color name="click_grey">#ffd9d9d9</color>

</resources>
Java代码 MainActivity.xml
把数据填充到ListView显示,并实现ListView点击事件,ListView长点击事件
import java.util.ArrayList;

import java.util.HashMap;

import android.app.Activity;

import android.os.Bundle;

import android.view.View;

import android.widget.AdapterView;

import android.widget.AdapterView.OnItemClickListener;

import android.widget.AdapterView.OnItemLongClickListener;

import android.widget.ListView;

import android.widget.SimpleAdapter;

public class MainActivity extends Activity {

    ListView lv_list;

    ArrayList<HashMap<String, Object>> data = new ArrayList<HashMap<String, Object>>();

    @Override

    protected void onCreate(Bundle savedInstanceState) {

        super.onCreate(savedInstanceState);

        setContentView(R.layout.activity_main);

        lv_list = (ListView) findViewById(R.id.lv_list);

        initData();// 初始化数据

        // listview行点击事件

        lv_list.setOnItemClickListener(new OnItemClickListener() {

            @Override

            public void onItemClick(AdapterView<?> parent, View view, int position, long id) {

                HashMap<String, Object> map = (HashMap<String, Object>) parent.getItemAtPosition(position);// 根据item位置获取数据

                // TODO:具体操作

            }

        });

        // listview行长点击事件

        lv_list.setOnItemLongClickListener(new OnItemLongClickListener() {

            @Override

            public boolean onItemLongClick(AdapterView<?> parent, View view, int position, long id) {

                // TODO:具体操作

                return false;

            }

        });

    }

    private void initData() {

        // 添加10条演示数据

        data.clear();

        for (int i = 0; i < 10; i++) {

            HashMap<String, Object> map = new HashMap<String, Object>();

            map.put("code", "apple" + i);

            map.put("name", "苹果" + i);

            map.put("spec", "xxx-xx" + i);

            map.put("qty", 1 + i);

            map.put("status", "已出库");

            data.add(map);

        }

        //数据填充到适配器

        SimpleAdapter adapter = new SimpleAdapter(MainActivity.this, data, R.layout.list_item, new String[] { "code", "name", "spec", "qty", "status" },

                new int[] { R.id.tv_code, R.id.tv_name, R.id.tv_spec, R.id.tv_qty, R.id.tv_status });

        //数据填充到listview

        lv_list.setAdapter(adapter);

    }

}
【Android-ListView控件】显示信息的更多相关文章
- 使用Listview控件显示数据
1.图像列表控件 ImageList是含有图像对象的集合,可以通过索引或关键字引用该集合中的每个对象. ImageList空间的属性 属性 说明 Images 存储在图像列表中的所有图像 ImageS ...
- Xamarin Android ListView 控件使用
在项目中通常用到了ListView控件,示例如下: create the listitem class ,eg; public class ColorItem { public string Colo ...
- Android Visibility控件显示和隐藏
Android控件显示和隐藏 visibility 可见(visible) XML文件:android:visibility="visible" Java代码:view.setVi ...
- android WebView控件显示网页
有时需要app里面显示网页,而不调用其他浏览器浏览网页,那么这时就需要WebView控件.这个控件也是很强大的,放大,缩小,前进,后退网页都可以. 1.部分方法 //支持javascriptweb.g ...
- C# 解决ListView控件显示数据出现闪屏的问题
一.发现问题 如果发送数据过快的情况下,ListVies滚屏显示数据时会显示闪屏,如下所示现象: 二.解决问题 根据出现闪屏的情况,在网上查了资料要使用双缓存的办法来处理.其原理是数据在缓存区中进行处 ...
- 如何清空android ListView控件的内容
第一种方法: listView.setAdapter(null); 第二种方法: listAdapter.clear(); listAdapter.notifyDataSetChanged() ; 满 ...
- winform利用ImageList控件和ListView控件组合制作图片文件浏览器
winform利用ImageList控件和ListView控件组合制作图片文件浏览器,见图,比较简单,实现LISTVIEW显示文件夹图片功能. 1.选择文件夹功能代码: folderBrowserDi ...
- 【Android基础】listview控件的使用(3)------Map与SimpleAdapter组成的多显示条目的Listview
前面介绍的两种listview的使用都是最基础的,所以有很大的局限性,比如只能在一个item(即每一行的条目)中显示一个文本信息,这一篇我将介绍Map与SimpleAdapter组成的多显示条目的Li ...
- Android中ListView 控件与 Adapter 适配器如何使用?
一个android应用的成功与否,其界面设计至关重要.为了更好的进行android ui设计,我们常常需要借助一些控件和适配器.今天小编在android培训网站上搜罗了一些有关ListView 控件与 ...
- 【Android基础】listview控件的使用(4)-----自定义布局的listview的使用
前面我介绍了listview控件的不同用法,但是这些用法在实际的开发项目中是不足以满足需求的,因为前面的几种用法只能简单的显示文本信息,而且布局都比较单一,很难做出复杂的结果,在实际的开发项目中,90 ...
随机推荐
- mybatis 的一对一关联查询association
现在项目的列表查询数据需要查一个总数count, 如果直接写在同一个sql里面,会导致查询速度很慢, 因此,想到使用关联查询,例子如下: 附上代码: 其中遇到的坑哟: 1.association中的s ...
- Mysql解析json字符串/数组
1 Mysql解析json字符串 解决方法:JSON_EXTRACT(原字段,'$.json字段名') 执行SQL: SELECT JSON_EXTRACT( t.result,'$.row'), ...
- Django2.2连接mysql数据库出现django.core.exceptions.ImproperlyConfigured: mysqlclient 1.3.3 or newer is required; you have 0.7.11.None问题
在使用Django2.2开发的时候,想要使用mysql数据库,在settings.py文件中更改命令: DATABASES = { 'default': { 'ENGINE': 'django.db. ...
- RSA 非对称加密原理(小白也能看懂哦~)
来源. https://blog.csdn.net/jijianshuai/article/details/80582187 RSA 加密原理 步骤 说明 描述 备注 1 找出质数 P .Q - 2 ...
- Kernel--试题
1. 内核堆栈区别: 1.栈自动分配回收,函数里面声明的变量:2.堆:malloc kmalloc申请的空间,需要自己释放 https://blog.csdn.net/tainjau/article/ ...
- C++ Primer练习题day1
/* 练习1.1略 练习1.2.改写程序,让他返回-1. 练习1.3.编写程序,在标准的输出上打印Hello,World. */ #include<iostream> int main() ...
- Python补充4——替换与修改
最近在自学Python ,在学习过程中发现一个问题,就是Python 的替换与修改. 按照中文思维,替换与修改有什么区别吗?如果发生了部分替换不就是修改了吗?如果修改了不就是新对象替换了老对象吗? 实 ...
- react项目中关于img标签的src属性的使用
在一个html文件中,img的src属性赋值为相对路径或绝对路径的字符串即可访问到图片.如下: <img src="../images/photo.png"/> 但在j ...
- Class.getResources()和classLoader.getResources()区别
Class.getResource(String path) path不以’/'开头时,默认是从此类所在的包下取资源: path 以’/'开头时,则是从ClassPath根下获取: package t ...
- Springboot整合MybatisPlus
目录 1.pom文件 2.创建CodeGenerator.java 3.在application.yml中配置mybatis-plus 4.创建MybatisPlusConfig.java文件 其他 ...