
Spring-Spring配置-依赖注入
5、Spring配置
5.1、别名
<!--别名,如果添加了别名,我们也可以使用别名获取到这个对象-->

<alias name="user" alias="userAlias"/>
5.2、bean的配置
<!--

id:bean的唯一标识符,也就是相当于我们学的对象名

class:bean对象所对应的全限定名:包名+类名

name:也是别名,而且name可以同时取多个别名

-->

<bean id="userT" class="com.rui.pojo.UserT" name="user2 u2,u3;u4">

</bean>
5.3、import
这个import,一般用于团队开发使用,他可以将多个配置文件,导入合并为一个
假设现在项目中有多个人开发,这三个人负责不同的类开发,不同的类需要注册在不同的bean中,我们可以利用import将所有人的beans.xml合并为一个总的!
- 张三
- 李四
- 王五
- applicationContext.xml
<?xml version="1.0" encoding="UTF-8"?>

<beans xmlns="http://www.springframework.org/schema/beans"

       xmlns:xsi="http://www.w3.org/2001/XMLSchema-instance"

       xsi:schemaLocation="http://www.springframework.org/schema/beans

        https://www.springframework.org/schema/beans/spring-beans.xsd">

    <import resource="beans.xml"/>

    <import resource="beans2.xml"/>

    <import resource="beans3.xml"/>

</beans>
使用的时候,直接使用总的配置就可以了
6、依赖注入
6.1、构造器注入
前面已经说过
6.2、Set方式注入【重点】
- 依赖注入:Set注入!
- 依赖:bean对象的创建依赖于容器
- 注入:bean对象中的所有属性,由容器来注入!
【环境搭建】
复杂类型
package com.rui.pojo;

public class Address {

    private String address;

    public String getAddress() {

        return address;

    }

    public void setAddress(String address) {

        this.address = address;

    }

}
真实测试对象
package com.rui.pojo;

import java.util.*;

public class Student {

    private String name;

    private Address address;

    private String[] books;

    private List<String> hobbys;

    private Map<String,String> card;

    private Set<String> games;

    private String wife;

    private Properties info;

    public String getName() {

        return name;

    }

    public void setName(String name) {

        this.name = name;

    }

    public Address getAddress() {

        return address;

    }

    public void setAddress(Address address) {

        this.address = address;

    }

    public String[] getBooks() {

        return books;

    }

    public void setBooks(String[] books) {

        this.books = books;

    }

    public List<String> getHobbys() {

        return hobbys;

    }

    public void setHobbys(List<String> hobbys) {

        this.hobbys = hobbys;

    }

    public Map<String, String> getCard() {

        return card;

    }

    public void setCard(Map<String, String> card) {

        this.card = card;

    }

    public Set<String> getGames() {

        return games;

    }

    public void setGames(Set<String> games) {

        this.games = games;

    }

    public String getWife() {

        return wife;

    }

    public void setWife(String wife) {

        this.wife = wife;

    }

    public Properties getInfo() {

        return info;

    }

    public void setInfo(Properties info) {

        this.info = info;

    }

    @Override

    public String toString() {

        return "Student{" +

                "name='" + name + '\'' +

                ", address=" + address +

                ", books=" + Arrays.toString(books) +

                ", hobbys=" + hobbys +

                ", card=" + card +

                ", games=" + games +

                ", wife='" + wife + '\'' +

                ", info=" + info +

                '}';

    }

}
beans.xml
<?xml version="1.0" encoding="UTF-8"?>

<beans xmlns="http://www.springframework.org/schema/beans"

       xmlns:xsi="http://www.w3.org/2001/XMLSchema-instance"

       xsi:schemaLocation="http://www.springframework.org/schema/beans

        https://www.springframework.org/schema/beans/spring-beans.xsd">

<bean id="student" class="com.rui.pojo.Student">

    <!--第一种,普通注入,value-->

    <property name="name" value="尹锐"/>

</bean>

</beans>
测试类
package com.rui;

import com.rui.pojo.Student;

import org.springframework.context.ApplicationContext;

import org.springframework.context.support.ClassPathXmlApplicationContext;

public class MyTest {

    public static void main(String[] args) {

        ApplicationContext context = new ClassPathXmlApplicationContext("beans.xml");

        Student student = (Student) context.getBean("student");

        System.out.println(student.getName());

    }

}
完善注入信息
<?xml version="1.0" encoding="UTF-8"?>

<beans xmlns="http://www.springframework.org/schema/beans"

       xmlns:xsi="http://www.w3.org/2001/XMLSchema-instance"

       xsi:schemaLocation="http://www.springframework.org/schema/beans

        https://www.springframework.org/schema/beans/spring-beans.xsd">

    <bean id="address" class="com.rui.pojo.Address">

        <property name="address" value="杭州"></property>

    </bean>

<bean id="student" class="com.rui.pojo.Student">

    <!--第一种,普通注入,value-->

    <property name="name" value="尹锐"/>

    <!--第二种,Bean注入,ref-->

    <property name="address" ref="address"/>

    <!--数组注入,ref-->

    <property name="books">

        <array>

            <value>红楼梦</value>

            <value>西游记</value>

            <value>水浒传</value>

            <value>三国演义</value>

        </array>

    </property>

    <!--List-->

    <property name="hobbys">

        <list>

            <value>听歌</value>

            <value>敲代码</value>

            <value>看电影</value>

        </list>

    </property>

    <!--Map-->

    <property name="card">

        <map>

            <entry key="身份证" value="111222333344445555"/>

            <entry key="银行卡" value="11123123123123123123"/>

        </map>

    </property>

    <!--Set-->

    <property name="games">

        <set>

            <value>LOL</value>

            <value>COC</value>

            <value>BOB</value>

        </set>

    </property>

    <!--null-->

    <property name="wife">

        <null/>

    </property>

    <!--Properties-->

    <property name="info">

        <props>

            <prop key="driver">171030338</prop>

            <prop key="url">171030338</prop>

            <prop key="username">171030338</prop>

            <prop key="password">171030338</prop>

        </props>

    </property>

</bean>

</beans>
6.3、拓展方式注入
我们可以使用p命名空间和c命名空间进行注入
官方解释: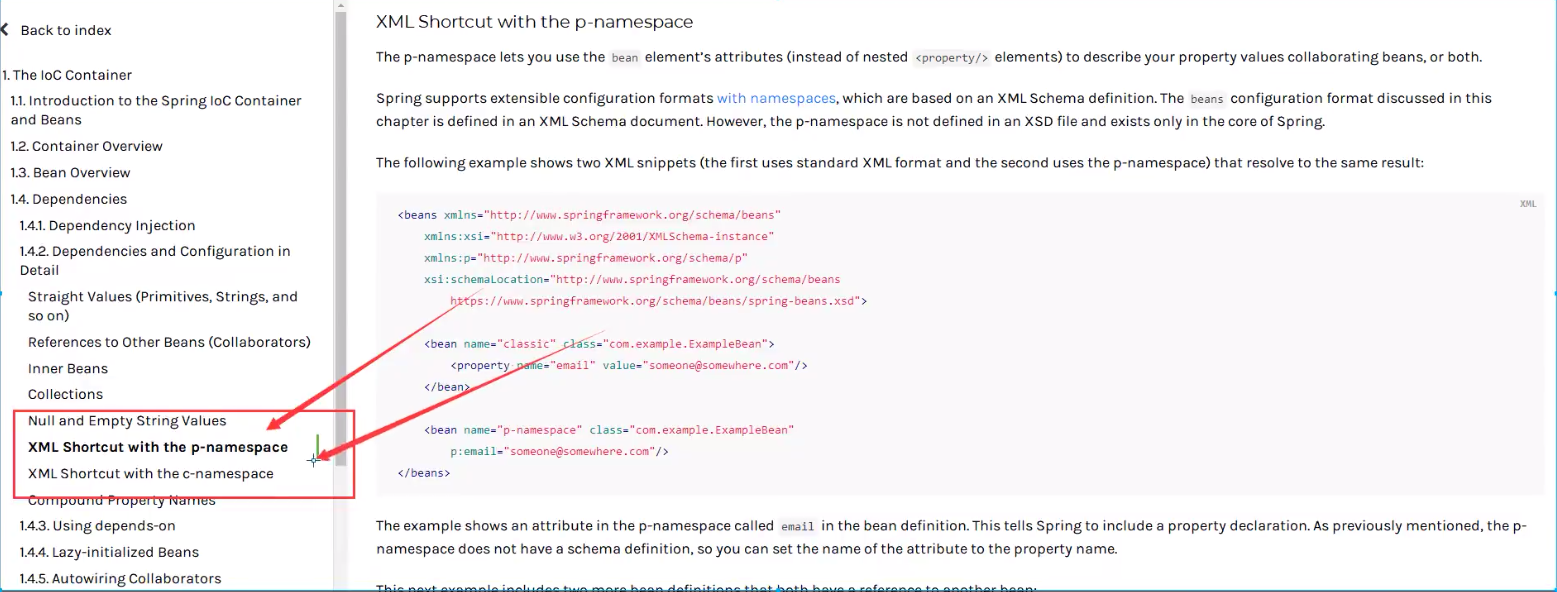
xml:
<?xml version="1.0" encoding="UTF-8"?>

<beans xmlns="http://www.springframework.org/schema/beans"

       xmlns:xsi="http://www.w3.org/2001/XMLSchema-instance"

       xmlns:p="http://www.springframework.org/schema/p"

       xmlns:c="http://www.springframework.org/schema/c"

       xsi:schemaLocation="http://www.springframework.org/schema/beans

        https://www.springframework.org/schema/beans/spring-beans.xsd">

    <!--p命名空间注入,可以直接注入属性的值:property-->

    <bean id="user" class="com.rui.pojo.User" p:name="尹锐" p:age="18"/>

    <!--c命名空间注入,通过构造器注入:construct-args-->

    <bean id="user2" class="com.rui.pojo.User" c:age="18" c:name="尹锐"/>

</beans>
测试:
@Test

public void test2() {

    ApplicationContext context = new ClassPathXmlApplicationContext("userbeans.xml");

    User user = (User) context.getBean("user2");

    System.out.println(user);

}
注意点:p命名空间和c命名空间不能直接使用,需要导入xml约束!
xmlns:p="http://www.springframework.org/schema/p"

xmlns:c="http://www.springframework.org/schema/c"
6.4、bean的作用域
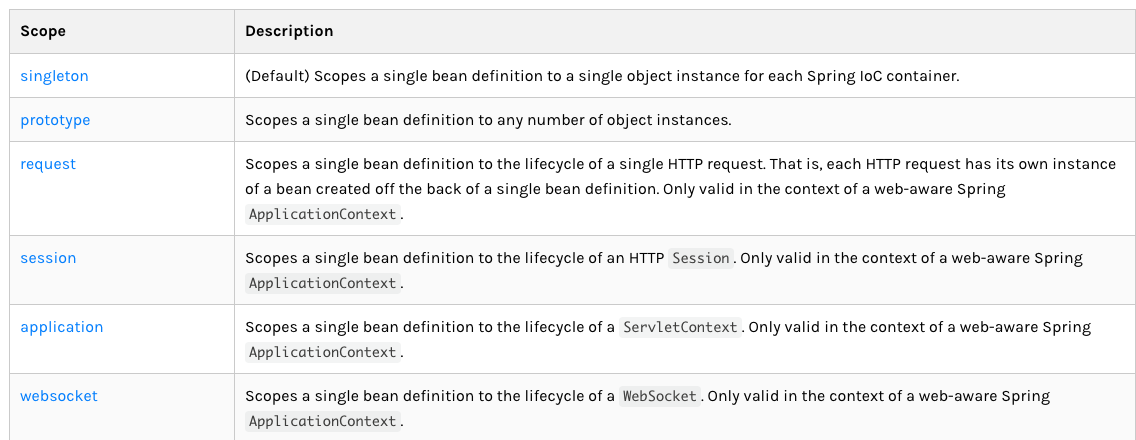
单例模式(Spring默认机制)
<bean id="user2" class="com.rui.pojo.User" c:age="18" c:name="尹锐" scope="singleton"/>
原型模式:每次从容器中get的时候,都会产生一个新对象
<bean id="user2" class="com.rui.pojo.User" c:age="18" c:name="尹锐" scope="prototype"/>其余的request、session、application、这些只能在web开发中用到!
Spring-Spring配置-依赖注入的更多相关文章
- Spring Framework------>version4.3.5.RELAESE----->Reference Documentation学习心得----->Spring Framework的依赖注入和控制反转
Dependency Injection and Inversion of Control 1.概述: 1.1相关概念 bean:由IoC容器所管理的对象,也即各个类实例化所得对象都叫做bean 控制 ...
- 谈谈自己了解的spring.NET的依赖注入
spring.net里实现了控制反转IOC(Inversion of control),也即依赖注入DI(Dependency Injection),以达到解耦的目的,实现模块的组件化.程序 ...
- Spring学习(三)——Spring中的依赖注入的方式
[前面的话] Spring对我太重要了,做个关于web相关的项目都要使用Spring,每次去看Spring相关的知识,总是感觉一知半解,没有很好的系统去学习一下,现在抽点时间学习一下Spring.不知 ...
- spring六种种依赖注入方式
平常的java开发中,程序员在某个类中需要依赖其它类的方法,则通常是new一个依赖类再调用类实例的方法,这种开发存在的问题是new的类实例不好统一管理,spring提出了依赖注入的思想,即依赖类不由程 ...
- spring.NET的依赖注入
谈谈自己了解的spring.NET的依赖注入 spring.net里实现了控制反转IOC(Inversion of control),也即依赖注入DI(Dependency Injection), ...
- spring 四种依赖注入方式以及注解注入方式
平常的java开发中,程序员在某个类中需要依赖其它类的方法,则通常是new一个依赖类再调用类实例的方法,这种开发存在的问题是new的类实例不好统一管理,spring提出了依赖注入的思想,即依赖类不由程 ...
- JavaEE开发之Spring中的依赖注入与AOP
上篇博客我们系统的聊了<JavaEE开发之基于Eclipse的环境搭建以及Maven Web App的创建>,并在之前的博客中我们聊了依赖注入的相关东西,并且使用Objective-C的R ...
- JavaEE开发之Spring中的依赖注入与AOP编程
上篇博客我们系统的聊了<JavaEE开发之基于Eclipse的环境搭建以及Maven Web App的创建>,并在之前的博客中我们聊了依赖注入的相关东西,并且使用Objective-C的R ...
- spring几种依赖注入方式以及ref-local/bean,factory-bean,factory-method区别联系
平常的java开发中,程序员在某个类中需要依赖其它类的方法,则通常是new一个依赖类再调用类实例的方法,这种开发存在的问题是new的类实例不好统一管理,spring提出了依赖注入的思想,即依赖类不由程 ...
- 【Spring IoC】依赖注入DI(四)
平常的Java开发中,程序员在某个类中需要依赖其它类的方法.通常是new一个依赖类再调用类实例的方法,这种开发存在的问题是new的类实例不好统一管理. Spring提出了依赖注入的思想,即依赖类不由程 ...
随机推荐
- Redis HashMap 使用
散列类型相当于Java中的HashMap,他的值是一个字典,保存很多key,value对,每对key,value的值个键都是字符串类型,换句话说,散列类型不能嵌套其他数据类型.一个散列类型键最多可以包 ...
- WCF-复杂配置
两种模式,一个契约两个实现,两个契约一个实现. 服务类库 宿主 static void Main(string[] args) { ServiceHost sh1 = new ServiceHost( ...
- K8S从入门到放弃系列-(10)kubernetes集群之kube-proxy部署
摘要: kube-proxy的作用主要是负责service的实现,具体来说,就是实现了内部从pod到service和外部的从node port向service的访问 新版本目前 kube-proxy ...
- 使用 jsvc 启动tomcat(使用普通用户运行)
使用 jsvc 启动tomcat(使用普通用户运行) jsvc简介 在生产中,tomcat应该以daemon的模式运行,而且如果需要以普通用户的身份启动tomcat,那么就不能使用1024以下的端口, ...
- 1.ASP.NET Core Docker学习-Docker介绍与目录
Docker的优点: 1节约时间,快速部署和启动 2节约成本 3标准化应用发布 4方便做持续集成 5可以用Docker做为集群中的轻量主机或节点 6方便构建基于SOA或者微服务架构 的系统 学习目录: ...
- 2019杭电多校二 F. Fantastic Magic Cube (FWT)
大意: 给定$N^3$立方体, 每个单位立方体权值为三个坐标异或, 每次沿坐标轴切一刀, 得分为两半内权值和的乘积, 求切成$n^3$块的最大得分. 可以发现得分与切法无关, 假设每个点权值为$a_i ...
- MySQL中的索引详讲(转)
https://www.cnblogs.com/whgk/p/6179612.html
- 使用RabbitMQ实现分布式事务
RabbitMQ解决分布式事务思路: 案例: 经典案例,以目前流行点外卖的案例,用户下单后,调用订单服务,让后订单服务调用派单系统通知送外卖人员送单,这时候订单系统与派单系统采用MQ异步通讯. Rab ...
- C# 中类的成员有哪些?
类(class)是C#类型中最基础的类型.类是一个数据结构,将状态(字段)和行为(方法和其他函数成员)组合在一个单元中.类提供了用于动态创建类实例的定义,也就是对象(object).类支持继承(inh ...
- Python内置函数系列
Python内置(built-in)函数随着python解释器的运行而创建.在Python的程序中,你可以随时调用这些函数,不需要定义. 作用域相关(2) locals() :以字典类型返回当前位置 ...