Spring之注解实现aop(面向切面编程)
1:Aop(aspect object programming)面向切面编程,名词解释:
1.1:功能:让关注点代码与业务逻辑代码分离
1.2:关注点
重复代码就叫做关注点
1.3:切面
关注点形成的类,就叫做切面(类)
面向切面编程,就是指对很多功能都有的重复代码抽取,再在运行的时候往业务方法上动态植入"切面类代码";
1.4:切入点
执行目标对象方法,动态植入切面代码
可以通过切入点表达式,指定拦截那些类的那些方法,给指定的类在运行的时候植入切面类代码;
2:注解方式实现aop编程
2.1:开发步骤
(1):先引入aop相关的jar文件
spring-aop-3.2.5.RELEASE.jar【去spring3.2源码里面找】
aopalliance.jar【去spring2.5源码/lib/aopalliance文件里面找】
aspectjweaver.jar【去spring2.5源码/lib/aspectj文件里面找】或者【aspectj-1.8.2/lib/aspectjweaver.jar】
aspectjrt.jar【去spring2.5源码/lib/aspectj文件里面找】或者【aspectj-1.8.2/lib/aspectjrt.jar】
《注意:用到的spring2.5版本的jar本舰,如果用jd1.7版本可能会出现问题,
需要升级以下aspectj组件,即使用aspectj-1.8.2版本中提供的jar文件aspectjweaver.jar和aspectjrt.jar》
(2)bean.xml中引入aop名称空间
技巧:找到文件spring-framework-3.2.5.RELEASE/docs/spring-framework-reference/htmlsingle
打开index.html搜索xmlns:aop然后找到下面红色三句话,分别拷贝到bean.xml中
<?xml version="1.0" encoding="UTF-8"?>
<beans xmlns="http://www.springframework.org/schema/beans"
xmlns:xsi="http://www.w3.org/2001/XMLSchema-instance"
xmlns:aop="http://www.springframework.org/schema/aop"
xsi:schemaLocation="http://www.springframework.org/schema/beans
http://www.springframework.org/schema/beans/spring-beans.xsd
http://www.springframework.org/schema/aop
http://www.springframework.org/schema/aop/spring-aop.xsd">
拷贝之后的bean.xml如下所示:
 <?xml version="1.0" encoding="UTF-8"?>

 <beans xmlns="http://www.springframework.org/schema/beans"

     xmlns:xsi="http://www.w3.org/2001/XMLSchema-instance"

     xmlns:p="http://www.springframework.org/schema/p"

     xmlns:context="http://www.springframework.org/schema/context"

     xmlns:aop="http://www.springframework.org/schema/aop"

     xsi:schemaLocation="

         http://www.springframework.org/schema/beans

         http://www.springframework.org/schema/beans/spring-beans.xsd

         http://www.springframework.org/schema/context

         http://www.springframework.org/schema/context/spring-context.xsd

         http://www.springframework.org/schema/aop

         http://www.springframework.org/schema/aop/spring-aop.xsd">

 </beans>
(3):bean.xml中开启aop注解扫描,如下配置所示:
 <?xml version="1.0" encoding="UTF-8"?>

 <beans xmlns="http://www.springframework.org/schema/beans"

     xmlns:xsi="http://www.w3.org/2001/XMLSchema-instance"

     xmlns:p="http://www.springframework.org/schema/p"

     xmlns:context="http://www.springframework.org/schema/context"

     xmlns:aop="http://www.springframework.org/schema/aop"

     xsi:schemaLocation="

         http://www.springframework.org/schema/beans

         http://www.springframework.org/schema/beans/spring-beans.xsd

         http://www.springframework.org/schema/context

         http://www.springframework.org/schema/context/spring-context.xsd

         http://www.springframework.org/schema/aop

         http://www.springframework.org/schema/aop/spring-aop.xsd">

       <!-- 开启注解扫描 -->

       <context:component-scan base-package="com.bie.aop"></context:component-scan>

       <!-- 开启aop注解方式,默认为false -->

       <aop:aspectj-autoproxy></aop:aspectj-autoproxy>

 </beans>
(4):开始写一个切面类,源码如下所示:
 package com.bie.aop;

 import org.aspectj.lang.annotation.After;

 import org.aspectj.lang.annotation.Aspect;

 import org.aspectj.lang.annotation.Before;

 import org.aspectj.lang.annotation.Pointcut;

 import org.springframework.stereotype.Component;

 /**

 * @author BieHongLi

 * @version 创建时间:2017年3月28日 下午9:10:43

 * @Aspect:指定当前类为切面类

 */

 @Component  //加入到IoC容器

 @Aspect  //指定当前类为切面类

 public class Aop {

     //指定切入点表达式,拦截那些方法,即为那些类生成代理对象

     //@Pointcut("execution(* com.bie.aop.UserDao.save(..))")  ..代表所有参数

     //@Pointcut("execution(* com.bie.aop.UserDao.*())")  指定所有的方法

     //@Pointcut("execution(* com.bie.aop.UserDao.save())") 指定save方法

     @Pointcut("execution(* com.bie.aop.UserDao.*(..))")

     public void pointCut(){

     }

     @Before("pointCut()")

     public void begin(){

         System.out.println("开启事务");

     }

     @After("pointCut()")

     public void close(){

         System.out.println("关闭事务");

     }

 }
(5):写好切面类就可以写执行目标对象方法,接口和实现类如下所示:
 package com.bie.aop;

 /**

 * @author BieHongLi

 * @version 创建时间:2017年3月28日 下午9:09:29

 *

 */

 public interface IUserDao {

     public void save();

 }
 package com.bie.aop;

 import org.springframework.stereotype.Component;

 /**

 * @author BieHongLi

 * @version 创建时间:2017年3月28日 下午9:09:53

 * 目标对象

 */

 @Component

 public class UserDao implements IUserDao{

     @Override

     public void save() {

         System.out.println("..核心业务--核心业务..");

     }

 }
(6):最后就可以进行进行测试了,源码如下所示:
 package com.bie.aop;

 import org.junit.Test;

 import org.springframework.context.ApplicationContext;

 import org.springframework.context.support.ClassPathXmlApplicationContext;

 /**

 * @author BieHongLi

 * @version 创建时间:2017年3月28日 下午9:13:18

 *

 */

 public class AopTest {

     ApplicationContext ac = new ClassPathXmlApplicationContext("bean.xml");

     //目标对象有实现接口,spring会自动选择"jdk代理【动态代理】"

     //动态代理的标识:class com.sun.proxy.$Proxy10

     @Test

     public void test01(){

         IUserDao dao =  (IUserDao) ac.getBean("userDao");

         System.out.println(dao.getClass());

         dao.save();

     }

     //class com.bie.aop.OrderDao$$EnhancerByCGLIB$$4952a60a

     //目标对象没有实现接口,spring会用"cglib代理哦"

     @Test

     public void testCglib(){

         OrderDao dao =  (OrderDao) ac.getBean("orderDao");

         System.out.println(dao.getClass());

         dao.save();

     }

 }
3:心得体会和报错解决:
3.1:虽然案例很简单很简单,但是我花了三四个小时,为什么呢!我用junit测试spring写的注解实现aop(面向切面编程)。
3.2:编辑环境:eclipse+tomcat8.0+jdk1.8,为什么说编辑环境呢,因为jdk1.8和spring好像有仇似的,开始我安装的jdk是1.8版本的,总之包很多很多错,主要的caused by:java.lang.IllegalArgumentException【看错误主要看caused by】
3.3:这个错是UserDao dao = (UserDao) ac.getBean("userDao");---》
IUserDao dao = (IUserDao) ac.getBean("userDao");
意思就是说必须使用接口来接受从IoC容器获取的,不能使用实现类接受,不然报的错够你喝一壶了
java.lang.ClassCastException: com.sun.proxy.$Proxy10 cannot be cast to com.bie.aop.UserDao
at com.bie.aop.AopTest.test01(AopTest.java:18)
at sun.reflect.NativeMethodAccessorImpl.invoke0(Native Method)
at sun.reflect.NativeMethodAccessorImpl.invoke(NativeMethodAccessorImpl.java:57)
at sun.reflect.DelegatingMethodAccessorImpl.invoke(DelegatingMethodAccessorImpl.java:43)
at java.lang.reflect.Method.invoke(Method.java:606)
at org.junit.runners.model.FrameworkMethod$1.runReflectiveCall(FrameworkMethod.java:50)
at org.junit.internal.runners.model.ReflectiveCallable.run(ReflectiveCallable.java:12)
at org.junit.runners.model.FrameworkMethod.invokeExplosively(FrameworkMethod.java:47)
at org.junit.internal.runners.statements.InvokeMethod.evaluate(InvokeMethod.java:17)
at org.junit.runners.ParentRunner.runLeaf(ParentRunner.java:325)
at org.junit.runners.BlockJUnit4ClassRunner.runChild(BlockJUnit4ClassRunner.java:78)
at org.junit.runners.BlockJUnit4ClassRunner.runChild(BlockJUnit4ClassRunner.java:57)
at org.junit.runners.ParentRunner$3.run(ParentRunner.java:290)
at org.junit.runners.ParentRunner$1.schedule(ParentRunner.java:71)
at org.junit.runners.ParentRunner.runChildren(ParentRunner.java:288)
at org.junit.runners.ParentRunner.access$000(ParentRunner.java:58)
at org.junit.runners.ParentRunner$2.evaluate(ParentRunner.java:268)
at org.junit.runners.ParentRunner.run(ParentRunner.java:363)
at org.eclipse.jdt.internal.junit4.runner.JUnit4TestReference.run(JUnit4TestReference.java:86)
at org.eclipse.jdt.internal.junit.runner.TestExecution.run(TestExecution.java:38)
at org.eclipse.jdt.internal.junit.runner.RemoteTestRunner.runTests(RemoteTestRunner.java:459)
at org.eclipse.jdt.internal.junit.runner.RemoteTestRunner.runTests(RemoteTestRunner.java:675)
at org.eclipse.jdt.internal.junit.runner.RemoteTestRunner.run(RemoteTestRunner.java:382)
at org.eclipse.jdt.internal.junit.runner.RemoteTestRunner.main(RemoteTestRunner.java:192)
3.4:然后呢,我就思考就要换成jdk1.7,我去oracle官网搜了,已经没了jdk1.7,我又去我的百度云翻出1.7,然后安装,之后呢,我就验证呗,其实安装之前我也思考过,能不能安装1.8之后再安装1.7,安装肯定没毛病啊,但是总要配置环境变量吧,我就配置jdk1.7之后发现验证的时候还是显示是jdk1.8,我就赶紧思考啊,思考过后我考虑应该把jdk1.7,jdk1.8都卸载了,然后我都卸载了,然后重新安装jdK1.7,之后配置之后,其实主要给Java_home环境变量改一下就行,然后验证就显示jdk1.7版本了,之后呢又去测试程序,然而呢,程序之前是jdk1.8,全部报错了,我又把jdk1.8换成1.7;详细更换jdk1.8--->jdk1.7的过程如下所示;
首先,第一步:点击window-->Preferences-->Java-->Installed JREs-->ADD

第二步:点击add之后显示如下所示
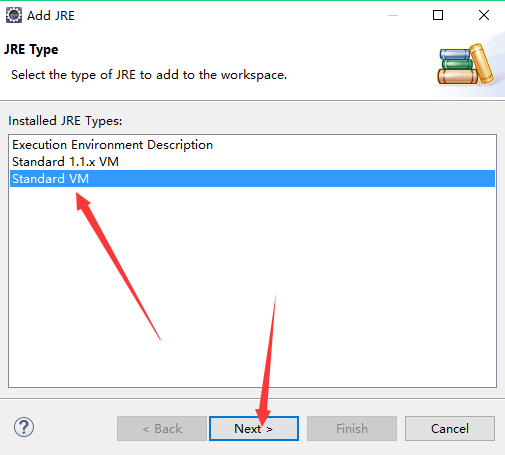
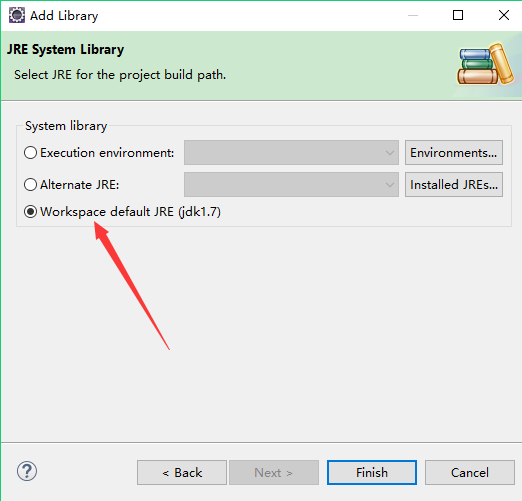
第三步:点击next之后点击如下图所示的Directory即可;

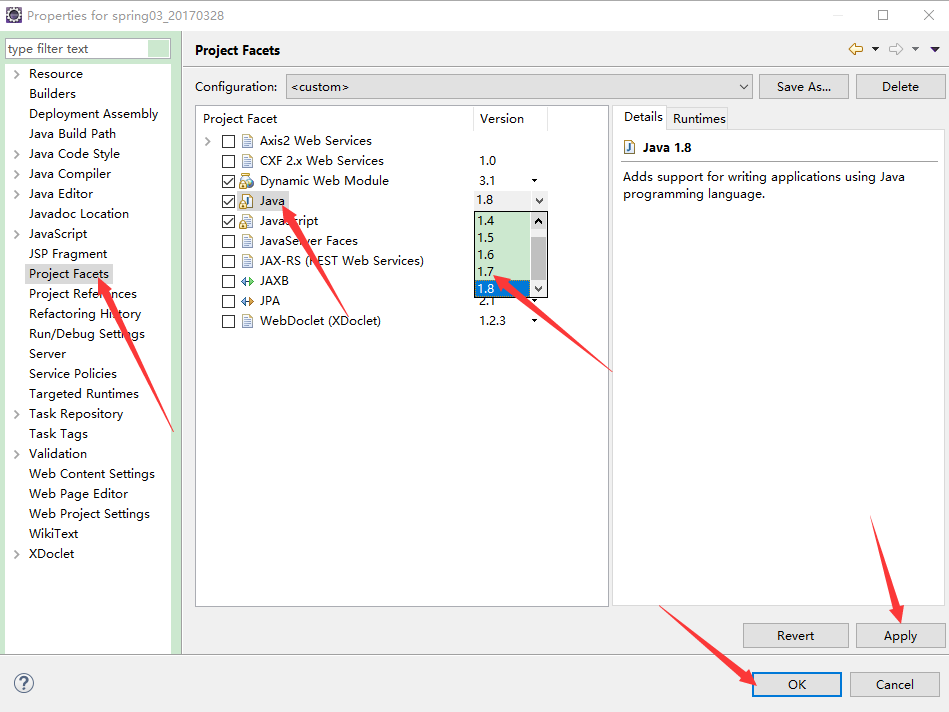
第四步:点击项目右击
第五步:如下所示
第六步:如下所示
第七步:如下所示

第八步:如下所示
第九步:如下所示
然后呢,jdk总算是由jdk1.8换成了1.7,这个过程虽然比较麻烦,但是解决问题,我也很开心啊,加油吧,骚年~~~
Spring之注解实现aop(面向切面编程)的更多相关文章
- 不依赖Spring使用AspectJ达到AOP面向切面编程
网上大多数介绍AspectJ的文章都是和Spring容器混用的,但有时我们想自己写框架就需要抛开Spring造轮子,类似使用原生AspectJ达到面向切面编程.步骤很简单,只需要两步. 1.导入依赖 ...
- spring框架学习(三)——AOP( 面向切面编程)
AOP 即 Aspect Oriented Program 面向切面编程 首先,在面向切面编程的思想里面,把功能分为核心业务功能,和周边功能. 所谓的核心业务,比如登陆,增加数据,删除数据都叫核心业务 ...
- Spring注解式AOP面向切面编程.
1.AOP指在程序运行期间动态的将某段代码切入到指定方法指定位置进行运行的编程方式.aop底层是动态代理. package com.bie.config; import org.aspectj.lan ...
- Spring:AOP面向切面编程
AOP主要实现的目的是针对业务处理过程中的切面进行提取,它所面对的是处理过程中的某个步骤或阶段,以获得逻辑过程中各部分之间低耦合性的隔离效果. AOP是软件开发思想阶段性的产物,我们比较熟悉面向过程O ...
- Spring Boot2(六):使用Spring Boot整合AOP面向切面编程
一.前言 众所周知,spring最核心的两个功能是aop和ioc,即面向切面和控制反转.本文会讲一讲SpringBoot如何使用AOP实现面向切面的过程原理. 二.何为aop aop全称Aspec ...
- 浅谈Spring AOP 面向切面编程 最通俗易懂的画图理解AOP、AOP通知执行顺序~
简介 我们都知道,Spring 框架作为后端主流框架之一,最有特点的三部分就是IOC控制反转.依赖注入.以及AOP切面.当然AOP作为一个Spring 的重要组成模块,当然IOC是不依赖于Spring ...
- 详细解读 Spring AOP 面向切面编程(二)
本文是<详细解读 Spring AOP 面向切面编程(一)>的续集. 在上篇中,我们从写死代码,到使用代理:从编程式 Spring AOP 到声明式 Spring AOP.一切都朝着简单实 ...
- Spring 08: AOP面向切面编程 + 手写AOP框架
核心解读 AOP:Aspect Oriented Programming,面向切面编程 核心1:将公共的,通用的,重复的代码单独开发,在需要时反织回去 核心2:面向接口编程,即设置接口类型的变量,传入 ...
- 谈一谈AOP面向切面编程
AOP是什么 : AOP面向切面编程他是一种编程思想,是指在程序运行期间,将某段代码动态的切入到指定方法的指定位置,将这种编程方式称为面向切面编程 AOP使用场景 : 日志 事务 使用AOP的好处是: ...
随机推荐
- 部分iphone手机上的div的点击事件无效
最近在做一个手机移动端的项目,Andrio手机和部分iphone手机上点击事件都是好的,只有在老的型号上的iphone手机上点击事件无效果. 后来在网上查了很多资料,发现有加样式cursor:poin ...
- spring boot / cloud (八) 使用RestTemplate来构建远程调用服务
spring boot / cloud (八) 使用RestTemplate来构建远程调用服务 前言 上周因家里突发急事,请假一周,故博客没有正常更新 RestTemplate介绍: RestTemp ...
- TTL转MIPI DSI芯片方案TC358778XBG
型号:TC358778XBG功能:TTL转MIPI DSI通信方式:IIC分辨率:1920*1080电源:3.3/1.8/1.2封装形式:BGA80深圳长期现货 ,提供技术支持,样品申请及规格书请联系 ...
- vue 父子组件传参
父向子组件传参 例子:App.vue为父,引入componetA组件之后,则可以在template中使用标签(注意驼峰写法要改成componet-a写法,因为html对大小写不敏感,component ...
- Java并发之线程
在前面我们介绍的一些内容中,我们的程序都是一条执行流,一步一步的执行.但其实这种程序对我们计算机的资源的使用上是低效的.例如:我们有一个用于计算的程序,主程序计算数据,在计算的过程中每得到一个结果就需 ...
- [自制操作系统] 图形界面&VBE工具&MMIO显存&图形库/字库
本文记录了在JOS(或在任意OS)上实现图形界面的方法与一些图形库的实现. 本文中支持的新特性: 支持基本图形显示 支持中英文显示(中英文点阵字库) 相关:VBE VESA MMIO 点阵字库 Git ...
- PHP(Math的调用)
<script> //数学函数(用Math来调用)://round=四舍五入最接近的整数// var l = 1.1;// var y1 = Math.round(l);// docume ...
- 对#ifndef的理解
由于对#ifndef的用法不太理解,在询问了老师#ifndef的含义以及查找资料后,对#ifndef总结了以下几点: <1> #ifndef是宏定义的一种,是三种预处理功能(宏定义,文件包 ...
- 201521123098 《Java程序设计》第8周学习总结
1. 本周学习总结 1.1 以你喜欢的方式(思维导图或其他)归纳总结集合与泛型相关内容. 1. 泛型的本质: 1. 他只是一个编译器现象: 2. 虚拟机里只有普通的类和方法: 3. 运行时没有类型参数 ...
- 201521123095 《Java程序设计》第6周学习总结
1.本周学习总结 1.1 面向对象学习暂告一段落,请使用思维导图,以封装.继承.多态为核心概念画一张思维导图,对面向对象思想进行一个总结. 注1:关键词与内容不求多,但概念之间的联系要清晰,内容覆盖面 ...