Developing your first FNC custom control
Friday, May 13, 2016
Some weeks ago, we released the TMS FNC UI Pack, a set of Framework Neutral Components (FNC), i.e. UI controls that can be used from VCL Windows applications, FireMonkey (FMX) Windows, Mac OS-X, iOS, Android applications and LCL framework basedLazarus applications for Windows, Linux, Mac OS-X,..
The TMS FNC UI Pack contains highly complex & feature-rich components such as grid, planner, rich editor, treeview, toolbars. To create such complex components that work under 3 frameworks and a myriad of operating systems is not a trivial excercise and requires intricate knowledge about the VCL, FMX and LCL frameworks as well as the operating systems the controls need to work under.
To help ourselves and the users of the TMS FNC UI Pack, we have introduced several abstractions that facilitate creating framework neutral components and this is what we want to cover in this brief introduction to developing FNC custom controls.
FNC custom control basics
The structure of the FNC custom control we want to present is this of a classic UI control. The control is responsible for painting itself and interacts with keyboard and/or mouse. The control has several properties to control its appearance and behavior. If we look at this concept from the perspective of implementing this for 3 different frameworks, the biggest challenges faced are:
1) abstractions in the code for dealing with graphics: especially VCL and FMX are quite different in this respect, so abstraction is welcome.
2) abstractions in keyboard and mouse handling: also here there are differences, although subtle, between VCL, FMX and LCL.
3) abstractions in types: types such as font, color, rectangles, points are different in FMX and VCL.
So, we'll cover what is included in FNC to facilitate dealing with this.
Unit organisation
Perhaps the biggest stumbling block is unit organisation. As it is desirable to create components that can be installed in the IDE, (which means for Delphi for both the VCL and FireMonkey framework simultanously) we'll need units for VCL and units for FireMonkey. Although we can use the same class name, the class hierarchy for the VCL control and the FMX control will be different. The VCL FNC control will descend from the VCL TCustomControl and the FMX FNC control will descend from the FMX TControl. In Lazarus, the FNC control will descend from the LCL TCustomControl. In a nutshell, to solve this, we create 3 units for a component that will be nearly identical and we provide a conversion step to allow you to write the code in one unit and automatically generate the other units for the other frameworks. For this example, in total, we'll have 6 units: 3 units with the code for the control for the 3 supported frameworks and 3 units for the component registration in the IDE:
- // Units for the VCL variant of the FNC control
- VCL.TMSFNCCust.pas
- VCL.TMSFNCCustReg.pas
- // Units for the FMX variant of the FNC control
- FMX.TMSFNCCust.pas
- FMX.TMSFNCCustReg.pas
- // Units for the LCL variant of the FNC control
- LCLTMSFNCCust.pas
- LCLTMSFNCCustReg.pas
We'll also use 3 packages: a package for VCL, a package for FMX and a package for LCL. We can install the VCL & FMX package simultanously in the Delphi IDE and the LCL package in the Lazarus IDE. The package for the custom control will have a dependency to the framework plus to the TMS FNC UI Pack for the framework. The structure of the packages in the Delphi 10.1 Berlin IDE is:

and in Lazarus, this is:
Getting to grips
Ok, now that the unit structure is setup, we can focus on writing the code. To write this code, we'll use 3 TMS FNC UI Pack units with abstractions: xxx.TMSFNCCustomControl, xxx.TMSFNCGraphics and xxx.TMSFNCTypes (with xxx = the framework). In this example, we'll write the code in VCL and automatically generate the FMX & LCL equivalents from it, so the uses list becomes:
for FMX
- uses
- Classes, Types, FMX.TMSFNCCustomControl, FMX.TMSFNCGraphics, FMX.TMSFNCTypes;
for LCL
- uses
- Classes, Types, LCLTMSFNCCustomControl, LCLTMSFNCGraphics, LCLTMSFNCTypes;
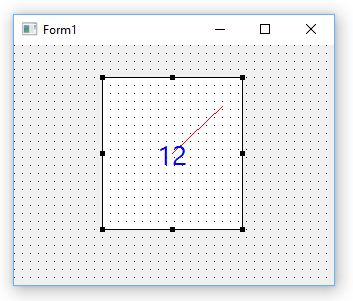
The FNC control we'll write here is very rudimentary for the sake of focusing on the abstractions. It is basically a gauge control that can be clicked with the mouse to set the gauge value, has a gauge value property to set it and can use the key up & down to change the gauge value. So, we need painting of the gauge, we need some gauge line color & font settings and we need handling of the mouse click and keyboard.
Control initialization
The control descends from the abstract FNC class TTMSFNCCustomControl and exposes one extra color property for the gauge line color (note that this are of the abstract type TTMSFNCGraphicsColor), a font (of the abstract type TTMSFNCGraphicsFont, that has also a font color in all frameworks) and a gauge value property of the type TControlValue. Note that the Stroke & Fill properties are published. This contains the control border & control background color and even enables things such as setting a background gradient, a border with a specific pen style etc...
- TControlValue = 0..100;
- TTMSFNCCustomControlSample = class(TTMSFNCCustomControl)
- private
- FLineColor: TTMSFNCGraphicsColor;
- FFont: TTMSFNCGraphicsFont;
- FValue: TControlValue;
- protected
- procedure Draw({%H-}AGraphics: TTMSFNCGraphics; {%H-}ARect: TRectF); override;
- public
- constructor Create(AOwner: TComponent); override;
- destructor Destroy; override;
- published
- property Stroke;
- property Fill;
- property Font: TTMSFNCGraphicsFont read FFont write SetFont;
- property LineColor: TTMSFNCGraphicsColor read FLineColor write SetLineColor default gcRed;
- property Value: TControlValue read FValue write SetValue default 0;
- end;
In the constructor, initialization of the line color property value is done as well as the border color and the font is created. This is of the type TTMSFNCGraphicsFont and the main purpose is to have a font with font color in all frameworks. There is one more thing particular in the constructor and that is the assignment of the Font.OnChange event handler. In Delphi Pascal, we can simply assign the object method but for the FPC compiler, this needs to be prefixed with the @ symbol. Fortunately, the Lazarus environment has the LCL define we can use to handle this.
- { TTMSFNCCustomControlSample }
- constructor TTMSFNCCustomControlSample.Create(AOwner: TComponent);
- begin
- inherited;
- Stroke.Color := gcBlack;
- FLineColor := gcRed;
- FFont := TTMSFNCGraphicsFont.Create;
- FFont.OnChanged := {$IFDEF LCL}@{$ENDIF}FontChanged;
- Width := 100;
- Height := 100;
- end;
- destructor TTMSFNCCustomControlSample.Destroy;
- begin
- FFont.Free;
- inherited;
- end;
Painting
The control descends from the abstract FNC class TTMSFNCCustomControl and exposes 3 color properties, the border, background and gauge line color (note that these are of the type TTMSFNCGraphicsColor), a font (of the type TTMSFNCGraphicsFont, that has also a font color in all frameworks) and a gauge value property of the type TControlValue.
Painting is done in the override of the Draw() method that has 2 parameters: AGraphics: TTMSFNCGraphics, a framework neutral graphics library and the rectangle of the control via ARect of the type TRectF. In VCL and LCL only the not fractional part of the floating point numbers is used but of course in the FireMonkey framework, this can use the fractional parts as well.
The painting code itself is:
- procedure TTMSFNCCustomControlSample.Draw(AGraphics: TTMSFNCGraphics;
- ARect: TRectF);
- var
- angle: double;
- lf,tf: TPointF;
- w: single;
- begin
- inherited;
- angle := Value/High(Value)*2*PI;
- w := Min(ARect.Right - ARect.Left, ARect.Bottom - ARect.Top) / 2;
- lf.X := (ARect.Right - ARect.Left)/2;
- lf.Y := (ARect.Bottom - ARect.Top)/2;
- tf.X := lf.X + Cos(angle) * w;
- tf.Y := lf.Y - Sin(angle) * w;
- AGraphics.Stroke.Color := LineColor;
- AGraphics.DrawLine(lf,tf);
- AGraphics.Font.Assign(Font);
- AGraphics.DrawText(ARect, InttoStr(Value),false, gtaCenter, gtaCenter);
- end;
Mouse and keyboard handling
The mouse and keyboard handling is via the HandleKeyDown and HandleMouseDown virtual method overrides:
- TTMSFNCCustomControlSample = class(TTMSFNCCustomControl)
- protected
- procedure HandleKeyDown(var {%H-}Key: Word; {%H-}Shift: TShiftState); override;
- procedure HandleMouseDown({%H-}Button: TMouseButton; {%H-}Shift: TShiftState; {%H-}X, {%H-}Y: Single); override;
- end;
The implementation is straightforward. One thing that is noteworthy, is that the unit xxx.TTMSFNCTypes has a list of keys in a framework and operating system neutral way, i.e. we can check for the arrow up and arrow down keys with the constants KEY_DOWN and KEY_UP.
- procedure TTMSFNCCustomControlSample.HandleKeyDown(var Key: Word;
- Shift: TShiftState);
- begin
- inherited;
- if Key = KEY_DOWN then
- begin
- if Value > Low(Value) then
- Value := Value - 1;
- end;
- if Key = KEY_UP then
- begin
- if Value < High(Value) then
- Value := Value + 1;
- end;
- end;
In the mouse down handler, we set the focus to the control when possible and then calculate the value of the gauge that matches with the mouse click position. Note that the X,Y values are of the type single to accomodate FMX and will contain non fractional values in VCL and LCL.
- procedure TTMSFNCCustomControlSample.HandleMouseDown(Button: TTMSFNCMouseButton;
- Shift: TShiftState; X, Y: Single);
- var
- angle: single;
- dx,dy: single;
- begin
- inherited;
- if AllowFocus then
- SetFocus;
- dx := x - (Width/2);
- dy := - y + (Height/2);
- if dx = 0 then
- angle := sign(dy) * PI / 2
- else
- angle := ArcTan(dy/dx);
- if dx < 0 then
- angle := PI + angle;
- if angle < 0 then
- angle := angle + 2 * PI;
- Value := Round((angle / 2 / PI) * High(Value));
- end;
Creating the units for FMX and LCL
Now that we have the VCL framework FNC component ready that contains 100% framework neutral code, let's create automatically the FMX and LCL units from this. 3 steps are needed:
1) Rename the unit VCL.TMSFNCCust.pas to FMX.TMSFNCCust.pas and LCLTMSFNCCust.pas
2) Change in the unit .PAS file the unit name, i.e. replace VCL.TMSFNCCust by FMX.TMSFNCCust and LCLTMSFNCCust respectively
3) Change the unit references in the uses list from
VCL.TMSFNCCustomControl, VCL.TMSFNCGraphics, VCL.TMSFNCTypes;
to
FMX.TMSFNCCustomControl, FMX.TMSFNCGraphics, FMX.TMSFNCTypes;
or
LCLTMSFNCCustomControl, LCLTMSFNCGraphics, LCLTMSFNCTypes;
To accomplish this, we call a simple powershell script that performs text replacement from VCL.TMS to FMX.TMS or LCLTMS respectively:
- powershell -command "(gc VCL.TMSFNCCust.pas) -replace 'VCL.TMS','LCLTMS' |Out-file LCLTMSFNCCust.pas -Encoding utf8"
- powershell -command "(gc VCL.TMSFNCCust.pas) -replace 'VCL.TMS','FMX.TMS' |Out-file FMX.TMSFNCCust.pas -Encoding utf8"
With these units created, we can compile the packages and install our FNC custom control for use from VCL, FMX and LCL applications in Lazarus.
The full source of this sample FNC custom control can be downloaded here. This sample can be used with the latest version of theTMS FNC UI Pack.
We hope this already whets your appetite for exploring FNC and the power of writing code for UI controls once for use in 3 frameworks. See also this blog article for a more general coverage of what is available in the TMS FNC UI Pack. In a next article, we'll go deeper in compound control creation and also the TTMSFNCGraphics library that offers a vast range of functions, going from drawing text, polygons, polylines, images in various formats, controls like checkboxes, radiobuttons, buttons, ... and much more.
Bruno Fierens
http://tmssoftware.com/site/blog.asp?post=346
Developing your first FNC custom control的更多相关文章
- WinForm中Component Class、User Control及Custom Control的区别和使用建议
reference: http://blog.csdn.net/redstonehe/article/details/1536549 .NET Framework 为您提供了开发和实现新控件的能力.除 ...
- WinForm中Component Class、User Control及Custom Control的区别和使用-转
转http://www.cnblogs.com/jhtchina/archive/2010/11/28/1028591.html NET Framework 为您提供了开发和实现新控件的能力.除了常见 ...
- Custom Control
How to create custom control http://www.silverlightshow.net/items/Creating-a-Silverlight-Custom-Cont ...
- WinForm中Component Class、User Control及Custom Control的区别和使用
NET Framework 为您提供了开发和实现新控件的能力.除了常见的用户控件外,现在您会发现,您可以编写能执行自身绘图的自定义控件,甚至还可以通过继承扩展现有控件的功 能.确定创建何种类型的控件可 ...
- Writing a Reusable Custom Control in WPF
In my previous post, I have already defined how you can inherit from an existing control and define ...
- Recommended Practices for WPF Custom Control Developers
I have always found that there isn’t enough documentation about Custom Control development in WPF. M ...
- ClassLibary和WPF User Control LIbary和WPF Custom Control Libary的异同
说来惭愧,接触WPF这么长时间了,今天在写自定义控件时遇到一个问题:运行界面中并没有显示自定义控件,经调试发现原来没有加载Themes中的Generic.xaml. 可是为什么在其他solution中 ...
- VS中Component Class、User Control及Custom Control的区别 .
.NET Framework 为您提供了开发和实现新控件的能力.除了常见的用户控件外,现在您会发现,您可以编写能执行自身绘图的自定义控件,甚至还可以通过继承扩展现有控件的功能.确定创建何种类型的控件可 ...
- WPF中的Generic.xaml, theme以及custom control
原文:WPF中的Generic.xaml, theme以及custom control 在Visual Studio中创建自定义控件时,所有控件都将添加到/Themes/Generic.xaml. 最 ...
随机推荐
- error C4996 The POSIX name for this item is deprecated. Instead, use the ISO C and C++ conformant name
error C4996: 'strupr': The POSIX name for this item is deprecated. Instead, use the ISO C and C++ co ...
- OSG显示文字——自定义显示文字函数
#include <Windows.h> #include <osg/Geode> #include <osg/Geometry> #include <osg ...
- Cocos2d-x CCNotificationCenter 通知中心
相信接触过ios开发的人来说对NSNotificationCenter都不陌生.而在cocos2d-x中也参照这个类,提供了CCNotificationCenter这个类,用作通知中心. 那么Noti ...
- Mongodb 安装迁移
<pre name="code" class="python">1.下载MongoDB(64位) http://fastdl.mongodb.org ...
- zoj 3665 Yukari's Birthday(枚举+二分)
Yukari's Birthday Time Limit: 2 Seconds Memory Limit: 32768 KB Today is Yukari's n-th birthday ...
- kettle中调用java类
kettle中调用java类 有时须要在kettle调用java类,如:验证.查询或自己定义加密等.有时甚至连主要的数据訪问都不那么简单,如获取一个存储文件或使用一个数据库连接,某些数据源可能封装在应 ...
- js 数组,字符串,JSON,bind, Name
/** * Created by W.J.Chang on 2014/5/23. */ // 判读是否是数组的方法 console.log(Array.isArray(new Array)); con ...
- 用ADB(Android Debug Bridge)实时监测Android程序的运行
监控Android设备上程序的运行,需要ADB的配合,具体ADB工具的介绍以及命令选项可见博客: http://blog.csdn.net/mliubing2532/article/details ...
- ceph优秀博文
ceph官方博文: http://ceph.com/community/blog/ rgw根据rgw用户来分pool存放数据 http://cephnotes.ksperis.com/blog/201 ...
- C#反射调用程序集类中方法
建立类 class OperatorClass { /// <summary> /// 加法 /// </summary> /// <param name="x ...