基于 IdentityServer3 实现 OAuth 2.0 授权服务【客户端模式(Client Credentials Grant)】
github:https://github.com/IdentityServer/IdentityServer3/
documentation:https://identityserver.github.io/Documentation/
samples https://github.com/IdentityServer/IdentityServer3.Samples/
OAuth 2.0定义的四种授权方式。
- 授权码模式(authorization code)
- 简化模式(implicit)
- 密码模式(resource owner password credentials)
- 客户端模式(client credentials)
虽然之前已经基于 Katana 实现了 OAuth 2.0 的相关模式,后面发现 IdentityServer 要相对完善一些,IdentityServer 是属于 .NET Foundation 的一个子项目,IdentityServer3 是基于 Katana 开发的 OpenID Connect/OAuth 2.0 服务框架,虽然 Katana 微软已经不维护了,现已经属于 ASP.NET Core 的一部分,相应对应 ASP.NET Core 的版本是 IdentityServer4 ,还处于 Beta 版本;不过 IdentityServer3 的扩展IdentityServer3.Integration.AspNetCore 支持 ASP.NET Core , 个人觉得 ASP.NET Core 设计很好,但是现在还不成熟,可能还需要等一段时间,所以选择了 IdentityServer3 。
授权角色
资源拥有者(resource owner):能授权访问受保护资源的一个实体,如新浪微博用户 irving;
资源服务器(resource server):存储受保护资源,客户端通过 access token 请求资源,资源服务器响应受保护资源给客户端;存储着用户 irving 的微博等信息。
授权服务器(authorization server):成功验证资源拥有者并获取授权之后,授权服务器颁发授权令牌(Access Token)给客户端。
客户端(client):如新浪微博第三方应用,也可以是它自己的官方应用;其本身不存储资源,而是资源拥有者授权通过后,使用它的授权(授权令牌)访问受保护资源,然后客户端把相应的数据展示出来。“客户端”术语不代表任何特定实现(如应用运行在一台服务器、桌面、手机或其他设备)。
Client Credentials Grant 模式只需要关注 授权服务器,资源服务器,客户端三个角色 具体:https://identityserver.github.io/Documentation/docsv2/overview/terminology.html
授权服务器
Install-Package IdentityServer3
服务配置
public class Startup

    {

        /// <summary>

        /// 配置idsv授权服务

        /// </summary>

        /// <param name="app"></param>

        public void Configuration(IAppBuilder app)

        {

            var opts = new IdentityServerOptions

            {

                SiteName = "Embedded OAuth2 Service",

                EnableWelcomePage = true,

                Factory = new IdentityServerServiceFactory()

                              .UseInMemoryClients(Clients.Get())

                              .UseInMemoryScopes(Scopes.Get())

                              .UseInMemoryUsers(new List<InMemoryUser>()),

                //.UseInMemoryUsers(Users.Get())

                RequireSsl = false,

                //SigningCertificate = new X509Certificate2(string.Format(@"{0}\bin\identityServer\idsrv3test.pfx", AppDomain.CurrentDomain.BaseDirectory), "idsrv3test")

            };

            app.UseIdentityServer(opts);

            /*

                //自定义路由

                app.Map("/identity", idsrvApp =>

                {

                    idsrvApp.UseIdentityServer(opts);

                });

            */

        }

    }
.csharpcode, .csharpcode pre
{
font-size: small;
color: black;
font-family: consolas, "Courier New", courier, monospace;
background-color: #ffffff;
/*white-space: pre;*/
}
.csharpcode pre { margin: 0em; }
.csharpcode .rem { color: #008000; }
.csharpcode .kwrd { color: #0000ff; }
.csharpcode .str { color: #006080; }
.csharpcode .op { color: #0000c0; }
.csharpcode .preproc { color: #cc6633; }
.csharpcode .asp { background-color: #ffff00; }
.csharpcode .html { color: #800000; }
.csharpcode .attr { color: #ff0000; }
.csharpcode .alt
{
background-color: #f4f4f4;
width: 100%;
margin: 0em;
}
.csharpcode .lnum { color: #606060; }
客户端
public class Clients

    {

        public static List<Client> Get()

        {

            return new List<Client>

                    {

                        new Client

                        {

                            ClientName = "App接口服务",

                            ClientId = "app_test_id",

                            Enabled = true,

                            AccessTokenType = AccessTokenType.Reference,

                            Flow = Flows.ClientCredentials,

                            ClientSecrets = new List<Secret>

                            {

                                new Secret("F621F470-9731-4A25-80EF-67A6F7C5F4B8".Sha256())

                            },

                            AllowedScopes = new List<string>

                            {

                                "user",

                                "order"

                            }

                        }

                    };

        }
作用域
public class Scopes

    {

        public static List<Scope> Get()

        {

            return new List<Scope>

            {

                new Scope

                {

                    Name = "user"

                },

                new Scope

                {

                    Name = "order"

                }

            };

        }

    }
用户(客户端模式不需要用户参与所以没有用户数据)
完成上述工作,服务端基础服务就完成了,访问 /.well-known/openid-configuration ,可以获得服务的配置信息,暂且部署到 http://192.168.210.165 服务器上,配置信息如下(官方也就有服务端的示例: https://github.com/IdentityServer/demo.identityserver.io)
{

    "issuer": "http://192.168.210.165",

    "jwks_uri": "http://192.168.210.165/.well-known/jwks",

    "authorization_endpoint": "http://192.168.210.165/connect/authorize",

    "token_endpoint": "http://192.168.210.165/connect/token",

    "userinfo_endpoint": "http://192.168.210.165/connect/userinfo",

    "end_session_endpoint": "http://192.168.210.165/connect/endsession",

    "check_session_iframe": "http://192.168.210.165/connect/checksession",

    "revocation_endpoint": "http://192.168.210.165/connect/revocation",

    "introspection_endpoint": "http://192.168.210.165/connect/introspect",

    "frontchannel_logout_supported": true,

    "frontchannel_logout_session_supported": true,

    "scopes_supported": [

        "user",

        "order"

    ],

    "claims_supported": [ ],

    "response_types_supported": [

        "code",

        "token",

        "id_token",

        "id_token token",

        "code id_token",

        "code token",

        "code id_token token"

    ],

    "response_modes_supported": [

        "form_post",

        "query",

        "fragment"

    ],

    "grant_types_supported": [

        "authorization_code",

        "client_credentials",

        "password",

        "refresh_token",

        "implicit"

    ],

    "subject_types_supported": [

        "public"

    ],

    "id_token_signing_alg_values_supported": [

        "RS256"

    ],

    "code_challenge_methods_supported": [

        "plain",

        "S256"

    ],

    "token_endpoint_auth_methods_supported": [

        "client_secret_post",

        "client_secret_basic"

    ]

}
注意:寄宿到 IIS 中需要 WebConfig 配置中需配置:
<system.webServer>

  <modules runAllManagedModulesForAllRequests="true">

  </modules>

</system.webServer
资源服务器
Install-Package Microsoft.Owin.Host.SystemWeb
Install-Package Microsoft.AspNet.WebApi.OwinInstall-Package IdentityServer3.AccessTokenValidation
服务配置
public class Startup

    {

        /// <summary>

        /// 配置授权服务

        /// </summary>

        /// <param name="app"></param>

        public void Configuration(IAppBuilder app)

        {

            app.UseIdentityServerBearerTokenAuthentication(new IdentityServerBearerTokenAuthenticationOptions

            {

                Authority = "http://192.168.210.165",

                ValidationMode = ValidationMode.ValidationEndpoint,

                EnableValidationResultCache = true,

                ValidationResultCacheDuration = TimeSpan.FromMinutes(5),

                RequiredScopes = new[] { "user", "order" }

            });

        }

    }
控制器
    [Route("api/v1/values")]

    public class ValuesController : ApiController

    {

        public IHttpActionResult Get()

        {

            var caller = User as ClaimsPrincipal;

            return Json(new

            {

                message = "OK computer",

                client = caller.FindFirst("client_id").Value

            });

        }

    }
OK,完成,由于是一台测试服务器,部署到 http://192.168.210.165:88/ 端口。
客户端
Install-Package serilog
Install-Package serilog.sinks.literateInstall-Package IdentityModel
class Program

    {

        static void Main(string[] args)

        {

            var log = new LoggerConfiguration()

                          .WriteTo

                          .LiterateConsole(outputTemplate: "{Timestamp:HH:mm} [{Level}] ({Name:l}){NewLine} {Message}{NewLine}{Exception}")

                          .CreateLogger();

            var token = new TokenClient(

                         "http://192.168.210.165/connect/token",

                         "app_test_id",

                         "F621F470-9731-4A25-80EF-67A6F7C5F4B8");

            var response = token.RequestClientCredentialsAsync("user").Result;

            var client = new HttpClient();

            client.SetBearerToken(response.AccessToken);

            log.Information(client.GetStringAsync("http://192.168.210.165:88/api/v1/values").Result);

            Console.ReadKey();

        }

    }
测试
顺便使用Fiddler抓了一下包
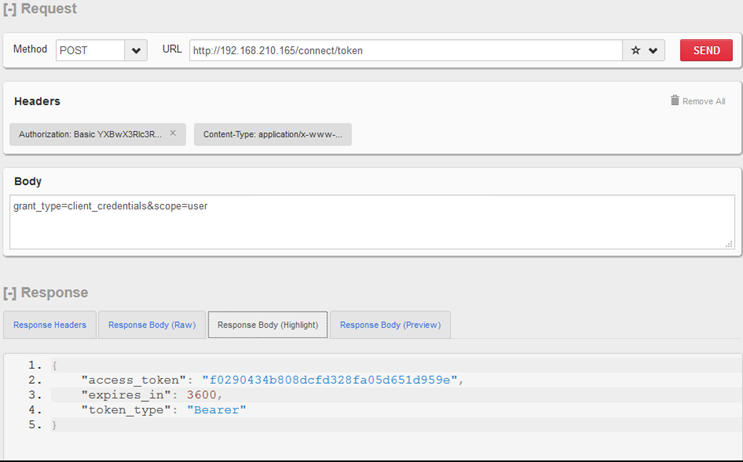
                POST http://192.168.210.165/connect/token HTTP/1.1

                Accept: application/json

                Authorization: Basic YXBwX3Rlc3RfaWQ6RjYyMUY0NzAtOTczMS00QTI1LTgwRUYtNjdBNkY3QzVGNEI4

                Content-Type: application/x-www-form-urlencoded

                Host: 192.168.210.165

                Content-Length: 40

                Expect: 100-continue

                Connection: Keep-Alive

                grant_type=client_credentials&scope=user
                GET http://192.168.210.165:88/api/v1/values HTTP/1.1

                Authorization: Bearer 9f82476751e1f8b93f1ea6df7de83b51

                Host: 192.168.210.165:88

个人比较喜欢使用 Flurl.Http 这个类库,可以扩展一下客户端,扩展的方法现在还有一些问题,就不贴代码了。
其他细节:
- 生产环境最好加证书与HTTPS
- 客户端,作用域,持久化到DB(有EF的扩展 https://github.com/IdentityServer/IdentityServer3.EntityFramework )
- 票据的持久化与自定义验证
REFER:
Announcing IdentityServer for ASP.NET 5 and .NET Corehttp://leastprivilege.com/2016/01/11/announcing-identityserver-for-asp-net-5-and-net-core/
OAuth2 Implicit Flow with Angular and ASP.NET Core 1.0 IdentityServerhttp://damienbod.com/2015/11/08/oauth2-implicit-flow-with-angular-and-asp-net-5-identity-server
理解OAuth 2.0
http://www.ruanyifeng.com/blog/2014/05/oauth_2_0.html
基于 IdentityServer3 实现 OAuth 2.0 授权服务【客户端模式(Client Credentials Grant)】的更多相关文章
- 基于 IdentityServer3 实现 OAuth 2.0 授权服务【密码模式(Resource Owner Password Credentials)】
密码模式(Resource Owner Password Credentials Grant)中,用户向客户端提供自己的用户名和密码.客户端使用这些信息,向"服务商提供商"索要授权 ...
- 基于 IdentityServer3 实现 OAuth 2.0 授权服务数据持久化
最近花了一点时间,阅读了IdentityServer的源码,大致了解项目整体的抽象思维.面向对象的重要性; 生产环境如果要使用 IdentityServer3 ,主要涉及授权服务,资源服务的部署负载的 ...
- (转)基于OWIN WebAPI 使用OAuth授权服务【客户端模式(Client Credentials Grant)】
适应范围 采用Client Credentials方式,即应用公钥.密钥方式获取Access Token,适用于任何类型应用,但通过它所获取的Access Token只能用于访问与用户无关的Open ...
- 基于OWIN WebAPI 使用OAuth授权服务【客户端模式(Client Credentials Grant)】
适应范围 采用Client Credentials方式,即应用公钥.密钥方式获取Access Token,适用于任何类型应用,但通过它所获取的Access Token只能用于访问与用户无关的Open ...
- Microsoft.Owin.Security.OAuth搭建OAuth2.0授权服务端
Microsoft.Owin.Security.OAuth搭建OAuth2.0授权服务端 目录 前言 OAuth2.0简介 授权模式 (SimpleSSO示例) 使用Microsoft.Owin.Se ...
- SimpleSSO:使用Microsoft.Owin.Security.OAuth搭建OAuth2.0授权服务端
目录 前言 OAuth2.0简介 授权模式 (SimpleSSO示例) 使用Microsoft.Owin.Security.SimpleSSO模拟OpenID认证 通过authorization co ...
- 理解OAuth 2.0授权
一.什么是OAuth 二.什么场景下会用到OAuth授权 三.OAuth 2.0中的4个成员 四.OAuth 2.0授权流程 五.OAuth 2.0授权模式 1. authorization c ...
- OAuth 2.0 授权认证详解
一.认识 OAuth 2.0 1.1 OAuth 2.0 应用场景 OAuth 2.0 标准目前被广泛应用在第三方登录场景中,以下是虚拟出来的角色,阐述 OAuth2 能帮我们干什么,引用阮一峰这篇理 ...
- 在ASP.NET中基于Owin OAuth使用Client Credentials Grant授权发放Token
OAuth真是一个复杂的东东,即使你把OAuth规范倒背如流,在具体实现时也会无从下手.因此,Microsoft.Owin.Security.OAuth应运而生(它的实现代码在Katana项目中),帮 ...
随机推荐
- LeftoverDataException.
在用java poi 3.8操作excel的时候,在打开一个已有excel文件时,有时候会报错: org.apache.poi.hssf.record.RecordInputStream$Leftov ...
- 开发中model,entity和pojo的区别
Entity接近原始数据,Model接近业务对象- Entity:是专用于EF的对数据库表的操作, Model:是为页面提供数据和数据校验的,所以两者可以并存 POJO:POJO是Plain Ordi ...
- anomaly detection algorithm
anomaly detection algorithm 以上就是异常监测算法流程
- 错误:创建 cachingConfiguration 的配置节处理程序时出错: 未能加载文件或程序集“Microsoft.Practices.EnterpriseLibrary.Caching,
问题: 错误:创建 cachingConfiguration 的配置节处理程序时出错: 未能加载文件或程序集“Microsoft.Practices.EnterpriseLibrary.Caching ...
- C# 使用Newtonsoft.Json.dll 格式化显示Json串
private string ConvertJsonString(string str) { //格式化json字符串 JsonSerializer serializer = new JsonSeri ...
- iOS开发-Alcatraz插件管理
CocoaPod负责iOS开发中的引用类库的管理,Alcatraz中文翻译阿尔卡特拉斯岛,也有人称之为恶魔岛,主要是负责管理第三方Xcode 插件.模版以及颜色配置的工具,直接集成到 Xcode 的图 ...
- SegmentFault创始人高阳:辍学后带着500元北漂,4年建成国内最大开发者
i黑马注:i黑马曾经和高阳聊过几次天,在他身上我看到了90后CEO特别明显的成功特质“敢为天下先”.在别人犹豫的时候敢第一个出手,在互联网时代往往会取得最关键的“先机优势”. 7月19日,“腾讯产品家 ...
- Java核心知识点学习----线程中如何创建锁和使用锁 Lock,设计一个缓存系统
理论知识很枯燥,但这些都是基本功,学完可能会忘,但等用的时候,会发觉之前的学习是非常有意义的,学习线程就是这样子的. 1.如何创建锁? Lock lock = new ReentrantLock(); ...
- python学习笔记-Day4(2)
正则表达式 语法: import re #导入模块名 p = re.compile("^[0-9]") #生成要匹配的正则对象 , ^代表从开头匹配,[0-9]代表匹配0至9的任意 ...
- 第七章 springboot + retrofit
retrofit:一套RESTful架构的Android(Java)客户端实现. 好处: 基于注解 提供JSON to POJO,POJO to JSON,网络请求(POST,GET,PUT,DELE ...