
springcloud 之Ribbon客户端负载均衡配置使用
- pom.xml添加配置
说明:这里服务注册与发现用的是Eureka,所以消费者端需要引入eureka,使用EurekaClient来调用服务<dependency>
<groupId>org.springframework.cloud</groupId>
<artifactId>spring-cloud-starter-eureka</artifactId>
</dependency>
<dependency>
<groupId>org.springframework.cloud</groupId>
<artifactId>spring-cloud-starter-ribbon</artifactId>
</dependency>
<dependency>
<groupId>org.springframework.cloud</groupId>
<artifactId>spring-cloud-starter-config</artifactId>
</dependency> - 修改application.yml 添加eureka的服务注册地址,如下图:
说明:下图中的 service-url配置的是3个eureka集群服务地址
ConfigBean代码
说明:主要代码,获取RestTemplate时,添加@LoadBalanced注解实现客户端负载均衡package com.thr.springcloud.cfgbean; import org.springframework.cloud.client.loadbalancer.LoadBalanced;
import org.springframework.context.annotation.Bean;
import org.springframework.context.annotation.Configuration;
import org.springframework.web.client.RestTemplate; import com.netflix.loadbalancer.IRule;
import com.netflix.loadbalancer.RandomRule; /**
* 注解@Configuration说明:相当于spring的applicationContext.xml
* 即此时加了@Configuration注解的CfgBean类 等同于 applicationContext.xml
* @author xiongxiaomeng
*/
@Configuration
public class CfgBean { /**
* 使用RestTemplate调用Rest服务
* @LoadBalanced 获取RestTemplate时,加入Ribbon的负载均衡的配置
* @return Rest服务调用模板
*/
@Bean
@LoadBalanced
public RestTemplate getRestTemplate()
{
return new RestTemplate();
} /**
* 定义负载均衡算法:
* 默认:轮询,当前改成:随机
* @return 随机算法
*/
@Bean
public IRule myRule() {
return new RandomRule();
} }- 主启动类添加EurekaClient配置:
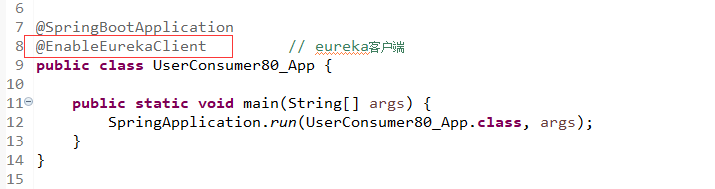
- 客户端访问类 UserController_Consumer.java
package com.thr.springcloud.controller;

import java.util.List;

import org.springframework.beans.factory.annotation.Autowired;

import org.springframework.web.bind.annotation.PathVariable;

import org.springframework.web.bind.annotation.RequestMapping;

import org.springframework.web.bind.annotation.RestController;

import org.springframework.web.client.RestTemplate;

import com.thr.springcloud.entities.User;

/**

 * 消费者端的RestController

 * 消费者端 都是 调用服务提供者的Controller,这里使用RestTemplate的方式调用

 * @author xiongxiaomeng

 *

 */

@RestController

public class UserController_Consumer {

    //未加入Eureka+Ribbon之前,采用ip+端口的访问方式

    //private static final String REST_URL_PREFIX = "http://localhost:8001";

    //加入Eureka+Ribbon之后,可以直接采用服务名的调用方式,无须再使用ip+端口的调用方式

    private static final String REST_URL_PREFIX = "http://THRCLOUD-DEPT";

    //使用restTemplate访问restful接口非常的简单粗暴无脑。(url, requestMap, ResponseBean.class)这三个参数分别代表

    @Autowired

    private RestTemplate _restTemplate;

    @RequestMapping(value="/consumer/user/add")

    public boolean add(User user) {

        return _restTemplate.postForObject(REST_URL_PREFIX + "/user/add", user, Boolean.class);

    }

    @RequestMapping(value="/consumer/user/get/{userId}")

    public User get(@PathVariable("userId") Long userId) {

        return _restTemplate.getForObject(REST_URL_PREFIX + "/user/get/" + userId, User.class);

    }

    @SuppressWarnings("unchecked")

    @RequestMapping(value="/consumer/user/list")

    public List<User> list() {

        return _restTemplate.getForObject(REST_URL_PREFIX + "/user/list", List.class);

    }

    @RequestMapping(value="/consumer/user/discovery")

    public Object discovery() {

        return _restTemplate.getForObject(REST_URL_PREFIX + "/user/discovery", Object.class);

    }

}
springcloud 之Ribbon客户端负载均衡配置使用的更多相关文章
- SpringCloud实战-Ribbon客户端负载均衡
前面我们已经完成了注册中心和服务提供者两个基础组件.接着介绍使用Spring Cloud Ribbon在客户端负载均衡的调用服务. ribbon 是一个客户端负载均衡器,可以简单的理解成类似于 ngi ...
- springcloud(十二):Ribbon客户端负载均衡介绍
springcloud(十二):Ribbon客户端负载均衡介绍 Ribbon简介 使用分布式微服务脚骨的应用系统,在部署的时候通常会为部分或者全部微服务搭建集群环境,通过提供多个实例来提高系统的稳定型 ...
- SpringBoot(三) - Ribbon客户端负载均衡,Zuul网关,Config配置中心
1.Ribbon客户端负载均衡 1.1 依赖 1.2 配置信息 # feign默认加载了ribbon负载均衡,默认负载均衡机制是:轮询 # 负载均衡机制是添加在消费端(客户端)的,如果改为随机,指定服 ...
- spring cloud --- Ribbon 客户端负载均衡 + RestTemplate ---心得【无熔断器】
spring boot 1.5.9.RELEASE spring cloud Dalston.SR1 1.前言 了解了 eureka 服务注册与发现 的3大角色 ,会使用RestTem ...
- spring cloud --- Ribbon 客户端负载均衡 + RestTemplate + Hystrix 熔断器 [服务保护] ---心得
spring boot 1.5.9.RELEASE spring cloud Dalston.SR1 1.前言 当超大并发量并发访问一个服务接口时,服务器会崩溃 ,不仅导致这个接口无法 ...
- SpringCloud系列之客户端负载均衡Netflix Ribbon
1. 什么是负载均衡? 负载均衡是一种基础的网络服务,它的核心原理是按照指定的负载均衡算法,将请求分配到后端服务集群上,从而为系统提供并行处理和高可用的能力.提到负载均衡,你可能想到nginx.对于负 ...
- ③SpringCloud 实战:使用 Ribbon 客户端负载均衡
这是SpringCloud实战系列中第三篇文章,了解前面第两篇文章更有助于更好理解本文内容: ①SpringCloud 实战:引入Eureka组件,完善服务治理 ②SpringCloud 实战:引入F ...
- 笔记:Spring Cloud Ribbon 客户端负载均衡
Spring Cloud Ribbon 是一个基于 HTTP 和 TCP 的客户端负载均衡工具,基于 Netflix Ribbon 实现,通过Spring Cloud 的封装,可以让我们轻松的将面向服 ...
- SpringCloud Netflix Ribbon(负载均衡)
⒈Ribbon是什么? Spring Cloud Ribbon是基于Netflix Ribbon实现的一套客户端负载均衡工具. Ribbon是Netflix发布的开源项目,主要功能是提供客户端的软件负 ...
随机推荐
- k8s记录-下载k8s相关二进制包(一)
1)软件清单操作系统:CentOS7Kubernetes版本:v1.14.2flannel:v0.10.0ectd3:v3.3.11Docker版本:v18.09.0-ceDocker-compose ...
- 123457123456#0#-----com.tym.NaojingJiZhuanWan--前拼后广--脑筋急转弯
com.tym.NaojingJiZhuanWan--前拼后广--脑筋急转弯
- Ideal设置编码格式
file-------settings-------file Encodings
- Apache使用内置插件mod_php解析php的配置
apache安装完毕之后,修改httpd.conf配置文件,添加代码如下: LoadModule php5_module modules/libphp5.so <FilesMatch \.php ...
- 【JS新手教程】LODOP打印复选框选中的任务或页数
之前的博文:[JS新手教程]LODOP打印复选框选中的内容关于任务:Lodop打印语句最基本结构介绍(什么是一个任务)关于本文用到的JS的eval方法:JS-JAVASCRIPT的eval()方法该文 ...
- asp.net Forms身份验证详解
在做网站的时候,都会用到用户登录的功能.对于一些敏感的资源,我们只希望被授权的用户才能够访问,这让然需要用户的身份验证.对于初学者,通常将用户登录信息存放在Session中,笔者在刚接触到asp.ne ...
- 设计模式之--Visitor
Ref: https://www.jianshu.com/p/feec47a25b67 https://www.cnblogs.com/alphablox/p/5346567.html
- 《Mysql - Count(*) 的优化》
一:Count(*) 的实现方式? - 要明确的是,在不同的 MySQL 引擎中,count(*) 有不同的实现方式. - MyISAM 引擎把一个表的总行数存在了磁盘上,因此执行 count(*) ...
- 学习makefile 的网址
http://www.ruanyifeng.com/blog/2015/02/make.html http://blog.csdn.net/ruglcc/article/details/7814546 ...
- Python字典dict的基本使用
可以将字典看作是特殊的列表,将下标0.1.2,表示成name,age,job. 程序列出了基本的增删改查,其余方法自行测试. 1.程序测试 #!/usr/bin/python # -*- coding ...