
apache CXF Service 简单使用
cxf介绍
框架官网:cxf.apache.org
支持多种协议:
SOAP1.1,1.2
XML/HTTP
CORBA(Common Object Request Broker Architecture公共对象请求代理体系结构,早期语言使用的WS。C,c++,C#)
并可以与Spring进行快速无缝的整合
灵活的部署:可以运行在Tomcat,Jboss,Jetty(内置),IBMWS,BeaWL上面。
入门案例(服务端)
第一步:创建动态web项目
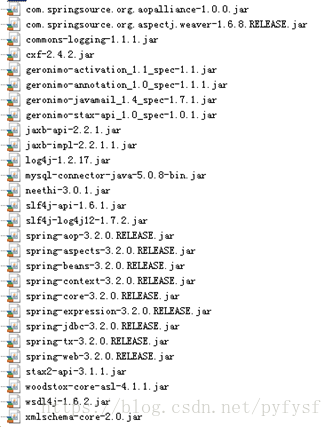
第二步:导入CXF相关jar包
第三步:在web.xml中配置CXF框架提供的一个Servlet
 <!-- 配置CXF框架提供的Servlet -->

  <servlet>

    <servlet-name>cxf</servlet-name>

    <servlet-class>org.apache.cxf.transport.servlet.CXFServlet</servlet-class>

    <!-- 通过初始化参数指定CXF框架的配置文件位置 -->

    <init-param>

        <param-name>config-location</param-name>

        <param-value>classpath:cxf.xml</param-value>

    </init-param>

  </servlet>

  <servlet-mapping>

    <servlet-name>cxf</servlet-name>

    <url-pattern>/service/*</url-pattern>

  </servlet-mapping>
第四步:在类路径下提供cxf.xml
<?xml version="1.0" encoding="UTF-8"?>

<beans xmlns="http://www.springframework.org/schema/beans"

xmlns:xsi="http://www.w3.org/2001/XMLSchema-instance"

xmlns:jaxws="http://cxf.apache.org/jaxws"

xmlns:soap="http://cxf.apache.org/bindings/soap"

xsi:schemaLocation="http://www.springframework.org/schema/beans

                    http://www.springframework.org/schema/beans/spring-beans.xsd

                    http://cxf.apache.org/bindings/soap

                    http://cxf.apache.org/schemas/configuration/soap.xsd

                    http://cxf.apache.org/jaxws

                    http://cxf.apache.org/schemas/jaxws.xsd">

    <!-- 引入CXF Bean定义如下,早期的版本中使用 -->

    <import resource="classpath:META-INF/cxf/cxf.xml" />

    <import resource="classpath:META-INF/cxf/cxf-extension-soap.xml" />

    <import resource="classpath:META-INF/cxf/cxf-servlet.xml" />

</beans>
第五步:开发一个接口和实现类
import javax.jws.WebService;

@WebService

public interface HelloService {

    public String sayHello(String name);

}
public class HelloServiceImpl implements HelloService{

    public String sayHello(String name) {

        System.out.println("基于CXF开发的服务端sayHello方法被调用了。。。。");

        return "hello " + name;

    }

}
第六步:注册服务
<?xml version="1.0" encoding="UTF-8"?>

<beans xmlns="http://www.springframework.org/schema/beans"

xmlns:xsi="http://www.w3.org/2001/XMLSchema-instance"

xmlns:jaxws="http://cxf.apache.org/jaxws"

xmlns:soap="http://cxf.apache.org/bindings/soap"

xsi:schemaLocation="http://www.springframework.org/schema/beans

                    http://www.springframework.org/schema/beans/spring-beans.xsd

                    http://cxf.apache.org/bindings/soap

                    http://cxf.apache.org/schemas/configuration/soap.xsd

                    http://cxf.apache.org/jaxws

                    http://cxf.apache.org/schemas/jaxws.xsd">

    <!-- 引入CXF Bean定义如下,早期的版本中使用 -->

    <import resource="classpath:META-INF/cxf/cxf.xml" />

    <import resource="classpath:META-INF/cxf/cxf-extension-soap.xml" />

    <import resource="classpath:META-INF/cxf/cxf-servlet.xml" />

    <bean id="helloService" class="com.itheima.service.HelloServiceImpl"/>

    <!-- 注册服务 -->

    <jaxws:server id="myService" address="/cxfService">

        <jaxws:serviceBean>

            <ref bean="helloService"/>

        </jaxws:serviceBean>

    </jaxws:server>

</beans>
入门案例(客户端)
方式一:使用jdk提供的wsimport命令生成本地代码完成调用
方式二:使用CXF提供的方式
第一步:创建Java项目并导入CXF相关jar包

第二步:使用wsimport或者CXF提供wsdl2java生成本地代码,只需要生成接口文件

第三步:将接口文件复制到项目中

第四步:提供spring配置文件,注册客户端代理对象
<?xml version="1.0" encoding="UTF-8"?>

<beans xmlns="http://www.springframework.org/schema/beans"

xmlns:xsi="http://www.w3.org/2001/XMLSchema-instance"

xmlns:jaxws="http://cxf.apache.org/jaxws"

xmlns:soap="http://cxf.apache.org/bindings/soap"

xsi:schemaLocation="http://www.springframework.org/schema/beans

                    http://www.springframework.org/schema/beans/spring-beans.xsd

                    http://cxf.apache.org/bindings/soap

                    http://cxf.apache.org/schemas/configuration/soap.xsd

                    http://cxf.apache.org/jaxws

                    http://cxf.apache.org/schemas/jaxws.xsd">

    <!-- 引入CXF Bean定义如下,早期的版本中使用 -->

    <import resource="classpath:META-INF/cxf/cxf.xml" />

    <import resource="classpath:META-INF/cxf/cxf-extension-soap.xml" />

    <import resource="classpath:META-INF/cxf/cxf-servlet.xml" />

    <!-- 注册CXF客户端代理对象,通过spring框架创建这个代理对象,使用代理对象实现远程调用 -->

    <jaxws:client id="myClient"

                address="http://192.168.115.87:8080/cxf_service/service/cxfService"

                serviceClass="cn.itcast.client.HelloService">

    </jaxws:client>

</beans>
第五步:读取spring配置文件,创建spring工厂,从工厂中获取代理对象,实现远程调用
import org.springframework.context.ApplicationContext;

import org.springframework.context.support.ClassPathXmlApplicationContext;

public class App {

    public static void main(String[] args) {

        ApplicationContext ctx = new ClassPathXmlApplicationContext("cxf.xml");

        HelloService proxy = (HelloService) ctx.getBean("myClient");

        String ret = proxy.sayHello("test");

        System.out.println(ret);

    }

}
apache CXF Service 简单使用的更多相关文章
- Apache CXF实现Web Service(1)——不借助重量级Web容器和Spring实现一个纯的JAX-WS web service
废话少说,先在Eclipse中新建一个Java Project (可以不是WTP的Dynamic Web Project) 选择Java Project 再看pom.xml 我们使用cxf 3.1.4 ...
- Apache CXF实现Web Service(4)——Tomcat容器和Spring实现JAX-RS(RESTful) web service
准备 我们仍然使用 Apache CXF实现Web Service(2)——不借助重量级Web容器和Spring实现一个纯的JAX-RS(RESTful) web service 中的代码作为基础,并 ...
- Apache CXF 103 CXF Basics - partial
本Spike记录中内容,如无特别指出,均引用[1]. 0 引言 0.1 基本的Web服务术语 XML 业界的结构化交换信息表示的事实上的标准. XML namespace是在XML文档中提供唯一的命名 ...
- Spring 4 集成Apache CXF开发JAX-RS Web Service
什么是JAX-RS 在JSR-311规范中定义,即Java API for RESTful Web Services,一套Java API,用于开发 RESTful风格的Webservice. 工程概 ...
- Web Service与Apache CXF 框架
一.WebService简介 为了支持跨网络的机器间相互操作交互而设计,用于开发分布式的互操作的应用程序组件. Web Service服务通常被定义为一组模块化的API,它们可以通过网络进行调用,来执 ...
- Apache CXF实现Web Service(5)—— GZIP使用
Apache CXF实现Web Service(5)-- GZIP使用 参考来源: CXF WebService整合Spring Apache CXF实现Web Service(1)--不借助重量级W ...
- Apache CXF实现Web Service(3)——Tomcat容器和不借助Spring的普通Servlet实现JAX-RS(RESTful) web service
起步 参照这一系列的另外一篇文章: Apache CXF实现Web Service(2)——不借助重量级Web容器和Spring实现一个纯的JAX-RS(RESTful) web service 首先 ...
- Apache CXF实现Web Service(2)——不借助重量级Web容器和Spring实现一个纯的JAX-RS(RESTful) web service
实现目标 http://localhost:9000/rs/roomservice 为入口, http://localhost:9000/rs/roomservice/room为房间列表, http: ...
- 使用Apache CXF和Spring集成创建Web Service(zz)
使用Apache CXF和Spring集成创建Web Service 您的评价: 还行 收藏该经验 1.创建HelloWorld 接口类 查看源码 打印? 1 package ...
随机推荐
- SQLite的使用(包括编译安装的步骤)
SQLite官网http://www.sqlite.org/ SQLite简介 SQLite是一款轻型的数据库,是遵守ACID(原子性.一致性.隔离性和持久性)的关系式数据库管理系统.SQLite实现 ...
- 什么水平算精通C++ Builder?
主 题: 大家讨论一下什么水平算精通C++ Builder?(我这样算什么,马上要毕业了,不知道如何评价自己) //C++ builder 使用时间3年 熟悉VCL源代码 开发过3 ...
- c# 获取cook
using System; using System.Collections.Generic; using System.Linq; using System.Runtime.InteropServi ...
- JavaScript语言核心--词法结构
编程语言的词法结构是一套基础性规则,用来描述如何使用这门语言来编写程序.作为语法的基础,它规定了诸如变量名是什么样的.怎么写注释,以及程序语言之间如何分隔等规则. 1. 字符集 JavaScript程 ...
- Realm_King 之 .NET 打包详细教程(A)
最近一直在winform程序开发,听说身边的人不是很了解打包,给大家提供一点简单的打包,相信能看懂的... (一)右键解决方案: 在弹出"添加新项目"窗体中找到 其他项目类型=& ...
- 星星的模块封装类 IDSStarsScoreView
1 IDSStarsScoreView 的实现效果 2 类的封装方法: <声明文件> // // IDSStarsScoreView.h // Near // // ...
- 伪元素黑魔法:一个替代onerror解决图片加载失败的方案
问题的引出是这样的,在一个项目中有大量的页面主体是table做数据展示,所以就封装了一个table的组件,提供动态渲染的方案.有个问题是数据类型中有图片,对于图片的加载失败我们需要做容错.一般我们的思 ...
- Tido c++树状数组知识讲解(转载)
树状数组可以用来动态计算前缀和,可以随时进行更新 而普通的前缀和只是静态的
- 学习过程中遇到的python内置函数,后续遇到会继续补充进去
1.python内置函数isinstance(数字,数字类型),判断一个数字的数字类型(int,float,comple).是,返回True,否,返回False2.python内置函数id()可以查看 ...
- 高并发 Nginx+Lua OpenResty系列(1)——环境搭建
OpenResty是一款基于Nginx的高性能负载均衡服务器容器,简单来说是Nginx+Lua.结合了Lua语言来对Nginx进行扩展,使得在Nginx上具有web容器功能. OpenResty运行环 ...