Android 点九图机制讲解及在聊天气泡中的应用
点九图简介
Android为了使用同一张图作为不同数量文字的背景,设计了一种可以指定区域拉伸的图片格式“.9.png”,这种图片格式就是点九图。
注意:这种图片格式只能被使用于Android开发。在ios开发中,可以在代码中指定某个点进行拉伸,而在Android中不行,所以在Android中想要达到这个效果,只能使用点九图(下文会啪啪打脸,其实是可以的,只是很少人这样使用,兼容性不知道怎么样,点击跳转)

点九图实质
点九图的本质实际上是在图片的四周各增加了1px的像素,并使用纯黑(#FF000000)的线进行标记,其它的与原图没有任何区别。可以参考以下图片:
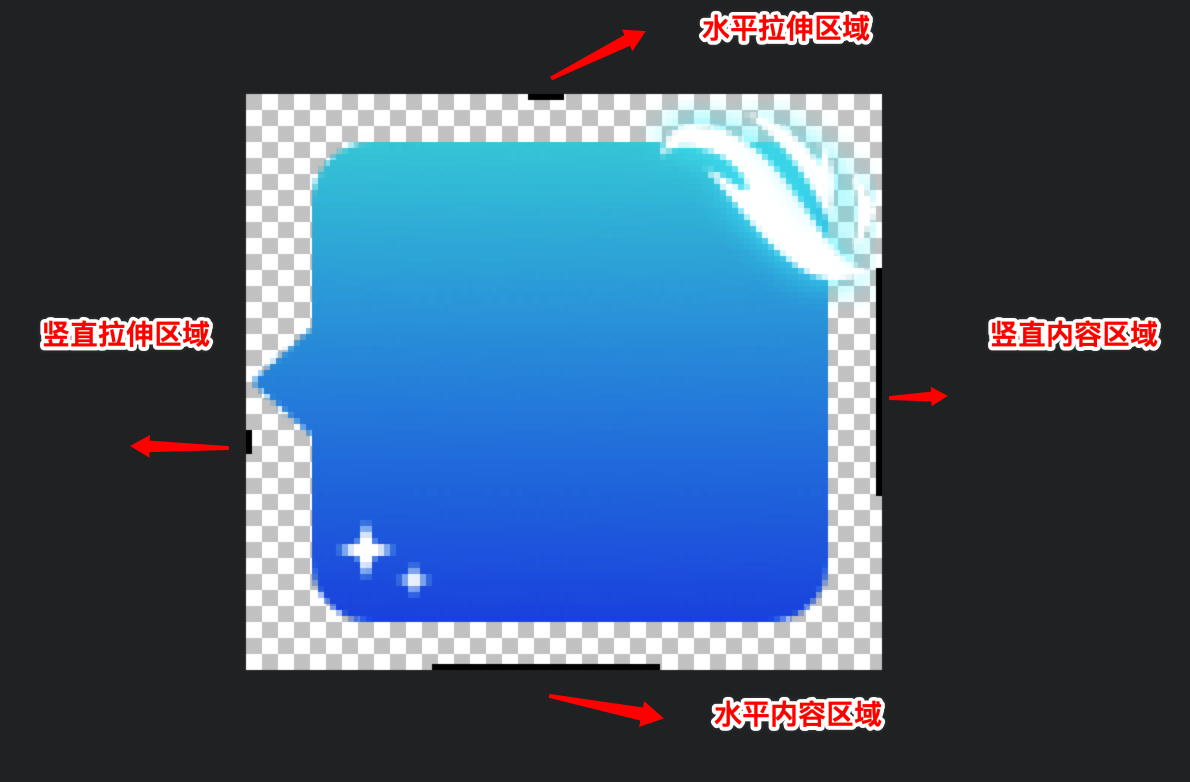
| 标记位置 | 含义 |
|---|---|
| 左-黑点 | 纵向拉伸区域 |
| 上-黑点 | 横向拉伸区域 |
| 右-黑线 | 纵向显示区域 |
| 下-黑线 | 横向显示区域 |
点九图在 Android 中的应用
点九图在 Android 中主要有三种应用方式
- 直接放在 res 目录中的 drawable 或者 mipmap 目录中
- 放在 assert 目录中
- 从网络下载
第一种方式是我们最常用的,直接调用 setBackgroundResource 或者 setImageResource 方法,这样的话图片及可以做到自动拉伸。
而对于第二种或者第三种方式,如果我们直接去加载 .9.png,你会发现图片或者图片背景根本无法拉伸。纳尼,这是为甚么呢。下面,且听老衲慢慢道来。
Android 并不是直接使用点九图,而是在编译时将其转换为另外一种格式,这种格式是将其四周的黑色像素保存至Bitmap类中的一个名为 mNinePatchChunk 的 byte[] 中,并抹除掉四周的这一个像素的宽度;接着在使用时,如果 Bitmap 的这个 mNinePatchChunk 不为空,且为 9patch chunk,则将其构造为 NinePatchDrawable,否则将会被构造为 BitmapDrawable,最终设置给 view。
因此,在 Android 中,我们如果想动态使用网络下载的点九图,一般需要经过以下步骤:
- 使用 sdk 目录下的 aapt 工具将点九图转化为 png 图片
- 解析图片的时候,判断是否含有 NinePatchChunk,有的话,转化为 NinePatchDrawable
public static void setNineImagePatch(View view, File file, String url) {

    if (file.exists()) {

        Bitmap bitmap = BitmapFactory.decodeFile(file.getAbsolutePath());

        byte[] chunk = bitmap.getNinePatchChunk();

        if (NinePatch.isNinePatchChunk(chunk)) {

            NinePatchDrawable patchy = new NinePatchDrawable(view.getResources(), bitmap, chunk, new Rect(), null);

            view.setBackground(patchy);

        }

    }

}
点九图上传服务器流程

aapt 转换命令
单个图片文件转换
./aapt s -i xxx.9.png -o xxx.png
批量转换
# 批量转换

./aapt c -S inputDir -C outputDir

# inputDir 为原始.9图文件夹,outputDir 为输出文件夹
执行成功实例
jundeMacBook-Pro:一期气泡 junxu$ ./aapt c -S /Users/junxu/Desktop/一期气泡/气泡需求整理 -C /Users/junxu/Desktop/一期气泡/output

Crunching PNG Files in source dir: /Users/junxu/Desktop/一期气泡/气泡需求整理

To destination dir: /Users/junxu/Desktop/一期气泡/output
注意:
若不是标准的点九图,在转换的过程会报错,这时候请设计重新提供新的点九图
实际开发当中遇到的问题
小屏手机适配问题
刚开始,我们的切图是按照 2 倍图切的,这样在小屏幕手机上会手机气泡高度过大的问题。

原因分析:
该现象的本质是点九图图片的高度大于单行文本消息的高度。
解决方案一(暂时不可取):
- 我尝试去压缩点九图,但最终再部分手机上面显示错乱,不知道是不是压缩点九图的方法错了。
解决方案二
对于低分辨率的手机和高分辨的手机分别下发不同的图片 url,我们尝试过得方案是当 density < 2 的时候,采用一倍图图片,density >= 2 采用二倍图图片。
解决方案三
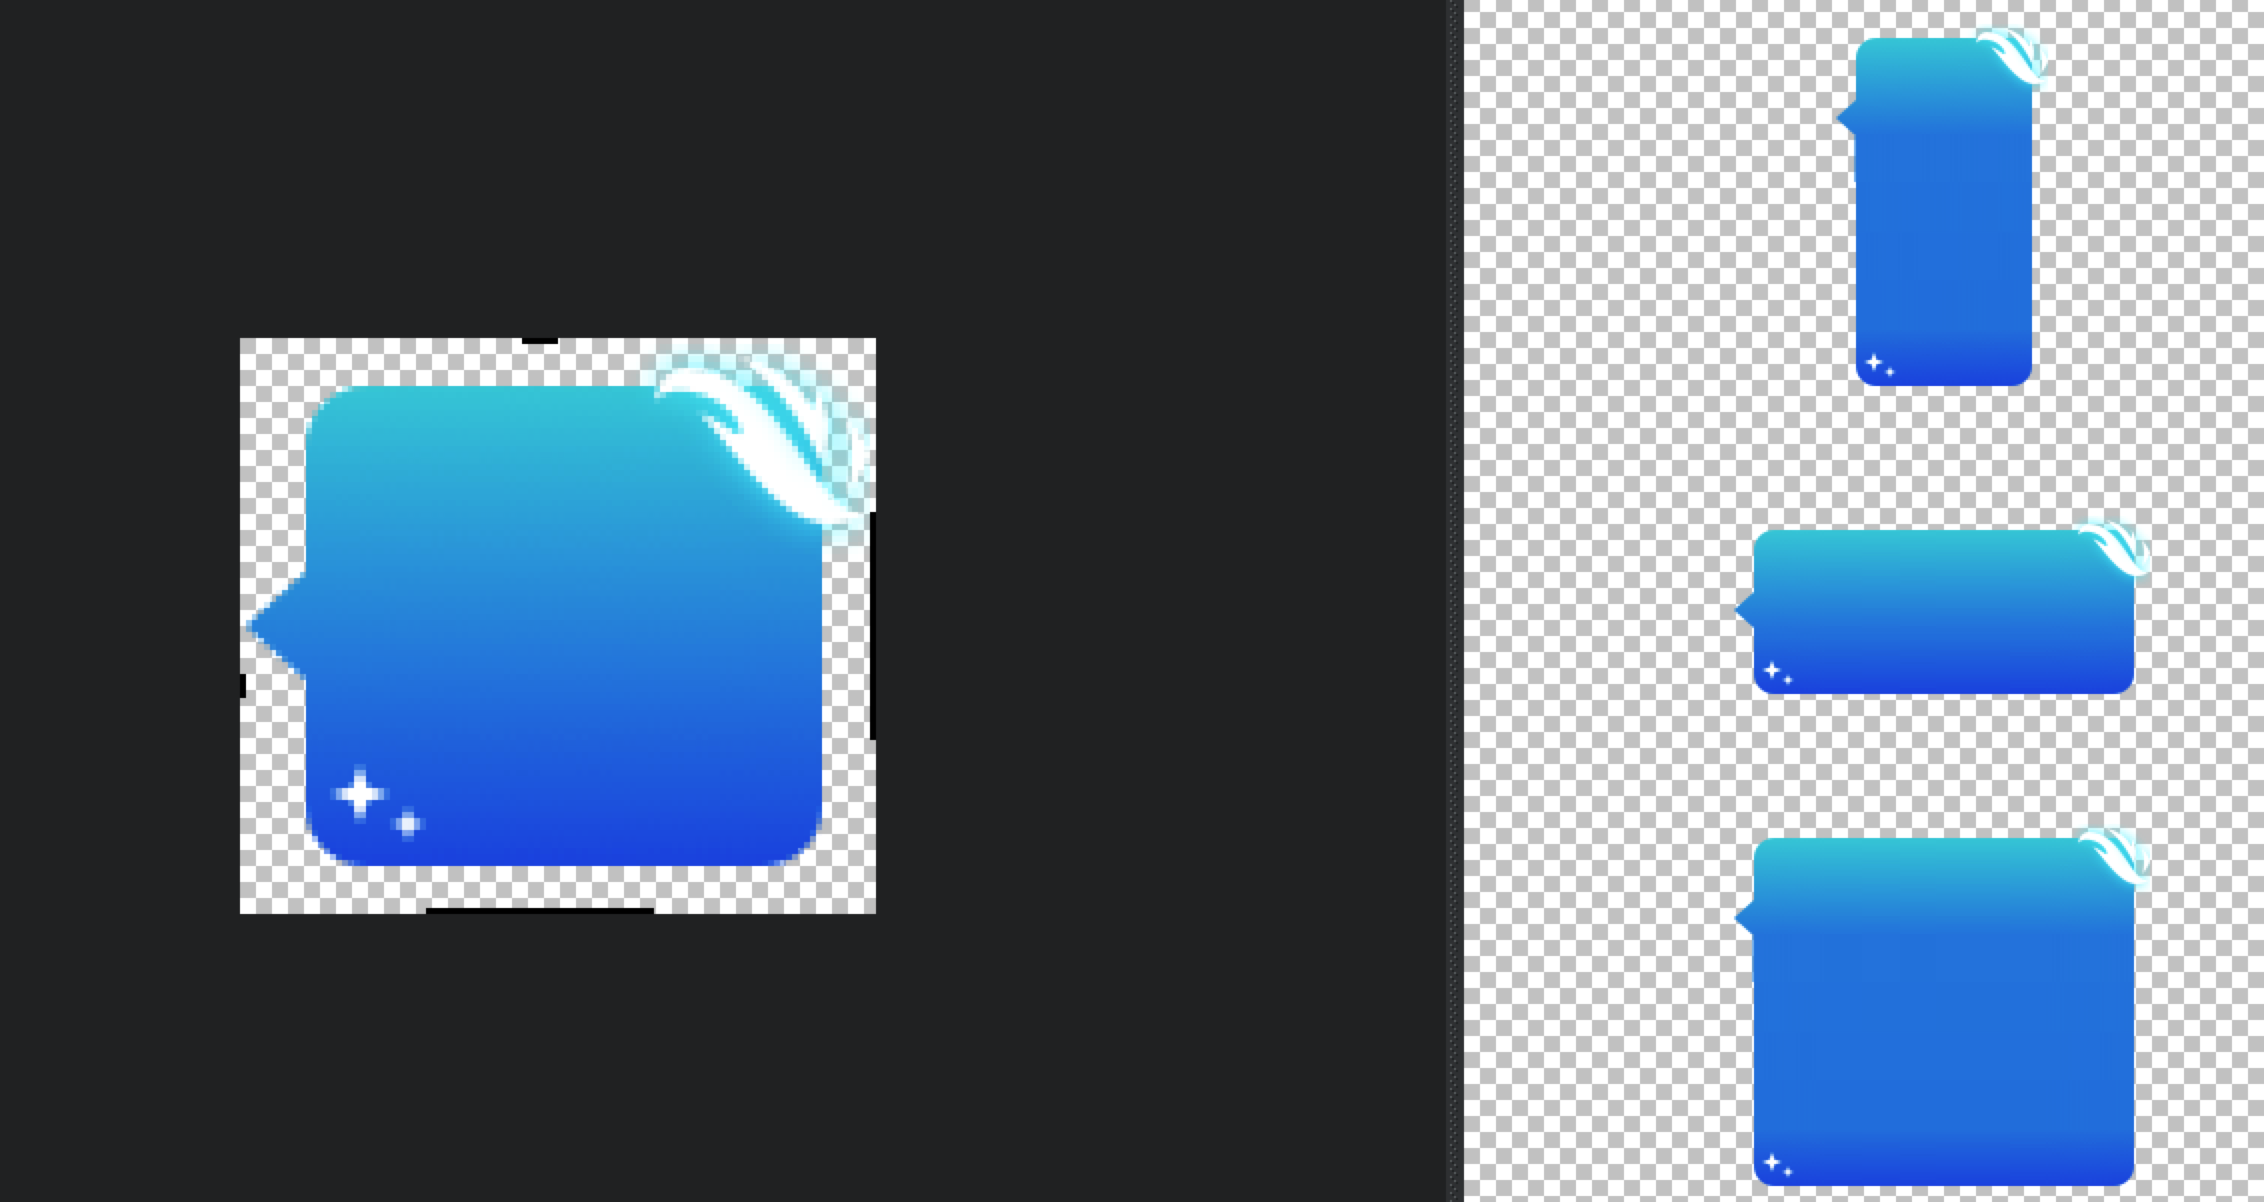
可能有人会有这样的疑问呢,为什么要采用一倍图,两倍图的解决方案呢?直接让 UI 设计师给一套图,点九图图片的高度适中不就解决了。是啊,我们也是这样想得,但他们说对于有一些装饰的点九图,如果缩小高度,一些装饰图案他们不太好切。比如下面图片中的星星。
小结
说到底,方案二,方案三其实都是折中的一种方案,如果直接能够做到点九图缩放,那就完美解决了。而 Android 中 res 目录中的 drawable 或者 mipmap 的点九图确实能做到,去看了相关的代码,目前也没有发现什么好的解决方案,如果你有好的解决方案话,欢迎留言交流。
点九图的 padding 在部分手机上面失效
这个是部分 Android 手机的 bug,解决方法见:https://stackoverflow.com/questions/11065996/ninepatchdrawable-does-not-get-padding-from-chunk
public class NinePatchChunk {

    private static final String TAG = "NinePatchChunk";

    public final Rect mPaddings = new Rect();

    public int mDivX[];

    public int mDivY[];

    public int mColor[];

    private static float density = IMO.getInstance().getResources().getDisplayMetrics().density;

    private static void readIntArray(final int[] data, final ByteBuffer buffer) {

        for (int i = 0, n = data.length; i < n; ++i)

            data[i] = buffer.getInt();

    }

    private static void checkDivCount(final int length) {

        if (length == 0 || (length & 0x01) != 0)

            throw new IllegalStateException("invalid nine-patch: " + length);

    }

    public static Rect getPaddingRect(final byte[] data) {

        NinePatchChunk deserialize = deserialize(data);

        if (deserialize == null) {

            return new Rect();

        }

    }

    public static NinePatchChunk deserialize(final byte[] data) {

        final ByteBuffer byteBuffer =

                ByteBuffer.wrap(data).order(ByteOrder.nativeOrder());

        if (byteBuffer.get() == 0) {

            return null; // is not serialized

        }

        final NinePatchChunk chunk = new NinePatchChunk();

        chunk.mDivX = new int[byteBuffer.get()];

        chunk.mDivY = new int[byteBuffer.get()];

        chunk.mColor = new int[byteBuffer.get()];

        try {

            checkDivCount(chunk.mDivX.length);

            checkDivCount(chunk.mDivY.length);

        } catch (Exception e) {

            return null;

        }

        // skip 8 bytes

        byteBuffer.getInt();

        byteBuffer.getInt();

        chunk.mPaddings.left = byteBuffer.getInt();

        chunk.mPaddings.right = byteBuffer.getInt();

        chunk.mPaddings.top = byteBuffer.getInt();

        chunk.mPaddings.bottom = byteBuffer.getInt();

        // skip 4 bytes

        byteBuffer.getInt();

        readIntArray(chunk.mDivX, byteBuffer);

        readIntArray(chunk.mDivY, byteBuffer);

        readIntArray(chunk.mColor, byteBuffer);

        return chunk;

    }

}

NinePatchDrawable patchy = new NinePatchDrawable(view.getResources(), bitmap, chunk, NinePatchChunk.getPaddingRect(chunk), null);

view.setBackground(patchy);
动态下载点九图会导致聊天气泡闪烁
- 这里我们采取的方案是预下载(预下载 10 个)
- 聊天气泡采用内存缓存,磁盘缓存,确保 RecyclerView 快速滑动的时候不会闪烁
理解点九图
以下内容参考腾讯音乐的 Android动态布局入门及NinePatchChunk解密
回顾NinePatchDrawable的构造方法第三个参数bitmap.getNinePatchChunk(),作者猜想,aapt命令其实就是在bitmap图片中,加入了NinePatchChunk的信息,那么我们是不是只要能自己构造出这个东西,就可以让任何图片按照我们想要的方式拉升了呢?
可是查了一堆官方文档,似乎并找不到相应的方法来获得这个byte[]类型的chunk参数。
既然无法知道这个chunk如何生成,那么能不能从解析的角度逆向得出这个NinePatchChunk的生成方法呢?
下面就需要从源码入手了。
NinePatchChunk.java
public static NinePatchChunk deserialize(byte[] data) {

    ByteBuffer byteBuffer =

            ByteBuffer.wrap(data).order(ByteOrder.nativeOrder());

    byte wasSerialized = byteBuffer.get();

    if (wasSerialized == 0) return null;

    NinePatchChunk chunk = new NinePatchChunk();

    chunk.mDivX = new int[byteBuffer.get()];

    chunk.mDivY = new int[byteBuffer.get()];

    chunk.mColor = new int[byteBuffer.get()];

    checkDivCount(chunk.mDivX.length);

    checkDivCount(chunk.mDivY.length);

    // skip 8 bytes

    byteBuffer.getInt();

    byteBuffer.getInt();

    chunk.mPaddings.left = byteBuffer.getInt();

    chunk.mPaddings.right = byteBuffer.getInt();

    chunk.mPaddings.top = byteBuffer.getInt();

    chunk.mPaddings.bottom = byteBuffer.getInt();

    // skip 4 bytes

    byteBuffer.getInt();

    readIntArray(chunk.mDivX, byteBuffer);

    readIntArray(chunk.mDivY, byteBuffer);

    readIntArray(chunk.mColor, byteBuffer);

    return chunk;

}
其实从这部分解析byte[] chunk的源码,我们已经可以反推出来大概的结构了。如下图,
按照上图中的猜想以及对.9.png的认识,直觉感受到,mDivX,mDivY,mColor这三个数组是最关键的,但是具体是什么,就要继续看源码了。
ResourceTypes.h
/**

 * This chunk specifies how to split an image into segments for

 * scaling.

 *

 * There are J horizontal and K vertical segments.  These segments divide

 * the image into J*K regions as follows (where J=4 and K=3):

 *

 *      F0   S0    F1     S1

 *   +-----+----+------+-------+

 * S2|  0  |  1 |  2   |   3   |

 *   +-----+----+------+-------+

 *   |     |    |      |       |

 *   |     |    |      |       |

 * F2|  4  |  5 |  6   |   7   |

 *   |     |    |      |       |

 *   |     |    |      |       |

 *   +-----+----+------+-------+

 * S3|  8  |  9 |  10  |   11  |

 *   +-----+----+------+-------+

 *

 * Each horizontal and vertical segment is considered to by either

 * stretchable (marked by the Sx labels) or fixed (marked by the Fy

 * labels), in the horizontal or vertical axis, respectively. In the

 * above example, the first is horizontal segment (F0) is fixed, the

 * next is stretchable and then they continue to alternate. Note that

 * the segment list for each axis can begin or end with a stretchable

 * or fixed segment.

 * /
正如源码中,注释的一样,这个NinePatch Chunk把图片从x轴和y轴分成若干个区域,F区域代表了固定,S区域代表了拉伸。mDivX,mDivY描述了所有S区域的位置起始,而mColor描述了,各个Segment的颜色,通常情况下,赋值为源码中定义的NO_COLOR = 0x00000001就行了。就以源码注释中的例子来说,mDivX,mDivY,mColor如下:
mDivX = [ S0.start, S0.end, S1.start, S1.end];

mDivY = [ S2.start, S2.end, S3.start, S3.end];

mColor = [c[0],c[1],...,c[11]]
对于mColor这个数组,长度等于划分的区域数,是用来描述各个区域的颜色的,而如果我们这个只是描述了一个bitmap的拉伸方式的话,是不需要颜色的,即源码中NO_COLOR = 0x00000001
说了这么多,我们还是通过一个简单例子来说明如何构造一个按中心点拉伸的 NinePatchDrawable 吧,
Bitmap bitmap = BitmapFactory.decodeFile(filepath);

int[] xRegions = new int[]{bitmap.getWidth() / 2, bitmap.getWidth() / 2 + 1};

int[] yRegions = new int[]{bitmap.getWidth() / 2, bitmap.getWidth() / 2 + 1};

int NO_COLOR = 0x00000001;

int colorSize = 9;

int bufferSize = xRegions.length * 4 + yRegions.length * 4 + colorSize * 4 + 32;

ByteBuffer byteBuffer = ByteBuffer.allocate(bufferSize).order(ByteOrder.nativeOrder());

// 第一个byte,要不等于0

byteBuffer.put((byte) 1);

//mDivX length

byteBuffer.put((byte) 2);

//mDivY length

byteBuffer.put((byte) 2);

//mColors length

byteBuffer.put((byte) colorSize);

//skip

byteBuffer.putInt(0);

byteBuffer.putInt(0);

//padding 先设为0

byteBuffer.putInt(0);

byteBuffer.putInt(0);

byteBuffer.putInt(0);

byteBuffer.putInt(0);

//skip

byteBuffer.putInt(0);

// mDivX

byteBuffer.putInt(xRegions[0]);

byteBuffer.putInt(xRegions[1]);

// mDivY

byteBuffer.putInt(yRegions[0]);

byteBuffer.putInt(yRegions[1]);

// mColors

for (int i = 0; i < colorSize; i++) {

    byteBuffer.putInt(NO_COLOR);

}

return byteBuffer.array();
create-a-ninepatch-ninepatchdrawable-in-runtime
在 stackoverflow 上面也找到牛逼的类,可以动态创建点九图,并拉伸图片,啪啪打脸,刚开始说到 android 中无法想 ios 一样动态指定图片拉伸区域。
public class NinePatchBuilder {

    int width, height;

    Bitmap bitmap;

    Resources resources;

    private ArrayList<Integer> xRegions = new ArrayList<Integer>();

    private ArrayList<Integer> yRegions = new ArrayList<Integer>();

    public NinePatchBuilder(Resources resources, Bitmap bitmap) {

        width = bitmap.getWidth();

        height = bitmap.getHeight();

        this.bitmap = bitmap;

        this.resources = resources;

    }

    public NinePatchBuilder(int width, int height) {

        this.width = width;

        this.height = height;

    }

    public NinePatchBuilder addXRegion(int x, int width) {

        xRegions.add(x);

        xRegions.add(x + width);

        return this;

    }

    public NinePatchBuilder addXRegionPoints(int x1, int x2) {

        xRegions.add(x1);

        xRegions.add(x2);

        return this;

    }

    public NinePatchBuilder addXRegion(float xPercent, float widthPercent) {

        int xtmp = (int) (xPercent * this.width);

        xRegions.add(xtmp);

        xRegions.add(xtmp + (int) (widthPercent * this.width));

        return this;

    }

    public NinePatchBuilder addXRegionPoints(float x1Percent, float x2Percent) {

        xRegions.add((int) (x1Percent * this.width));

        xRegions.add((int) (x2Percent * this.width));

        return this;

    }

    public NinePatchBuilder addXCenteredRegion(int width) {

        int x = (int) ((this.width - width) / 2);

        xRegions.add(x);

        xRegions.add(x + width);

        return this;

    }

    public NinePatchBuilder addXCenteredRegion(float widthPercent) {

        int width = (int) (widthPercent * this.width);

        int x = (int) ((this.width - width) / 2);

        xRegions.add(x);

        xRegions.add(x + width);

        return this;

    }

    public NinePatchBuilder addYRegion(int y, int height) {

        yRegions.add(y);

        yRegions.add(y + height);

        return this;

    }

    public NinePatchBuilder addYRegionPoints(int y1, int y2) {

        yRegions.add(y1);

        yRegions.add(y2);

        return this;

    }

    public NinePatchBuilder addYRegion(float yPercent, float heightPercent) {

        int ytmp = (int) (yPercent * this.height);

        yRegions.add(ytmp);

        yRegions.add(ytmp + (int) (heightPercent * this.height));

        return this;

    }

    public NinePatchBuilder addYRegionPoints(float y1Percent, float y2Percent) {

        yRegions.add((int) (y1Percent * this.height));

        yRegions.add((int) (y2Percent * this.height));

        return this;

    }

    public NinePatchBuilder addYCenteredRegion(int height) {

        int y = (int) ((this.height - height) / 2);

        yRegions.add(y);

        yRegions.add(y + height);

        return this;

    }

    public NinePatchBuilder addYCenteredRegion(float heightPercent) {

        int height = (int) (heightPercent * this.height);

        int y = (int) ((this.height - height) / 2);

        yRegions.add(y);

        yRegions.add(y + height);

        return this;

    }

    public byte[] buildChunk() {

        if (xRegions.size() == 0) {

            xRegions.add(0);

            xRegions.add(width);

        }

        if (yRegions.size() == 0) {

            yRegions.add(0);

            yRegions.add(height);

        }

        int NO_COLOR = 1;//0x00000001;

        int COLOR_SIZE = 9;//could change, may be 2 or 6 or 15 - but has no effect on output

        int arraySize = 1 + 2 + 4 + 1 + xRegions.size() + yRegions.size() + COLOR_SIZE;

        ByteBuffer byteBuffer = ByteBuffer.allocate(arraySize * 4).order(ByteOrder.nativeOrder());

        byteBuffer.put((byte) 1);//was translated

        byteBuffer.put((byte) xRegions.size());//divisions x

        byteBuffer.put((byte) yRegions.size());//divisions y

        byteBuffer.put((byte) COLOR_SIZE);//color size

        //skip

        byteBuffer.putInt(0);

        byteBuffer.putInt(0);

        //padding -- always 0 -- left right top bottom

        byteBuffer.putInt(0);

        byteBuffer.putInt(0);

        byteBuffer.putInt(0);

        byteBuffer.putInt(0);

        //skip

        byteBuffer.putInt(0);

        for (int rx : xRegions)

            byteBuffer.putInt(rx); // regions left right left right ...

        for (int ry : yRegions)

            byteBuffer.putInt(ry);// regions top bottom top bottom ...

        for (int i = 0; i < COLOR_SIZE; i++)

            byteBuffer.putInt(NO_COLOR);

        return byteBuffer.array();

    }

    public NinePatch buildNinePatch() {

        byte[] chunk = buildChunk();

        if (bitmap != null)

            return new NinePatch(bitmap, chunk, null);

        return null;

    }

    public NinePatchDrawable build() {

        NinePatch ninePatch = buildNinePatch();

        if (ninePatch != null)

            return new NinePatchDrawable(resources, ninePatch);

        return null;

    }

}
运行一下测试代码
mLlRoot = findViewById(R.id.ll_root);

try {

    InputStream is = getAssets().open("sea.png");

    Bitmap bitmap = BitmapFactory.decodeStream(is);

    for (int i = 0; i < 5; i++) {

        NinePatchDrawable ninePatchDrawable = NinePatchHelper.buildMulti(this, bitmap);

        TextView textView = new TextView(this);

        textView.setTextSize(25);

        textView.setPadding(20, 10, 20, 10);

        textView.setText(strArray[i]);

        textView.setGravity(Gravity.CENTER_VERTICAL);

        LinearLayout.LayoutParams layoutParams = new LinearLayout.LayoutParams(LinearLayout.LayoutParams.WRAP_CONTENT, LinearLayout.LayoutParams.WRAP_CONTENT);

        layoutParams.leftMargin = 20;

        layoutParams.rightMargin = 20;

        textView.setLayoutParams(layoutParams);

        if (Build.VERSION.SDK_INT >= Build.VERSION_CODES.JELLY_BEAN) {

            textView.setBackground(ninePatchDrawable);

        }

        mLlRoot.addView(textView);

    }

} catch (IOException e) {

    e.printStackTrace();

}
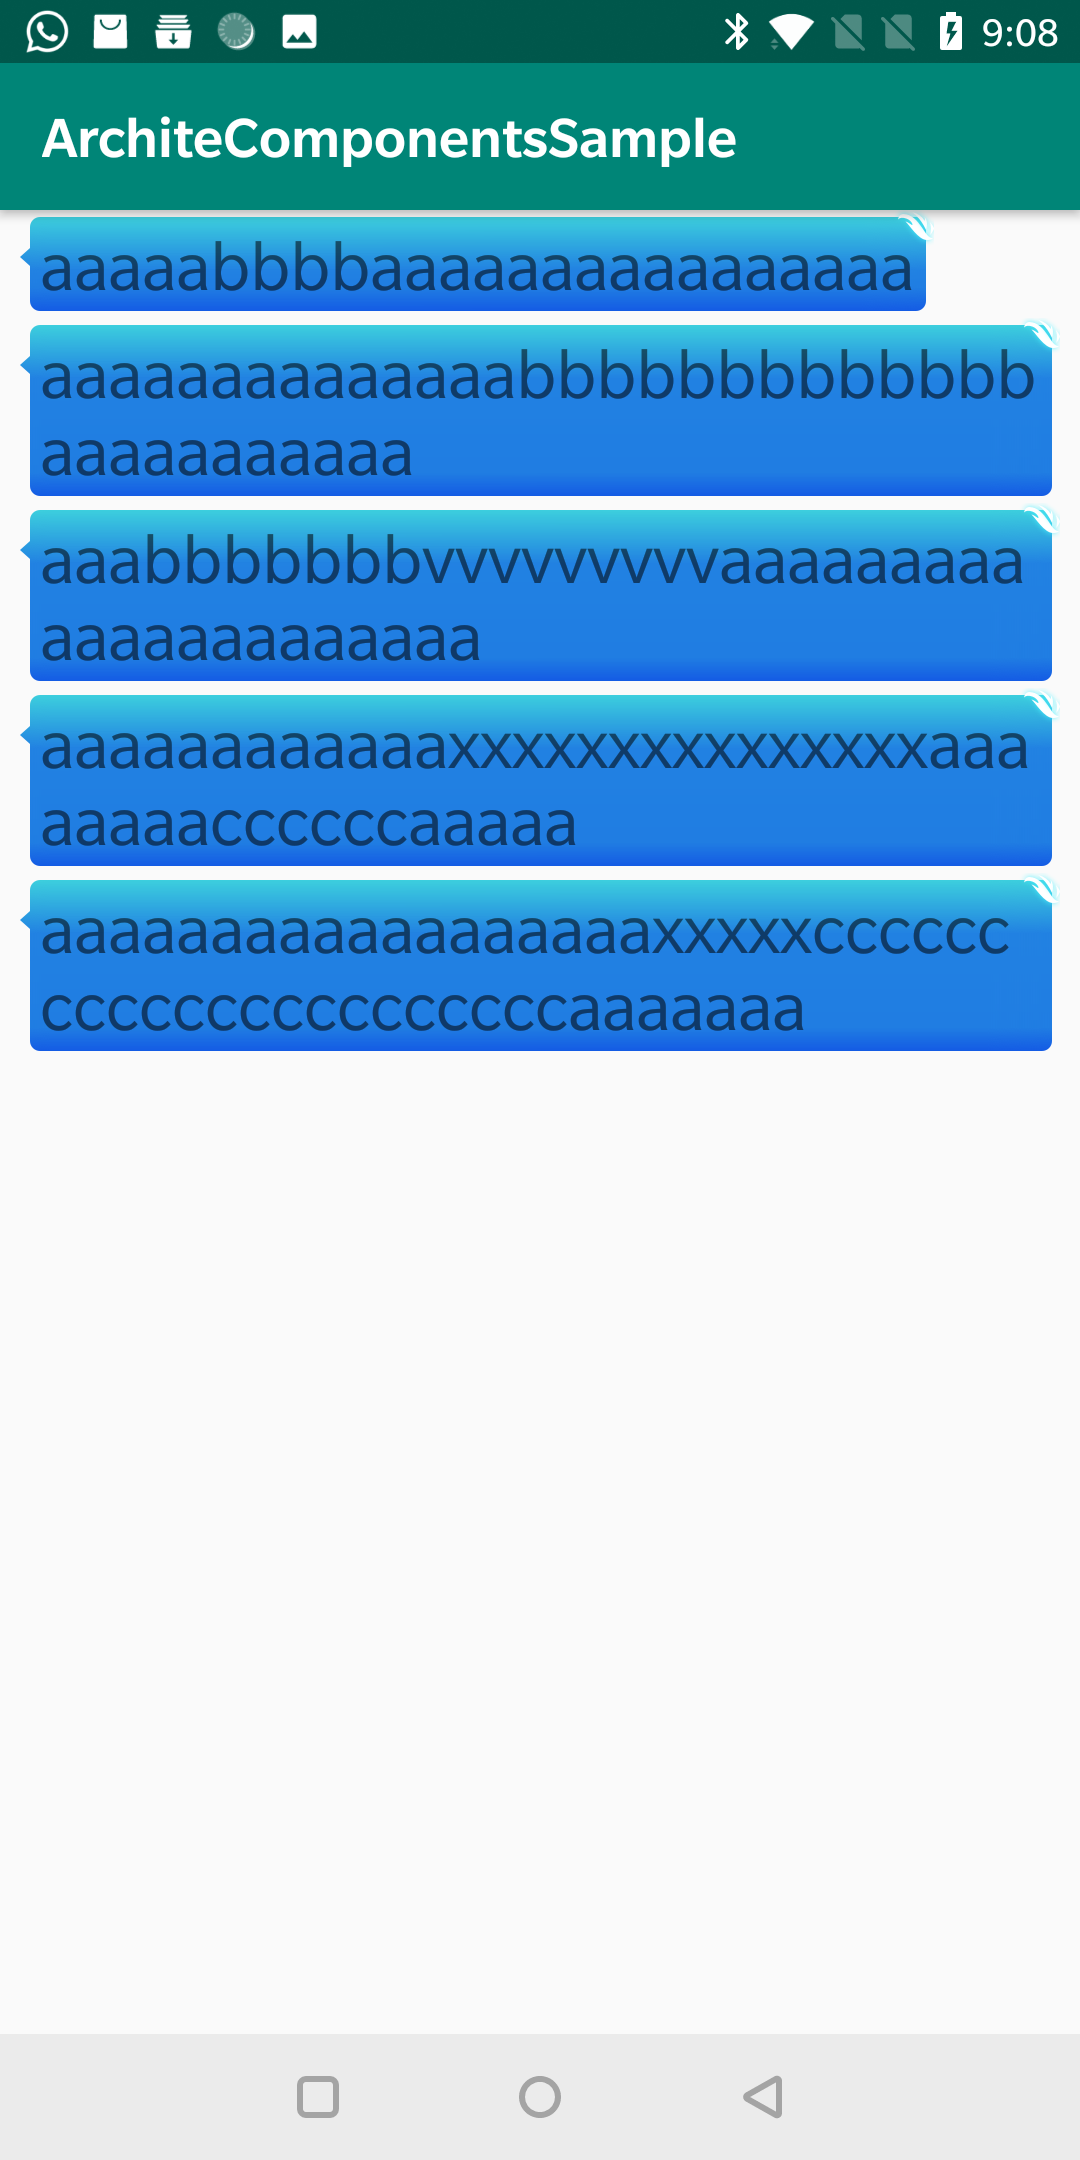
可以看到,我们的图片完美拉伸
参考文章
- https://cloud.tencent.com/developer/article/1168755?
- https://mp.weixin.qq.com/s?__biz=MzI1NjEwMTM4OA==&mid=2651232105&idx=1&sn=fcc4fa956f329f839f2a04793e7dd3b9&mpshare=1&scene=21&srcid=0719Nyt7J8hsr4iYwOjVPXQE#wechat_redirect
推荐阅读
Rxjava 2.x 源码系列 - 变换操作符 Map(上)
java 源码系列 - 带你读懂 Reference 和 ReferenceQueue
扫一扫,欢迎关注我的微信公众号 stormjun94(徐公码字), 目前是一名程序员,不仅分享 Android开发相关知识,同时还分享技术人成长历程,包括个人总结,职场经验,面试经验等,希望能让你少走一点弯路。

Android 点九图机制讲解及在聊天气泡中的应用的更多相关文章
- Android Touch事件传递机制通俗讲解
在讲正题之前我们讲一段有关任务传递的小故事,抛砖迎玉下: 话说一家软件公司,来一个任务,分派给了开发经理去完成: 开发经理拿到,看了一下,感觉好简单,于是 开发经理:分派给了开发组长 开发组长:分派给 ...
- 网络编程懒人入门(九):通俗讲解,有了IP地址,为何还要用MAC地址?
1.前言 标题虽然是为了解释有了 IP 地址,为什么还要用 MAC 地址,但是本文的重点在于理解为什么要有 IP 这样的东西.本文对读者的定位是知道 MAC 地址是什么,IP 地址是什么. (本文同步 ...
- Android Touch事件传递机制 二:单纯的(伪生命周期)
转载于:http://blog.csdn.net/yuanzeyao/article/details/38025165 在前一篇文章中,我主要讲解了Android源码中的Touch事件的传递过程,现在 ...
- Android touch 事件传递机制
前言: (1)在自定义view的时候经常会遇到事件拦截处理,比如在侧滑菜单的时候,我们希望在侧滑菜单里面有listview控件,但是我们希望既能左右滑动又能上下滑动,这个时候就需要对触摸的touch事 ...
- Android群英传笔记——第九章:Android系统信息和安全机制
Android群英传笔记--第九章:Android系统信息和安全机制 本书也正式的进入尾声了,在android的世界了,不同的软件,硬件信息就像一个国家的经济水平,军事水平,不同的配置参数,代表着一个 ...
- Android Touch事件传递机制 二:单纯的(伪生命周期) 这个清楚一点
转载于:http://blog.csdn.net/yuanzeyao/article/details/38025165 在前一篇文章中,我主要讲解了Android源码中的Touch事件的传递过程,现在 ...
- Android Touch事件传递机制详解 下
尊重原创:http://blog.csdn.net/yuanzeyao/article/details/38025165 资源下载:http://download.csdn.net/detail/yu ...
- Android 操作系统的内存回收机制(转载)
Android 操作系统的内存回收机制(转载) Android APP 的运行环境 Android 是一款基于 Linux 内核,面向移动终端的操作系统.为适应其作为移动平台操作系统的特殊需要,谷歌对 ...
- Android之事件分发机制
本文主要包括以下内容 view的事件分发 viewGroup的事件分发 首先来看两张图 在执行touch事件时 首先执行dispatchTouchEvent方法,执行事件分发. 再执行onInterc ...
随机推荐
- Nginx 502 Bad Gateway 错误的解决方法
502 bad gateway 的解决方法 通用配置 proxy_buffer_size 4k; #设置代理服务器(nginx)保存用户头信息的缓冲区大小 proxy_buffers 4 32k; # ...
- python之爬虫-必应壁纸
python之爬虫-必应壁纸 import re import requests """ @author RansySun @create 2019-07-19-20:2 ...
- Python之配置文件处理
在平时的工程中,我们在构建工程时,常常需要用到配置文件,用来配置项目的一些信息,比如数据库,请求网址,文件夹,线程.进程数等信息,这样就可以方便我们通过修改配置文件中的参数来很好地完成整个项目的功 ...
- Spring学习之旅(一)--初始Spring
之前从博客.视频断断续续的学到了 Spring 的相关知识,但是都是一个个碎片化的知识.刚好最近在读 <Sprign实战(第四版)>,所以借此机会重新整理下Spring 系列的内容. Sp ...
- ASP.NET Core 3.0中使用动态控制器路由
原文:Dynamic controller routing in ASP.NET Core 3.0 作者:Filip W 译文:https://www.cnblogs.com/lwqlun/p/114 ...
- Keras(五)LSTM 长短期记忆模型 原理及实例
LSTM 是 long-short term memory 的简称, 中文叫做 长短期记忆. 是当下最流行的 RNN 形式之一 RNN 的弊端 RNN没有长久的记忆,比如一个句子太长时开头部分可能会忘 ...
- 到底什么是故事点(Story Point)?
故事点是一个度量单位,用于表示完成一个产品待办项或者其他任何某项工作所需的所有工作量的估算结果. 当采用故事点估算时,我们为每个待办项分配一个点数.待办项估算结果的原生数据并不重要,我们只关注最后得到 ...
- Luogu-P1027 Car的旅行路线 已知三点确定矩形 + 最短路
传送门:https://www.luogu.org/problemnew/show/P1027 题意: 图中有n个城市,每个城市有4个机场在矩形的四个顶点上.一个城市间的机场可以通过高铁通达,不同城市 ...
- 2019 HZNU Winter Training Day 14 Comprehensive Training
A - Choosing Capital for Treeland CodeForces - 219D 题意:有一颗单向边的树,要选取一个结点作为首都.要求是这个结点到其它结点,总共需要翻转的路径数量 ...
- 计蒜客 ACM训练联盟周赛 第一场 Christina式方格取数 思维
助手Christina发明了一种方格取数的新玩法:在n*m的方格棋盘里,每个格子里写一个数.两个人轮流给格子染色,直到所有格子都染了色.在所有格子染色完后,计算双方的分数.对于任意两个相邻(即有公共边 ...