NodeMCU入门(3):断线自动重连,指示灯显示连接状态
准备工作
1.NodeMCU模块
2.ESPlorer v0.2.0-rc6
事件监听器
NodeMCU采用了事件响应的方式。也就是说,只需为事件设置一个回调函数,当事件发生时,回调函数就会被调用。
注册事件监听器
wif.sta.eventMonReg()Please update your program to use the
wifi.eventmonAPI, as thewifi.sta.eventmon___()API is deprecated.
通过监听器获取wifi连接状态
status=nil

wifi.sta.eventMonReg(wifi.STA_WRONGPWD, function()

    status = 'STA_WRONGPWD'

    print(status)

end)

--启动监听器
wifi.sta.eventMonStart(1000)
通过http://nodemcu.readthedocs.io/en/master/en/modules/wifi/#wifistaeventmonreg 文档可以获取更多的例子,如:
--register callback

wifi.sta.eventMonReg(wifi.STA_IDLE, function() print("STATION_IDLE") end)

wifi.sta.eventMonReg(wifi.STA_CONNECTING, function() print("STATION_CONNECTING") end)

wifi.sta.eventMonReg(wifi.STA_WRONGPWD, function() print("STATION_WRONG_PASSWORD") end)

wifi.sta.eventMonReg(wifi.STA_APNOTFOUND, function() print("STATION_NO_AP_FOUND") end)

wifi.sta.eventMonReg(wifi.STA_FAIL, function() print("STATION_CONNECT_FAIL") end)

wifi.sta.eventMonReg(wifi.STA_GOTIP, function() print("STATION_GOT_IP") end)

--register callback: use previous state

wifi.sta.eventMonReg(wifi.STA_CONNECTING, function(previous_State)

    if(previous_State==wifi.STA_GOTIP) then

        print("Station lost connection with access point\n\tAttempting to reconnect...")

    else

        print("STATION_CONNECTING")

    end

end)

--unregister callback

wifi.sta.eventMonReg(wifi.STA_IDLE)
断线自动重连
有时因为路由器重启等原因,NodeMCU可能会掉线,好在NodeMCU可以设置自动连接:
Auto connects to AP in station mode.
0 to disable auto connecting, 1 to enable auto connecting
修改上一节中的 wifi.sta.connect()为 wifi.sta.autoconnect(1)
控制LED灯闪烁
在NodeMCU上有一个LED可用。可以用它来显示当前的连接状态。经测试,控制该LED的引脚为D4。
这是一个控制LED以特定延迟序列闪烁的函数。
----------------------

--define

---------------------

IO_BLINK =

TMR_BLINK =

gpio.mode(IO_BLINK, gpio.OUTPUT)

---------------------

-- blink

---------------------

blink = nil

tmr.register(TMR_BLINK, , tmr.ALARM_AUTO, function()

    gpio.write(IO_BLINK, blink.i % )

    tmr.interval(TMR_BLINK, blink[blink.i + ])

    blink.i = (blink.i + ) % #blink

end)

function blinking(param)

    if type(param) == 'table' then

        blink = param

        blink.i =

        tmr.interval(TMR_BLINK, )

        running, _ = tmr.state(TMR_BLINK)

        if running ~= true then

            tmr.start(TMR_BLINK)

        end

    else

        tmr.stop(TMR_BLINK)

        gpio.write(IO_BLINK, param or gpio.LOW)

    end

end
blinking()函数需要传入一个数组,数组元素依次表示LED亮灭的延迟。例子:
blinking({, }) -- 循环闪烁:亮300ms,灭300ms

blinking({,  , , }) -- 循环闪烁:亮100ms,灭100ms,亮100ms,灭500ms

blinking() -- 常亮

blinking(gpio.LOW) -- 常亮

blinking(gpio.HIGH) -- 常灭
LED显示连接状态
现在就可以结合监听器用LED显示连接状态了。
在上一节的监听器事件里,各添加一行闪烁的即可。
wifi.sta.eventMonReg(wifi.STA_WRONGPWD, function()

    blinking({,  , , })

    status = 'STA_WRONGPWD'

    print(status)

end)

wifi.sta.eventMonReg(wifi.STA_APNOTFOUND, function()

    blinking({, })

    status = 'STA_APNOTFOUND'

    print(status)

end)

wifi.sta.eventMonReg(wifi.STA_CONNECTING, function(previous_State)

    blinking({, })

    status = 'STA_CONNECTING'

    print(status)

end)

wifi.sta.eventMonReg(wifi.STA_GOTIP, function()

    blinking()

    status = 'STA_GOTIP'

    print(status, wifi.sta.getip())

end)
更新测试
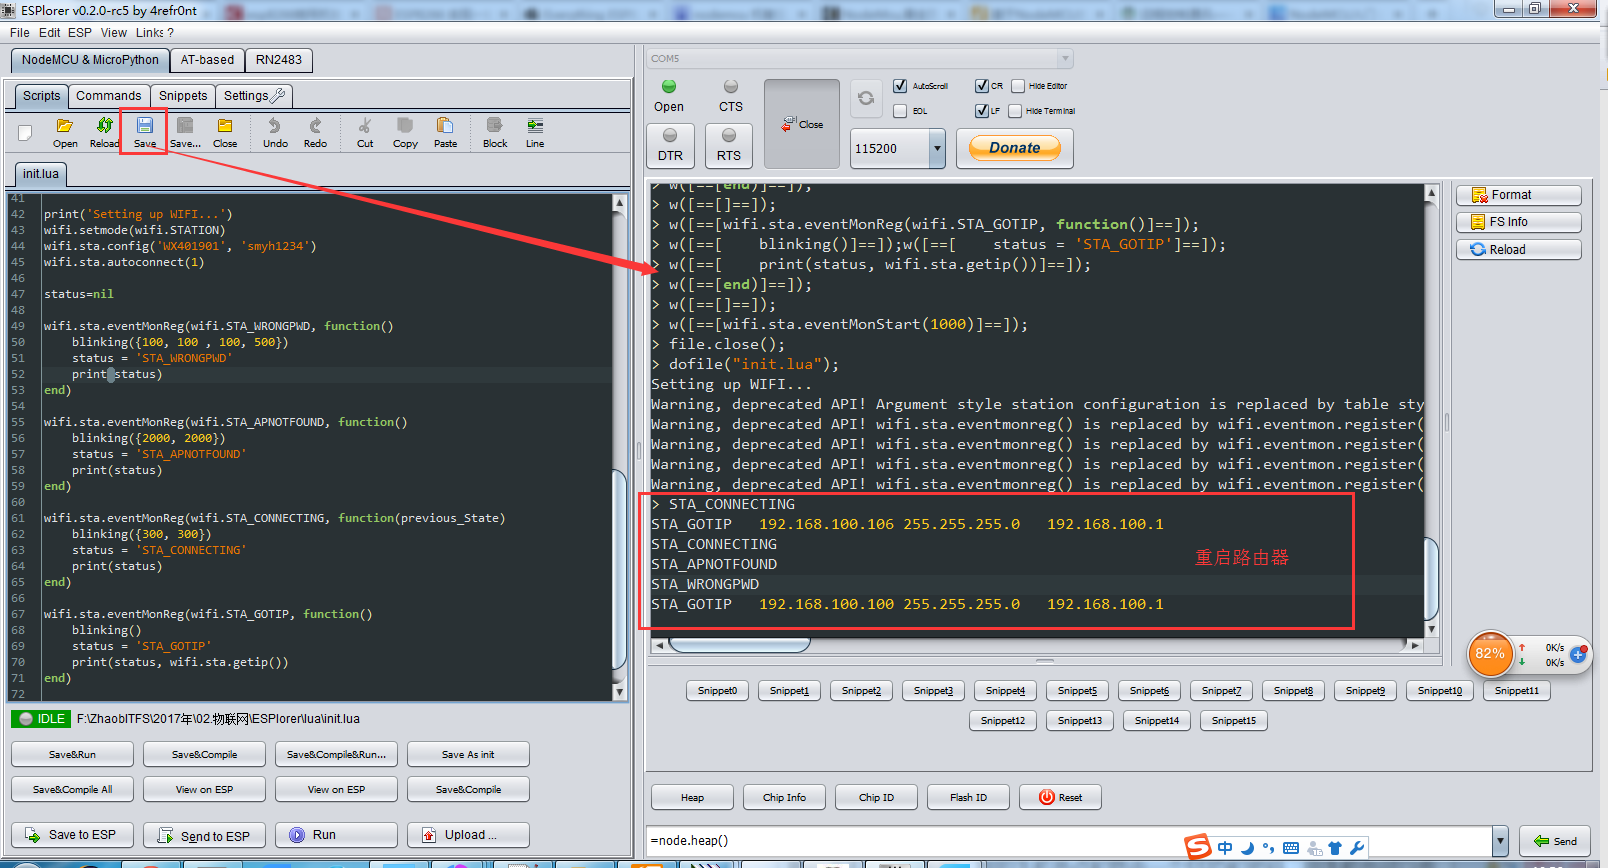
点击保存按钮就可以更新到NodeMCU模块里了,并且重新刷固件也不会丢失,通过输出信息可以看到每一步操作,错误提示可以定位到行,有问题时可以仔细看看输出。
连接上WIFI后LED常亮,重启路由器,LED灯闪烁并输出状态信息。
-- init.lua

----------------------

--define

---------------------

IO_BLINK =

TMR_BLINK =

gpio.mode(IO_BLINK, gpio.OUTPUT)

---------------------

-- blink

---------------------

blink = nil

tmr.register(TMR_BLINK, , tmr.ALARM_AUTO, function()

    gpio.write(IO_BLINK, blink.i % )

    tmr.interval(TMR_BLINK, blink[blink.i + ])

    blink.i = (blink.i + ) % #blink

end)

function blinking(param)

    if type(param) == 'table' then

        blink = param

        blink.i =

        tmr.interval(TMR_BLINK, )

        running, _ = tmr.state(TMR_BLINK)

        if running ~= true then

            tmr.start(TMR_BLINK)

        end

    else

        tmr.stop(TMR_BLINK)

        gpio.write(IO_BLINK, param or gpio.LOW)

    end

end

---------------------

-- wifi

---------------------

print('Setting up WIFI...')

wifi.setmode(wifi.STATION)

wifi.sta.config('WX401901', 'smyh1234')

wifi.sta.autoconnect()

status=nil

wifi.sta.eventMonReg(wifi.STA_WRONGPWD, function()

    blinking({,  , , })

    status = 'STA_WRONGPWD'

    print(status)

end)

wifi.sta.eventMonReg(wifi.STA_APNOTFOUND, function()

    blinking({, })

    status = 'STA_APNOTFOUND'

    print(status)

end)

wifi.sta.eventMonReg(wifi.STA_CONNECTING, function(previous_State)

    blinking({, })

    status = 'STA_CONNECTING'

    print(status)

end)

wifi.sta.eventMonReg(wifi.STA_GOTIP, function()

    blinking()

    status = 'STA_GOTIP'

    print(status, wifi.sta.getip())

end)

wifi.sta.eventMonStart()
init.lua
相关资源
你也可以在NodeMCU-Tutorial下载到本文的相关资源和代码。
本文是在 NodeMCU之旅(二):断线自动重连,闪烁连接状态 基础之上的学习过程,感谢原作者。
NodeMCU入门(3):断线自动重连,指示灯显示连接状态的更多相关文章
- NodeMCU之旅(二):断线自动重连,闪烁连接状态
事件监听器 NodeMCU采用了事件响应的方式.也就是说,只需为事件设置一个回调函数,当事件发生时,回调函数就会被调用. 注册事件监听器 wif.sta.eventMonReg() 开始监听 wifi ...
- 【树莓派】树莓派下WiFi断线自动重连
实现 WiFi 断线自动重连.原理是用 Python 监测网络是否断线,如果断线则重启网络服务. 1.Python 代码 autowifi.py,放在 /home/pi 目录下: #!/usr/bin ...
- golang监听rabbitmq消息队列任务断线自动重连接
需求背景: goalng常驻内存任务脚本监听rbmq执行任务 任务脚本由supervisor来管理 当rabbitmq长时间断开连接会出现如下图 进程处于fatal状态 假如因为不可抗拒因素,rabb ...
- Python爬虫实战三之实现山东大学无线网络掉线自动重连
综述 最近山大软件园校区QLSC_STU无线网掉线掉的厉害,连上之后平均十分钟左右掉线一次,很是让人心烦,还能不能愉快地上自习了?能忍吗?反正我是不能忍了,嗯,自己动手,丰衣足食!写个程序解决掉它! ...
- Netty 自动重连
from: http://www.dozer.cc/2015/05/netty-auto-reconnect.html 自动重连 用 Netty 写 Client 和 Server 的时候必须要去处理 ...
- 如何实现Azure虚拟网络中点到站VPN的自动重连
在Windows Azure早期版本中,用户要在某台Azure平台之外的机器与Azure平台内部的机器建立专用连接,可以借助Azure Connect这个功能.当前的Azure版本,已经没有Az ...
- 解读dbcp自动重连那些事---转载
http://agapple.iteye.com/blog/791943 可以后另一篇做对比:http://agapple.iteye.com/blog/772507 同样的内容,不同的描述方式,不一 ...
- PERL DBI 自动重连问题
[root@wx03 mojo]# cat relink.pl use Mojolicious::Lite; use JSON qw/encode_json decode_json/; use Enc ...
- NodeMCU入门(5):Docker Image 构建固件,开启SmartConfig
准备工作 1.NodeMCU模块 2.ESP8266Flasher.exe 3.EspTouch.apk 3.docker toolbox(win7系统) 或 docker(win10以上),本教程是 ...
随机推荐
- 百度编辑器 Ueditor 如何增加模板 ?
模板文件在这里: dialogs/template/config.js 参见:http://t.mreald.com/191 .
- python自带的调试器
python是自带调试器的. 比如你写了一个python程序,名叫test.py. 你想调试一下这个程序,你可以执行 python -m pdb test.py,就会进入test.py的调试. 想查看 ...
- android ListView 分页加载数据
1.mainActivity <LinearLayout xmlns:android="http://schemas.android.com/apk/res/android" ...
- 近几年杭电OJ大型比赛题目合集【更新到2017年11月初】
2017年: 区域赛网络赛 6194~6205 6206~6216 区域赛网络赛 6217~6229 2016年: 区域赛网络赛 5868~5877 5878~5891 5 ...
- 【通信】JDK中的URLConnection参数详解
JDK中的URLConnection参数详解 来自:http://www.blogjava.net/supercrsky/articles/247449.html 针对JDK中的URLConnecti ...
- php 利用root 权限执行shell脚本
http://blog.csdn.net/lxwxiao/article/details/8513355 也可以指定某个shell文件不需要密码 www-data ALL=(ALL) NOPASSWD ...
- 启动apache 提示Starting httpd: AH00558
Starting httpd: AH00558: httpd: Could not reliably determine the server's fully qualified domain nam ...
- 如何用MoveIt快速搭建机器人运动规划平台?
MoveIt = RobotGo,翻译成中文就是“机器人,走你!”所以,MoveIt的主要就是一款致力于让机器人能够自主运动及其相关技术的软件,它的所有模块都是围绕着运动规划的实现而设计的. 两个月前 ...
- Kaggle 泰坦尼克
入门kaggle,开始机器学习应用之旅. 参看一些入门的博客,感觉pandas,sklearn需要熟练掌握,同时也学到了一些很有用的tricks,包括数据分析和机器学习的知识点.下面记录一些有趣的数据 ...
- Tomcat中catalina run后台运行脚本
编写启动脚本start.sh,将其放在/srv/aubapp/bin/下 #!/bin/sh #设置web应用程序目录 export CATALINA_BASE="/srv/aubapp&q ...