『cs231n』通过代码理解风格迁移
文件目录
vgg16.py
import os

import numpy as np

import tensorflow as tf

from download import exist_or_download

model_url = 'https://s3.amazonaws.com/cadl/models/vgg16.tfmodel'

model_dir = 'vgg16/'

model_name = 'vgg16.tfmodel'

def model_download():

    print('Downloading Model ... ')

    exist_or_download(url=model_url, dir=model_dir)

class VGG16:

    input_tensor_name = 'images:0'

    layer_operation_names = ['conv1_1/conv1_1','conv1_2/conv1_2',

                            'conv2_1/conv2_1','conv2_2/conv2_2',

                            'conv3_1/conv3_1','conv3_2/conv3_2','conv3_3/conv3_3',

                            'conv4_1/conv4_1','conv4_2/conv4_2','conv4_3/conv4_3',

                            'conv5_1/conv5_1','conv5_2/conv5_2','conv5_3/conv5_3']

    dropout_tensor_names = ['dropout/random_uniform:0',

                            'dropout_1/random_uniform:0']

    def __init__(self):

        # 载入tfmodel模型到新的图中

        self.graph = tf.Graph()

        with self.graph.as_default():

            with tf.gfile.FastGFile(os.path.join(model_dir,model_name),'rb') as f:

                graph_def = tf.GraphDef()

                graph_def.ParseFromString(f.read())

                tf.import_graph_def(graph_def,name='')

            # 由图中获取tensor

            self.input_tensor = self.graph.get_tensor_by_name(self.input_tensor_name)

            self.layer_tensors = [self.graph.get_tensor_by_name(name + ':0') for name in self.layer_operation_names]

    def get_layer_tensors(self, layer_ids):

        '''获取特定序列号的tensors'''

        return [self.layer_tensors[idx] for idx in layer_ids]

    def get_layer_names(self, layer_ids):

        '''获取特定序列号的op名称'''

        return [self.layer_operation_names[idx] for idx in layer_ids]

    def get_all_layer_names(self, startswith=None):

        '''获取全op中名称开头为startswith的op名称'''

        names = [op.name for op in self.graph.get_operations()]

        if startswith is not None:

            names = [name for name in names if name.startswith(startswith)]

        return names

    def create_feed_dict(self,input_image):

        '''把input图片扩维,并以feed字典形式返回'''

        input_image = np.expand_dims(input_image, axis=0)

        feed_dict = {self.input_tensor_name: input_image}

        return feed_dict
二进制模型文件载入流程:
# 新建空白图

self.graph = tf.Graph()

# 空白图列为默认图

with self.graph.as_default():

    # 二进制读取模型文件

    with tf.gfile.FastGFile(os.path.join(model_dir,model_name),'rb') as f:

        # 新建GraphDef文件,用于临时载入模型中的图

        graph_def = tf.GraphDef()

        # GraphDef加载模型中的图

        graph_def.ParseFromString(f.read())

        # 在空白图中加载GraphDef中的图

        tf.import_graph_def(graph_def,name='')

        # 在图中获取张量需要使用graph.get_tensor_by_name加张量名

        # 这里的张量可以直接用于session的run方法求值了

        # 补充一个基础知识,形如'conv1'是节点名称,而'conv1:0'是张量名称,表示节点的第一个输出张量

        self.input_tensor = self.graph.get_tensor_by_name(self.input_tensor_name)

        self.layer_tensors = [self.graph.get_tensor_by_name(name + ':0') for name   in self.layer_operation_names]
download.py
import os

import sys

import tarfile

import zipfile

import urllib.request

def _print_download_progress(count, block_size, total_size):

    '''打印下载进度'''

    # 当前下载进度

    pct_complete = float(count * block_size / total_size)

    # 强化表达式格式输出,\r表示新行,后面的表示小数点后一位百分数

    msg = '\r- Download progress: {0:.1%}'.format(pct_complete)

    # 输出,这里和print功能差不多

    sys.stdout.write(msg)

    sys.stdout.flush()

def exist_or_download(url,dir):

    # url末尾为文件名,提取出来

    file_name = url.split('/')[-1]

    # 保存文件路径&文件名

    file_path = os.path.join(dir, file_name)

    if not os.path.exists(file_path):

        if not os.path.exists(dir):

            os.makedirs(dir)

        # 下载文件

        file_path, _ = urllib.request.urlretrieve(url=url,

                                                  filename=file_path,

                                                  reporthook=_print_download_progress)

        # 参数 finename 指定了保存本地路径(如果参数未指定,urllib会生成一个临时文件保存数据。)

        # 参数 reporthook 是一个回调函数,当连接上服务器、以及相应的数据块传输完毕时会触发该回调,我们可以利用这个回调函数来显示当前的下载进度。

        # 参数 data 指 post 到服务器的数据

        # 该方法返回一个包含两个元素的(filename, headers)元组,filename 表示保存到本地的路径,header 表示服务器的响应头。

        print('\r- Download finish.')

        # 自动解压

        if file_path.endwith('.zip'):

            zipfile.ZipFile(file=file_path, mode='r').extractall(dir)

        elif file_path.endwith('.tar.gz','tgz'):

            tarfile.open(name=file_path, model='r:gz').extractall(dir)

        print('Done')

    else:

        print('Data has apparently alreadly been downloaded and unpacked.')
sys.stdout.write()
由于python3中print有end关键字,所以意义不大,但是在2.x中若想实现输出不换行,只能直接调用stdout对象的write方法了,因为stdout没有end这个符号这一说,输出不会换行,因此如果你想同一样输出多次,在需要输出的字符串对象里面加上"\r",就可以回到行首。
urllib.request.urlretrieve():请求url的常用方法
urllib.request.urlretrieve(url=url,

                          filename=file_path,

                          reporthook=_print_download_progress)

# 参数 finename 指定了保存本地路径(如果参数未指定,urllib会生成一个临时文件保存数据。)

# 参数 reporthook 是一个回调函数需要自己实现,当连接上服务器、以及相应的数据块传输完毕时会触发该回调,会传入(已接受数据块数量,数据块大小,文件总大小)三个参数。

# 参数 data 指 post 到服务器的数据

# 该方法返回一个包含两个元素的(filename, headers)元组,filename 表示保存到本地的路径,header 表示服务器的响应头。
解压函数:先读取,后创建
if file_path.endwith('.zip'):

    zipfile.ZipFile(file=file_path, mode='r').extractall(dir)

elif file_path.endwith('.tar.gz','tgz'):

    tarfile.open(name=file_path, model='r:gz').extractall(dir)
Style_transfer.py
import os

import numpy as np

import tensorflow as tf

import matplotlib.pyplot as plt

from PIL import Image

import vgg16

os.environ['TF_CPP_MIN_LOG_LEVEL'] = '2'

print('\nTensotFlow version:', tf.__version__, '\n')

vgg16.model_download()

"""图像处理辅助函数"""

def load_image(file_name, max_size=None):

    '''把图片放大为最长边等于max_size的大小,并转换为float32数组'''

    image = Image.open(file_name)

    if max_size is not None:

        factor = max_size/np.max(image.size)

        size = np.array(image.size)*factor

        size = size.astype(int)

        image = image.resize(size, Image.LANCZOS)   # 插值算法,常用于下采样(放大)

    return np.float32(image)

def save_image(image, file_name):

    '''把数组转化成图像'''

    # 像素切割,类型转换

    image = np.clip(image, 0.0, 255.0).astype(np.uint8)

    # 存为图片

    with open(file_name, 'wb') as file:

        Image.fromarray(image).save(file, 'jpeg')

def plot_image(image):

    '''展示数组对应的图片'''

    image = np.clip(image, 0.0, 255.0).astype(np.uint8)

    plt.figure()

    plt.imshow(Image.fromarray(image))

    plt.show()

def plot_images(content_image, style_image, mixed_image):

    '''展示三张图片'''

    fig, axes = plt.subplots(1,3,figsize=(10,10))

    fig.subplots_adjust(hspace=0.1, wspace=0.1)

    ax = axes.flat[0]

    ax.imshow(content_image/255.0)

    ax.set_xlabel('Content')

    ax = axes.flat[1]

    ax.imshow(mixed_image/255.0)

    ax.set_xlabel('Mixed')

    ax = axes.flat[2]

    ax.imshow(style_image / 255.0)

    ax.set_xlabel('Style')

    # 删除坐标轴

    for ax in axes.flat:

        ax.set_xticks([])

        ax.set_yticks([])

    plt.show()

"""损失函数"""

def mean_squared_error(a, b):

    '''

    求两个张量的平方差

    :param a: 张量a,tf的数据格式

    :param b: 张量b,tf的数据格式

    :return: 平方差值

    '''

    return tf.reduce_mean(tf.square(a-b))

def create_content_loss(session, model, content_image, layer_ids):

    '''

    内容学习损失函数

    :param session: tf会话对象

    :param model: 模型对象

    :param content_image: 内容图片

    :param layer_ids: 模型层list

    :return: 损失函数值

    '''

    feed_dict = model.create_feed_dict(input_image=content_image)

    layers = model.get_layer_tensors(layer_ids)

    values = session.run(layers, feed_dict=feed_dict)

    with model.graph.as_default():

        layer_losses= []

        for value, layer in zip(values, layers):

            # print(layer, tf.constant(value))

            loss = mean_squared_error(layer, tf.constant(value))

            layer_losses.append(loss)

        total_loss = tf.reduce_mean(layer_losses)

        return total_loss

def gram_matrix(tensor):

    '''创建格拉姆矩阵,本质上就是风格层中激活特征向量的点乘矩阵'''

    shape = tensor.get_shape()

    factor = tf.reshape(tensor, shape=[-1, int(shape[3])])

    matrix = tf.matmul(factor, factor, transpose_a=True)

    return matrix

def create_style_loss(session, model, style_image, layer_ids):

    '''

    风格学习损失函数

    :param session: tf会话对象

    :param model: 模型对象

    :param style_image: 风格图片

    :param layer_ids: 模型层list

    :return:

    '''

    feed_dict = model.create_feed_dict(input_image=style_image)

    layers = model.get_layer_tensors(layer_ids)

    gram_layers = [gram_matrix(layer) for layer in layers]

    # print(np.asarray(session.run(layers,feed_dict)[0]).shape)

    with model.graph.as_default():

        values = session.run(gram_layers, feed_dict=feed_dict)

        layer_losses = []

        for value, gram_layer in zip(values, gram_layers):

            loss = mean_squared_error(gram_layer, tf.constant(value))

            layer_losses.append(loss)

        total_loss = tf.reduce_mean(layer_losses)

    return total_loss

def create_denoise_loss(model):

    '''混合图像去噪损失函数'''

    loss = tf.reduce_sum(tf.abs(model.input_tensor[:,1:,:,:] - model.input_tensor[:,:-1,:,:])) + \

           tf.reduce_sum(tf.abs(model.input_tensor[:,:,1:,:] - model.input_tensor[:,:,:-1,:]))

    return loss

"""风格迁移"""

def style_transfer(content_image, style_image,

                   content_layer_ids, style_layer_ids,

                   weight_content=1.5, weight_style=10.0, weight_denoise=0.3,

                   num_iterations=120, learning_rate=10.0):

    '''

    :param content_image: 内容学习对象

    :param style_image: 风格学习对象

    :param content_layer_ids: 内容特征提取层

    :param style_layer_ids: 风格特征提取层

    :param weight_content: 内容loss函数权重

    :param weight_style: 风格loss函数权重

    :param weight_denoise: 降噪loss函数权重

    :param num_iterations: 迭代次数

    :param learning_rate: 学习率

    :return: 最终输出图

    '''

    model = vgg16.VGG16()

    session = tf.Session(graph=model.graph)

    print('Content layers:\n',model.get_layer_names(content_layer_ids),'\n')

    print('Style layers:\n',model.get_layer_names(style_layer_ids),'\n')

    loss_content = create_content_loss(session, model, content_image, content_layer_ids)

    loss_style = create_style_loss(session, model, style_image, style_layer_ids)

    loss_denoise = create_denoise_loss(model)

    with model.graph.as_default():

        adj_content = tf.Variable(1e-10, name='adj_content')

        adj_style = tf.Variable(1e-10, name='adj_style')

        adj_denoise = tf.Variable(1e-10, name='adj_denoise')

        init = tf.global_variables_initializer()

    session.run(init)

    update_adj_content = adj_content.assign(1.0 / (loss_content+1e-10))

    update_adj_style = adj_style.assign(1.0 / (loss_style+1e-10))

    update_adj_denoise = adj_denoise.assign(1.0 / (loss_denoise+1e-10))

    loss = weight_content * adj_content * loss_content + \

           weight_style * adj_style * loss_style + \

           weight_denoise * adj_denoise * loss_denoise

    # tf.summary.scalar(loss, 'loss')

    # merge = tf.summary.merge_all()

    gradient = tf.gradients(loss, model.input_tensor)  # 计算梯度,并非使用optimizer类实现

    run_list = [gradient, update_adj_content, update_adj_style, update_adj_denoise]

    mixed_image = np.random.rand(*content_image.shape) + 128

    '''

    from PIL import Image

    plt.imshow(Image.fromarray(np.uint8(mixed_image)))

    plt.savefig('{0}.png'.format([-1]),format='png')

    '''

    mixed_images = []

    for i in range(num_iterations):

        feed_dict = model.create_feed_dict(mixed_image)

        # layers = model.get_layer_tensors(style_layer_ids)

        # gram_layers = [gram_matrix(layer) for layer in layers]

        # print(np.asarray(session.run(gram_layers,feed_dict)[0]).shape)

        grad, adj_content_val, adj_style_val, adj_denoise_val = session.run(run_list, feed_dict=feed_dict)

        lr_step = learning_rate / (np.std(grad)+1e-8)

        mixed_image -= np.squeeze(np.asarray(grad) * lr_step)  # <-------好多坑

        mixed_image = np.clip(mixed_image, 0.0, 255.0)

        print('.',end='')  # 每次迭代画一个点,模拟进度条

        if (i%10 == 0) or (i == num_iterations-1):

            print('\n', 'Iteration:', i)

            print('Weight Adj. for Content: {0:2e}, Style: {1:2e}, Denoise: {2:2e}'.format(

                adj_content_val, adj_style_val, adj_denoise_val))

            plot_images(content_image, style_image, mixed_image)

            mixed_images.append(mixed_image)

    print('\n', 'Final images:')

    plot_image(mixed_image)

    session.close()

    return mixed_images

if __name__=='__main__':

    content_filename = 'images/image_r.jpg'

    content_image = load_image(content_filename,max_size=None)

    style_filename = 'images/mosaic.jpg'

    style_image = load_image(style_filename,max_size=300)

    print('\nContent image size: \r ', content_image.shape,

          '\rStyle image size: \r ',style_image.shape, '\n')

    content_layer_ids = [4]

    style_layer_ids = list(range(13))

    img = style_transfer(content_image=content_image,

                         style_image=style_image,

                         content_layer_ids=content_layer_ids,

                         style_layer_ids=style_layer_ids,

                         weight_content=1.5,

                         weight_style=10.0,

                         weight_denoise=0.3,

                         num_iterations=300,

                         learning_rate=10.0)

"""

细节1:

这应该是个全卷积型网络,由于没有用到FC层所以不能肯定,但是至少feed部分没有限制尺寸,

斯格拉姆矩阵利用[固定深度C,不定长L].dot([不定长L,固定深度C])=[C,C],忽略两者feature尺寸的差距,所以理所当然的混合图

大小和内容图大小必须下相同。

细节2:

在loss函数建立的过程中,在静态的graph中动态的构建了新的op,之所以这么说是在静态loss函数op构建中使用了session得到了

中间的参量(也就是content和style的feature),而整个loss函数所在graph的目标输入是mixed。

细节3:

在def style_transfer()中有一处标注了坑,这里面有一点突发状况,新建的Variable节点被报错不存在于默认图中,经排查,这

是因为这几个节点和model类中的节点不存在依赖关系,而model中的graph不是默认graph,所以要添加上下文环境使之进入model的

graph中。

细节3:

loss函数整合时有这样的计算公式:权重*本次loss/上次loss,调整更新速度,感觉意义不大。

"""

"""

# 保存输出图像

from PIL import Image

for i in range(len(img)):

    image = Image.fromarray(np.uint8(img[i]))

    plt.imshow(image)

    plt.savefig('{0}.png'.format([i]),format='png')

"""
计算梯度函数注意一下,意外的方便,
tf.gradients(loss, model.input_tensor) # 计算梯度,并非使用optimizer类实现
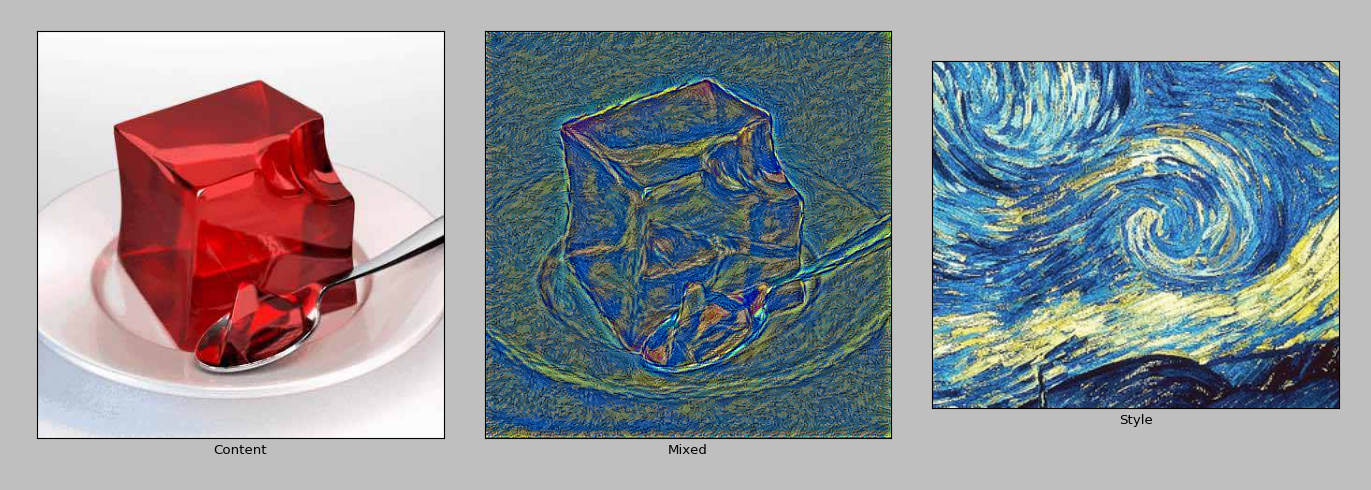
效果一般,我认为是风格层选的太多了,应该更多的注重高层的特征,减少底层的特征学习,否则学不出来漩涡的结构。
使用
"""

# 保存输出图像

from PIL import Image

for i in range(len(img)):

    image = Image.fromarray(np.uint8(img[i]))

    plt.imshow(image)

    plt.savefig('{0}.png'.format([i]),format='png')

"""
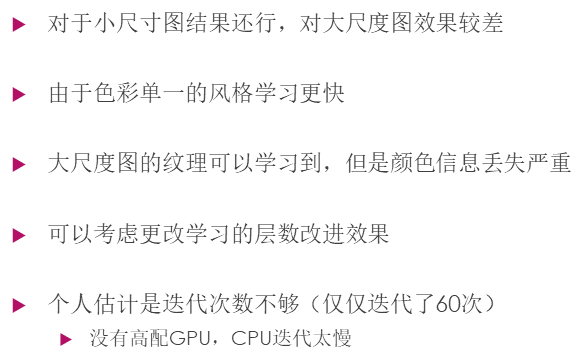
最近(17.9.19)使用这个内容做了课堂展示,所以进行了一点探究,几点总结如下:


实验室的电脑配的差不多了,尝试看看能不能得到更好的结果。
『cs231n』通过代码理解风格迁移的更多相关文章
- 『cs231n』通过代码理解gan网络&tensorflow共享变量机制_上
GAN网络架构分析 上图即为GAN的逻辑架构,其中的noise vector就是特征向量z,real images就是输入变量x,标签的标准比较简单(二分类么),real的就是tf.ones,fake ...
- 『TensorFlow』通过代码理解gan网络_中
『cs231n』通过代码理解gan网络&tensorflow共享变量机制_上 上篇是一个尝试生成minist手写体数据的简单GAN网络,之前有介绍过,图片维度是28*28*1,生成器的上采样使 ...
- 『cs231n』RNN之理解LSTM网络
概述 LSTM是RNN的增强版,1.RNN能完成的工作LSTM也都能胜任且有更好的效果:2.LSTM解决了RNN梯度消失或爆炸的问题,进而可以具有比RNN更为长时的记忆能力.LSTM网络比较复杂,而恰 ...
- 『cs231n』计算机视觉基础
线性分类器损失函数明细: 『cs231n』线性分类器损失函数 最优化Optimiz部分代码: 1.随机搜索 bestloss = float('inf') # 无穷大 for num in range ...
- 『摄影欣赏』16幅 Romantic 风格照片欣赏【组图】
今天,我们将继续分享人类情感的系列文章.爱是人类最重要的感觉,也可能是各种形式的艺术(电影,音乐,书,画等)最常表达的主题 .这里有40个最美丽的爱的照片,将激励和给你一个全新的视觉角度为这种情绪.我 ...
- 『cs231n』作业3问题1选讲_通过代码理解RNN&图像标注训练
一份不错的作业3资料(含答案) RNN神经元理解 单个RNN神经元行为 括号中表示的是维度 向前传播 def rnn_step_forward(x, prev_h, Wx, Wh, b): " ...
- 『cs231n』作业2选讲_通过代码理解Dropout
Dropout def dropout_forward(x, dropout_param): p, mode = dropout_param['p'], dropout_param['mode'] i ...
- 『cs231n』作业2选讲_通过代码理解优化器
1).Adagrad一种自适应学习率算法,实现代码如下: cache += dx**2 x += - learning_rate * dx / (np.sqrt(cache) + eps) 这种方法的 ...
- 『cs231n』作业1选讲_通过代码理解KNN&交叉验证&SVM
通过K近邻算法探究numpy向量运算提速 茴香豆的“茴”字有... ... 使用三种计算图片距离的方式实现K近邻算法: 1.最为基础的双循环 2.利用numpy的broadca机制实现单循环 3.利用 ...
随机推荐
- String comparison is too slow in R language
## String comparison is too slow in R language ## it will take 3 minutes, it is too slow date() strA ...
- pyhon 之 数据类型详解
目录1.字符串2.布尔类型3.整数4.浮点数5.数字6.列表7.元组8.字典9.日期 1.字符串1.1.如何在Python中使用字符串a.使用单引号(')用单引号括起来表示字符串,例如:str='th ...
- java.lang.OutOfMemoryError:GC overhead limit exceeded
在调测程序时报java.lang.OutOfMemoryError:GC overhead limit exceeded 错误 错误原因:在用程序进行数据切割时报了该错误.由于在本地执行数据切割测试的 ...
- 【译】第24节---Fluent API - 属性映射
原文:http://www.entityframeworktutorial.net/code-first/configure-property-mappings-using-fluent-api.as ...
- 提高R语言速度--转载
1. 参考<R语言编程艺术>(Norman Matloff) chapter 14 & chapter 15 2. 方法 (1)向量化 与非向量化-循环做个对比: ...
- JavaScript的sort方法
说明 array.sort()用于对数组进行排序,返回数组,方法默认是“升序”排序,原数组会发生改变 简单点:比较函数两个参数a和b,返回a-b升序,返回b-a升序 普通数组(降序) var arr ...
- Chrome,你这坑人的默认非安全端口
今天用chrome打开页面的发现一个错误: ERR_UNSAFE_PORT 字面意思是error:不安全端口. 一.什么是默认非安全端口? 每个浏览器出于安全问题,都会禁止一些网络浏览以外的端口 ...
- mysql Percona-XtraBackup backup
全量备份FULL BACKUP https://www.percona.com/doc/percona-xtrabackup/2.4/backup_scenarios/full_backup.html ...
- Java java.lang.SecurityException: Prohibited package name
java.lang.SecurityException: Prohibited package name 提示java错误: Exception in thread "main" ...
- SqlServer中exists和in的区别
1.in 2.exists