Android-自定义控件-继承View与ViewGroup的初步理解
继承View需要走的流程是:
1.构造实例化, public ChildView(Context context, @Nullable AttributeSet attrs)
2.测量自身的高和宽onMeasure-->setMeasuredDimension(宽,高)
3.onDraw绘制,需要X轴,Y轴
继承ViewGroup需要走的流程是:
1.构造实例化, public ChildView(Context context, @Nullable AttributeSet attrs)
2.onMeasure测量子控件的高和宽,子控件.measure(宽,高),而自己的高和宽交给父控件去测量,因为我是父控件的子控件
3.onLayout给子控件排版指定位置
布局文件,指定自定义类:
<!-- 继承View 与 继承ViewGroup的初步理解 -->

<RelativeLayout

    xmlns:android="http://schemas.android.com/apk/res/android"

    xmlns:myswitch="http://schemas.android.com/apk/res-auto"

    xmlns:tools="http://schemas.android.com/tools"

    android:layout_width="400dp"

    android:layout_height="500dp">

    <!-- 爷爷类,爷爷类有一个孩子(爸爸类) -->

    <custom.view.upgrade.view_viewgroup_theory.GrandpaViewGroup

        android:layout_width="300dp"

        android:layout_height="300dp"

        android:background="#3300cc"

        android:layout_centerInParent="true"

        > <!--

            虽然android:layout_centerInParent="true"属性可以去居中

            但这是Android RelativeLayout 对爷爷类进行了居中的排版固定位置处理

         -->

        <!-- 爸爸类,爸爸类有一个孩子(孩子类) -->

        <custom.view.upgrade.view_viewgroup_theory.FatherViewGroup

            android:layout_width="200dp"

            android:layout_height="200dp"

            android:background="#00ccff">

            <!-- 孩子类目前不包含孩子 -->

            <custom.view.upgrade.view_viewgroup_theory.ChildView

                android:layout_width="100dp"

                android:layout_height="100dp"

                android:background="#cc3300"/>

        </custom.view.upgrade.view_viewgroup_theory.FatherViewGroup>

    </custom.view.upgrade.view_viewgroup_theory.GrandpaViewGroup>

</RelativeLayout>
爷爷类,GrandpaViewGroup:
package custom.view.upgrade.view_viewgroup_theory;

import android.content.Context;

import android.util.AttributeSet;

import android.util.Log;

import android.view.View;

import android.view.ViewGroup;

/**

 * 爷爷类,爷爷类有自己的孩子(爸爸类) ----> 爸爸类有自己的孩子(孩子类)

 */

public class GrandpaViewGroup extends ViewGroup {

    private static final String TAG = GrandpaViewGroup.class.getSimpleName();

    /**

     * 此两个参数的构造方法,用于在xml布局指定初始化,并传入xml中的所有属性

     * @param context

     * @param attrs

     */

    public GrandpaViewGroup(Context context, AttributeSet attrs) {

        super(context, attrs);

    }

    // 爸爸类

    private View fatherViewGroup;

    /**

     * 当xml布局完成加载后,调用此方法

     */

    @Override

    protected void onFinishInflate() {

        super.onFinishInflate();

        // 获取子控件(爸爸类)

        fatherViewGroup = getChildAt(0);

    }

    /**

     * 由于当前是ViewGroup所以测量子控件的宽和高

     * ,如果当前是View就是此类自己的高和宽

     * @param widthMeasureSpec

     * @param heightMeasureSpec

     */

    @Override

    protected void onMeasure(int widthMeasureSpec, int heightMeasureSpec) {

        super.onMeasure(widthMeasureSpec, heightMeasureSpec);

        // 测量子控件(爸爸类)的宽和高

        // 宽和高就是 爸爸类在xml布局中设置的值

        fatherViewGroup.measure(fatherViewGroup.getLayoutParams().width, fatherViewGroup.getLayoutParams().height);

        // 想获取测量后子控件(爸爸类)的高和宽,是无法获取到的,因为子控件(爸爸类)是ViewGroup,拿到测量后的高和宽需要 View-->setMeasuredDimension()

        // 测试下:子控件(爸爸类)的高和宽

        Log.d(TAG, "fatherViewGroup.getMeasuredWidth():" + fatherViewGroup.getMeasuredWidth() +

                         " fatherViewGroup.getMeasuredHeight():" + fatherViewGroup.getMeasuredHeight());

    }

    /**

     * 排版 指定位置,只给子控件指定位置的

     * @param changed 当发生改变

     * @param l 左边线距离左边距离,注意:值是由父控件Layout后,处理了逻辑后传递过来的

     * @param t 上边线距离上边距离,注意:值是由父控件Layout后,处理了逻辑后传递过来的

     * @param r 右边线距离左边距离,注意:值是由父控件Layout后,处理了逻辑后传递过来的

     * @param b 底边线距离上边距离,注意:值是由父控件Layout后,处理了逻辑后传递过来的

     *

     * 父控件必须排版了layout此类的位置,此onLayout方法才会执行,否则不执行

     */

    @Override

    protected void onLayout(boolean changed, int l, int t, int r, int b) {

        // 测试下:获取自身当前GrandpaViewGroup测量后的宽和高

        int measuredWidth = getMeasuredWidth();

        int measuredHeight = getMeasuredHeight();

        Log.d(TAG, "measuredWidth:" + measuredWidth + " measuredHeight:" + measuredHeight);

        // 给子控件(爸爸类)指定位置

        // Y轴与X轴移动计算一样,X计算:移动X轴方向,得到自身(GrandpaViewGroup爷爷类)宽度的一半 减 子控件(爸爸类)的一半就居中了

        int fatherL = (measuredWidth / 2) - (fatherViewGroup.getLayoutParams().width / 2);

        int fatherT = (measuredHeight / 2) - (fatherViewGroup.getLayoutParams().height / 2);

        // L位置增加了,R位置也需要增加

        int fatherR = fatherViewGroup.getLayoutParams().width + fatherL;

        int fatherB = fatherViewGroup.getLayoutParams().height + fatherT;

        fatherViewGroup.layout(fatherL, fatherT, fatherR, fatherB);

    }

    /**

     * 为什么继承了ViewGroup就不需要onDraw绘制了,因为绘制都是在View中处理

     * 继承了ViewGroup需要做好测量-->排版固定位置就好了,绘制是交给View去处理

     */

}
爸爸类,FatherViewGroup:
package custom.view.upgrade.view_viewgroup_theory;

import android.content.Context;

import android.util.AttributeSet;

import android.util.Log;

import android.view.View;

import android.view.ViewGroup;

/**

 * 爸爸类,爸爸类有自己的孩子

 */

public class FatherViewGroup extends ViewGroup {

    private static final String TAG = FatherViewGroup.class.getSimpleName();

    /**

     * 此两个参数的构造方法,用于在xml布局指定初始化,并传入xml中的所有属性

     * @param context

     * @param attrs

     */

    public FatherViewGroup(Context context, AttributeSet attrs) {

        super(context, attrs);

    }

    // 子控件(孩子类)

    private View childView;

    /**

     * 当xml布局完成加载后,调用此方法

     */

    @Override

    protected void onFinishInflate() {

        super.onFinishInflate();

        childView = getChildAt(0);

    }

    private int w;

    private int h;

    /**

     * 测量子控件(孩子类)的高和宽

     * @param widthMeasureSpec 可以转变为模式,也可以转变为父类给当前自己传递过来的宽

     * @param heightMeasureSpec 可以转变为模式,也可以转变为父类给当前自己传递过来的高

     */

    @Override

    protected void onMeasure(int widthMeasureSpec, int heightMeasureSpec) {

        super.onMeasure(widthMeasureSpec, heightMeasureSpec);

        // 可以获取模式

        MeasureSpec.getMode(widthMeasureSpec);

        MeasureSpec.getMode(heightMeasureSpec);

        /**

         * 可以获取父类(爷爷类)在测量方法--->

         * fatherViewGroup.measure(fatherViewGroup.getLayoutParams()

         * .width, fatherViewGroup.getLayoutParams().height);

         * 传递过来的高和宽

         */

        w = MeasureSpec.getSize(widthMeasureSpec);

        h = MeasureSpec.getSize(heightMeasureSpec);

        Log.d(TAG, " w:" + w + " h:" + h);

        // 开始测量子控件(孩子类)

        // 宽高都是孩子类在xml布局设置的宽高

        childView.measure(childView.getLayoutParams().width, childView.getLayoutParams().height);

        // 测试下:子控件(孩子类)的高和宽

        /**

         * 注意:为什么在这里又可以获取到子控件的宽和高呢?

         *      因为子控件是View 并且这个View在测量方法中执行了 setMeasuredDimension(w, h);

         */

        Log.d(TAG, "childView.getMeasuredWidth():" + childView.getMeasuredWidth() +

                " childView.getMeasuredHeight():" + childView.getMeasuredHeight());

    }

    /**

     * 排版 指定位置,只给子控件指定位置的

     * @param changed 当发生改变

     * @param l 左边线距离左边距离

     * @param t 上边线距离上边距离

     * @param r 右边线距离左边距离

     * @param b 底边线距离上边距离

     */

    @Override

    protected void onLayout(boolean changed, int l, int t, int r, int b) {

        // 测试下:获取自身当前FatherViewGroup测量后的宽和高

        // 注意:在这里无法获取,还不知道是什么原因!!!,

        // 爷爷类可以获取到是因为爷爷类的父类控件是系统的RelativeLayout

        int measuredWidth = getMeasuredWidth();

        int measuredHeight = getMeasuredHeight();

        Log.d(TAG, "爸爸类 >>> measuredWidth:" + measuredWidth + " measuredHeight:" + measuredHeight);

        // 给子控件(爸爸类)指定位置

        // Y轴与X轴移动计算一样,X计算:移动X轴方向,得到自身(FatherViewGroup爸爸类)宽度的一半 减 子控件(孩子类)的一本就居中了

        int childL = (w / 2) - (childView.getMeasuredWidth() / 2);

        int childT = (h / 2) - (childView.getMeasuredHeight() / 2);

        // L位置增加了,R位置也需要增加

        int childR = childView.getMeasuredWidth() + childL;

        int childB = childView.getMeasuredHeight() + childT;

        childView.layout(childL, childT, childR, childB);

    }

    /**

     * 为什么继承了ViewGroup就不需要onDraw绘制了,因为绘制都是在View中处理

     * 继承了ViewGroup需要做好测量-->排版固定位置就好了,绘制是交给View去处理

     */

}
孩子类,ChildView:
package custom.view.upgrade.view_viewgroup_theory;

import android.content.Context;

import android.graphics.Canvas;

import android.graphics.Color;

import android.graphics.Paint;

import android.graphics.Rect;

import android.support.annotation.Nullable;

import android.util.AttributeSet;

import android.view.View;

/**

 * 孩子类,孩子类暂时还没有自己的孩子,所有是继承View

 */

public class ChildView extends View {

    private static final String CONTEXT = "child";

    // 创建画笔把文字画到画布中去

    private Paint mPaint;

    private Rect rect;

    /**

     * 此两个参数的构造方法,用于在xml布局指定初始化,并传入xml中的所有属性

     * @param context

     * @param attrs

     */

    public ChildView(Context context, @Nullable AttributeSet attrs) {

        super(context, attrs);

        mPaint =  new Paint();

        // 画笔防锯齿

        mPaint.setAntiAlias(true);

        // 画笔白色

        mPaint.setColor(Color.WHITE);

        mPaint.setTextSize(40);

        rect = new Rect();

    }

    /**

     * 此高宽是父控件(爸爸类)传递过来的高和宽

     */

    private int w;

    private int h;

    @Override

    protected void onMeasure(int widthMeasureSpec, int heightMeasureSpec) {

        super.onMeasure(widthMeasureSpec, heightMeasureSpec);

        w = MeasureSpec.getSize(widthMeasureSpec);

        h = MeasureSpec.getSize(heightMeasureSpec);

        setMeasuredDimension(w, h);

    }

    /**

     * 绘制的方法

     * @param canvas 画布

     */

    @Override

    protected void onDraw(Canvas canvas) {

        super.onDraw(canvas);

        // 拿到自身宽度的一半 减 文字宽度的一半

        mPaint.getTextBounds(CONTEXT, 0, CONTEXT.length(), rect);

        int x = (w / 2) - (rect.width() / 2);

        int y = (h / 2) - (rect.height() / 2) + rect.height();

        canvas.drawText(CONTEXT, x, y , mPaint);

    }

}
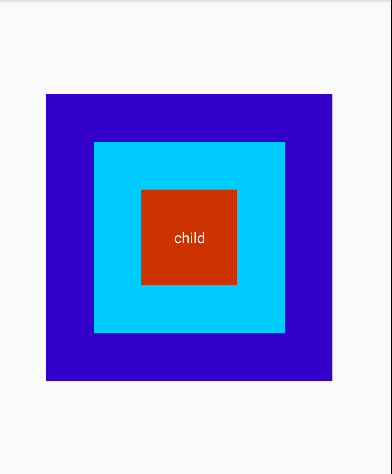
效果图:
Android-自定义控件-继承View与ViewGroup的初步理解的更多相关文章
- Android 中的View与ViewGroup
Android重点知识--View和ViewGroup与自定义控件 作者:丁明祥 邮箱:2780087178@qq.com 一.基础 ViewGroup 参考资料: Android 手把手教您自定义V ...
- Android精通:View与ViewGroup,LinearLayout线性布局,RelativeLayout相对布局,ListView列表组件
UI的描述 对于Android应用程序中,所有用户界面元素都是由View和ViewGroup对象构建的.View是绘制在屏幕上能与用户进行交互的一个对象.而对于ViewGroup来说,则是一个用于存放 ...
- Android单独继承View类来实现自定义控件
一个单独继承view类来实现自定义控件,在该方法中,需要重写ondraw方法来绘制自己所需要的控件,下面也以一个简单的例子来说明如何实现自定义控件.该方法可以实现所需要的所有的自定义控件. 属性文件中 ...
- Android界面的View以及ViewGroup的区别
因为这个问题会经常成为面试的热点,所以我们来谈谈View以及ViewGroup的区别. 先看看View及ViewGroup类关系 Android View和ViewGroup从组成架构上看,似乎 ...
- Android之UI View与ViewGroup
1.基本概念 View:所有可视化控件的父类,Android App屏幕上用户可以交互的对象(例如 按钮 下拉框 文本框等). ViewGroup:View的子类,存放View和ViewGroup对象 ...
- android自定义控件(四) View中的方法
onFinishInflate() 当View中所有的子控件 均被映射成xml后触发 onMeasure(int, int) 确定所有子元素的大小 onLayout(boolean, int, int ...
- Android View和ViewGroup
View和ViewGroup Android的UI界面都是由View和ViewGroup及其派生类组合而成的. 其中,View是所有UI组件的基类,而 ViewGroup是容纳这些组件的容器,其本身也 ...
- android自定义控件一站式入门
自定义控件 Android系统提供了一系列UI相关的类来帮助我们构造app的界面,以及完成交互的处理. 一般的,所有可以在窗口中被展示的UI对象类型,最终都是继承自View的类,这包括展示最终内容的非 ...
- Android自定义控件1--自定义控件介绍
Android控件基本介绍 Android本身提供了很多控件比如我们常用的有文本控件TextView和EditText:按钮控件Button和ImageButton状态开关按钮ToggleButton ...
随机推荐
- FatJar—Java Application制作jar包
Fat Jar功能非常强大,先下载吧. 下载地址:sourceforge.net/projects/fjep/files/ http://files.cnblogs.com/files/nidongd ...
- 语音-数字中继-E1-学习帖
1.电话线,俗称数字中继,模拟线路,一门电话线只能跑一个电话号码,用模拟语音卡:2.光纤,信令有两种30B+D(也叫pri信令)或者7号信令,数字线路,一路可以跑30路电话,用数字语音卡:数字语音卡 ...
- Oracle表空间知识
Oracle表空间知识 一,创建临时表空间 CREATE temporary TABLESPACE TEMP_PNLREPORT tempfile '/oradata2/ORCL/temp_pnlre ...
- CEP实时分析模型
大数据量的实时分析场景: 股票实时分析系统:大数据量(基于内存),要求分析汇总数据
- [Octave] fminunc()
fminunc( FCN, X0); fminunc( FCN, C0, Options); [X, FVEC, INFO, OUTPUT, GRAD, HESS] = fminunc (FCN, . ...
- python爬虫----基本操作
一.爬虫基本操作 有些网站和其他网站是有关系(链接),全球的网站就相当于一个蜘蛛网,我们放一只蜘蛛在上面爬,一定能够把网爬个遍.那么如果我们要爬取互联网上内容我们就相当于放一只蜘蛛在上面. 爬虫分为 ...
- leetcode922
public class Solution { public int[] SortArrayByParityII(int[] A) { var len = A.Length; ];//奇数1,3,5, ...
- leetcode475
public class Solution { public int FindRadius(int[] houses, int[] heaters) { houses = houses.Distinc ...
- 智能指针--C++
智能指针(一):STL auto_ptr实现原理 智能指针实际上是一个类(class),里面封装了一个指针.它的用处是啥呢? 指针与内存 说到指针自然涉及到内存.我们如果是在堆栈(stack)中分配了 ...
- 【独家】阿里天池IJCAI17大赛第四名方案全解析(附代码)
[独家]阿里天池IJCAI17大赛第四名方案全解析(附代码) https://mp.weixin.qq.com/s?__biz=MzAxMzA2MDYxMw==&mid=2651560625& ...