Python学习---django知识补充之CBV
Django知识补充之CBV
Django:
url --> def函数 FBV[function based view] 用函数和URL进行匹配
url --> 类 CBV[function based view] 用类和URL进行匹配
POSTMAN插件
http://blog.csdn.net/zzy1078689276/article/details/77528249
基于CBV的登录实例:
settings.py
INSTALLED_APPS = [

   ...

 'app01',   # 注册app

]

STATICFILES_DIRS = (os.path.join(BASE_DIR, "statics"),)  # 现添加的配置,这里是元组,注意逗号

TEMPLATES = [

   ...

   'DIRS': [os.path.join(BASE_DIR, 'templates')],

]
urls.py
from django.contrib import admin

from django.urls import path

from django.conf.urls import url, include

from app01 import views

urlpatterns = [

   # 基于CBV的登录

 # url(r'^login.html/', views.login),  # 原来基于函数

   url(r'^login.html/', views.Login.as_view()), # 现在基于类名.as_view()

]
views.py
from django.shortcuts import render, redirect
from app01 import models
# 基于CBV的登录,需要导入views
from django import views
class Login(views.View):
# http_method_names = ['get', 'post', 'put', 'patch', 'delete', 'head', 'options', 'trace']
def get(self, request, *args, **kwargs):
print(request.method, 'GGGGGGGGGGGG')
message = ''
return render(request, 'login.html', {'message': message}) # 这里是网页html
def post(self, request, *args, **kwargs):
print(request.method, 'OOOOOOOOOOOOO')
username = request.POST.get("user")
password = request.POST.get("pass")
print('username: %s, password:%s' % (username, password))
# obj = models.Administrator.objects.filter(username=username, password=password).count()
# if obj: 从数据库内取出数据,进行判断也可以
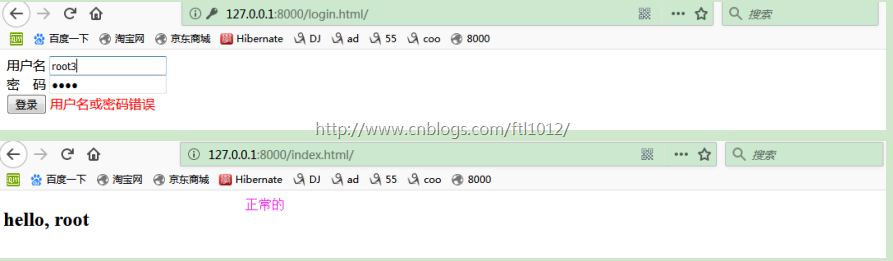
if username == 'root' and password == 'root':
req = redirect('/index.html/') # 接收redirect对象,# 这里是浏览器路径,伪静态
# req.set_cookie('username', username, max_age=10) # 设置超时时间10s
import datetime
timeout = datetime.datetime.now() + datetime.timedelta(seconds=10)
req.set_cookie('username', username, max_age=10, expires=timeout)
# IE设置超时时间10s
return req
# return redirect('/index.html') # 与上面3行同,只是添加了Cookie
else:
message = '用户名或密码错误'
return render(request, 'login.html', {'message': message}) # 这里是网页html
templates/login.html
<!DOCTYPE html>
<html lang="en">
<head>
<meta charset="UTF-8">
<title>Title</title>
</head>
<body>
{# 伪静态#}
<form action="/login.html/" method="post">
{% csrf_token %} {# 为跨站请求 #}
<div>
<label for="user">用户名</label>
<input id="user" name="user" type="text">
</div>
<div>
<label for="pass">密 码</label>
<input id="pass" name="pass" type="password">
</div>
<div>
<label></label>
<input value="登录" type="submit">
<span style="color: red">{{ message }}</span>
</div>
</form>
</body>
</html>
templates/index.html
<!DOCTYPE html>

<html lang="en">

<head>

    <meta charset="UTF-8">

</head>

<body>

    <h2>hello, {{ username }}</h2>

</body>

</html>
页面显示:
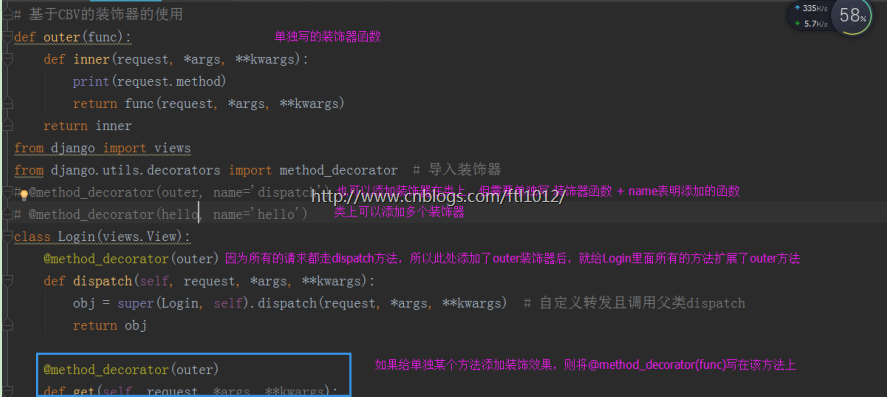
CBV基于装饰器的使用<一> ---基于Python旧方法
CBV基于装饰器的使用<一> ---基于Python旧方法
装饰器:函数执行之前/后可以增加扩展功能
有多个方法的时候,必须给每个方法添加装饰器哈
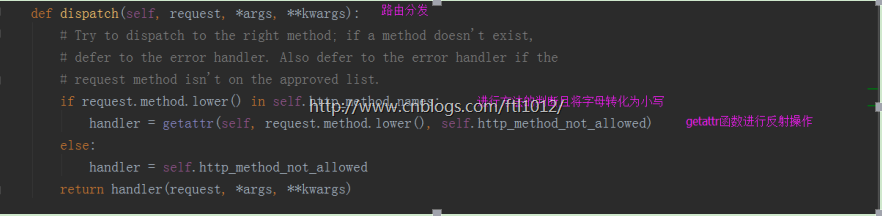
CBV的反射原理
单一装饰器
views.py
from django.shortcuts import render, redirect

from app01 import models

# 基于CBV的登录,需要导入views

from django import views

from django.utils.decorators import method_decorator  # 导入装饰器

# 基于CBV的装饰器的使用

def outer(func):

    def inner(request, *args, **kwargs):

        print(request.method)

        return func(request, *args, **kwargs)

    return inner

class Login(views.View):

    # http_method_names = ['get', 'post', 'put', 'patch', 'delete', 'head', 'options', 'trace']

    @method_decorator(outer)

    def get(self, request, *args, **kwargs):

        message = ''

        return render(request, 'login.html', {'message': message})  # 这里是网页html

    @method_decorator(outer)

    def post(self, request, *args, **kwargs):

        username = request.POST.get("user")

        password = request.POST.get("pass")

        print('username: %s, password:%s' % (username, password))

        # obj = models.Administrator.objects.filter(username=username, password=password).count()

        # if obj:   从数据库内取出数据,进行判断也可以

        if username == 'root' and password == 'root':

            req = redirect('/index.html/')  # 接收redirect对象,# 这里是浏览器路径,伪静态

            # req.set_cookie('username', username, max_age=10)  # 设置超时时间10s

            import datetime

            timeout = datetime.datetime.now() + datetime.timedelta(seconds=10)

            req.set_cookie('username', username, max_age=10, expires=timeout)

            # IE设置超时时间10s

            return req

            # return redirect('/index.html') # 与上面3行同,只是添加了Cookie

        else:

            message = '用户名或密码错误'

            return render(request, 'login.html', {'message': message})  # 这里是网页html
CBV基于装饰器的使用<二> --基于Django的dispatch[多个装饰器]
CBV基于装饰器的使用<二> --基于Django的dispatch[多个装饰器]
如果对某一种请求做处理: 单一装饰器
如果对所有的请求做处理: dispatch单一装饰器
添加装饰器有2中方法:
1.类上添加
2.方法上添加
自定义转发dispatch函数
from django import views
from django.utils.decorators import method_decorator # 导入装饰器
class Login(views.View):
# http_method_names = ['get', 'post', 'put', 'patch', 'delete', 'head', 'options', 'trace']
# 自定义转发器,URL进来都在此处进行URL转发,我们可以有一些预操作[函数验证可以放此处]
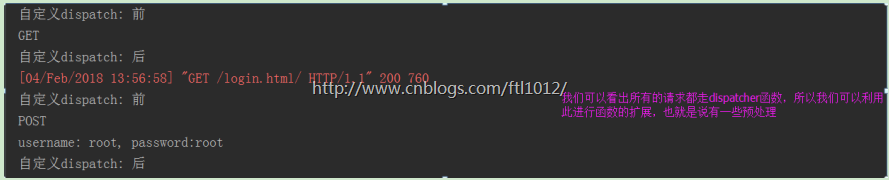
def dispatch(self, request, *args, **kwargs):
print('自定义dispatch: 前')
# if request.method == 'POST':
# return HttpResponse("Good Bye") # 预操作处理
# 请求先到Login的dispatch,然后调用父类的dispatch,返回结果给了obj
obj = super(Login, self).dispatch(request, *args, **kwargs) # 自定义转发且调用父类dispatch
# 将父类的返回结果返回给界面,否则界面报错
print('自定义dispatch: 后')
return obj def get(self, request, *args, **kwargs):
message = ''
return render(request, 'login.html', {'message': message}) # 这里是网页html
...同上
Python学习---django知识补充之CBV的更多相关文章
- 【python学习小知识】求绝对值和numpy和tensor的相互转换
一.python求绝对值的三种方法 1.条件判断 2.内置函数abs() 3.内置模块 math.fabs 1.条件判段,判断大于0还是小于0,小于0则输出相反数即可 # 法1:使用条件判断求绝对值 ...
- Python学习---django模板语法180122
django模板语法[Template] 模版的组成: HTML代码+逻辑控制代码 <h1> {{ user_name }} </h1> 逻辑控制代码的组成: 1.变量: ...
- Python学习---Django下的Sql性能的测试
安装django-debug-tools Python学习---django-debug-tools安装 性能测试: settings.py INSTALLED_APPS = [ ... 'app01 ...
- python学习-- Django根据现有数据库,自动生成models模型文件
Django引入外部数据库还是比较方便的,步骤如下 : 创建一个项目,修改seting文件,在setting里面设置你要连接的数据库类型和连接名称,地址之类,和创建新项目的时候一致 运行下面代码可以自 ...
- Django知识补充
目录 一.文件上传 二.Models补充 三.Django总结 一.文件上传 1.通过form表单或者通过From类上传 views.py from django.shortcuts import r ...
- Python之Django rest_Framework补充
一.什么是RESTful REST与技术无关,代表的是一种软件架构风格,REST是Representational State Transfer的简称,中文翻译为"表征状态转移" ...
- Python学习---django下的cookie操作 180201
什么是Cookies 什么是Cookies cookies设置的原因: 1. http请求的无记忆性: 2.加快访问速度 3. 减少服务器压力 cookies特点: cookies保存在客户端浏览器 ...
- Python学习---django之ORM语法[对象关系映射]180124
ORM语法[对象关系映射] ORM: 用面向对象的方式去操作数据库的创建表以及增删改查等操作. 优点:1 ORM使得我们的通用数据库交互变得简单易行,而且完全不用考虑该死的SQL语句.快速开发. 2 ...
- Python学习---Django的基础学习
django实现流程 Django学习框架: #安装: pip3 install django 添加环境变量 #1 创建project django-ad ...
随机推荐
- archlinux安装gnome的一些坑随记
问题1:网络设置无法查看,提示缺少NetworkManager 解决:安装networkmanager库,因为gnome调用的是networkmanager这个软件来管理网络的.然后要启动它:sudo ...
- ASP.NET MVC Web API 学习笔记---联系人增删改查
本章节简单介绍一下使用ASP.NET MVC Web API 做增删改查. 目前很多Http服务还是通过REST或者类似RESP的模型来进行数据操作的. 下面我们通过创建一个简单的Web API来管理 ...
- HDU 5444 Elven Postman (2015 ACM/ICPC Asia Regional Changchun Online)
Elven Postman Elves are very peculiar creatures. As we all know, they can live for a very long time ...
- 使用Vue搭建多页面应用
使用Vue-cli搭建多页面应用时对项目结构和配置的调整 前提:在这里使用的是webpack模板进行搭建 第一步.安装Vue-cli并且进行初始化 首先打开git,在里面使用npm全局安装Vue- ...
- NUmericupdown控件
Numericupdown控件是由system.windows.froms.Numericupdown类提供的,主要作用是将一个数按一定的值进行增加或减少.它主要有四个常用属性 Increment ...
- memcached 细究(一)
memcached是高性能的分布式的内存缓存服务器.由国外社区网站LIVEJOURNAL的开发团队开发. 使用目的: 通过缓存数据库查询结果,减少数据库的访问次数,以提高动态web应用的速度.提高可扩 ...
- HDU 2276 Kiki & Little Kiki 2 矩阵构造
Kiki & Little Kiki 2 Time Limit: 2000/1000 MS (Java/Others) Memory Limit: 32768/32768 K (Java ...
- JDBC处理事务
一.什么是事务? 在人员管理系统中,你删除一个人员,你即需要删除人员的基本资料,也要删除和该人员相关的信息,如信箱,文章等等,这样,这些数据库操作语句就构成一个事务! 二.事务是必须满足4个条件(AC ...
- C#3.0匿名类和Lanmda表达式
1.初始化器:className variableName = new className(property1=value1…); 2.var可以声明一个没有类型的变量,根据赋值的不同改变数据类型 3 ...
- sql: Oracle 11g create procedure
CREATE OR REPLACE PROCEDURE proc_Insert_BookKindList ( temTypeName nvarchar2, temParent int ) AS nco ...