树莓派-交叉编译环境搭建(Eclipse)
转自别人的文章(http://www.cnblogs.com/emouse/archive/2013/06/07/3124063.html),一些看不清楚的图片替换了一下。
In this blog entry the setup of a cross-compiling development environment for the Raspberry Pi will be demonstrated. This will include the
- Official Raspbian (armhf) cross compiling toolchain(available from github)
- Eclipse for C/C++ Developers (Linux 32-bit)
We will finally write a simple Hello World program on our Kubuntu virtual machine (VM), compile it using the cross compiler and then deploy it onto our Raspberry Pi board to run it.
I’m going to assume that you have alreadyinstalled a Raspbian Wheezy image on your RPi boardand that you have Ubuntu / Kubuntu Linux installed either has a host OS or guest OS on your desktop PC.
A remote debugging tutorial; which I consider to be the continuation of this tutorial, can be found here.
So what is a cross compiling toolchain and why use one ?
A native compiler such as the default gcc tool on Kubuntu is a compiler that runs on an Intel machine, as well as creates binaries intended to be run on an Intel machine. i.e it creates binaries for the same type of machine that it runs on. Similarly the GCC tool in the RPi’s Raspbian Linux OS is intended to run on an ARM machine as well as creates binaries for an ARM machine.
A cross compiler such as the “arm-linux-gnueabihf-gcc” that we will use is able to run on an Intel machine but creates binaries for an ARM machine. In other words, it runs on one architecture and creates binaries for another. This allows us to develop and compile our programs on our Desktop PC but when it comes to deploying the binaries we deploy them and run them on the Raspberry Pi.
So why use a Cross-compiler instead of developing our code and compiling it natively on the Raspberry Pi itself? After all, the Raspberry Pi has a native GCC compiler. We can also use code editors such as nano or vi from the command line (remotely over SSH) or GUI programs such as Geany (remotely over VNC).
The main case for cross-compilation over native compilation (develop and compile on the RPi itself) is that it tends to be faster. Remember the RPi board may be fast compared to a microcontroller…but its still has limited RAM resources and is pretty slow compared to an average desktop computer….
Also you have a myriad of development tools that you can use on your desktop PC that you simply can’t use on the Raspberry Pi; such as the Eclipse IDE.
Now that I’ve explained the why…let’s get started!
Downloading and Setting Up the Cross Compiling Toolchain
- Open a terminal window on your desktop side Kubuntu/Ubuntu Linux OS and type the following command: “sudo apt-get install git“. This will install the GIT tool on your desktop linux box which in turn will enable us to download / clone the cross compiling toolchain from GitHub.com.
- If you’re running a 64-bit Ubuntu/Kubuntu Linux OS you will probably also want to install the 32-bit library/header files. Since the cross compiler will need them to properly run. You can do this by typing “sudo apt-get install ia32-libs“. Again this step is only required if you are running a 64-bit Linux OS.
- Once git is installed, create a “raspberrypi” directory in your home directory by typing “mkdir raspberrypi“.
- Go to the raspberrypi directory by “cd raspberrypi” and then type: “sudo git clone git://github.com/raspberrypi/tools.git“
- This command will download (clone) Raspbian’s official cross compiling toolchain from Github. The command will take a few minutes to complete its task.
- When the previous command completes, navigate to “/home/halherta/raspberrypi/tools/arm-bcm2708″ using “cd ~/raspberrypi/tools/arm-bcm2708” on your Deskop Linux OS.
- In the arm-bcm2708 folder you’ll see three other folders each containing a separate toolchain:
- arm-bcm2708-linux-gnueabi
- arm-bcm2708hardfp-linux-gnueabi
- gcc-linaro-arm-linux-gnueabihf-raspbian
Of those three we will use the third one. The next step is to add the directory containing the binary files of the third toolchain “gcc-linaro-arm-linux-gnueabihf-raspbian” to the PATH environment variable in linux. This way we can access the toolchain’s binary files from anywhere on our computer. We will do this by adding an “export PATH” command to the bottom of the .bashrc and .profile files in the home directory.
- In a terminal window (on your Desktop Linux OS) type “cd ~/“ to point to the home directory, then type “nano .bashrc“. This will open the .bashrc file in a command line based editor called nano. Go to the bottom of the .bashrc file using the down arrow key. Then type the following command:
“export PATH=$PATH:$HOME/raspberrypi/tools/arm-bcm2708/gcc-linaro-arm-linux-gnueabihf-raspbian/bin”
- Then hit Ctrl+x to exit. You will be prompted to save changes. Say yes and hit “Enter”.
- Similarly in our home directory type “nano .profile“. This will open the .profile file in the command line editor nano. Go to the bottom of the .profile file using the down arrow key. Then type the same command again:
“export PATH=$PATH:$HOME/raspberrypi/tools/arm-bcm2708/gcc-linaro-arm-linux-gnueabihf-raspbian/bin”
- Then hit Ctrl+x to exit. You will be prompted to save changes. Say yes and hit “Enter”.
Now restart your machine. (You probably could just log out and log in again)
Ideally you need to export the toolchain’s directory path to the PATH variable in either the .bashrc or the .profile files. This didn’t work for me. If it works for you thats great.
When you log-in into your desktop Linux OS, open a new console window and type: ” arm-linux-gnueabihf-gcc -v”. If you were successful you should see output similar to that in Figure 1. Congratulations! you just installed Raspbian’s official cross compiling toolchain on your Desktop PC / Virtual Machine!
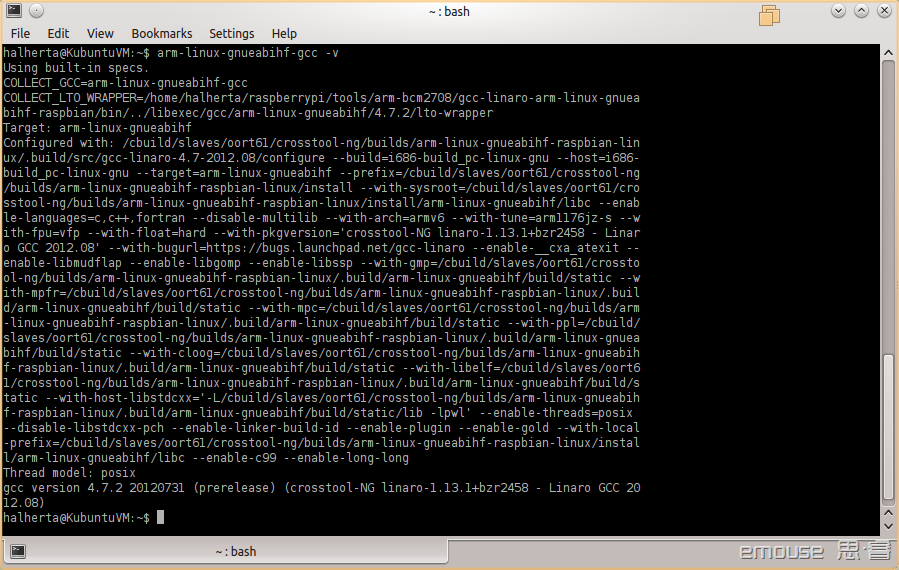
Figure 1. Cross Compiling Toolchain successfully installed and accessible from anywhere within your Desktop side Linux OS!!!
Downloading and Setting Up Eclipse
The Next step is to download and install Eclipse. Unfortunately as of this writing the apt-get repositories have yet to contain the latest Eclipse build…Eclipse Juno. So we will not be using the apt-get package manager. Instead we will download the latest Eclipse IDE from the web using a web browser.
- Before we can run eclipse, we need to ensure that we have a Java runtime environment installed; since eclipse relies heavily on Java. We can do this with the following command: “sudo apt-get install openjdk-7-jre“
- Go to the link provided below and download the linux version of the Eclipse IDE (Juno) for C/C++. Download the 32-bit version of the IDE if you’re running a 32-bit Linux OS or download the 64-bit version of the IDE if you’re running a 64-bit Linux OS.
Link: http://www.eclipse.org/downloads/packages/eclipse-ide-cc-developers/junor
- If you’re not sure whether you’re running a 64-bit or 32-bit Linux OS, open a terminal window and type” uname -a“. If the output of that command contains “i686″ or “i386″, you’re running a 32-bit Linux OS. If in the output you see “x64″ then you’re running a 64-bit Linux OS.
- The next step is to extract the “eclipse” folder into our home directory from the eclipse-cpp-juno-linux-gtk.tar.gz compressed file. This can be easily done using the Dolphin File Manager. Navigate to the directory in which “eclipse-cpp-juno-linux-gtk.tar.gz” was downloaded. Click on the file. This will open a decompression tool. Click on extract and choose to extract to the /home/halherta directory. Alternatively open a new console and navigate to the directory containing the .gz file then type: “tar -xvzf eclipse-cpp-juno-linux-gtk.tar.gz -C ~/“. Either way you will end up having the eclipse directory created in your home directory. To start eclipse, go to the home directory “cd ~/” then ‘cd’ your way into the eclipse folder “cd eclipse” then type “./eclipse &“.
- If you have been following my series of tutorials from scratch and/or are running Kubuntu, you can enable starting eclipse from the start menu right click on the blue KDE start menu button and click on “Edit Applications”. This will open the KDE Menu Editor.
- Select on the “Development” tab in the right of the window and then click on the “new item” button. A message box will pop-up. Enter under “item name”: “Eclipse Juno for C/C++ Developers”. Then click on the “open file dialog” adjacent to the “command field” and select the eclipse binary which should be “/home/halherta/eclipse/eclipse”. Furthermore, click on the icon box. This will open an icon source box select the “other icon” option and then click on the browse button. Browse to the “/home/halherta/eclipse/” folder and then select the “icon.xpm” file.
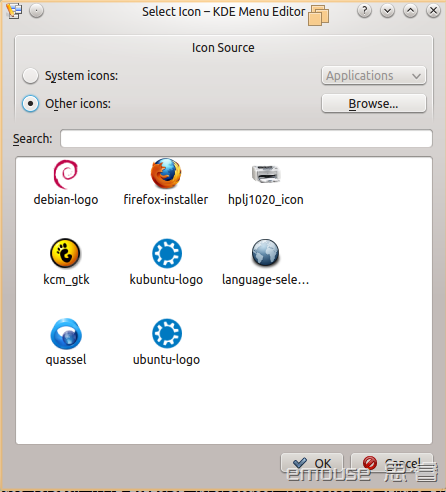
Figure 2. Choose “Other Icons” and hit “Browse” button to select “icon.xpm” file in the eclipse directory
- After these changes the KDE Menu Editor window should look like the illustration shown in Figure 3.
Figure 2. Choose “Other Icons” and hit “Browse” button to select “icon.xpm” file in the eclipse directory
- Finally click on the “Save” button and then close the KDE Menu Editor. If you now navigate the KDE menu, you should find eclipse under “Applications->Development”. If you click on it the Eclipse IDE should start.
- Note if you’re running Ubuntu (without Unity…just gnome classic) you can right click on the “Applications Menu” and select “Edit Menu” to edit your gnome-based Ubuntu start menu and add to it an entry for eclipse in a similar manner as demonstrated above. And don’t ask me about Ubuntu Unity integration..I hate it.
Creating a New Project in Eclipse
When Eclipse runs, it will first launch the workspace launcher. You will be prompted to choose a workspace directory. Accept the default. Feel free to check the “Use this as the default and do not ask again” option if you feel inclined to do so. (You can always switch/change the workspace directory by going to “File->Switch Workspace” ).
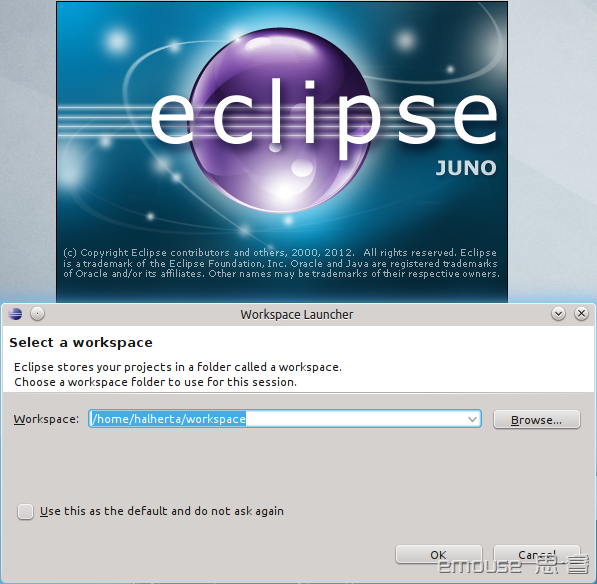
Figure 4. Workspace launcher
- You should then see a Welcome Tab (Figure 5). Click on the ‘x’ on the Welcome tab to close it
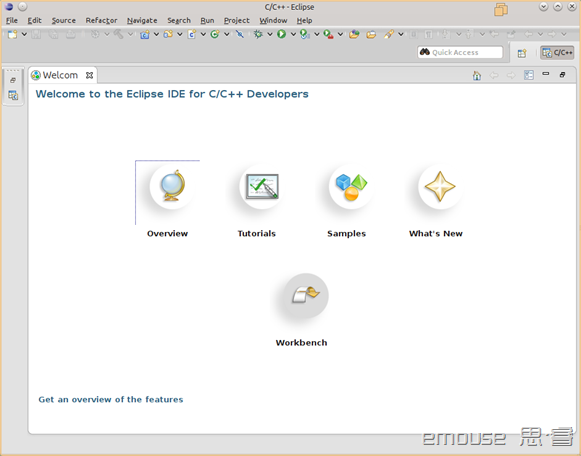
Figure 5. Welcome Tab. Click on the ‘x’ in the tab to close it
- Now go to File->New->C++ Project. This will open the “C++ Project” window shown in Figure 6.
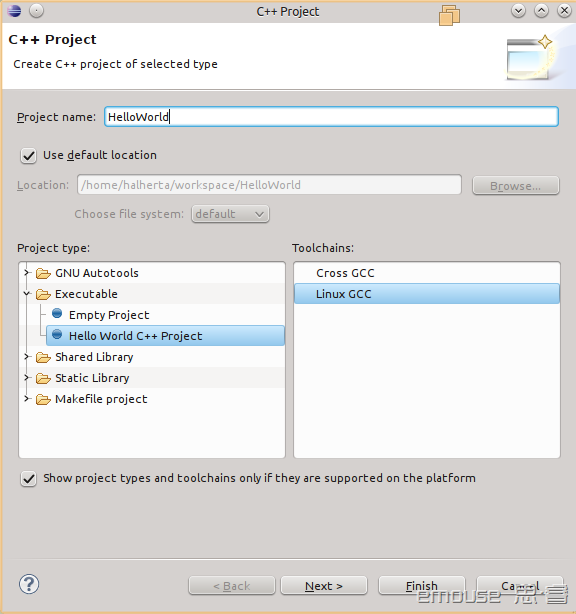
Figure 6. C++ Project Window
- Type “HelloWorld” in the “Project Name” field. Under Project type select “Executable->Empty Project” Under “Toolchains” select “Linux GCC”. Then click on “Next” This should take you to the “Select Configurations” Window. Accept the defaults and click “Finish”.
- This should be the end of the basic project configuration. Your Eclipse Environment should look as shown in Figure 7.
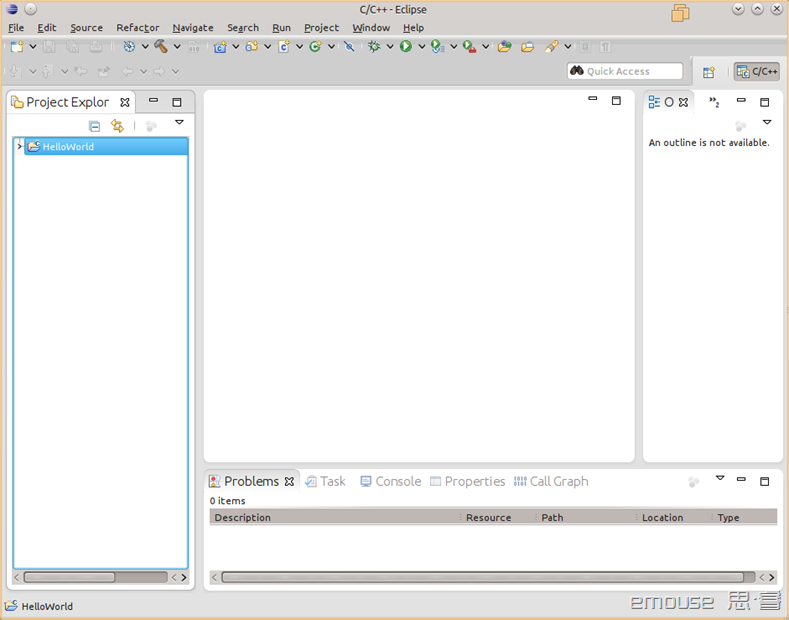
Figure 7. New Hello World Project initial setup
- Notice how this project does not have any source files so lets add one. Click on “File->New Source File”. This should open the “New Source File” window.
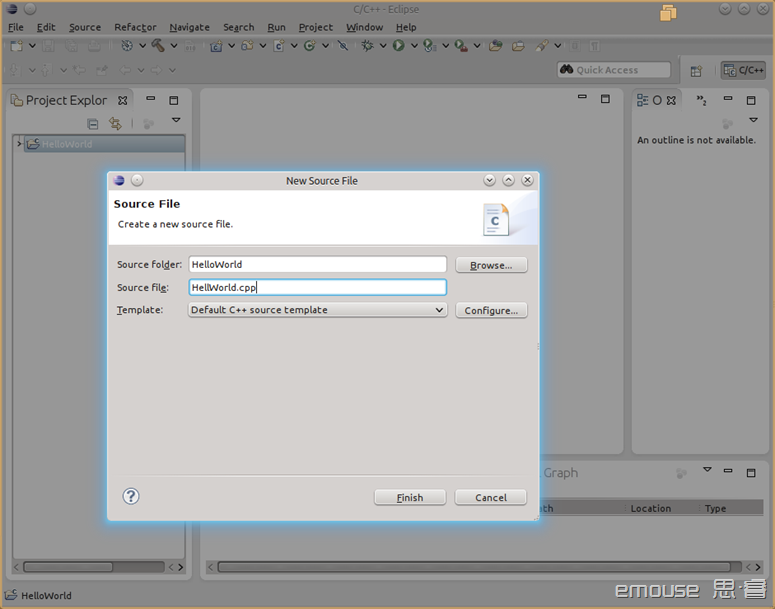
Figure 8. New source File Window.
- Ensure that the “Source folder” and “Source file” fields include “HelloWorld” and “HelloWorld.cpp” respectively as shown in Figure 8 and click Finish. This will add a HelloWorld.cpp source file to our project. In the source file type the following basic C++ code:

/*

 * HellWorld.cpp

 *

 *  Created on: 2012-09-27

 *      Author: halherta

 */

#include <iostream>

using namespace std;

int main (void)

{

    cout << "Hello RPi Development World !"<< endl;

    return 0;

}
Save your project by clicking on “File->Save”.
- Now we will need to access the Project properties to ensure that the correct compiler (the Raspbian cross compiler) and its header and library files are being used. To do this select the “HelloWorld” folder/project in the project explorer and then click on project properties. This will open the “Properties for HelloWorld” window.
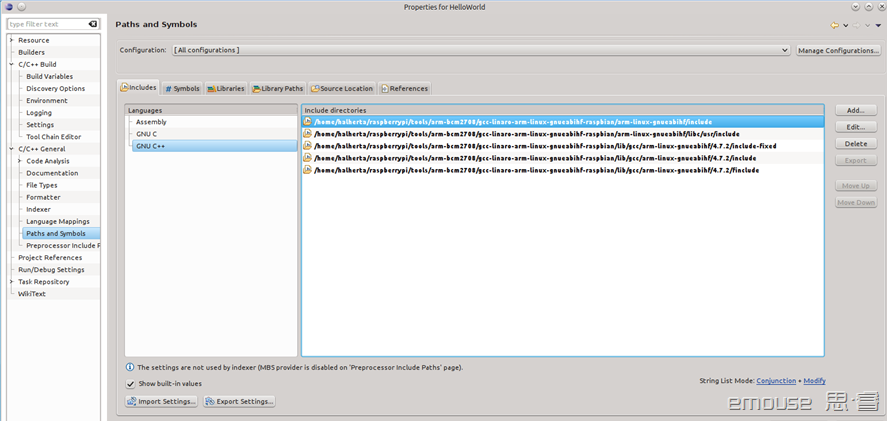

Figure 9.
- First go to “C/C++ General -> Paths and Symbols” from the left hand side navigation bar. In the “Includes” Tab make sure that all the include paths included in Figure 9 are added.
Then go to the “Library Paths” and make sure that all the library paths in Figure 10 are added.
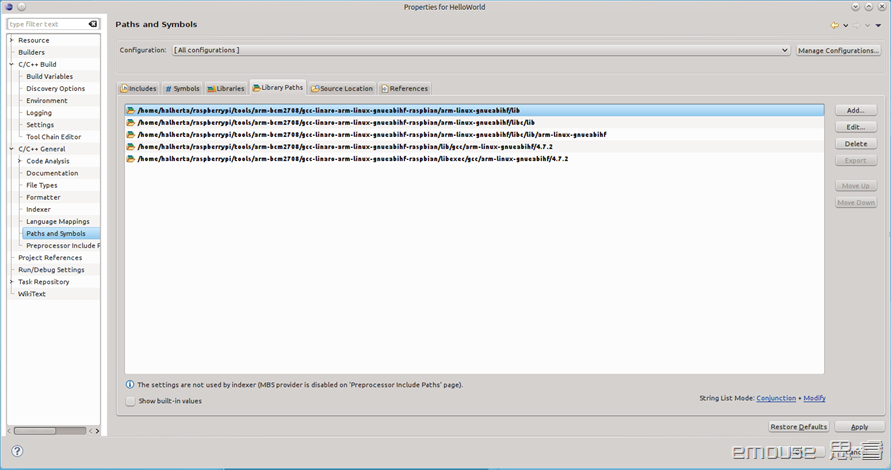

Figure 10. Library Path for the Cross Compiler
- Finally go to “C/C++ Build -> Settings” (Figure 11) from the left hand side navigation bar. Under the “Tool Settings” Tab select “GCC C++ Compiler” for that Tab’s Navigation bar and ensure that the command field contains: “arm-linux-gnueabihf-g++”
- Similarly the command field for the “GCC C Compiler” should contain “arm-linux-gnueabihf-gcc”
- Similarly the command field for the “GCC C++ Linker” should contain “arm-linux-gnueabihf-g++”
- And finally the command field for the “GCC Assembler” should contain “arm-linux-gnueabihf-as.
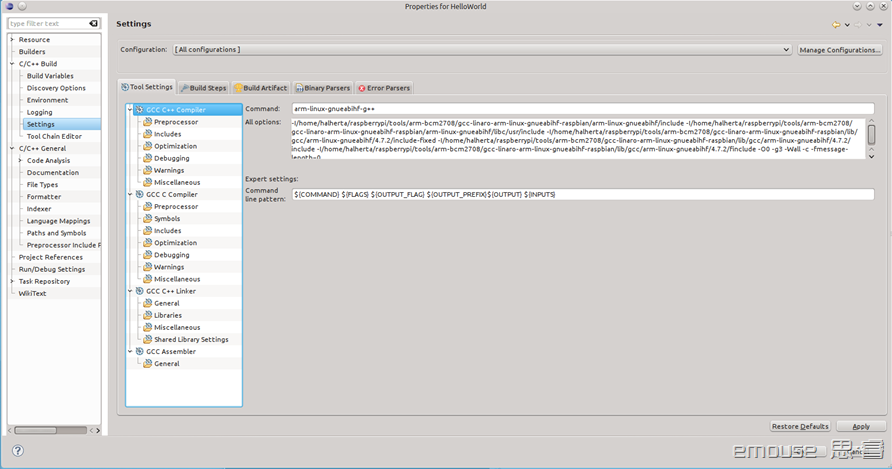
Figure 11. C/C++ Build->Settings
Then click on the Apply and OK buttons. At this point the Eclipse IDE is configured to utilize the Raspbian cross compiler.
To build the project click on “Project->Build Project”. To clean the project click on “Project->Clean”. Figure 12 shows the Eclipse workspace with the HelloWorld program successfully cross compiled for the Raspberry Pi!!!
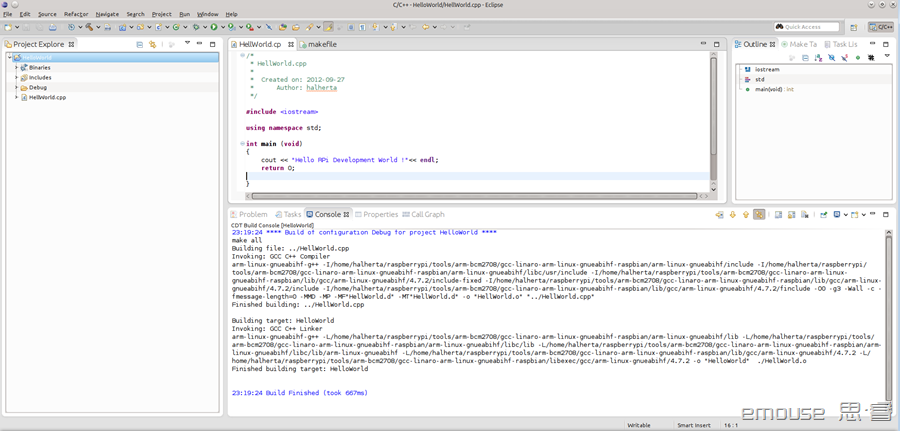
Figure 12. HelloWorld program successfully compiled for Raspberry Pi.!!!
The binary file for our HelloWorld application resides in the “~/workspace/HelloWorld/Debug”. Lets go there via a console window with cd “cd ~/workspace/HelloWorld/Debug/“. If we type in “ls -al” we’ll find that our Binary file is highlighted in green and is called HelloWorld. If I try to run it with “./HelloWorld” I get the following error message “cannot execute binary file“. Now if I type “file HelloWorld“, I get the following output: “HelloWorld: ELF 32-bit LSB executable, ARM, version 1 (SYSV), dynamically linked (uses shared libs), for GNU/Linux 2.6.26, BuildID[sha1]=0xb37e6eaa466429d015cc334d55f5d46c97c9fc6c, not stripped“. This indicates that the HelloWorld Binary File was compiled for a 32-bit ARM machine and cannot run on an Intel Machine.
Deploying the Binary file onto the Raspberry Pi
To deploy the binary to the Raspberry Pi, make sure that the RPi board is powered and connected to your network. The next step is click on “Window->Show View->Other”. This will open a show view window. In this window select the “Remote Systems” folder and then select “Remote Systems Details” and press OK (Figure 13).
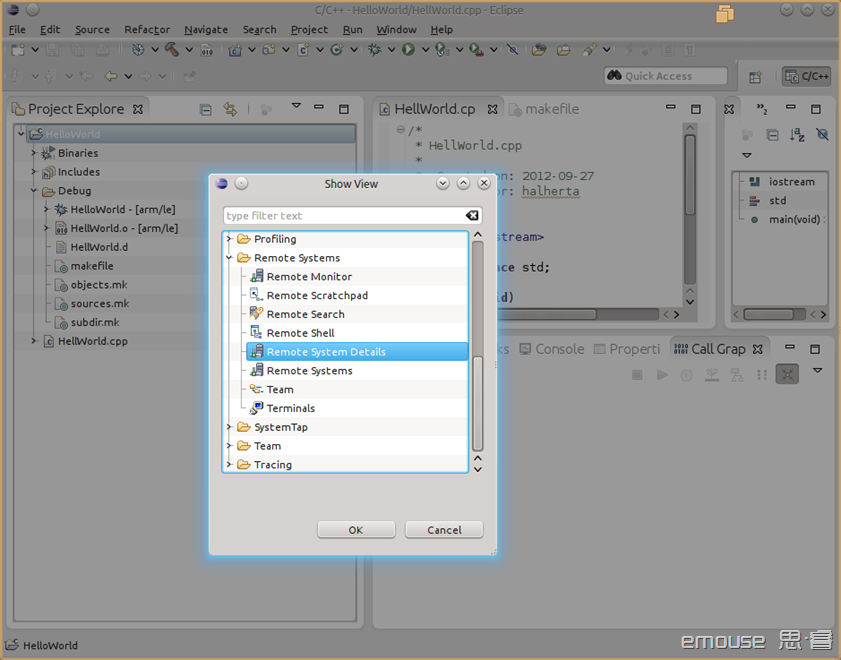
Figure 13. Remote system view
- If the “Remote Systems Details” shows up in the bottom of the workspace, drag it such that its tab shares the same region as the project explorer tab as shown in Figure 14.
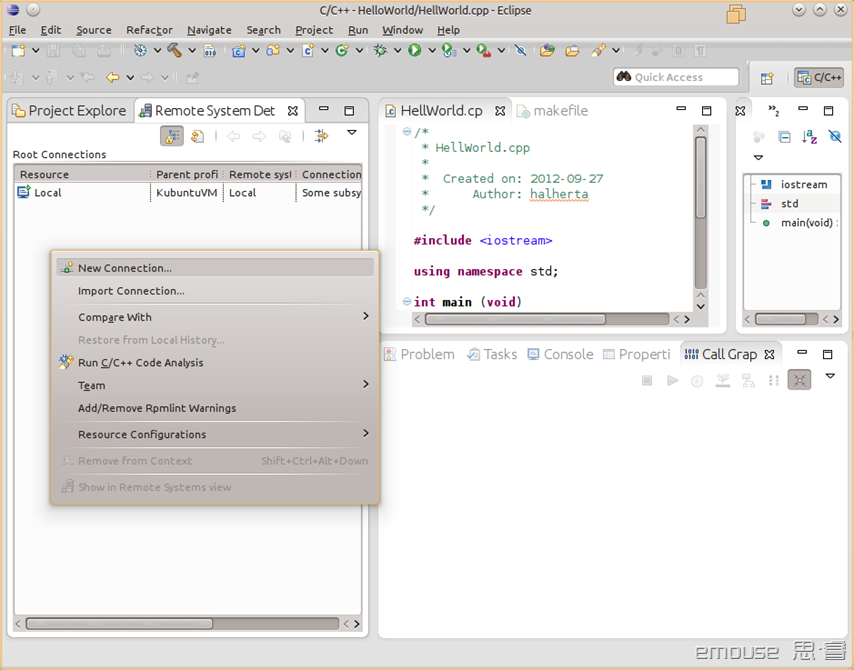
Figure 14.
- Now right click in the “Remote Systems Detail” area and click on “New Connection”. In the “Select Remote System Type” window (Figure 15), select “SSH only” then click “Next”
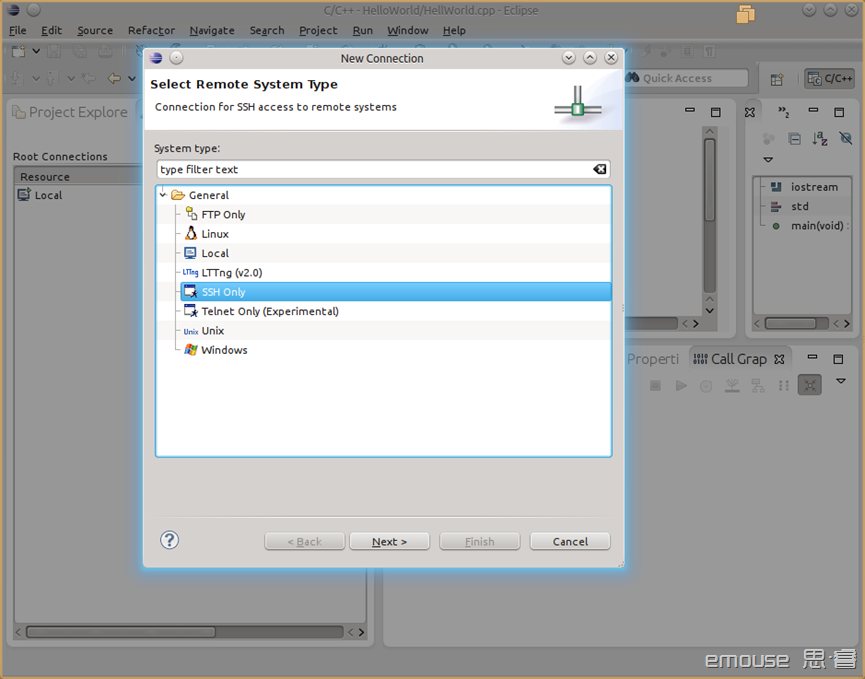
Figure 15.
- In the “Remote SSH Only System Connection” type in the IP address of the RPi in the “Host name” field and give the connection a valid name in the “Connection name” field. I typed “RaspberryPi”. Then click “Finish”.
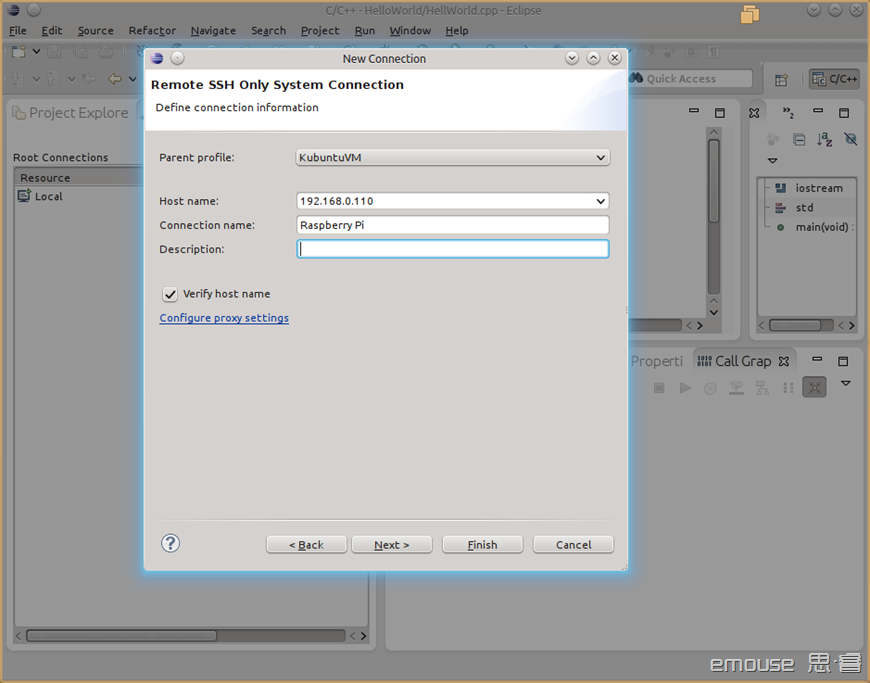
Figure 16.
- At this point a second device (Raspberry Pi) shows up in the “Remote Systems Detail” tab. Right click on the Raspberry Pi resource and click connect. You will be prompted to enter the username and password. Make sure that you utilize “username:pi” and “password:raspberry” (if you haven’t changed the default password). You may get a warning windows asking you if you are sure that you want to accept this connection. Affirm that you want to proceed with the connection. At this point you should be connected to your RPi from eclipse

Figure 17.
- Right click on the Raspberry Pi resource again in the “Remote Systems Detail” tab and click on the “Show in Remote Systems View”. This will open a “Remote Systems” tab in the same region of the workspace. In this tab, one can navigate the root file systems of both the Kubuntu (local) OS and that of the Raspbian/Raspberry Pi.
- Locate the HelloWorld Binary file on our local desktop PC and drag it to the home directory on the Raspberry Pi. This effectively copies the Binary file to the home directory of the Raspberry Pi.
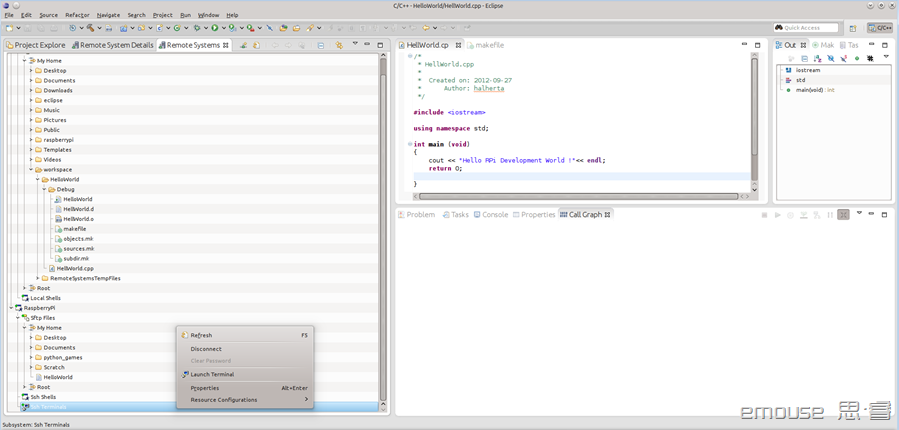
Figure 18.
- Now right click on the SSH terminal icon under the Raspberry Pi icon in the “Remote Systems” and select “Launch Terminal” . This should launch a terminal window in the bottom of the Eclipse workspace (Figure 19). This is basically a console / terminal window connected to the Raspberry Pi via SSH.
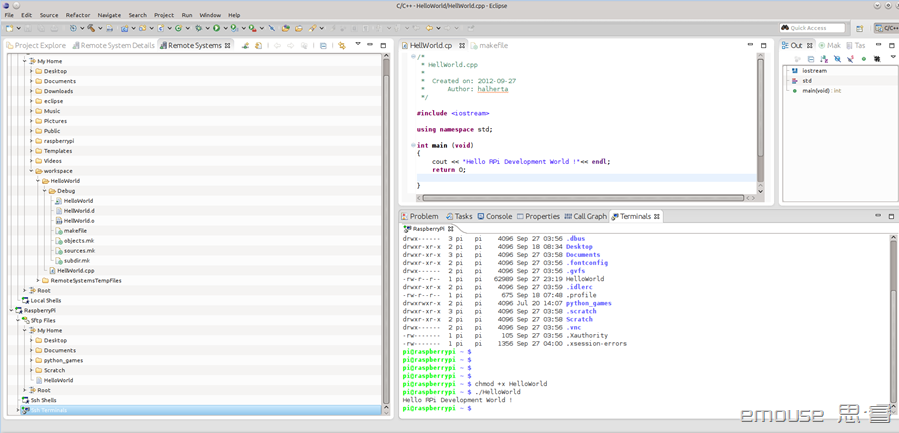
Figure 19.
- In the terminal window type “ls -al” to confirm that the “HelloWorld” binary indeed got copied into the home directory of the Raspberry Pi’s root file system. Then change the “HelloWorld” binary’s permission to make it executable: “chmod +x HelloWorld“
- Finally type “./HelloWorld“. You should see the output shown in Figure 19. :“Hello RPi Development World !”
- Congratulations!!! You just developed and ran your first cross compiled application for the Raspberry Pi.!!!!
- To remotely debug your applications on the Raspberry Pi from Eclipse, check out this blog entry!
树莓派-交叉编译环境搭建(Eclipse)的更多相关文章
- Exynos4412交叉编译环境搭建
Exynos4412交叉编译环境搭建 交叉编译:在PC机(x86平台)上开发程序,在ARM板上运行,提高开发.编译速度. 环境: Tiny4412SDK1506开发板 需要软件: arm-linux- ...
- Ubuntu系统下arm-linux-gcc交叉编译环境搭建过程
搭建所需环境Linux版本:Ubuntu 14.10 交叉编译器版本:arm-linux-gcc-4.4.3资源链接 何为交叉编译环境搭建交叉编译环境,即安装.配置交叉编译工具链.在Ubuntu环境下 ...
- YA157C交叉编译环境搭建
目录 1.开发板简介 3.主机搭建交叉编译环境 4.编译第一个ARM Linux程序--Hello World 5.在开发板上运行Hello World程序 6.ssh登录开发板 7.注意 8.she ...
- NDK学习一: 环境搭建Eclipse篇
下载NDK 国内的一个镜像站点 下载速度比较快 http://wear.techbrood.com/tools/sdk/ndk/#Installing 网上搭建环境的方案有很多 1. Eclipse ...
- Python介绍、环境搭建(Eclipse插件)、第一个程序
Python介绍 特点 优雅.明白.简单. 适合领域 1. Web站点和各种网络服务 2. 系统工具和脚本 3. 作为"胶水"语言把其它语言开发的模块包装起来方便使用 和其它语言对 ...
- Zedboard学习(二):zedboard的Linux下交叉编译环境搭建 标签: 交叉编译linuxzedboard 2017-07-04 23:49 19人阅读
环境准备 首先肯定是要下载xilinx-2011.09-50-arm-xilinx-linux-gnueabi.bin文件,这是官方提供的linux下交叉编译链安装文件,下载地址为:https://p ...
- Android独立交叉编译环境搭建
我们经常需将一些C/C++源码编译成本地二进制,直接在android的linux内核上运行,这是就需要进行交叉编译.由于Android的运行环境核普通Linux又区别,所以常规方式针对ARM进行交叉编 ...
- iMX6 yocto平台QT交叉编译环境搭建
转:https://blog.csdn.net/morixinguan/article/details/79351909 . /opt/fsl-imx-fb/4.9.11-1.0.0/environm ...
- Zynq7000开发系列-4(新:Xilinx交叉编译环境搭建)
一.前言 本来上一篇文章已经讲了Xilinx交叉编译环境的搭建,但是我在后续的使用中发现:使用2011年版本的交叉编译链编译OpenCV 3.1.0时出现错误: 网络搜索一番,查明是交叉编译链的问题 ...
随机推荐
- cardslib
https://github.com/gabrielemariotti/cardslib
- [Webpack 2] Use Karma for Unit Testing with Webpack
When writing tests run by Karma for an application that’s bundled with webpack, it’s easiest to inte ...
- [Javascript] The Array forEach method
Most JavaScript developers are familiar with the for loop. One of the most common uses of the for lo ...
- cglib源码分析(二):Class name 生成策略
一.如何获取动态生成的class 字节码 结合生成的class文件是一个学习cglib的比较好的方法.在cglib中,生成的class文件默认只存储在内存中,我们可以在代码中加入下面语句来获取clas ...
- MySQL INSERT DELAYED
INSERT DELAYED 语法 INSERT [LOW_PRIORITY | DELAYED | HIGH_PRIORITY] [IGNORE] [INTO] tbl_name [(col_nam ...
- C++实现多线程类Thread
Windows编程中创建线程的常见函数有:CreateThread._beginthread._beginthreadex.据说在任何情况下_beginthreadex都是较好的选择. _begint ...
- Linux操作系统搭建LAMP开发环境
Step1. 安装 Apache 在terminal中输入命令 sudo apt-get install apache2 打开浏览器,在地址栏输入:127.0.0.1,如果出现了 “It works! ...
- (转)Asp.NetURL重写的一种方法
说到不用设置iis,主要是为了实现在虚拟主机或是拿不到iis操作限的时候,不能添加isap又想实现类似于静态化的程序实现方式,先声明,这里最终要实现的效果是,最终可以用 12345.html 替换 s ...
- Android XML解析
解析XML有三种方式:Dom.SAX.Pull 其中pull解析器运行方式与SAX类似. 我们首先认识pull解析器:http://developer.android.com/intl/zh-cn/r ...
- 通过Web.config中的configSections配置自己系统的全局常量
通过Web.config中的configSections配置自己系统的全局常量 随着系统的庞大,你的全局信息保存在appsitting里可能会比较乱,不如为模块写个自定义的全局常量吧 首先在Web.C ...