
caffe-ssd使用预训练模型做目标检测
首先参考https://www.jianshu.com/p/4eaedaeafcb4
这是一个傻瓜似的目标检测样例,目前还不清楚图片怎么转换,怎么验证,后续继续跟进
- 模型测试
(1)图片数据集上测试
python examples/ssd/score_ssd_pascal.py
输出为
I0505 ::27.929069  caffe.cpp:] Finetuning from models/VGGNet/VOC0712/SSD_300x300/VGG_VOC0712_SSD_300x300_iter_120000.caffemodel

I0505 ::28.052016  net.cpp:] Ignoring source layer mbox_loss

I0505 ::28.053956  caffe.cpp:] Starting Optimization

I0505 ::28.053966  solver.cpp:] Solving VGG_VOC0712_SSD_300x300_train

I0505 ::28.053969  solver.cpp:] Learning Rate Policy: multistep

I0505 ::28.197612  solver.cpp:] Iteration , loss = 1.45893

I0505 ::28.197657  solver.cpp:] Iteration , Testing net (#)

I0505 ::28.213793  net.cpp:] Ignoring source layer mbox_loss

I0505 ::04.390517  solver.cpp:]     Test net output #: detection_eval = 0.570833

I0505 ::04.414819  solver.cpp:] Optimization Done.

I0505 ::04.414847  caffe.cpp:] Optimization Done.

作者:Ericzhang922

链接:https://www.jianshu.com/p/4eaedaeafcb4

來源:简书

简书著作权归作者所有,任何形式的转载都请联系作者获得授权并注明出处。
可以看到图片数据集上的检测结果为57.0833%。利用python examples/ssd/ssd_detect.py可以用单张图片测试检测效果(注意文件内加载文件的路径,如果报错修改为绝对路径):

可以得到如下结果
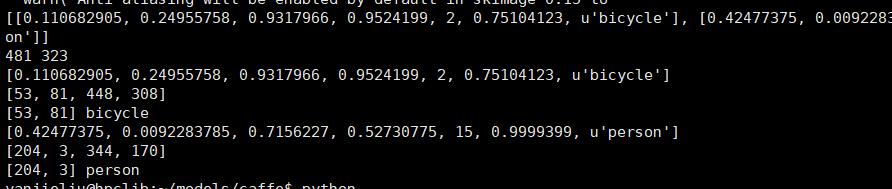
然后来看ssd_detect.py中的代码
#encoding=utf8

'''

Detection with SSD

In this example, we will load a SSD model and use it to detect objects.

'''

import os

import sys

import argparse

import numpy as np

from PIL import Image, ImageDraw

# Make sure that caffe is on the python path:

caffe_root = './'

os.chdir(caffe_root)

sys.path.insert(0, os.path.join(caffe_root, 'python'))

import caffe

from google.protobuf import text_format

from caffe.proto import caffe_pb2

def get_labelname(labelmap, labels):

    num_labels = len(labelmap.item)

    labelnames = []

    if type(labels) is not list:

        labels = [labels]

    for label in labels:

        found = False

        for i in xrange(0, num_labels):

            if label == labelmap.item[i].label:

                found = True

                labelnames.append(labelmap.item[i].display_name)

                break

        assert found == True

    return labelnames

class CaffeDetection:

    def __init__(self, gpu_id, model_def, model_weights, image_resize, labelmap_file):

        caffe.set_device(gpu_id)

        caffe.set_mode_gpu()

        self.image_resize = image_resize

        # Load the net in the test phase for inference, and configure input preprocessing.

        self.net = caffe.Net(model_def,      # defines the structure of the model

                             model_weights,  # contains the trained weights

                             caffe.TEST)     # use test mode (e.g., don't perform dropout)

         # input preprocessing: 'data' is the name of the input blob == net.inputs[0]

        self.transformer = caffe.io.Transformer({'data': self.net.blobs['data'].data.shape})

        self.transformer.set_transpose('data', (2, 0, 1))

        self.transformer.set_mean('data', np.array([104, 117, 123])) # mean pixel

        # the reference model operates on images in [0,255] range instead of [0,1]

        self.transformer.set_raw_scale('data', 255)

        # the reference model has channels in BGR order instead of RGB

        self.transformer.set_channel_swap('data', (2, 1, 0))

        # load PASCAL VOC labels

        file = open(labelmap_file, 'r')

        self.labelmap = caffe_pb2.LabelMap()

        text_format.Merge(str(file.read()), self.labelmap)

    def detect(self, image_file, conf_thresh=0.5, topn=5):

        '''

        SSD detection

        '''

        # set net to batch size of 1

        # image_resize = 300

        self.net.blobs['data'].reshape(1, 3, self.image_resize, self.image_resize)

        image = caffe.io.load_image(image_file)

        #Run the net and examine the top_k results

        transformed_image = self.transformer.preprocess('data', image)

        self.net.blobs['data'].data[...] = transformed_image

        # Forward pass.

        detections = self.net.forward()['detection_out']

        # Parse the outputs.

        det_label = detections[0,0,:,1]

        det_conf = detections[0,0,:,2]

        det_xmin = detections[0,0,:,3]

        det_ymin = detections[0,0,:,4]

        det_xmax = detections[0,0,:,5]

        det_ymax = detections[0,0,:,6]

        # Get detections with confidence higher than 0.6.

        top_indices = [i for i, conf in enumerate(det_conf) if conf >= conf_thresh]

        top_conf = det_conf[top_indices]

        top_label_indices = det_label[top_indices].tolist()

        top_labels = get_labelname(self.labelmap, top_label_indices)

        top_xmin = det_xmin[top_indices]

        top_ymin = det_ymin[top_indices]

        top_xmax = det_xmax[top_indices]

        top_ymax = det_ymax[top_indices]

        result = []

        for i in xrange(min(topn, top_conf.shape[0])):

            xmin = top_xmin[i] # xmin = int(round(top_xmin[i] * image.shape[1]))

            ymin = top_ymin[i] # ymin = int(round(top_ymin[i] * image.shape[0]))

            xmax = top_xmax[i] # xmax = int(round(top_xmax[i] * image.shape[1]))

            ymax = top_ymax[i] # ymax = int(round(top_ymax[i] * image.shape[0]))

            score = top_conf[i]

            label = int(top_label_indices[i])

            label_name = top_labels[i]

            result.append([xmin, ymin, xmax, ymax, label, score, label_name])

        return result

def main(args):

    '''main '''

    detection = CaffeDetection(args.gpu_id,

                               args.model_def, args.model_weights,

                               args.image_resize, args.labelmap_file)

    result = detection.detect(args.image_file)

    print result

    img = Image.open(args.image_file)

    draw = ImageDraw.Draw(img)

    width, height = img.size

    print width, height

    for item in result:

        xmin = int(round(item[0] * width))

        ymin = int(round(item[1] * height))

        xmax = int(round(item[2] * width))

        ymax = int(round(item[3] * height))

        draw.rectangle([xmin, ymin, xmax, ymax], outline=(255, 0, 0))

        draw.text([xmin, ymin], item[-1] + str(item[-2]), (0, 0, 255))

        print item

        print [xmin, ymin, xmax, ymax]

        print [xmin, ymin], item[-1]

    img.save('detect_result.jpg')

def parse_args():

    '''parse args'''

    parser = argparse.ArgumentParser()

    parser.add_argument('--gpu_id', type=int, default=0, help='gpu id')

    parser.add_argument('--labelmap_file',

                        default='data/VOC0712/labelmap_voc.prototxt')

    parser.add_argument('--model_def',

                        default='models/VGGNet/VOC0712/SSD_300x300/deploy.prototxt')

    parser.add_argument('--image_resize', default=300, type=int)

    parser.add_argument('--model_weights',

                        default='models/VGGNet/VOC0712/SSD_300x300/'

                        'VGG_VOC0712_SSD_300x300_iter_120000.caffemodel')

    parser.add_argument('--image_file', default='examples/images/fish-bike.jpg')

    return parser.parse_args()

if __name__ == '__main__':

    main(parse_args())
首先看传参这部分
def parse_args():

    '''parse args'''

    parser = argparse.ArgumentParser()

    parser.add_argument('--gpu_id', type=int, default=0, help='gpu id')

    parser.add_argument('--labelmap_file',

                        default='data/VOC0712/labelmap_voc.prototxt')

    parser.add_argument('--model_def',

                        default='models/VGGNet/VOC0712/SSD_300x300/deploy.prototxt')

    parser.add_argument('--image_resize', default=300, type=int)

    parser.add_argument('--model_weights',

                        default='models/VGGNet/VOC0712/SSD_300x300/'

                        'VGG_VOC0712_SSD_300x300_iter_120000.caffemodel')

    parser.add_argument('--image_file', default='examples/images/fish-bike.jpg')

    return parser.parse_args()
通过这部分的代码,我们可以看到进行检测时与训练时不一样,不需要对图片格式进行转换,直接输入原始图片就可以
所以,利用此命令 python ./examples/ssd/ssd_detect.py --image_file examples/images/fish-bike.jpg 可以指定用来检测的图片,
根据自己图片的位置,调整参数 python ./examples/ssd/ssd_detect.py --image_file ~/dataset/img_test/p1.jpg ,又因为需要进行时间统计,所以对代码进行修改。加入时间统计的函数,如下
#encoding=utf8

'''

Detection with SSD

In this example, we will load a SSD model and use it to detect objects.

'''

import os

import sys

import argparse

import numpy as np

from PIL import Image, ImageDraw

import time

# Make sure that caffe is on the python path:

caffe_root = './'

os.chdir(caffe_root)

sys.path.insert(0, os.path.join(caffe_root, 'python'))

import caffe

from google.protobuf import text_format

from caffe.proto import caffe_pb2

def get_labelname(labelmap, labels):

    num_labels = len(labelmap.item)

    labelnames = []

    if type(labels) is not list:

        labels = [labels]

    for label in labels:

        found = False

        for i in xrange(0, num_labels):

            if label == labelmap.item[i].label:

                found = True

                labelnames.append(labelmap.item[i].display_name)

                break

        assert found == True

    return labelnames

class CaffeDetection:

    def __init__(self, gpu_id, model_def, model_weights, image_resize, labelmap_file):

        caffe.set_device(gpu_id)

        caffe.set_mode_gpu()

        self.image_resize = image_resize

        # Load the net in the test phase for inference, and configure input preprocessing.

        self.net = caffe.Net(model_def,      # defines the structure of the model

                             model_weights,  # contains the trained weights

                             caffe.TEST)     # use test mode (e.g., don't perform dropout)

         # input preprocessing: 'data' is the name of the input blob == net.inputs[0]

        self.transformer = caffe.io.Transformer({'data': self.net.blobs['data'].data.shape})

        self.transformer.set_transpose('data', (2, 0, 1))

        self.transformer.set_mean('data', np.array([104, 117, 123])) # mean pixel

        # the reference model operates on images in [0,255] range instead of [0,1]

        self.transformer.set_raw_scale('data', 255)

        # the reference model has channels in BGR order instead of RGB

        self.transformer.set_channel_swap('data', (2, 1, 0))

        # load PASCAL VOC labels

        file = open(labelmap_file, 'r')

        self.labelmap = caffe_pb2.LabelMap()

        text_format.Merge(str(file.read()), self.labelmap)

    def detect(self, image_file, conf_thresh=0.5, topn=5):

        '''

        SSD detection

        '''

        # set net to batch size of 1

        # image_resize = 300

        self.net.blobs['data'].reshape(1, 3, self.image_resize, self.image_resize)

        image = caffe.io.load_image(image_file)

        #Run the net and examine the top_k results

        transformed_image = self.transformer.preprocess('data', image)

        self.net.blobs['data'].data[...] = transformed_image

        # Forward pass.

        detections = self.net.forward()['detection_out']

        # Parse the outputs.

        det_label = detections[0,0,:,1]

        det_conf = detections[0,0,:,2]

        det_xmin = detections[0,0,:,3]

        det_ymin = detections[0,0,:,4]

        det_xmax = detections[0,0,:,5]

        det_ymax = detections[0,0,:,6]

        # Get detections with confidence higher than 0.6.

        top_indices = [i for i, conf in enumerate(det_conf) if conf >= conf_thresh]

        top_conf = det_conf[top_indices]

        top_label_indices = det_label[top_indices].tolist()

        top_labels = get_labelname(self.labelmap, top_label_indices)

        top_xmin = det_xmin[top_indices]

        top_ymin = det_ymin[top_indices]

        top_xmax = det_xmax[top_indices]

        top_ymax = det_ymax[top_indices]

        result = []

        for i in xrange(min(topn, top_conf.shape[0])):

            xmin = top_xmin[i] # xmin = int(round(top_xmin[i] * image.shape[1]))

            ymin = top_ymin[i] # ymin = int(round(top_ymin[i] * image.shape[0]))

            xmax = top_xmax[i] # xmax = int(round(top_xmax[i] * image.shape[1]))

            ymax = top_ymax[i] # ymax = int(round(top_ymax[i] * image.shape[0]))

            score = top_conf[i]

            label = int(top_label_indices[i])

            label_name = top_labels[i]

            result.append([xmin, ymin, xmax, ymax, label, score, label_name])

        return result

def main(args):

    '''main '''

    start = time.time()

    detection = CaffeDetection(args.gpu_id,

                               args.model_def, args.model_weights,

                               args.image_resize, args.labelmap_file)

    result = detection.detect(args.image_file)

    end = time.time()

    print('time:\n')

    print str(end-start)

    with open('./mcode/ssd_outputs.txt', 'a') as f:

        f.write('\n')

        f.write(str(end-start))

    print result

    img = Image.open(args.image_file)

    draw = ImageDraw.Draw(img)

    width, height = img.size

    print width, height

    for item in result:

        xmin = int(round(item[0] * width))

        ymin = int(round(item[1] * height))

        xmax = int(round(item[2] * width))

        ymax = int(round(item[3] * height))

        draw.rectangle([xmin, ymin, xmax, ymax], outline=(255, 0, 0))

        draw.text([xmin, ymin], item[-1] + str(item[-2]), (0, 0, 255))

        print item

        print [xmin, ymin, xmax, ymax]

        print [xmin, ymin], item[-1]

    img.save('detect_result.jpg')

def parse_args():

    '''parse args'''

    parser = argparse.ArgumentParser()

    parser.add_argument('--gpu_id', type=int, default=0, help='gpu id')

    parser.add_argument('--labelmap_file',

                        default='data/VOC0712/labelmap_voc.prototxt')

    parser.add_argument('--model_def',

                        default='models/VGGNet/VOC0712/SSD_300x300/deploy.prototxt')

    parser.add_argument('--image_resize', default=300, type=int)

    parser.add_argument('--model_weights',

                        default='models/VGGNet/VOC0712/SSD_300x300/'

                        'VGG_VOC0712_SSD_300x300_iter_120000.caffemodel')

    parser.add_argument('--image_file', default='examples/images/fish-bike.jpg')

    return parser.parse_args()

if __name__ == '__main__':

    main(parse_args())
将文件修改后的文件放在/caffe/mcode/文件夹中,执行 python ./mcode/ssd_detect.py --image_file ~/dataset/img_test/p1.jpg
在weiliu89/caffe开源了三款数据集的fine-tuning模型,PASCAL VOC models、COCO models、ILSVRC models。
PASCAL VOC models:20分类
COCO models:80分类
ILSVRC models:1000分类
目前默认的模型应该是由vgg16搭建而来
caffe-ssd使用预训练模型做目标检测的更多相关文章
- tensorflow利用预训练模型进行目标检测(一):安装tensorflow detection api
一.tensorflow安装 首先系统中已经安装了两个版本的tensorflow,一个是通过keras安装的, 一个是按照官网教程https://www.tensorflow.org/install/ ...
- tensorflow利用预训练模型进行目标检测(二):预训练模型的使用
一.运行样例 官网链接:https://github.com/tensorflow/models/blob/master/research/object_detection/object_detect ...
- tensorflow利用预训练模型进行目标检测(三):将检测结果存入mysql数据库
mysql版本:5.7 : 数据库:rdshare:表captain_america3_sd用来记录某帧是否被检测.表captain_america3_d用来记录检测到的数据. python模块,包部 ...
- tensorflow利用预训练模型进行目标检测(四):检测中的精度问题以及evaluation
一.tensorflow提供的evaluation Inference and evaluation on the Open Images dataset:https://github.com/ten ...
- (转)如何用TensorLayer做目标检测的数据增强
数据增强在机器学习中的作用不言而喻.和图片分类的数据增强不同,训练目标检测模型的数据增强在对图像做处理时,还需要对图片中每个目标的坐标做相应的处理.此外,位移.裁剪等操作还有可能使得一些目标在处理后只 ...
- 使用Faster R-CNN做目标检测 - 学习luminoth代码
像玩乐高一样拆解Faster R-CNN:详解目标检测的实现过程 https://mp.weixin.qq.com/s/M_i38L2brq69BYzmaPeJ9w 直接参考开源目标检测代码lumin ...
- caffe SSD目标检测lmdb数据格式制作
一.任务 现在用caffe做目标检测一般需要lmdb格式的数据,而目标检测的数据和目标分类的lmdb格式的制作难度不同.就目标检测来说,例如准备SSD需要的数据,一般需要以下几步: 1.准备图片并标注 ...
- [目标检测]SSD原理
1 SSD基础原理 1.1 SSD网络结构 SSD使用VGG-16-Atrous作为基础网络,其中黄色部分为在VGG-16基础网络上填加的特征提取层.SSD与yolo不同之处是除了在最终特征图上做目标 ...
- 【目标检测】SSD:
slides 讲得是相当清楚了: http://www.cs.unc.edu/~wliu/papers/ssd_eccv2016_slide.pdf 配合中文翻译来看: https://www.cnb ...
随机推荐
- Java常见面试题02-方法重写和方法重载的区别?方法重载能改变返回值类型吗?
方法重写和方法重载的区别?方法重载能改变返回值类型吗? A:Override方法重写和Overload方法重载的区别? Overload是否可以改变返回值类型?可以 方法重写 • 子类中 ...
- C# DataTable常用方法总结
https://blog.csdn.net/wangzhen209/article/details/51743118
- js原生_获取url键值对
思路: 1.先对url进行处理,获取 ?后的字符串 postid=10457794&actiontip=保存修改成功') 2. 字符串通过&标识,不同参数转为数组 ["pos ...
- SourceInsight3.5 Space 替换Tab
# SourceInsight3.5 Space 替换Tab 公司要求所有的缩进都要使用空格,而不是Tab.至于使用Tab,还是Space来进行缩进,这在网上有各种各样的讨论,毕竟使用Tab可以节省很 ...
- Python 之 基础知识(四)
一.公共方法(列表.元组.字典以及字符串) 1.内置函数 cmp函数取消可以用比较运算符来代替,但是字典是无序的,故而不可以用比较运算符比较. 2.切片(列表.元组.字符串适用) 3.运算符 列表中直 ...
- Boost多线程-替换MFC线程
Mfc的多线程看起来简单,可以把线程直接压入向量,由系统类似进行调配,其实在内存的处理问题上留下了漏洞.在新线程里面载入大量流,会导致内存泄露. 方便之处:直接使用结构体传入函数参数,供 ...
- IOS - 零碎
---恢复内容开始--- 1.模拟器目录: ProjectNameApk.documents.library(cache.preference.cookies).temp 2.Edit-Refacto ...
- 【JavaScript框架封装】在实现一个自己定义类似于JQuery的append()函数的时候遇到的问题及解决方案
主要问题: 在刚开始创建了这个函数之后,使用的时候,总是会出现一个问题,就是按照正常步骤给一个ID选择器添加子节点的时候正常,但是到了给一个class选择器的元素添加的时候始终只能添加一个. 下面是我 ...
- P3369 【模板】普通平衡树 (splay 模板)
题目描述 您需要写一种数据结构(可参考题目标题),来维护一些数,其中需要提供以下操作: 插入x数 删除x数(若有多个相同的数,因只删除一个) 查询x数的排名(排名定义为比当前数小的数的个数+1.若有多 ...
- 【Tool】Augmentor和imgaug——python图像数据增强库
Augmentor和imgaug--python图像数据增强库 Tags: ComputerVision Python 介绍两个图像增强库:Augmentor和imgaug,Augmentor使用比较 ...