
【C#】第3章补充(二)如何将图形作为对象
分类:C#、VS2015
创建日期:2016-06-23
使用教材:(十二五国家级规划教材)《C#程序设计及应用教程》(第3版)
一、要点
该例子属于高级技术中的基本用法。对于初学者来说这是难点(难在还没有学习第13章WPF相关的绘图技术),因此,这里的关键是理解设计思路,而不是一开始就陷于细节的实现上。或者说,一旦你掌握了这些基本的设计思路,就会极大地提高你对面向对象编程的理解。
用到的技术:封装、继承、多态。
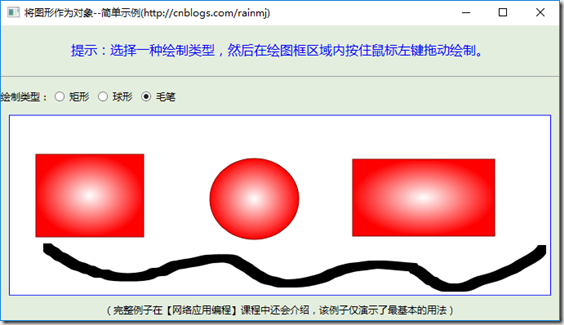
本补充示例的运行效果:
二、设计步骤
1、新建项目
项目名:WpfAdvanceDemo2
模板:WPF应用程序项目。
2、添加W0_DrawObject.cs文件
鼠标右击解决方案资源管理器中的项目名,选择【添加】->【类】,输入文件名W0_DrawObject.cs,然后将代码改为下面的内容:
using System;

using System.Windows;

using System.Windows.Controls;

using System.Windows.Ink;

using System.Windows.Input;

using System.Windows.Input.StylusPlugIns;

using System.Windows.Media;

namespace WpfAdvanceDemo2

{

    public abstract class W0_DrawObject : DynamicRenderer

    {

        protected Point previousPoint;

        public MyInkCanvas myInkCanvas { get; private set; }

        public DrawObjectStroke InkStroke { get; protected set; }

        public DrawingAttributes inkDA { get; set; }

        public abstract void CreateNewStroke(InkCanvasStrokeCollectedEventArgs e);

        public abstract Point Draw(Point first, DrawingContext dc, StylusPointCollection points);

        [ThreadStatic]

        protected Brush brush = Brushes.Gray;

        public W0_DrawObject(MyInkCanvas myInkCanvas)

        {

            this.myInkCanvas = myInkCanvas;

            this.inkDA = myInkCanvas.inkDA.Clone();

            this.DrawingAttributes = inkDA;

        }

        protected override void OnStylusDown(RawStylusInput rawStylusInput)

        {

            inkDA = myInkCanvas.inkDA.Clone();

            this.DrawingAttributes = inkDA;

            previousPoint = new Point(double.NegativeInfinity, double.NegativeInfinity);

            base.OnStylusDown(rawStylusInput);

        }

        protected override void OnStylusUp(RawStylusInput rawStylusInput)

        {

            base.OnStylusUp(rawStylusInput);

            this.InkStroke = null;

        }

    }

    public class DrawObjectStroke : Stroke

    {

        protected W0_DrawObject ink;

        public DrawObjectStroke(W0_DrawObject ink, StylusPointCollection stylusPoints)

            : base(stylusPoints)

        {

            this.ink = ink;

            this.DrawingAttributes = ink.inkDA.Clone();

            this.DrawingAttributes.Color = Colors.Transparent;

        }

        protected virtual void RemoveDirtyStylusPoints()

        {

            if (StylusPoints.Count > 2)

            {

                for (int i = StylusPoints.Count - 2; i > 0; i--)

                {

                    StylusPoints.RemoveAt(i);

                }

            }

        }

    }

}
3、添加W1_DrawRectangle.cs文件
鼠标右击解决方案资源管理器中的项目名,选择【添加】->【类】,输入文件名W1_DrawRectangle.cs,然后将代码改为下面的内容:
using System.Linq;

using System.Windows;

using System.Windows.Controls;

using System.Windows.Ink;

using System.Windows.Input;

using System.Windows.Input.StylusPlugIns;

using System.Windows.Media;

namespace WpfAdvanceDemo2

{

    public class W1_DrawRectangle : W0_DrawObject

    {

        public W1_DrawRectangle(MyInkCanvas myInkCanvas) : base(myInkCanvas)

        {

        }

        public override void CreateNewStroke(InkCanvasStrokeCollectedEventArgs e)

        {

            InkStroke = new DrawRectangleStroke(this, e.Stroke.StylusPoints);

        }

        public override Point Draw(Point first, DrawingContext dc, StylusPointCollection points)

        {

            Point pt = (Point)points.Last();

            Vector v = Point.Subtract(pt, first);

            if (v.Length > 4)

            {

                Rect rect = new Rect(first, v);

                //填充

                var b = new RadialGradientBrush(Colors.White, Colors.Red);

                dc.DrawRectangle(b, null, rect);

                //画轮廓

                Pen pen = new Pen(Brushes.DarkRed, 1.0);

                dc.DrawRectangle(null, pen, rect);

            }

            return first;

        }

        protected override void OnStylusDown(RawStylusInput rawStylusInput)

        {

            base.OnStylusDown(rawStylusInput);

            previousPoint = (Point)rawStylusInput.GetStylusPoints().First();

        }

        protected override void OnStylusMove(RawStylusInput rawStylusInput)

        {

            StylusPointCollection stylusPoints = rawStylusInput.GetStylusPoints();

            this.Reset(Stylus.CurrentStylusDevice, stylusPoints);

            base.OnStylusMove(rawStylusInput);

        }

        protected override void OnDraw(DrawingContext drawingContext, StylusPointCollection stylusPoints, Geometry geometry, Brush fillBrush)

        {

            Draw(previousPoint, drawingContext, stylusPoints);

            base.OnDraw(drawingContext, stylusPoints, geometry, brush);

        }

    }

    public class DrawRectangleStroke : DrawObjectStroke

    {

        public DrawRectangleStroke(W1_DrawRectangle ink, StylusPointCollection stylusPoints)

            : base(ink, stylusPoints)

        {

            this.RemoveDirtyStylusPoints();

        }

        protected override void DrawCore(DrawingContext drawingContext, DrawingAttributes drawingAttributes)

        {

            base.DrawCore(drawingContext, drawingAttributes);

            Point pt1 = (Point)StylusPoints.First();

            ink.Draw(pt1, drawingContext, StylusPoints);

        }

    }

}
4、添加W2_DrawEllipse.cs文件
鼠标右击解决方案资源管理器中的项目名,选择【添加】->【类】,输入文件名W2_DrawEllipse.cs,然后将代码改为下面的内容:
using System.Linq;

using System.Windows;

using System.Windows.Controls;

using System.Windows.Ink;

using System.Windows.Input;

using System.Windows.Input.StylusPlugIns;

using System.Windows.Media;

namespace WpfAdvanceDemo2

{

    public class W2_DrawEllipse : W0_DrawObject

    {

        public W2_DrawEllipse(MyInkCanvas myInkCanvas) : base(myInkCanvas)

        {

        }

        public override void CreateNewStroke(InkCanvasStrokeCollectedEventArgs e)

        {

            InkStroke = new DrawEllipseStroke(this, e.Stroke.StylusPoints);

        }

        public override Point Draw(Point first, DrawingContext dc, StylusPointCollection points)

        {

            Point pt = (Point)points.Last();

            Vector v = Point.Subtract(pt, first);

            double radiusX = (pt.X - first.X) / 2.0;

            double radiusY = (pt.Y - first.Y) / 2.0;

            Point center = new Point((pt.X + first.X) / 2.0, (pt.Y + first.Y) / 2.0);

            //填充

            var b = new RadialGradientBrush(Colors.White, Colors.Red);

            dc.DrawEllipse(b, null, center, radiusX, radiusY);

            //画轮廓

            Pen pen = new Pen(Brushes.DarkRed, 1.0);

            dc.DrawEllipse(null, pen, center, radiusX, radiusY);

            return first;

        }

        protected override void OnStylusDown(RawStylusInput rawStylusInput)

        {

            base.OnStylusDown(rawStylusInput);

            previousPoint = (Point)rawStylusInput.GetStylusPoints().First();

        }

        protected override void OnStylusMove(RawStylusInput rawStylusInput)

        {

            StylusPointCollection stylusPoints = rawStylusInput.GetStylusPoints();

            this.Reset(Stylus.CurrentStylusDevice, stylusPoints);

            base.OnStylusMove(rawStylusInput);

        }

        protected override void OnDraw(DrawingContext drawingContext, StylusPointCollection stylusPoints, Geometry geometry, Brush fillBrush)

        {

            Draw(previousPoint, drawingContext, stylusPoints);

            base.OnDraw(drawingContext, stylusPoints, geometry, brush);

        }

    }

    public class DrawEllipseStroke : DrawObjectStroke

    {

        public DrawEllipseStroke(W2_DrawEllipse ink, StylusPointCollection stylusPoints)

            : base(ink, stylusPoints)

        {

            this.RemoveDirtyStylusPoints();

        }

        protected override void DrawCore(DrawingContext drawingContext, DrawingAttributes drawingAttributes)

        {

            base.DrawCore(drawingContext, drawingAttributes);

            Point pt1 = (Point)StylusPoints.First();

            ink.Draw(pt1, drawingContext, StylusPoints);

        }

    }

}
5、添加W3_DrawCurve.cs文件
鼠标右击解决方案资源管理器中的项目名,选择【添加】->【类】,输入文件名W3_DrawCurve.cs,然后将代码改为下面的内容:
using System.Windows;

using System.Windows.Controls;

using System.Windows.Ink;

using System.Windows.Input;

using System.Windows.Media;

namespace WpfAdvanceDemo2

{

    public class W3_DrawCurve : W0_DrawObject

    {

        public W3_DrawCurve(MyInkCanvas myInkCanvas)

            : base(myInkCanvas)

        {

        }

        public override void CreateNewStroke(InkCanvasStrokeCollectedEventArgs e)

        {

            InkStroke = new DrawCurveStroke(this, e.Stroke.StylusPoints);

        }

        public override Point Draw(Point first, DrawingContext dc, StylusPointCollection points)

        {

            return first;

        }

        protected override void OnDraw(DrawingContext drawingContext, StylusPointCollection stylusPoints, Geometry geometry, Brush fillBrush)

        {

            base.OnDraw(drawingContext, stylusPoints, geometry, Brushes.Black);

        }

    }

    public class DrawCurveStroke : DrawObjectStroke

    {

        public DrawCurveStroke(W0_DrawObject ink, StylusPointCollection stylusPoints)

            : base(ink, stylusPoints)

        {

            this.DrawingAttributes.FitToCurve = true;

        }

        protected override void DrawCore(DrawingContext drawingContext, DrawingAttributes drawingAttributes)

        {

            base.DrawCore(drawingContext, drawingAttributes);

            Geometry geometry = this.GetGeometry();

            drawingContext.DrawGeometry(Brushes.Black, null, geometry);

        }

    }

}
6、添加MyInkCanvas.cs文件
鼠标右击解决方案资源管理器中的项目名,选择【添加】->【类】,输入文件名MyInkCanvas.cs,然后将代码改为下面的内容:
using System.Windows.Controls;

using System.Windows.Ink;

using System.Windows.Input;

using System.Windows.Media;

namespace WpfAdvanceDemo2

{

    public class MyInkCanvas : InkCanvas

    {

        private W0_DrawObject ink;

        public DrawingAttributes inkDA { get; private set; }

        public MyInkCanvas()

        {

            inkDA = new DrawingAttributes()

            {

                Color = Colors.Red,

                Width = 15,

                Height = 15,

                StylusTip = StylusTip.Rectangle,

                IgnorePressure = true,

                FitToCurve = false

            };

            this.DefaultDrawingAttributes = inkDA;

            ink = new W1_DrawRectangle(this);

            UpdateInkParams();

        }

        /// <summary>当收集墨迹时,会自动调用此方法</summary>

        protected override void OnStrokeCollected(InkCanvasStrokeCollectedEventArgs e)

        {

            this.Strokes.Remove(e.Stroke);

            ink.CreateNewStroke(e);

            this.Strokes.Add(ink.InkStroke);

            InkCanvasStrokeCollectedEventArgs args = new InkCanvasStrokeCollectedEventArgs(ink.InkStroke);

            base.OnStrokeCollected(args);

        }

        /// <summary>初始化墨迹参数</summary>

        public void SetInkAttributes(string name)

        {

            switch (name)

            {

                //---------------墨迹类型---------------------

                case "矩形":

                    ink = new W1_DrawRectangle(this);

                    inkDA.Width = inkDA.Height = 15;

                    inkDA.StylusTip = StylusTip.Rectangle;

                    this.UseCustomCursor = false;

                    break;

                case "球形":

                    ink = new W2_DrawEllipse(this);

                    inkDA.Width = inkDA.Height = 15;

                    inkDA.StylusTip = StylusTip.Ellipse;

                    this.UseCustomCursor = false;

                    break;

                case "毛笔":

                    ink = new W3_DrawCurve(this);

                    inkDA.Width = inkDA.Height = 10;

                    this.Cursor = Cursors.Pen;

                    this.UseCustomCursor = true;

                    break;

            }

            UpdateInkParams();

        }

        /// <summary>

        /// 根据墨迹类型和笔尖信息,设置MyInkCanvas中的相关参数

        /// </summary>

        private void UpdateInkParams()

        {

            this.DynamicRenderer = ink;

            this.EditingMode = InkCanvasEditingMode.Ink;

        }

    }

}
7、修改MainWindow.xaml文件
将其改为下面的内容。
<Window x:Class="WpfAdvanceDemo2.MainWindow"

        xmlns="http://schemas.microsoft.com/winfx/2006/xaml/presentation"

        xmlns:x="http://schemas.microsoft.com/winfx/2006/xaml"

        xmlns:d="http://schemas.microsoft.com/expression/blend/2008"

        xmlns:mc="http://schemas.openxmlformats.org/markup-compatibility/2006"

        xmlns:local="clr-namespace:WpfAdvanceDemo2"

        mc:Ignorable="d"

        Title="将图形作为对象--简单示例(http://cnblogs.com/rainmj)" Height="400" Width="700" WindowStartupLocation="CenterScreen" Background="#FFE4EEDE">

    <Grid>

        <Grid.RowDefinitions>

            <RowDefinition Height="Auto" />

            <RowDefinition Height="*"/>

            <RowDefinition Height="Auto" />

        </Grid.RowDefinitions>

        <StackPanel Grid.Row="0">

            <TextBlock Text="提示:选择一种绘制类型,然后在绘图框区域内按住鼠标左键拖动绘制。" Margin="0 20" FontSize="16" Foreground="Blue" VerticalAlignment="Center" HorizontalAlignment="Center"/>

            <Separator/>

            <WrapPanel ButtonBase.Click="RadioButton_Click" Margin="0 10 0 0">

                <TextBlock Text="绘制类型:" VerticalAlignment="Center"/>

                <RadioButton Content="矩形" IsChecked="True" Margin="5"/>

                <RadioButton Content="球形" Margin="5"/>

                <RadioButton Content="毛笔" Margin="5"/>

            </WrapPanel>

        </StackPanel>

        <Frame Name="frame1" Grid.Row="1" Margin="10" BorderThickness="1" BorderBrush="Blue"

                   NavigationUIVisibility="Hidden" />

        <TextBlock Grid.Row="2" Text="(完整例子在【网络应用编程】课程中还会介绍,该例子仅演示了最基本的用法)" Margin="0 0 0 5" VerticalAlignment="Center" HorizontalAlignment="Center"/>

    </Grid>

</Window>
8、修改MainWindow.xaml.cs文件
将其改为下面的内容。
using System;

using System.Collections.Generic;

using System.Linq;

using System.Text;

using System.Threading.Tasks;

using System.Windows;

using System.Windows.Controls;

using System.Windows.Data;

using System.Windows.Documents;

using System.Windows.Input;

using System.Windows.Media;

using System.Windows.Media.Imaging;

using System.Windows.Shapes;

namespace WpfAdvanceDemo2

{

    /// <summary>

    /// MainWindow.xaml 的交互逻辑

    /// </summary>

    public partial class MainWindow : Window

    {

        MyInkCanvas mycanvas;

        public MainWindow()

        {

            InitializeComponent();

            mycanvas = new MyInkCanvas();

            frame1.Content = mycanvas;

        }

        private void RadioButton_Click(object sender, RoutedEventArgs e)

        {

            string s = (e.Source as RadioButton).Content.ToString();

            mycanvas.SetInkAttributes(s);

        }

    }

}
9、运行
按<F5>键调试运行。
OK,这个例子虽然简单,但是却演示了封装、继承、多态在实际项目中的基本应用设计思路。请耐着性子仔细分析该例子的源代码,相信你掌握设计思路和技巧后一定会对C#面向对象编程的理解有一个大的飞跃。
在此基础上,你就可以继续学习复杂的例子了。实际上,任何内容都可以通过拖放绘制出来,包括视频。
三、高级用法
下面的截图演示了高级用法示例的运行效果(选择某种绘图类型以及其他选项后,按住鼠标左键随意拖放即可):
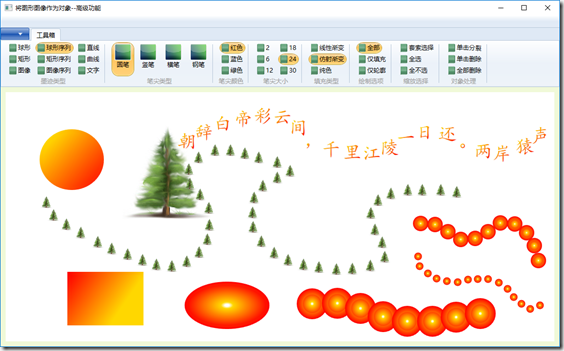
该例子更接近于实际项目,虽然例子看起来好像很复杂,但是基本的设计思路还是这个简单例子的思路,只不过是在简单例子基础上多添加了一些类而已。
这里顺便解释一下,类似Office的工具箱界面是如何实现的(用到了Ribbon控件):
(1)鼠标右击【引用】->【添加引用】,然后按下图所示添加Ribbon引用。
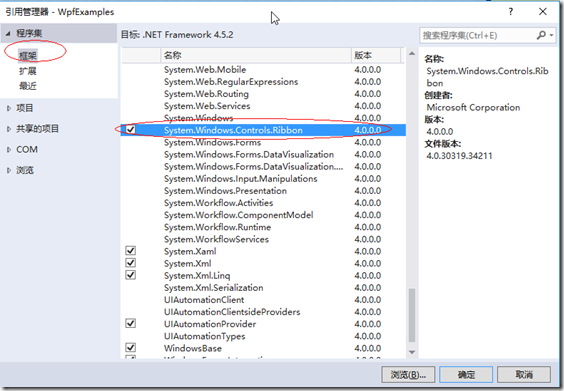
(2)在项目中添加一个Windows窗体,然后就可以在该窗体中使用Ribbon控件设计工具箱的内容了。下面是高级例子对应的XAML代码(为了方便快速理解,这里去掉了重复的内容,仅列出了其中的一部分代码):
<Window x:Class="WpfExamples.ch03.Ex02.WpfAdvanceDemo3.Demo3MainWindow"

        xmlns="http://schemas.microsoft.com/winfx/2006/xaml/presentation"

        xmlns:x="http://schemas.microsoft.com/winfx/2006/xaml"

        xmlns:d="http://schemas.microsoft.com/expression/blend/2008"

        xmlns:mc="http://schemas.openxmlformats.org/markup-compatibility/2006"

        xmlns:local="clr-namespace:WpfExamples.ch03.Ex02.WpfAdvanceDemo3"

        mc:Ignorable="d"

        Title="将图形图像作为对象--高级功能" Height="460" Width="980" Background="#FFF0F9D8" WindowState="Maximized">

    <Grid x:Name="root">

        <Grid.RowDefinitions>

            <RowDefinition Height="Auto" />

            <RowDefinition Height="*"/>

        </Grid.RowDefinitions>

        <Ribbon Name="ribbon" Grid.Row="0">

            <Ribbon.Resources>

                <Style TargetType="RibbonRadioButton">

                    <Setter Property="LargeImageSource" Value="/Resources/Images/b1.png"/>

                    <Setter Property="SmallImageSource" Value="/Resources/Images/b1.gif"/>

                    <Setter Property="CornerRadius" Value="13"/>

                    <Setter Property="Margin" Value="5 0 0 0"/>

                    <EventSetter Event="Checked" Handler="RibbonRadioButton_Checked"/>

                </Style>

            </Ribbon.Resources>

            <Ribbon.ApplicationMenu>

                <RibbonApplicationMenu Name="appMenu1" ToolTip="主菜单">

                    <RibbonApplicationMenu.Resources>

                        <Style TargetType="RibbonApplicationMenuItem">

                            <Setter Property="ImageSource" Value="/Resources/Images/b1.gif"/>

                            <EventSetter Event="Click" Handler="RibbonApplicationMenuItem_Click"/>

                        </Style>

                    </RibbonApplicationMenu.Resources>

                    <RibbonApplicationMenuItem Header="打开"/>

                    <RibbonApplicationMenuItem Header="另存为"/>

                    <RibbonSeparator/>

                    <RibbonApplicationMenuItem Header="退出"/>

                </RibbonApplicationMenu>

            </Ribbon.ApplicationMenu>

            <RibbonTab Name="rt1" Header="工具箱">

                <RibbonGroup Header="墨迹类型">

                    <RibbonGroup.GroupSizeDefinitions>

                        <RibbonGroupSizeDefinition>

                            <RibbonControlSizeDefinition ImageSize="Small"/>

                            <RibbonControlSizeDefinition ImageSize="Small"/>

                            ......(略,内容都一样,个数与下面的RibbonRadioButton个数对应即可)

                        </RibbonGroupSizeDefinition>

                    </RibbonGroup.GroupSizeDefinitions>

                    <RibbonRadioButton x:Name="rrbEllipseType" Label="球形" IsChecked="True"/>

                    <RibbonRadioButton Label="矩形"/>

                    <RibbonRadioButton Label="图像"/>

                    <RibbonRadioButton Label="球形序列"/>

                    <RibbonRadioButton Label="矩形序列"/>

                    <RibbonRadioButton Label="图像序列"/>

                    <RibbonRadioButton Label="直线"/>

                    <RibbonRadioButton Label="曲线"/>

                    <RibbonRadioButton Label="文字"/>

                </RibbonGroup>

                <RibbonGroup Header="笔尖类型">

                    <RibbonRadioButton x:Name="rrbEllipseStylus" Label="圆笔" IsChecked="True" GroupName="edit" />

                    <RibbonRadioButton Label="竖笔" GroupName="edit"/>

                    <RibbonRadioButton Label="横笔" GroupName="edit"/>

                    <RibbonRadioButton Label="钢笔" GroupName="edit"/>

                </RibbonGroup>

                .....(后面的代码和前面类似,不再列出了)

            </RibbonTab>

        </Ribbon>

        <Grid x:Name="grid1" Margin="10" Grid.Row="1" Visibility="Visible">

            <Rectangle Grid.ColumnSpan="2" Fill="white"

                       RadiusX="14" RadiusY="14"

                       Stroke="Blue" StrokeDashArray="3" />

            <local:MyInkCanvas x:Name="ink1"/>

        </Grid>

    </Grid>

</Window>
注意:练习时要一行一行的敲,不要用复制粘贴的办法,否则系统不会自动在后台代码(代码隐藏类)中添加对应的事件处理程序。
在后续的章节中,我们还会学习该高级例子涉及的更多概念(比如利用序列化和反序列化将绘图结果保存到文件中,并将序列化后的结果读取出来还原为截图中的各个绘图对象等)。这里暂不列出高级例子的设计步骤,准备等后续章节把相关的概念介绍完毕后,再学习高级例子的源代码也不晚。
说明:这些例子全部都是本人原创的,转载请注明出处:http://cnblogs.com/rainmj。
【C#】第3章补充(二)如何将图形作为对象的更多相关文章
- “全栈2019”Java第三十一章:二维数组和多维数组详解
难度 初级 学习时间 10分钟 适合人群 零基础 开发语言 Java 开发环境 JDK v11 IntelliJ IDEA v2018.3 文章原文链接 "全栈2019"Java第 ...
- 第47章 QR-Decoder-OV5640二维码识别—零死角玩转STM32-F429系列
第47章 QR-Decoder-OV5640二维码识别 全套200集视频教程和1000页PDF教程请到秉火论坛下载:www.firebbs.cn 野火视频教程优酷观看网址:http://i.y ...
- android中的rn项目更新gradle及补充二
修改build.gradle的版本,com.android.tools.build:gradle:2.1.0, 改为更高的,然后更改gradle/wrapper/gradle-wrapper.prop ...
- java基础知识点补充---二维数组
#java基础知识点补充---二维数组 首先定义一个二维数组 int[][] ns={ {1,2,3,4}, {5,6,7,8}, {9,10,11,12}, {13,14,15,16} }; 实现遍 ...
- Android 的Glide、TabLayout、RecyclerView(下一章补充)。
今天的内容主要和一些依赖有关, //Glide依赖implementation 'com.github.bumptech.glide:glide:4.11.0'//Google Design依赖//n ...
- 剖析虚幻渲染体系(13)- RHI补充篇:现代图形API之奥义与指南
目录 13.1 本篇概述 13.1.1 本篇内容 13.1.2 概念总览 13.1.3 现代图形API特点 13.2 设备上下文 13.2.1 启动流程 13.2.2 Device 13.2.3 Sw ...
- JAVA之旅(二十二)——Map概述,子类对象特点,共性方法,keySet,entrySet,Map小练习
JAVA之旅(二十二)--Map概述,子类对象特点,共性方法,keySet,entrySet,Map小练习 继续坚持下去吧,各位骚年们! 事实上,我们的数据结构,只剩下这个Map的知识点了,平时开发中 ...
- JavaScript -- 时光流逝(十二):DOM -- Element 对象
JavaScript -- 知识点回顾篇(十二):DOM -- Element 对象 (1) element.accessKey: 设置或返回accesskey一个元素,使用 Alt + 指定快捷键 ...
- Unit05: JavaScript对象概述 、 常用内置对象一 、 常用内置对象二 、 常用内置对象三
Unit05: JavaScript对象概述 . 常用内置对象一 . 常用内置对象二 . 常用内置对象三 常用内置对象使用演示: <!DOCTYPE html> <html> ...
随机推荐
- 透析Express.js
前言 最近,本屌在试用Node.js,在寻找靠谱web框架时发现了Express.js.Express.js在Node.js社区中是比较出名web框架,而它的定位是“minimal and flexi ...
- OpenJDK将对Android开发产生怎样的影响?
转载于:http://www.itxuexiwang.com/a/liunxjishu/2016/0228/182.html?1456926201 Google已决定将从下一版本的Android开始采 ...
- 大叔也说Xamarin~Android篇~为HttpClient共享Session,android与api的session共享机制
回到目录 杂谈 在进行android进行开发时,我们的数据一般通过接口来获收,这里指的接口泛指web api,webservice,wcf,web应用程序等:它们做为服务端与数据库进行直接通讯,而AP ...
- WebApi系列~通过HttpClient来调用Web Api接口
回到目录 HttpClient是一个被封装好的类,主要用于Http的通讯,它在.net,java,oc中都有被实现,当然,我只会.net,所以,只讲.net中的HttpClient去调用Web Api ...
- Atitit ACID解决方案2PC(两阶段提交) 跨越多个数据库实例的ACID保证
Atitit ACID解决方案2PC(两阶段提交) 跨越多个数据库实例的ACID保证 1.1. ACID解决方案1 1.2. 数据库厂商在很久以前就认识到数据库分区的必要性,并引入了一种称为2PC( ...
- Atitit intellij idea的使用总结attilax
Atitit intellij idea的使用总结attilax 1. ideaIC-2016.2.4.exe1 1.1. Ij vs eclipse市场份额1 1.2. Ij的优点(方便的支持gro ...
- 让DB2跑得更快——DB2内部解析与性能优化
让DB2跑得更快——DB2内部解析与性能优化 (DB2数据库领域的精彩强音,DB2技巧精髓的热心分享,资深数据库专家牛新庄.干毅民.成孜论.唐志刚联袂推荐!) 洪烨著 2013年10月出版 定价:7 ...
- Drupal网站开发实践--自定义购物流程
由于Commerce模块自带的购物流程步骤过多,界面不太美观,所以需要重新设计. 改造后的购物流程分成两部:购物车->结算,就两个页面.购物车页面可以修改商品的数量,删除购物车内商品,查看总金额 ...
- iOS-数据持久化-对象归档
一.简单说明 对象归档是将对象归档以文件的形式保存到磁盘中(也称为序列化,持久化),使用的时候读取该文件的保存路径读取文件的内容(也称为接档,反序列化), (对象归档的文件是保密的,在磁盘上无法查看文 ...
- 使用System.Drawing.Imaging.dll进行图片的合并
在最近开发项目的时候有时候需要进行图片的合并,即将两张图片合并成功一张图片 合并图片的代码: #region 两张图片的合并 /// <summary > /// 将Image对象转化成二 ...