组件基础—Vue学习笔记
ammm学习Vue有好几天了,今天遇到难点所以打算写一点随笔加深印象。
一、首先最简单的创建组件
1全局组件 Vue.component()
Vue.component('hello',{

        template:'<h1>hello world<h1>'

    })
然后就可以调用了,前提:你需要先设置Vue的接管范围
<!DOCTYPE html>

<html lang="en">

<head>

    <meta charset="UTF-8">

    <title>Hello World</title>

    <script src="Vue.js"></script>

</head>

<body>

    <div id="vm">

        <hello></hello>

    </div>

</body>

<script>

    Vue.component('hello',{

        template:'<h1>hello world<h1>'

    })

    new Vue({

        el:'#vm'

    })

</script>

</html>
2. 局部组件
先在外部声明,然后在Vue实例中实例化
var hello={

        template:'<h1>hello world</h1>'

    }

    var app=new Vue({

        el:'#app',

        components:{

            hello:hello       //在此处生成局部组件两个hello可以不同

        }

    })
二、组件传值
1.父组件向子组件传值
最简单的方法通过 <slot></slot>传值
<hello></hello>里面的hiboy会传递到子组件中替代slot
<body>

    <div id="app">

        <hello>hiboy</hello>

    </div>

</body>

<script>

    Vue.component('hello',{

        template:'<h1><slot></slot></h1>'

    })

    var app=new Vue({

        el:'#app'

    })

</script>
常规方法通过props传值
<body>

    <div id="app">

        <hello message="hi boy"></hello>

    </div>

</body>

<script>

    Vue.component('hello',{

        props:['message'],//此处的值和dom里的值对应

        template:'<h1>{{message}}</h1>'//通过插值表达绑定数据

    })

    var app=new Vue({

        el:'#app'

    })

</script>
当然我们可能会遇到像这样的Bug
(当你在一个表格中使用组件时会发现...)
<body>

    <div id="app">

        <table>

            <tbody>

                <hello></hello>

                <hello></hello>

            </tbody>

        </table>

    </div>

</body>

<script>

    Vue.component('hello',{

        template:'<tr>Hi boy</tr>'//通过插值表达绑定数据

    })

    var app=new Vue({

        el:'#app'

    })

</script>
我们想要在表格的tbody中插入两个组件,组件为tr但是仔细看一下运行后的Dom
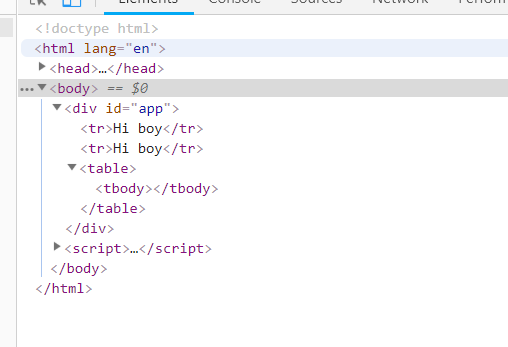
我们会发现插入的两个组件并没有在我们预想的tbody中(疑惑...)
解决方法:采用 is 声明
<body>

    <div id="app">

        <table>

            <tbody>

                <tr is="hello"></tr>//采用is把tr转化为hell组件

                <hello></hello>

            </tbody>

        </table>

    </div>

</body>

<script>

    Vue.component('hello',{

        template:'<tr>Hi boy</tr>'//通过插值表达绑定数据

    })

    var app=new Vue({

        el:'#app'

    })

</script>
看一下运行结果吧!

类似于以上情况的标签有 table、select、ul、ol
2.子组件向父组件传值
子组件向父组件传值主要通过向上层传递事件实现所需函数$emit(’事件名‘,值)//值可为空也可多个
<body>

    <div id="app">

        <hello @addnum="handleAddClick"></hello><!-- 接收子节点传过来的值 -->

        <h3>{{num}}</h3>

    </div>

</body>

<script>

    Vue.component('hello',{

        data:function(){                              //组件的data为一个函数

            return{

                number:0

            }

        },

        template:'<p @click="handleClick">{{number}}</p>',//number为data返回的值

        methods:{

            handleClick:function(){

                //这里点击一次我们让自身加一

                this.number++;

                //向上传递事件给父节点

                this.$emit('addnum',1);//第一个参数为事件名,第二个为所需要传的值,这里我们传1,当然可以传多个值

            }

        }

    })

    var app=new Vue({

        el:'#app',

        data:{

            num:0

        },

        methods:{

            handleAddClick:function(step){

                this.num+=step;

            }

        }

    })

</script>
注意:组件的data是一个函数通过返回值来实现
接下来我们通过两个子组件的值计算出父组件的值。此时我们会引入一个新的东西 ref 它可以让我们获取所需dom
<body>

    <div id="app">

        <hello @addnum="handleAddClick" ref="one"></hello><!-- 接收子节点传过来的值 -->

        <hello @addnum="handleAddClick" ref="two"></hello>

        <h3>{{num}}</h3>

    </div>

</body>

<script>

    Vue.component('hello',{

        data:function(){                              //组件的data为一个函数

            return{

                number:0

            }

        },

        template:'<p @click="handleClick">{{number}}</p>',//number为data返回的值

        methods:{

            handleClick:function(){

                //这里点击一次我们让自身加一

                this.number++;

                //向上传递事件给父节点

                this.$emit('addnum');

            }

        }

    })

    var app=new Vue({

        el:'#app',

        data:{

            num:0

        },

        methods:{

            handleAddClick:function(){

                this.num=this.$refs.one.number+this.$refs.two.number;

            }

        }

    })

</script>
通过this.$refs.one我们可以获得ref="one"的组件以及其内的所以内容,
this.$refs.one.number获取了组件中的number
Ok就是这样,至于最基础的模板语法就自己看官方文档吧。
组件基础—Vue学习笔记的更多相关文章
- vue学习笔记(八)组件校验&通信
前言 在上一章博客的内容中vue学习笔记(七)组件我们初步的认识了组件,并学会了如何定义局部组件和全局组件,上一篇内容仅仅只是对组件一个简单的入门,并没有深入的了解组件当中的其它机制,本篇博客将会带大 ...
- Vue学习笔记-Vue.js-2.X 学习(二)===>组件化开发
===重点重点开始 ========================== (三) 组件化开发 1.创建组件构造器: Vue.extends() 2.注册组件: Vue.component() 3.使用 ...
- vue学习笔记(九)vue-cli中的组件通信
前言 在上一篇博客vue学习笔记(八)组件校验&通信中,我们学会了vue中组件的校验和父组件向子组件传递信息以及子组件通知父组件(父子组件通信),上一篇博客也提到那是对组件内容的刚刚开始,而本 ...
- Vue学习笔记-Vue.js-2.X 学习(三)===>组件化高级
(四) 组件化高级 1.插槽(slot)的基本使用 A:基本使用: <slot></slot> B:默认置:<slot><h1>中间可以放默认值< ...
- vue 学习笔记(二)
最近公司赶项目,一直也没时间看 vue,之前看下的都快忘得差不多了.哈哈哈,来一起回顾一下vue 学习笔记(一)后,继续向下看嘛. #表单输入绑定 基础用法 v-model 会忽略所有表单元素的 va ...
- Vue学习笔记-Vue.js-2.X 学习(一)===>基本知识学习
一 使用环境: windows 7 64位操作系统 二 IDE:VSCode/PyCharm 三 Vue.js官网: https://cn.vuejs.org/ 四 下载安装引用 方式1:直接 ...
- Vue学习笔记-Django REST framework3后端接口API学习
一 使用环境 开发系统: windows 后端IDE: PyCharm 前端IDE: VSCode 数据库: msyql,navicat 编程语言: python3.7 (Windows x86- ...
- Vue学习笔记-vue-element-admin 前端学习
一 使用环境 开发系统: windows 后端IDE: PyCharm 前端IDE: VSCode 数据库: msyql,navicat 编程语言: python3.7 (Windows x86- ...
- Vue学习笔记-2
前言 本文非vue教程,仅为学习vue过程中的个人理解与笔记,有说的不正确的地方欢迎指正讨论 1.computed计算属性函数中不能使用vm变量 在计算属性的函数中,不能使用Vue构造函数返回的vm变 ...
随机推荐
- jquery和js中走的弯路
1.$.each的错误用法 $.each的return xx 不能结束外层的函数,但return true/false可以 所以一般的: var result; $.each(json,functio ...
- td里的英文字母不会自动换行的问题
今天发现一个问题,限制了TD的宽度之后,汉字会自动换行,但是英文却不会,在网上搜索一下,发现在TD里面加上style='word-break:break-all'这个样式之后,换行成功 <tab ...
- 【Maven】安装及配置(Linux)
本文介绍Linux环境下安装Maven 安装环境和软件 系统:Linux(CentOS) 软件:apache-maven-3.3.9-bin.tar.gz(解压版). 安装步骤 maven是基于Jav ...
- Django入门指南-第6章:第一个视图函数(完结)
http://127.0.0.1:8000/ # boards/views.py from django.http import HttpResponse from .models import Bo ...
- 动态渲染的input怎么取消记忆功能
方法1 :自定义去除记忆功能属性: $('#index_table_filter > label > input[type="search"]').attr('auto ...
- update 操作用法
--update 这个字段的所值为2 update tab a set a.字段1=2; --带条件的update update tab a set a.字段1=2 where id=10000; - ...
- [笔记]python
配置python apt install python2.7 python3 apt install python-bs4 python3-bs4 apt install virtualenv apt ...
- (转) MVC 中 @help 用法
ASP.NET MVC 3支持一项名为“Razor”的新视图引擎选项(除了继续支持/加强现有的.aspx视图引擎外).当编写一个视图模板时,Razor将所需的字符和击键数减少到最小,并保证一个快速.通 ...
- NHibernate的搭建
1.新建项目 Business:业务逻辑类 Data:数据层,存放数据库的操作及Nhibernate辅助类 Domain:数据实体和数据库映射文件 2.使用NuGet下载Nhibernate 数据库配 ...
- A Good Story for Great Friends
There once was a little girl who had a bad temper. Her mother gave her a bag of nails and told her t ...