用 Flask 来写个轻博客 (22) — 实现博客文章的添加和编辑页面
Blog 项目源码:https://github.com/JmilkFan/JmilkFan-s-Blog
目录
前文列表
用 Flask 来写个轻博客 (1) — 创建项目
用 Flask 来写个轻博客 (2) — Hello World!
用 Flask 来写个轻博客 (3) — (M)VC_连接 MySQL 和 SQLAlchemy
用 Flask 来写个轻博客 (4) — (M)VC_创建数据模型和表
用 Flask 来写个轻博客 (5) — (M)VC_SQLAlchemy 的 CRUD 详解
用 Flask 来写个轻博客 (6) — (M)VC_models 的关系(one to many)
用 Flask 来写个轻博客 (7) — (M)VC_models 的关系(many to many)
用 Flask 来写个轻博客 (8) — (M)VC_Alembic 管理数据库结构的升级和降级
用 Flask 来写个轻博客 (9) — M(V)C_Jinja 语法基础快速概览
用 Flask 来写个轻博客 (10) — M(V)C_Jinja 常用过滤器与 Flask 特殊变量及方法
用 Flask 来写个轻博客 (11) — M(V)C_创建视图函数
用 Flask 来写个轻博客 (12) — M(V)C_编写和继承 Jinja 模板
用 Flask 来写个轻博客 (13) — M(V)C_WTForms 服务端表单检验
用 Flask 来写个轻博客 (14) — M(V)C_实现项目首页的模板
用 Flask 来写个轻博客 (15) — M(V)C_实现博文页面评论表单
用 Flask 来写个轻博客 (16) — MV(C)_Flask Blueprint 蓝图
用 Flask 来写个轻博客 (17) — MV(C)_应用蓝图来重构项目
用 Flask 来写个轻博客 (18) — 使用工厂模式来生成应用对象
用 Flask 来写个轻博客 (19) — 以 Bcrypt 密文存储账户信息与实现用户登陆表单
用 Flask 来写个轻博客 (20) — 实现注册表单与应用 reCAPTCHA 来实现验证码
用 Flask 来写个轻博客 (21) — 结合 reCAPTCHA 验证码实现用户注册与登录
新建表单
- jmilkfansblog/forms.py
博客文章的新建和编辑的表单非常简单, 只需要输入 title 和 content 就可以了.
class PostForm(Form):

    """Post Form."""

    title = StringField('Title', [DataRequired(), Length(max=255)])

    text = TextAreaField('Blog Content', [DataRequired()])
新建视图函数
博客文章的添加和编辑仍然属于蓝图 blog 的功能集, 所以我们会在控制器 blog 模块中定义新的视图函数
- jmilkfansblog/controller/blog.py
@blog_blueprint.route('/new', methods=['GET', 'POST'])

def new_post():

    """View function for new_port."""

    form = PostForm()

    if form.validate_on_submit():

        new_post = Post(id=str(uuid4()), title=form.title.data)

        new_post.text = form.text.data

        new_post.publish_date = datetime.now()

        db.session.add(new_post)

        db.session.commit()

        return redirect(url_for('blog.home'))

    return render_template('new_post.html',

                           form=form)

@blog_blueprint.route('/edit/<string:id>', methods=['GET', 'POST'])

def edit_post(id):

    """View function for edit_post."""

    post = Post.query.get_or_404(id)

    form = PostForm()

    if form.validate_on_submit():

        post.title = form.title.data

        post.text = form.text.data

        post.publish_date = datetime.now()

        # Update the post

        db.session.add(post)

        db.session.commit()

        return redirect(url_for('blog.post', post_id=post.id))

    form.title.data = post.title

    form.text.data = post.text

    return render_template('edit_post.html', form=form, post=post)
NOTE 1: 添加博客文章时, 如果添加成功了就将输入到表单中的内容写入到数据库并将表单的数据传入 new_post 模板.
NOTE 2: 编辑博客文章时, 在表单的输入框中会含有原来的博客内容, 当编辑成功后会将新的博客内容写入数据库并重定向到文章页面.
新建模板
- jmilkfansblog/template/blog/new_post.html
{% block title %}New Post{% endblock %}

{% block body %}

<div class="row">

  <h1 class="text-center">Create A New Post</h1>

  <form method="POST" action="{{ url_for('blog.new_post') }}">

    {{ form.hidden_tag() }}

    <div class="form-group">

      {{ form.title.label }}

      {% if form.title.errors %}

        {% for e in form.title.errors %}

          <p class="help-block">{{ e }}</p>

        {% endfor %}

      {% endif %}

      {{ form.title(class_='form-control') }}

    </div>

    <div class="form-gruop">

      {{ form.text.label }}

      {% if form.text.errors %}

        {% for e in form.text.errors %}

          <p class="help-block">{{ e }}</p>

        {% endfor %}

      {% endif %}

      {{ form.text(id="editor", class_='form-contril') }}

    </div>

    <input class="btn-primary" type="submit" value="Submit">

  </form>

</div>

{% endblock %}

{% block js %}

<script src="//cdn.ckeditor.com/4.4.7/standard/ckeditor.js"></script>

<script>

    CKEDITOR.replace('editor');

</script>
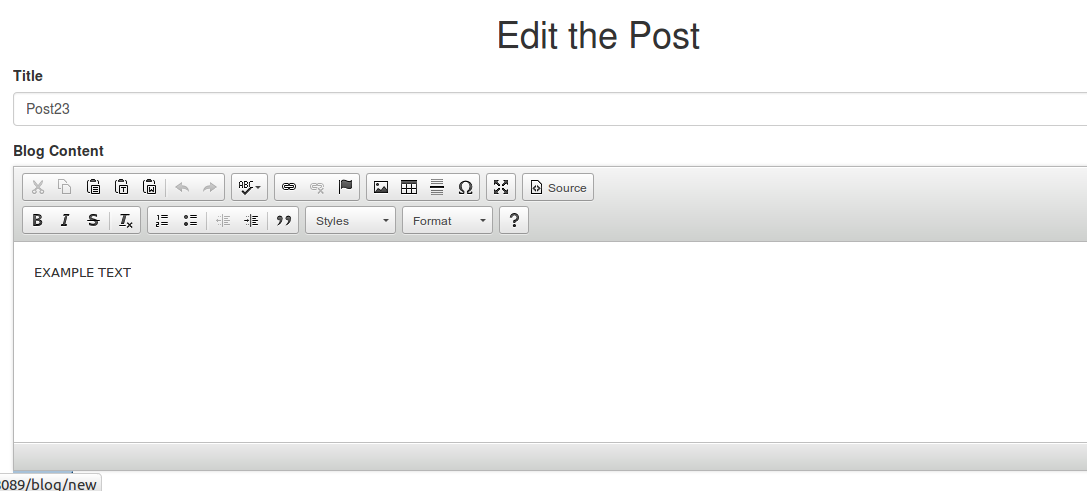
{% endblock %}- jmilkfansblog/template/blog/edit_post.html
{% extends "base.html" %}

{% block title %}Edit Post{% endblock %}

{% block body %}

<div class="row">

  <h1 class="text-center">Edit the Post</h1>

  <form method="POST" action="{{ url_for('blog.edit_post', id=post.id) }}">

    {{ form.hidden_tag() }}

    <div class="form-group">

      {{ form.title.label }}

      {% if form.title.errors %}

        {% for e in form.title.errors %}

          <p class="help-block">{{ e }}</p>

        {% endfor %}

      {% endif %}

      {{ form.title(class_='form-control', value=post.title) }}

    </div>

    <div class="form-gruop">

      {{ form.text.label }}

      {% if form.text.errors %}

        {% for e in form.text.errors %}

          <p class="help-block">{{ e }}</p>

        {% endfor %}

      {% endif %}

      {{ form.text(id="editor", class_='form-contril') }}

    </div>

    <input class="btn-primary" type="submit" value="Submit">

  </form>

</div>

{% endblock %}

{% block js %}

<script src="//cdn.ckeditor.com/4.4.7/standard/ckeditor.js"></script>

<script>

    CKEDITOR.replace('editor');

</script>

{% endblock %}NOTE: 在模板 new_post 和 edit_post 中都加入了一个所见即所得 (WYSIWYG) 的博客文章编辑器 CKEditor, 该编辑器是一个 JavaScript 文件 <script src="//cdn.ckeditor.com/4.4.7/standard/ckeditor.js"></script>, CKEditor 的安装和使用都是非常方便的.
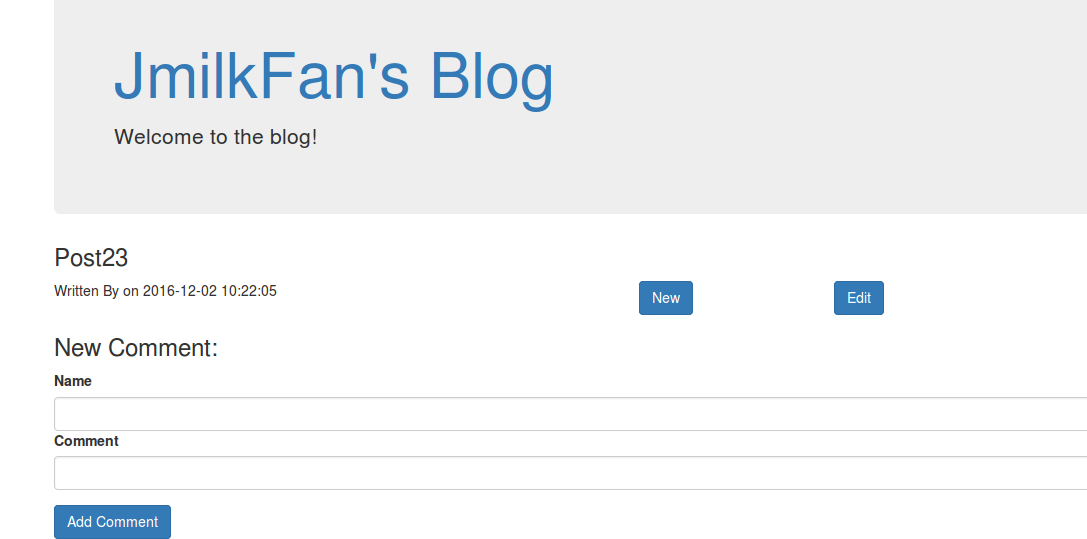
在博客文章页面添加 New 和 Edit 按钮
{% block body %}

<h3>{{ post.title }}</h3>

<div class="row">

  <div class="col-lg-6">

    <p>Written By <a href="{{ url_for('blog.user', username=post.users.username)

      }}">{{ post.users.username }}</a> on {{ post.publish_date }}</p>

    <p>{{ post.text | safe }}</p>

  </div>

  <div class="column">

    <div class="col-lg-2">

      <a href="{{ url_for('blog.new_post') }}" class="btn btn-primary">New</a>

    </div>

  </div>

  <div class="column">

    <div class="col-lg-2">

      <a href="{{ url_for('blog.edit_post', id=post.id) }}" class="btn btn-primary">Edit</a>

    </div>

  </div>

  <div class="col-lg-12">

...
NOTE : 由编辑器 CKEditor 提交的博客文章内容会被转换成为 HTML 被存放在数据库中, 所以需要使用过滤器 safe 来过滤并显示在页面中.
实现效果
New 和 Edit 的按钮:
Create a new post:
Edit a new post:
用 Flask 来写个轻博客 (22) — 实现博客文章的添加和编辑页面的更多相关文章
- 用 Flask 来写个轻博客
用 Flask 来写个轻博客 用 Flask 来写个轻博客 (1) — 创建项目 用 Flask 来写个轻博客 (2) — Hello World! 用 Flask 来写个轻博客 (3) — (M)V ...
- 用 Flask 来写个轻博客 (37) — 在 Github 上为第一阶段的版本打 Tag
Blog 项目源码:https://github.com/JmilkFan/JmilkFan-s-Blog 目录 目录 前文列表 第一阶段结语 打 Tag 前文列表 用 Flask 来写个轻博客 (1 ...
- 用 Flask 来写个轻博客 (36) — 使用 Flask-RESTful 来构建 RESTful API 之五
目录 目录 前文列表 PUT 请求 DELETE 请求 测试 对一条已经存在的 posts 记录进行 update 操作 删除一条记录 前文列表 用 Flask 来写个轻博客 (1) - 创建项目 用 ...
- 用 Flask 来写个轻博客 (35) — 使用 Flask-RESTful 来构建 RESTful API 之四
Blog 项目源码:https://github.com/JmilkFan/JmilkFan-s-Blog 目录 目录 前文列表 POST 请求 身份认证 测试 前文列表 用 Flask 来写个轻博客 ...
- 用 Flask 来写个轻博客 (34) — 使用 Flask-RESTful 来构建 RESTful API 之三
目录 目录 前文列表 应用请求中的参数实现 API 分页 测试 前文列表 用 Flask 来写个轻博客 (1) - 创建项目 用 Flask 来写个轻博客 (2) - Hello World! 用 F ...
- 用 Flask 来写个轻博客 (33) — 使用 Flask-RESTful 来构建 RESTful API 之二
Blog 项目源码:https://github.com/JmilkFan/JmilkFan-s-Blog 目录 目录 前文列表 扩展阅读 构建 RESTful Flask API 定义资源路由 格式 ...
- 用 Flask 来写个轻博客 (32) — 使用 Flask-RESTful 来构建 RESTful API 之一
目录 目录 前文列表 扩展阅读 RESTful API REST 原则 无状态原则 面向资源 RESTful API 的优势 REST 约束 前文列表 用 Flask 来写个轻博客 (1) - 创建项 ...
- 用 Flask 来写个轻博客 (31) — 使用 Flask-Admin 实现 FileSystem 管理
Blog 项目源码:https://github.com/JmilkFan/JmilkFan-s-Blog 目录 目录 前文列表 扩展阅读 编写 FileSystem Admin 页面 Flask-A ...
- 用 Flask 来写个轻博客 (30) — 使用 Flask-Admin 增强文章管理功能
Blog 项目源码:https://github.com/JmilkFan/JmilkFan-s-Blog 目录 目录 前文列表 扩展阅读 实现文章管理功能 实现效果 前文列表 用 Flask 来写个 ...
- 用 Flask 来写个轻博客 (29) — 使用 Flask-Admin 实现后台管理 SQLAlchemy
目录 目录 前文列表 扩展阅读 Flask-Admin BaseView 基础管理页面 ModelView 实现效果 前文列表 用 Flask 来写个轻博客 (1) - 创建项目 用 Flask 来写 ...
随机推荐
- Java数组相关算法一
一.数组反转 1.方法一:创建新数组 int[] arr = {6,29,0,4,3}; int[] arr2 = new int[arr.length]; for (int i = 0; i < ...
- P3806 【模板】点分治1(题解)(点分治)
P3806 [模板]点分治1(题解)(点分治) 洛谷题目传送门 #include<iostream> #include<cstdlib> #include<cstdio& ...
- 学习servlet时出现的一些问题
此篇用来记录学习servlet时遇到的一些问题,谨防以后再犯. 问题1.导入的web项目,servlet中导入的包名报错. (1)缺少相关包,推荐一个网站下载jar包很方便http://mvnrepo ...
- 攻防世界--simple-unpack
下载链接:https://adworld.xctf.org.cn/media/task/attachments/b7cf4629544f4e759d690100c3f96caa 1.准备 获取到信息: ...
- 20180209-xml模块
xml的用法操作如下: xml格式如下: <?xml version="1.0"?> <data> <country name="Liech ...
- java解析xml(使用jdom解析xml)
第一步: 装入jar包:下载地址:http://www.jdom.org/downloads/index.html 第二步: 在项目中加入jar包 jdom-2.06.jar 放入lib中 第三步: ...
- Codeforces Round #392 (Div. 2) - C
题目链接:http://codeforces.com/contest/758/problem/C 题意:给定N*M矩阵的教室,每个位置都有一个学生,Sergei坐在[X,Y],然后老师会问K个问题,对 ...
- 洛谷P3830 随机树(SHOI2012)概率期望DP
题意:中文题,按照题目要求的二叉树生成方式,问(1)叶平均深度 (2)树平均深度 解法:这道题看完题之后完全没头绪,无奈看题解果然不是我能想到的qwq.题解参考https://blog.csdn.ne ...
- javascaipt中数组元素删除方法delete和splice
一.用delete 删除数组中元素(少用) 说明:delete: 只是被删除的元素变成了 undefined ,即数组长度不变 //定义数组 var array=["aa",&qu ...
- CF240E Road Repairs
最小树形图+输出方案 输出方案的话记录一下哪些边 然后记得最后拆环要倒着拆就行了