Centos Yum 安装 Mysql 5.7
Centos 6 / 7 官方源安装Mysql 5.7
1 检查当前系统是否有旧版本
# rpm -qa | grep mysql
mysql-libs-5.1.71-1.el6.x86_64
# rpm -qa | grep MySQL
1.1 如有旧版本可以删除
# rpm -e mysql-libs-5.1.71-1.el6.x86_64 --nodeps
2 下载MySQL官方 Yum Repository
根据系统下载6或7
(6) wget -i http://dev.mysql.com/get/mysql57-community-release-el6-7.noarch.rpm
(7) wget -i http://dev.mysql.com/get/mysql57-community-release-el7-10.noarch.rpm
如果发现证书错误需要添加参数:
wget --no-check-certificate http://dev.mysql.com/get/mysql57-community-release-el6-7.noarch.rpm
3 安装和确认仓库内容
3.1 安装
3.2 检查有效仓库
# yum repolist enabled
Loaded plugins: fastestmirror
Loading mirror speeds from cached hostfile
* base: mirrors.aliyun.com
* extras: mirrors.aliyun.com
* updates: mirrors.aliyun.com
repo id repo name status
base CentOS-6 - Base 6,713
extras CentOS-6 - Extras 47
mysql-connectors-community MySQL Connectors Community 129
mysql-tools-community MySQL Tools Community 90
mysql57-community MySQL 5.7 Community Server 396
updates CentOS-6 - Updates 1,046
repolist: 8,421
3.3 查询安装版本
# yum list mysql-community*
Loaded plugins: fastestmirror
Loading mirror speeds from cached hostfile
* base: mirrors.aliyun.com
* extras: mirrors.aliyun.com
* updates: mirrors.aliyun.com
Available Packages
mysql-community-client.i686 5.7.30-1.el6 mysql57-community
mysql-community-client.x86_64 5.7.30-1.el6 mysql57-community
mysql-community-common.i686 5.7.30-1.el6 mysql57-community
mysql-community-common.x86_64 5.7.30-1.el6 mysql57-community
mysql-community-devel.i686 5.7.30-1.el6 mysql57-community
mysql-community-devel.x86_64 5.7.30-1.el6 mysql57-community
mysql-community-embedded.i686 5.7.30-1.el6 mysql57-community
mysql-community-embedded.x86_64 5.7.30-1.el6 mysql57-community
mysql-community-embedded-devel.i686 5.7.30-1.el6 mysql57-community
mysql-community-embedded-devel.x86_64 5.7.30-1.el6 mysql57-community
mysql-community-libs.i686 5.7.30-1.el6 mysql57-community
mysql-community-libs.x86_64 5.7.30-1.el6 mysql57-community
mysql-community-libs-compat.i686 5.7.30-1.el6 mysql57-community
mysql-community-libs-compat.x86_64 5.7.30-1.el6 mysql57-community
mysql-community-release.noarch el6-5 mysql-connectors-community
mysql-community-server.x86_64 5.7.30-1.el6 mysql57-community
mysql-community-test.x86_64 5.7.30-1.el6 mysql57-community
4 安装
# yum install mysql-server
Dependencies Resolved
===========================================================================================================
Package Arch Version Repository Size
===========================================================================================================
Installing:
mysql-community-server x86_64 5.7.30-1.el6 mysql57-community 162 M
Installing for dependencies:
mysql-community-client x86_64 5.7.30-1.el6 mysql57-community 25 M
mysql-community-common x86_64 5.7.30-1.el6 mysql57-community 370 k
mysql-community-libs x86_64 5.7.30-1.el6 mysql57-community 2.4 M
numactl x86_64 2.0.9-2.el6 base 74 k
Transaction Summary
===========================================================================================================
Install 5 Package(s)
Total download size: 189 M
Installed size: 905 M
Is this ok [y/N]:
5 数据库初始化
5.1 启动mysql 服务
# service mysqld start
Initializing MySQL database: [ OK ]
Starting mysqld: [ OK ]
5.2 查看初始密码
# grep password /var/log/mysqld.log
[Note] A temporary password is generated for root@localhost: l#.&dX3Hgade
[Note] Access denied for user 'UNKNOWN_MYSQL_USER'@'localhost' (using password: NO)
5.3 登录
# mysql -u root -pl#.&dX3Hgade
Server version: 5.7.30
Copyright (c) 2000, 2020, Oracle and/or its affiliates. All rights reserved.
Oracle is a registered trademark of Oracle Corporation and/or its
affiliates. Other names may be trademarks of their respective
owners.
Type 'help;' or '\h' for help. Type '\c' to clear the current input statement.
mysql>
5.4 更改初始密码(必须更改初始密码,默认策略大小写数字加特殊字符)
mysql> use mysql;
ERROR 1820 (HY000): You must reset your password using ALTER USER statement before executing this statemen
mysql> ALTER USER 'root'@'localhost' IDENTIFIED BY 'Password-8888';
5.5 确认和修改密码策略
mysql> show variables like '%password%';
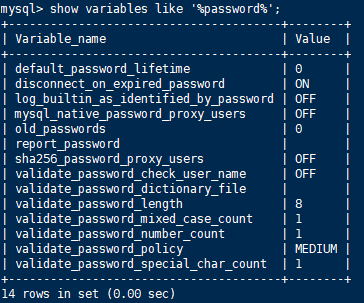
# vi /etc/my.cnf
添加 validate_password_policy配置
选择 0(LOW),1(MEDIUM),2(STRONG)其中一种,选择2需要提供密码字典文件
# 添加validate_password_policy配置
validate_password_policy=0
# 关闭密码策略
validate_password = off
修改后重启服务
5.6 添加远程管理权限
mysql > grant all privileges on *.* to 'root'@'192.168.1.1' identified by 'password' with grant option;
mysql > flush privileges;
Centos Yum 安装 Mysql 5.7的更多相关文章
- centos yum 安装 mysql
centos7下使用yum安装mysql 时间:2015-03-07 21:26:20 阅读:87445 评论:0 收藏:1 [点我收藏+] 标签: Cen ...
- centos yum安装mysql
查看有没有安装包 # yum list mysql 安装mysql客户端 # yum install mysql # yum list mysql-server 安装mysql 服务器端 # yum ...
- Centos yum 安装mysql报错 No package mysql-server available.
这是因为大多数mysql-*的资源名称被mariadb-*重命名了 所以换成 yum install mariadb-server 就可以了 PS[摘自网络] MariaDB不仅仅是Mysql的一个替 ...
- 阿里云服务器Linux CentOS安装配置(三)yum安装mysql
阿里云服务器Linux CentOS安装配置(三)yum安装mysql 1.执行yum安装mysql命令:yum -y install mysql-server mysql-devel 2.启动mys ...
- CentOS 7.0下使用yum安装MySQL
CentOS7默认数据库是mariadb,配置等用着不习惯,因此决定改成mysql,但是CentOS7的yum源中默认好像是没有mysql的.为了解决这个问题,我们要先下载mysql的repo源. 1 ...
- centos yum 安装php mysql
1 安装php7 查看 centos 版本 # cat /etc/centos-release 删除之前的 php 版本 # yum remove php* php-common rpm 安装 Php ...
- 使用yum方式在centOS上安装mysql
1.操作系统及MySQL版本 1.1 操作系统版本 CentOS release 6.5 (Final) 1.2 MySQL版本 mysql-5.1.73-3.el6_5.x86_64mysql-li ...
- centOS Linux下用yum安装mysql
centOS Linux下用yum安装mysql 第一篇:安装和配置MySQL 第一步:安装MySQL [root@192 local]# yum -y install mysql- ...
- 在 CentOS 7.5 64位上使用 yum 安装 MySQL 8.0
前段时间在 CentOS 7.5 64位上安装 MySQL 8.0.查了些资料,在这里记录一下详细的安装和设置步骤. 一.安装 使用yum安装MySQL之前需要先下载对应的.rpm文件,下载方法: 去 ...
随机推荐
- 神经网络与机器学习 笔记—单神经元解决XOR问题
单神经元解决XOR问题 有两个输入的单个神经元的使用得到的决策边界是输入空间的一条直线.在这条直线的一边的所有的点,神经元输出1:而在这条直线的另一边的点,神经元输出0.在输入空间中,这条直线的位置和 ...
- Service Started!!!-end In Service while
将原先的win7换成了xp,用体验换来更好的兼容 问题如下: 在虚拟机器中运行了DebugView后,就一直重复出现Service Started!!!-end In Service while, 虽 ...
- Android 面试必备 - 系统、App、Activity 启动过程“一锅端”
Android 系统启动过程 从系统层看: linux 系统层 Android系统服务层 Zygote 从开机启动到Home Launcher: 启动bootloader (小程序:初始化硬件) 加载 ...
- 如何使用mongo shell
Cd到MongoDb安装目录到bin目录下,执行mongo命令即可,其他命令参考手册:https://www.runoob.com/mongodb/mongodb-create-collection. ...
- VS2017报错 由#define后的分号引发的【“ 应输入“)】
其实并不是第十行分号出现了问题,而是由于在宏定义后面加了分号,修改成这样即可 一开始竟然没看出来--甚至以为是VS中出现"宏可以转换为constexpr"问题--下次要仔细--
- 迷失在Mysql的锁世界~
1.饮料 这是一杯饮料. 这是3杯饮料,每杯饮料的味道各不相同. 但是人类并不称呼[饮料]为[饮料],而是称呼[饮料]为[记录]. 2.红章鱼 这个红色的,长的像章鱼的家伙,我们就叫它红章鱼~ 红章鱼 ...
- [bug] Maven修改pom文件后jdk版本回退
参考 https://www.cnblogs.com/wxgblogs/p/6696229.html
- https://www.jqhtml.com/30047.html strace + 命令: 这条命令十分强大,可以定位你程序到底是哪个地方出了问题
https://www.jqhtml.com/30047.html 我的Linux手册 服务器 浏览数:72 2019-1-30 原文链接 基础安装 # CentOS sudo yum install ...
- shell脚本 在后台执行de 命令 >> 文件 2>&1 将标准输出与错误输出共同写入到文件中(追加到原有内容的后面)
命令 >> 文件 2>&1或命令 &>> 文件 将标准输出与错误输出共同写入到文件中(追加到原有内容的后面) # ll >>aaa 2> ...
- BRAM 和 DRAM 区别
转载: BRAM和DRAM的区别 Xilinx的FPGA开发板可以直接调用RAM,其中包括了BRAM和DRAM.经过网上查找资料发现,这两者的区别在于: 选择distributed memory ge ...