
Spring Boot 2.x整合Redis
最近在学习Spring Boot 2.x整合Redis,在这里和大家分享一下,希望对大家有帮助。
Redis是什么
Redis 是开源免费高性能的key-value数据库。有以下的优势(源于Redis官网http://www.redis.net.cn/):
性能极高 – Redis能读的速度是110000次/s,写的速度是81000次/s 。
丰富的数据类型 – Redis支持二进制案例的 Strings, Lists, Hashes, Sets 及 Ordered Sets 数据类型操作。
原子 – Redis的所有操作都是原子性的,意思就是要么成功执行要么失败完全不执行。单个操作是原子性的。多个操作也支持事务,即原子性,通过MULTI和EXEC指令包起来。
丰富的特性 – Redis还支持 publish/subscribe, 通知, key 过期等等特性。
如果想了解更多关于Redis是什么,可以参考:Redis初识
为什么要使用Redis
为什么要使用Redis?21世纪以来信息技术的飞速发展,我们已经迎来了大数据时代,数据较之前爆炸增长,并发访问量激增;由之带来的就是系统设计由单体架构向分布式架构的转变和演进。对于缓存这个问题,如果系统是单体的系统,可以在单个的JVM里面进行本地缓存,例如可以用HashMap来缓存一些数据。但是到了分布式系统里面,一个大系统里面有很多个子系统,那他们之间如何共享缓存?这就需要Redis,用Redis来实现缓存系统。都说“时势造英雄”,其实我想说Redis的大规模使用也是这个道理,用Redis做缓存系统从性能和并发两方面考虑都是值得肯定的。
- 性能:如果碰到需要执行耗时特别久,且结果不频繁变动的SQL,就特别适合将运行结果放入缓存。这样,后面的请求就去缓存中读取,使得请求能够迅速响应。
- 并发: 在大并发的情况下,所有的请求直接访问数据库,数据库会出现连接异常。这个时候,就需要使用redis做一个缓冲操作,让请求先访问到Redis,而不是直接访问数据库。
更多关于“为什么要使用Redis”,博客园【原创】分布式之redis复习精讲 ,这篇博文关于Redis的讲解我觉得超赞,谢谢作者的耐心分享。
Spring Boot 2.x如何整合Redis
我使用的Spring Boot版本是2.1.0,根据网上的一些旧的教程进行整合Redis 3.2的时候,会有许多地方有错误提示。这是因为Spring Boot 2.x做了一些修改,这些修改对使用而有没有影响呢?我们改怎么整合呢?下面就进入正式的整合过程。
1. pom.xnl引入依赖
        <dependency>

            <groupId>org.springframework.boot</groupId>

            <artifactId>spring-boot-starter-redis</artifactId>

        </dependency>
现在会提示Project build error: 'dependencies.dependency.version' for org.springframework.boot:spring-boot-starter-redis:jar is missing. 提示spring-boot-starter-redis:jar找不到。
这是因为Spring Boot 1.4之后不再支持spring-boot-starter-redis,更换spring-boot-starter-data-redis之后就可以了。如果你的pom文件报错,请检查是否将spring-boot-starter-redis 改成了spring-boot-starter-data-redis。
Spring Boot 2.x要使用下面的依赖:
        <dependency>

            <groupId>org.springframework.boot</groupId>

            <artifactId>spring-boot-starter-data-redis</artifactId>

        </dependency>
2. application.properties添加配置文件
这是之前版本的配置文件:
# REDIS (RedisProperties)

# Redis数据库索引(默认为0)

spring.redis.database=0

# Redis服务器地址

spring.redis.host=127.0.0.1

# Redis服务器连接端口

spring.redis.port=6379

# Redis服务器连接密码(默认为空)

spring.redis.password=

# 连接池最大连接数(使用负值表示没有限制)

spring.redis.pool.max-active=8

# 连接池最大阻塞等待时间(使用负值表示没有限制)

spring.redis.pool.max-wait=-1

# 连接池中的最大空闲连接

spring.redis.pool.max-idle=8

# 连接池中的最小空闲连接

spring.redis.pool.min-idle=0

# 连接超时时间(毫秒)

spring.redis.timeout=0
如果Spring Boot 2.x这么配置,有错误提示 Property 'spring.redis.pool.max-active' is Deprecated: Use 'spring.redis.jedis.pool.max-idle' instead. 'spring.redis.pool.max-active'已经被弃用了,推荐使用'spring.redis.jedis.pool.max-idle'来代替。
这是因为在2.x中配置redis的连接池信息时,不再使用spring.redis.pool的属性,而是直接使用redis的lettuce或jedis客户端来配置。现在的配置如下:
# REDIS (RedisProperties)

# Redis数据库索引(默认为0)

spring.redis.database=0

# Redis服务器地址

spring.redis.host=127.0.0.1

# Redis服务器连接端口

spring.redis.port=6379

# Redis服务器连接密码(默认为空)

spring.redis.password=

# 连接池最大连接数(使用负值表示没有限制)

spring.redis.jedis.pool.max-active=8

# 连接池最大阻塞等待时间(使用负值表示没有限制)

spring.redis.jedis.pool.max-wait=-1

# 连接池中的最大空闲连接

spring.redis.jedis.pool.max-idle=8

# 连接池中的最小空闲连接

spring.redis.jedis.pool.min-idle=0

# 连接超时时间(毫秒)

spring.redis.timeout=0
3. 配置CacheManager
这是之前的RedisConfig配置类:
@Configuration

@EnableCaching

public class RedisConfig extends CachingConfigurerSupport {

    @Bean

    public CacheManager cacheManager(RedisTemplate<?, ?>  redisTemplate) {

        CacheManager cacheManager = new  RedisCacheManager(redisTemplate);

        return cacheManager;

    }

    @Bean

    public RedisTemplate<String, String>  redisTemplate(RedisConnectionFactory factory) {

        RedisTemplate<String, String> redisTemplate = new  RedisTemplate<String, String>();

        redisTemplate.setConnectionFactory(factory);

        return redisTemplate;

    }

}
现在这么写会有报错The constructor RedisCacheManager(RedisTemplate<capture#1-of ?,capture#2-of ?>) is undefined。
这是因为Spring Boot 2.x版本删除了RedisCacheManager这个构造器, 也不可以通过之前的setDefaultExpiration方法设置默认的缓存过期时间等。
那么要怎样构造一个 RedisCacheManager?看看官方文档中怎么说?文档地址:https://docs.spring.io/spring-data/data-redis/docs/2.1.x/reference/html/#new-in-2.1.0
官方文档5.13.1. Support for the Spring Cache Abstraction(对Spring Cache Abstraction的支持)是关于怎么配置缓存的说明,我尝试着翻译了一下(蓝色部分),英文水平有限,各位轻喷。
Spring Redis provides an implementation for the Spring cache abstraction through the org.springframework.data.redis.cache package. To use Redis as a backing implementation, add RedisCacheManager to your configuration, as follows:
Spring Redis在 org.springframework.data.redis.cache 包中为Spring缓存抽象提供了一个实现方案。要使用Redis作为支持实现,需要将RedisCacheManager添加到配置中,如下所示:
@Bean

public RedisCacheManager cacheManager(RedisConnectionFactory connectionFactory) {

    return RedisCacheManager.create(connectionFactory);

}
RedisCacheManager behavior can be configured with RedisCacheManagerBuilder, letting you set the default RedisCacheConfiguration, transaction behavior, and predefined caches.
RedisCacheManager可以用 RedisCacheManagerBuilder 进行配置,允许自定义设置默认的RedisCacheConfiguration、事务行为和预定义的缓存。
RedisCacheManager cm = RedisCacheManager.builder(connectionFactory)

    .cacheDefaults(defaultCacheConfig())

    .initialCacheConfigurations(singletonMap("predefined", defaultCacheConfig().disableCachingNullValues()))

    .transactionAware()

    .build();
As shown in the preceding example, RedisCacheManager allows definition of configurations on a per-cache basis.
正如上面的例子所示,RedisCacheManager 允许基于每个缓存进行配置。
The behavior of RedisCache created with RedisCacheManager is defined with RedisCacheConfiguration. The configuration lets you set key expiration times, prefixes, and RedisSerializer implementations for converting to and from the binary storage format, as shown in the following example:
RedisCacheManager创建RedisCache的行为被定义为RedisCacheConfiguration。该配置允许设置键值过期时间、前缀和RedisSerializer实现等属性,以便与二进制存储格式进行转换,如下所示:
RedisCacheConfiguration config = RedisCacheConfiguration.defaultCacheConfig()

.entryTtl(Duration.ofSeconds(1))

    .disableCachingNullValues();
RedisCacheManager defaults to a lock-free RedisCacheWriter for reading and writing binary values. Lock-free caching improves throughput. The lack of entry locking can lead to overlapping, non-atomic commands for the putIfAbsent and clean methods, as those require multiple commands to be sent to Redis. The locking counterpart prevents command overlap by setting an explicit lock key and checking against presence of this key, which leads to additional requests and potential command wait times.
It is possible to opt in to the locking behavior as follows:
也可以选择锁定行为,如下所示:
RedisCacheManager cm = RedisCacheManager.build(RedisCacheWriter.lockingRedisCacheWriter())

    .cacheDefaults(defaultCacheConfig())

    ...
By default, any key for a cache entry gets prefixed with the actual cache name followed by two colons. This behavior can be changed to a static as well as a computed prefix.
The following example shows how to set a static prefix:
以下示例显示如何设置静态前缀:
// static key prefix

RedisCacheConfiguration.defaultCacheConfig().prefixKeysWith("( ͡° ᴥ ͡°)");

The following example shows how to set a computed prefix:

// computed key prefix

RedisCacheConfiguration.defaultCacheConfig().computePrefixWith(cacheName -> "¯\_(ツ)_/¯" + cacheName);
The following table lists the default settings for RedisCacheManager:
下表列出了RedisCacheManager的默认设置:
|
Setting
|
Value
|
|
Cache Writer
|
Non-locking
|
|
Cache Configuration
|
RedisCacheConfiguration#defaultConfiguration
|
|
Initial Caches
|
None
|
|
Trasaction Aware
|
No
|
The following table lists the default settings for RedisCacheConfiguration:
下表列出了RedisCacheConfiguration的默认设置:
|
Key Expiration
|
None
|
|
Cache null
|
Yes
|
|
Prefix Keys
|
Yes
|
|
Default Prefix
|
The actual cache name
|
|
Key Serializer
|
StringRedisSerializer
|
|
Value Serializer
|
JdkSerializationRedisSerializer
|
|
Conversion Service
|
DefaultFormattingConversionService with default cache key converters
|
对于Spring Boot 2.x,这里我使用RedisCacheConfiguration简单配置一下缓存时间,完成RedisCacheManager的配置,代码如下:
@Configuration

@EnableCaching

public class RedisConfig extends CachingConfigurerSupport {

    @Bean

    public CacheManager cacheManager(RedisConnectionFactory  factory) {

        RedisCacheConfiguration config =  RedisCacheConfiguration.defaultCacheConfig().entryTtl(Duration.ofSeconds(1));

        RedisCacheManager cacheManager =  RedisCacheManager.builder(factory).cacheDefaults(config).build();

        return cacheManager;

    }

}
4. Service层
在这里仅创建一个简单的RedisService,来进行存取缓存数据。
@Service

public class RedisService {

    @Resource

    private RedisTemplate<String, Object> redisTemplate;

    public void set(String key, Object value) {

        //更改在redis里面查看key编码问题

        RedisSerializer redisSerializer = new  StringRedisSerializer();

        redisTemplate.setKeySerializer(redisSerializer);

        ValueOperations<String, Object> vo =  redisTemplate.opsForValue();

        vo.set(key, value);

    }

    public Object get(String key) {

        ValueOperations<String, Object> vo =  redisTemplate.opsForValue();

        return vo.get(key);

    }

}
5. Model层
实体类没有修改,和之前文章里面用的一样:
@Entity

@Table(name = "user")

public class User implements Serializable {

    private static final long serialVersionUID = 1L;

    @Id

    @GeneratedValue

    private Long id;

    @Column(name = "username")

    private String userName;

    @Column(name = "password")

    private String passWord;

    public User() {

        super();

    }

    public User(String userName, String passWord) {

        super();

        this.userName = userName;

        this.passWord = passWord;

    }

    public User(Long id, String userName, String passWord) {

        super();

        this.id = id;

        this.userName = userName;

        this.passWord = passWord;

    }

    public Long getId() {

        return id;

    }

    public void setId(Long id) {

        this.id = id;

    }

    public String getUserName() {

        return userName;

    }

    public void setUserName(String userName) {

        this.userName = userName;

    }

    public String getPassWord() {

        return passWord;

    }

    public void setPassWord(String passWord) {

        this.passWord = passWord;

    }

}
6. Controller层
@RestController

@RequestMapping("user")

public class UserController {

    @Autowired

    private UserRepository userRepository;

    @Autowired

    private RedisService redisService;

    @RequestMapping("/saveUser")

    public String saveUser(Long id, String userName, String  passWord) {

        User user = new User(id, userName, passWord);

        redisService.set(id + "", user);

        return "success";

    }

    @RequestMapping("/getUserById")

    public User getUserById(Long id) {

        User res = (User) redisService.get(id + "");

        return res;

    }

}
7. 测试
使用Postman进行测试,访问http://localhost:8080//user/saveUser?id=12&userName=Howard&passWord=magician,添加了一个User。
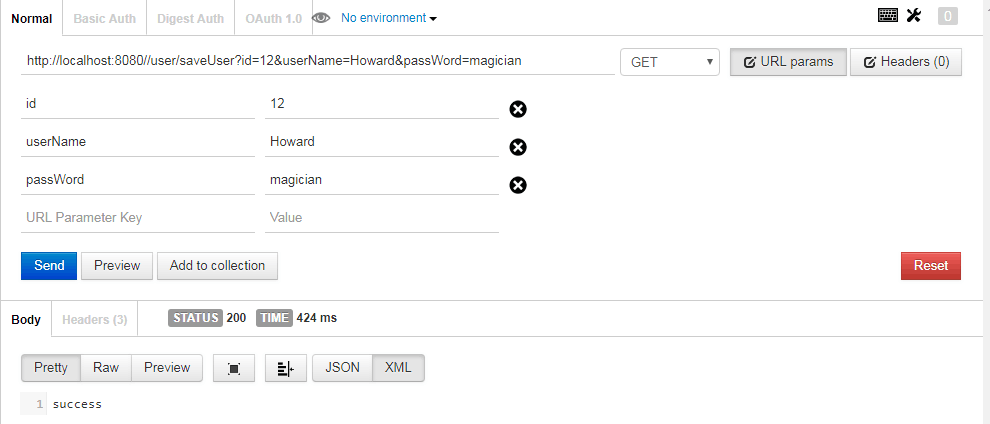
看看Redis数据库,使用get key查看,得到一个对象:

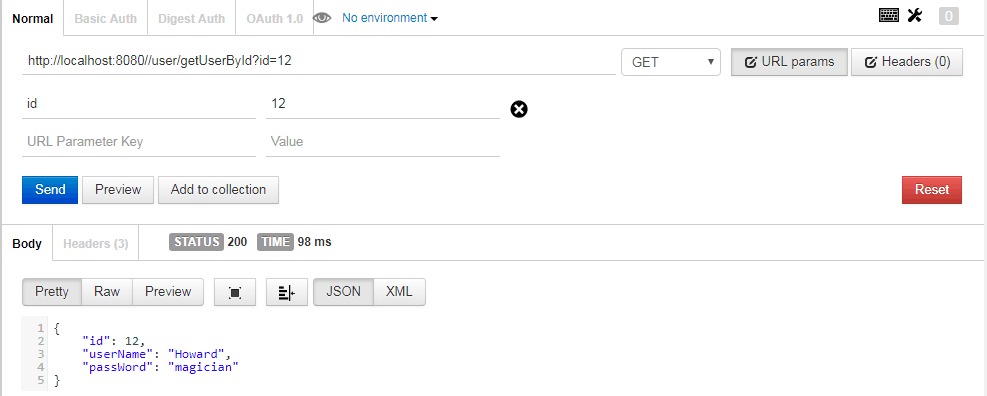
http://localhost:8080//user/getUserById?id=12,通过id获取User。
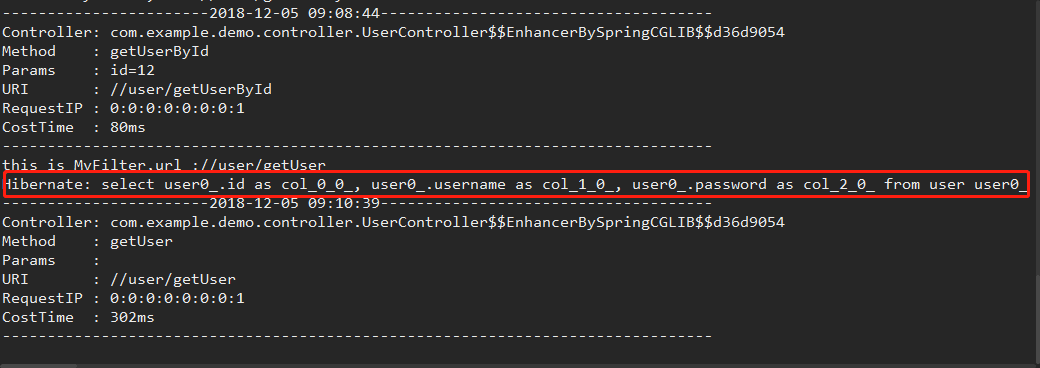
这是过滤器和拦截器的日志信息,可以看到没有进行MySQL数据库的操作,直接从缓存中读取,说明Redis配置生效了:

如果访问之前的接口,是有操作数据库的:
总结
Spring Boot 2.x整合Redis的更多相关文章
- Spring Boot 2.x 整合 Redis最佳实践
一.前言 在前面的几篇文章中简单的总结了一下Redis相关的知识.本章主要讲解一下 Spring Boot 2.0 整合 Redis.Jedis 和 Lettuce 是 Java 操作 Redis 的 ...
- Spring Boot WebFlux-06——WebFlux 整合 Redis
第06课:WebFlux 整合 Redis 前言 上一篇内容讲了如何整合 MongoDB,这里继续讲如何操作 Redis 这个数据源,那什么是 Reids? Redis 是一个高性能的 key-val ...
- Spring Boot 学习笔记--整合Redis
1.新建Spring Boot项目 添加spring-boot-starter-data-redis依赖 <dependency> <groupId>org.springfra ...
- Spring Boot不同版本整合Redis的配置
1. Spring Boot为1.4及其他低版本 1.1 POM.XML配置 <!--引入 spring-boot-starter-redis(1.4版本前)--> <depende ...
- Spring Boot 2.X整合Spring-cache,让你的网站速度飞起来
计算机领域有人说过一句名言:“计算机科学领域的任何问题都可以通过增加一个中间层来解决”,今天我们就用Spring-cache给网站添加一层缓存,让你的网站速度飞起来. 本文目录 一.Spring Ca ...
- Spring boot配置多个Redis数据源操作实例
原文:https://www.jianshu.com/p/c79b65b253fa Spring boot配置多个Redis数据源操作实例 在SpringBoot是项目中整合了两个Redis的操作实例 ...
- Spring Boot 2.0 整合携程Apollo配置中心
原文:https://www.jianshu.com/p/23d695af7e80 Apollo(阿波罗)是携程框架部门研发的分布式配置中心,能够集中化管理应用不同环境.不同集群的配置,配置修改后能够 ...
- spring boot 2.0 整合 elasticsearch6.5.3,spring boot 2.0 整合 elasticsearch NoNodeAvailableException
原文地址:spring boot 2.0 整合 elasticsearch NoNodeAvailableException 原文说的有点问题,下面贴出我的配置: 原码云项目地址:https://gi ...
- Spring Boot入门 and Spring Boot与ActiveMQ整合
1.Spring Boot入门 1.1什么是Spring Boot Spring 诞生时是 Java 企业版(Java Enterprise Edition,JEE,也称 J2EE)的轻量级代替品.无 ...
随机推荐
- PHP内核之旅-3.变量
PHP 内核之旅系列 PHP内核之旅-1.生命周期 PHP内核之旅-2.SAPI中的Cli PHP内核之旅-3.变量 一.弱类型语言 php是弱类型语言.一个变量可以表示任意数据类型. php强大的一 ...
- 爬虫值requests库
requests简介 简介 Requests是用python语言基于urllib编写的,采用的是Apache2 Licensed开源协议的HTTP库 ,使用起来比urllib简洁很多 因为是第三方库, ...
- IDEA设置生成带注释的getter和setter解决方案 (图文教程)
近日在研究重构代码的时候有用到idea的不少插件,比如CheckStyle,同时下载了阿里的开发规约,收到不少启发. 规约中会要求所有的方法都有Javadoc,但是通常我们用idea默认生成的gett ...
- linux简单内核链表排序
#include <stdio.h> #include <stdlib.h> #define container_of(ptr, type, mem)(type *)((uns ...
- linux 下 Emacs dired 模式 隐藏 dot file ".filename" 文件
有时候 emacs 下调用 C-x dired 是挺方便的一个事,但是一堆的点文件(linux下以"."为前缀的文件,即隐藏文件)让人目不暇接,打算隐藏之. 参考如下: 最主要的是 ...
- Go笔记之一:工程项目结构的注意事项
Go笔记之一:工程项目结构的注意事项 对 Go 项目目录的理解 (Windows平台为例) 刚安装完的 Go 需要设定环境变量,最关键的环境变量有三个,GOROOT.GOPATH和GOBIN.GORO ...
- VirtualBox报错:不能为虚拟电脑XXX打开一个新任务
报错产生的背景 今天在这里下载了一个用于VirtualBox的Kali Linux虚拟机文件(使用VirtualBox可以直接打开使用,不用执行安装过程).但是将该文件导入到VirtualBox中之后 ...
- Spring Boot 定制URL匹配规则的方法
事情的起源:有人问我,说编写了一个/hello访问路径,但是吧,不管是输入/hello还是/hello.html,还是/hello.xxx都能进行访问.当时我还以为他对代码进行处理了,后来发现不是,后 ...
- GitHub 系列之「Git速成」
1.什么是Git? Git 是 Linux 发明者 Linus 开发的一款新时代的版本控制系统,那什么是版本控制系统呢?怎么理解?网上一大堆详细的介绍,但是大多枯燥乏味,对于新手也很难理解,这里我只举 ...
- Class path & Path
Class path: 配置类文件 (配置完之后,在任何盘符下都可以访问该配置路径下的文件); Path: 配置可执行文件; Class path 配置时路径后面加分号与不加分号的区别 (当前路径与配 ...