Ramdisk根文件系统映像的修改与创建
本文简述Ramdisk根文件系统映像的修改以及创建,并附相关脚本以实现自动化配置,而根文件系统的制作过程请网上自行搜索。相关过程尽可能以图的方式展示出来,重在说明操作的过程,仅供参考。
Ramdisk简介
Ramdisk,顾名思义,即内存磁盘。先来摘一段来自百度百科的解释:
虚拟内存盘是通过软件将一部分内存(RAM)模拟为硬盘来使用的一种技术。相对于直接的硬盘文件访问来说,这种技术可以极大的提高在其上进行的文件访问的速度。但是RAM的易失性也意味着当关闭电源后这部分数据将会丢失。但是在一般情况下,传递到RAM盘上的数据都是在硬盘或别处永久贮存的文件的一个拷贝。经由适当的配置,可以实现当系统重启后重新建立虚拟盘。
这种技术在Windows和Linux系统中都可以实现。它并非一个实际的文件系统,而是一种将实际的文件系统装入内存的机制,并且可以作为Linux的根文件系统。将一些经常被访问而又不会更改的文件 ( 如只读的根文件系统 ) 通过 Ramdisk放在内存中,可以明显地提高系统的性能。 在嵌入式环境中,我们将使用 RAMDisk 制作好的 rootfs 压缩后写入 Flash ,启动的时候由Bootloader装载到 RAM 中。在 Linux 的启动阶段, initrd 提供了一套机制,可以将内映像和根文件系统一起载入内存并解压缩,然后挂载到 /(根目录) 下。这种方法操作简单,但是在 RAM 中的文件系统不是压缩的,因此需要占用许多嵌入式系统中稀有资源 RAM。
如何修改根文件系统映像
要修改根文件系统,需去掉u-boot的文件头,解压映像并挂载至设定的挂载点,在其中完成文件及目录的修改,最终压缩并制作成系统所需的根文件系统映像。具体修改步骤 见下:

note:
1. 使用文件转换命令dd来去除uramdisk的文件头,其中bs=4,skip=16意为4bytes作为单次读写的块大小,从文件的起始位置跳过16个这样的块(共64字节);
2. 准备压缩文件系统镜像前,先将当前工作目录从该镜像目录跳出再卸载;
3. mkimage制作ramdisk文件系统时,几个参数说明:-A 设置系统架构 -T 设置镜像类型 -C 设置文件压缩类型 -d 待加工的数据文件
以下为可参考脚本:
#!/bin/bash -e

###############################################################################

#

# Copyright (C) 2014 - 2018 by Yujiang Lin <lynyujiang@gmail.com>

#

# This program is free software; you can redistribute it and/or modify

# it under the terms of the GNU General Public License as published by

# the Free Software Foundation; either version 2 of the License, or

# (at your option) any later version.

#

# revised by Luego Zhang

#

#

###############################################################################

# => Force locale language to be set to English. This avoids issues when doing

# text and string processing.

export LC_ALL=C LANGUAGE=C LANG=C

# => Help and information

usage() {

    echo "Purpose: Modify Existing Ramdisk Image"

    echo "Version: 20191101v1.1"

    echo "Usage  : $(basename ${BASH_SOURCE}) [option]"

    echo "options:"

    echo "--help: Display this help message"

    exit 0;

}

expr "$*" : ".*--help" > /dev/null && usage

# => Setting The Development Environment Variables

#if [ ! "${ZN_CONFIG_DONE}" ]; then

#    printf "\033[31m[ERROR]\033[0m Please source the settings64.sh script first\n"

#    exit 1

#fi

source ./common.sh

# => Filename of the running script.

ZN_SCRIPT_NAME="$(basename ${BASH_SOURCE})"

###############################################################################

# => The beginning

print_info "[ $(date "+%Y/%m/%d %H:%M:%S") ] Starting ${ZN_SCRIPT_NAME}\n"

# => Check user input is correct

[[ -f $1 ]] || error_exit "(u)ramdisk.image.gz not found\n"

# => Set basic info

REALPATH=$(realpath $1)

read DIRNAME BASENAME <<<$(echo $(dirname ${REALPATH}) $(basename ${REALPATH}))

read FILENAME EXTENSION <<<$(echo ${BASENAME%.*} ${BASENAME##*.})

# => Check user input is correct again

if [ "${BASENAME}" = "uramdisk.image.gz" ]; then

    echo_info "Unwrap the image with the u-boot header"

    dd if=${DIRNAME}/uramdisk.image.gz of=${DIRNAME}/ramdisk.image.gz bs=64 skip=1

else

    [[ "${BASENAME}" = "ramdisk.image.gz" ]] || error_exit "(u)ramdisk.image.gz - not fount"

fi

# =>

echo_info "(1/6) Create a mount point for ramdisk.image"

RAMDISK_MOUNTPOINT=$(mktemp -d ${DIRNAME}/ramdisk.XXXXXX) || error_exit "Could not create a mount point"

# =>

echo_info "(2/6) Extract the initrd image from the gzip archive"

gunzip ${DIRNAME}/ramdisk.image.gz && chmod u+rwx ${DIRNAME}/ramdisk.image

# =>

echo_info "(3/6) Mount the initrd image as a loop back device at ${RAMDISK_MOUNTPOINT}"

sudo mount -o loop ${DIRNAME}/ramdisk.image ${RAMDISK_MOUNTPOINT}

[[ $? -ne 0 ]] && gunzip ${DIRNAME}/ramdisk.image && error_exit "Could not mount the ramdisk"

# => Make changes in the mounted filesystem.

cat << EOF

(4/6) Ready for anything, you can modify existing RAM disk image

Note: When finished, enter "exit" to exit bash, then the script will handle other remaining work

EOF

/bin/bash

# =>

echo_info "(5/6) Umount the initrd image and compress the image."

sudo umount ${RAMDISK_MOUNTPOINT} && gzip ${DIRNAME}/ramdisk.image

# =>

echo_info "(6/6) Wrapping the image with a U-Boot header and remove temp files"

if [ "${BASENAME}" = "uramdisk.image.gz" ]; then

    if type mkimage >/dev/null 2>&1; then

    echo_info "Wrapping the image with a U-Boot header"

    mkimage -A arm -T ramdisk -C gzip -d ${DIRNAME}/ramdisk.image.gz \

        ${DIRNAME}/uramdisk.image.gz

    else

    error_exit "Missing mkimage command"

    fi

fi

rm -rf $RAMDISK_MOUNTPOINT

# => The end

print_info "[ $(date "+%Y/%m/%d %H:%M:%S") ] Finished ${ZN_SCRIPT_NAME}\n"

################################################################
customize_ramdisk.sh
如何创建根文件系统映像
如果没有uramdisk的映像文件,则需要从创建一个空白映像开始,自己制作好根文件系统(相关内容在网上自己获取),将该根文件系统写入空白映像,最后封装成u-boot支持的系统映像文件,具体流程见下图:
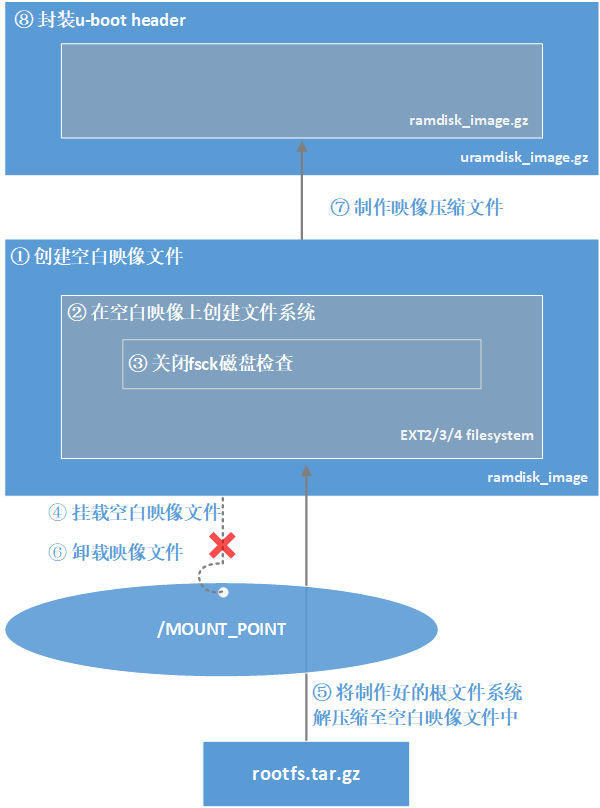
note:
此处需注意制作的映像大小就与内核中的设置相匹配。(通过make menuconfig ARCH=ARM打开设置界面,Device Drivers => Block Devices => Default Ram Disk Size (kbytes), 修改选项前数字,本例已修改为64MB,即65536)
以下为参考脚本文件:(使用前将common.sh拷贝至同一目录下)
#!/bin/bash

###############################################################################

# 版    权:米联客

# 技术社区:www.osrc.cn

# 功能描述:一些常用函数

# 版 本 号:V1.0

###############################################################################

# => Writing a Warning Message to the Console Window

echo_warn() {

    local msg="$1"

    printf "\033[33m[WARNING] \033[0m";

    printf "$msg\n";

}

export -f echo_warn

# => Writing a Infomation Message to the Console Window

echo_info() {

    local msg="$1"

    printf "\033[32m[INFO] \033[0m";

    printf "$msg\n";

}

export -f echo_info

# => Writing a Error Message to the Console Window

echo_error() {

    local msg="$1"

    printf "\033[31m[ERROR] \033[0m";

    printf "$msg\n";

}

export -f echo_error

# => Writing a Warning Message to the Console Window

print_warn() {

    local msg="$1"

    printf "\033[33m$msg\033[0m";

}

export -f print_warn

# => Writing a Infomation Message to the Console Window

print_info() {

    local msg="$1"

    printf "\033[32m$msg\033[0m";

}

export -f print_info

# => Writing a Error Message to the Console Window

print_error() {

    local msg="$1"

    printf "\033[31m$msg\033[0m";

}

export -f print_error

# => Writing a Error Message to the Console Window and exit

error_exit() {

    local msg="$1"

    printf "\033[31m[ERROR] \033[0m";

    printf "$msg\n";

    exit 1;

}

export -f error_exit
common.sh
#!/bin/bash -e

###############################################################################

#

# Copyright (C) 2014 - 2018 by Yujiang Lin <lynyujiang@gmail.com>

#

# This program is free software; you can redistribute it and/or modify

# it under the terms of the GNU General Public License as published by

# the Free Software Foundation; either version 2 of the License, or

# (at your option) any later version.

#

# history:

# 191106 - This script has been verified.

#

###############################################################################

# => Force locale language to be set to English. This avoids issues when doing

# text and string processing.

export LC_ALL=C LANGUAGE=C LANG=C

# => Help and information

usage() {

        printf "

NAME

        $(basename ${BASH_SOURCE}) - Create a new uramdisk.image.gz with a

        given folder of filesystem

SYNOPSIS

        $(basename ${BASH_SOURCE}) [option]

DESCRIPTION

        Create an empty image and eject the given rootfs into the image.

        Output the file like 'uramdisk.image.gz' finally.

NOTE

        First copy the given filesystem to the path of the script and modify

        the relative files in advance. Then execute the script.

OPTIONS

        --help    Display this help message

EXAMPLE

Version : 191107v1.2

 "

    exit 0;

}

expr "$*" : ".*--help"  > /dev/null && usage

# => Setting The Development Environment Variables

#if [ ! "${ZN_CONFIG_DONE}" ]; then

#    printf "\033[31m[ERROR]\033[0m Please source the settings64.sh script first\n"

#    exit 1

#fi

source common.sh

# => Filename of the running script.

ZN_SCRIPT_NAME="$(basename ${BASH_SOURCE})"

ZN_SCRIPT_PATH="$(dirname ${BASH_SOURCE})"

# => Check if the rootfs.tar.gz exists.

[[ -f ${ZN_SCRIPT_PATH}/rootfs.tar.gz ]] || error_exit "rootfs.tar.gz is not found"

###############################################################################

# expand capacity of the ramdisk image to 64MB 191106

IMAGE_CAPACITY_MB=64

# => beginning

echo  "\033[32m[ $(date "+%Y/%m/%d %H:%M:%S") ]\033[0m Starting ${ZN_SCRIPT_NAME}"

MOUNT_POINT=$(mktemp -d $ZN_SCRIPT_PATH/ramdisk.XXXXXX)

echo_info "Generate the Root filesystem"

# =>

echo_info "(1/8) Create an empty ramdisk image"

dd if=/dev/zero of=./ramdisk.image bs=1024 count=$((${IMAGE_CAPACITY_MB}*1024))

# =>

echo_info "(2/8) Create an ext2/ext3/ext4 file system"

sudo mke2fs -t ext4 -F ./ramdisk.image -L ramdisk -b 1024 -m 0

# =>

echo_info "(3/8) To disable fsck check on ./ramdisk.image"

sudo tune2fs -c 0 -i 0 ./ramdisk.image

# =>

echo_info "(4/8) Mount the ramdisk image as a loop back device"

sudo mount -o loop ./ramdisk.image ${MOUNT_POINT}

# =>

echo_info "(5/8) Make changes in the mounted filesystem"

sudo tar zxf ./rootfs.tar.gz -C ${MOUNT_POINT}

cat <<EOF

Please check the root filesystem.

Then enter "exit" to return the process.

EOF

/bin/bash

# =>

echo_info "(6/8) Unmount the ramdisk and compress it"

sudo umount ${MOUNT_POINT} && gzip ./ramdisk.image

# =>

echo_info "(7/8) Wrapping the image with a U-Boot header"

type mkimage >/dev/null 2>&1 || error_exit "Missing mkimage command"

mkimage -A arm -T ramdisk -C gzip -d ./ramdisk.image.gz ./uramdisk.image.gz

# =>

echo_info "(8/8) Housekeeping..."

sudo rm -f  ./ramdisk.image.gz

sudo rm -f  ./ramdisk.image

sudo rm -rf ${MOUNT_POINT}

# => The end

printf "\033[32m[ $(date "+%Y/%m/%d %H:%M:%S") ]\033[0m Finished ${ZN_SCRIPT_NAME}\n"
create_image_for ramdisk
参考:
如何将Zynq-7000自带的ramdisk8M文件系统扩到ramdisk24M制作
米联客https://www.uisrc.com/portal.php
Ramdisk根文件系统映像的修改与创建的更多相关文章
- 使用mkbootfs制作ramdisk根文件系统
span::selection, .CodeMirror-line > span > span::selection { background: #d7d4f0; }.CodeMirror ...
- zju(4)使用busybox制作根文件系统
1.实验目的 1.学习和掌握busybox相关知识及应用: 2.学会使用交叉编译器定制一个busybox: 3.利用该busybox制作一个文件系统: 4.熟悉根文件系统组织结构: 5.定制.编译ra ...
- 从ramdisk根文件系统启动Linux成功,及使用initramfs启动linux
下面两篇文章是ARM9论坛上的讲解ramdisk文件系统的很不错的文章 今天做了个试验,让Linux2.6.29.4从ramdisk根文件系统启动成功,总结一下. 其中涉及的内容较多,很多东西不再详述 ...
- 从ramdisk根文件系统启动Linux 二
今天做了个试验,让Linux2.6.29.4从ramdisk根文件系统启动成功,总结一下.其中涉及的内容较多,很多东西不再详述,如需深入研究请查阅相关资料(百度或谷歌一下一大堆). 开发环境:Fedo ...
- 从ramdisk根文件系统启动Linux成功
这几天参考国嵌的实验手册和网上的资料完成了u-boot定制.内核定制.ramdisk根文件系统的制作,并成功.趁热打铁,总结一下.本文引用了很多网络上的文章,就不一一注明了.感谢各大侠的帮助,如有雷同 ...
- 制作ramdisk-u.img根文件系统
具体步骤如下:1.解压内核源码树解压linux-2.6.29-mini2440-20090708.tgz到自己的工作目录,会生成一个友善之臂修改过的并且有几个mini2440默认配置文件的内核源码目录 ...
- TI Davinci DM6446开发攻略——根文件系统的裁剪和移植
一.补充文件系统知识 Linux根文件系统是存放tool软件.lib文件.script(脚本).配置文件.其他特殊文件.自己开发的应用程序的地方.嵌入式linux的根文件系统rootfs就像windo ...
- linux 内核移植和根文件系统的制作【转载】
原文地址:http://www.cnblogs.com/hnrainll/archive/2011/06/09/2076214.html 1.1 Linux内核基础知识 在动手进行Linux内核移植之 ...
- linux 内核移植和根文件系统的制作
1.1 Linux内核基础知识 在动手进行Linux内核移植之前,非常有必要对Linux内核进行一定的了解,下面从Linux内核的版本和分类说起. 1.1.1 Linux版本 Linux内核的版本号 ...
随机推荐
- [RN] React Native 使用开源库 react-native-image-crop-picker 实现图片选择、图片剪裁
React Native 使用开源库 react-native-image-crop-picker 实现图片选择.图片剪裁 该库可以实现启动本地相册和照相机来采集图片,并且提供多选.图片裁剪等功能,支 ...
- bzoj4605: 崂山白花蛇草水 权值线段树套KDtree
bzoj4605: 崂山白花蛇草水 链接 bzoj loj 思路 强制在线,那就权值线段树套KDtree好了,没啥好讲的. KDtree要加平衡因子来重构.另外,那水真难喝. 错误 树套树一边写过了, ...
- 同余方程组(EXCRT)(luogu4777)
#include<cstdio> #include<algorithm> #define ll long long using namespace std; ll k; ll ...
- luogu P3799 妖梦拼木棒
二次联通门 : luogu P3799 妖梦拼木棒 /* luogu P3799 妖梦拼木棒 用一个桶存下所有的木棒 美剧两根短的木棒长度 后随便乘一乘就 好了.. */ #include <a ...
- 配送城市地址联动选择JQuery
记录一次使用jq实现3层地址联动选择流程!效果如图. 需要引入 jq.js.layer.js.layui.js.layui.css (icon图标) 二.选中后页面展示效果 三.页面展示HTML &l ...
- SSM 实现支付宝支付功能(图文详解+完整代码)
阅读本文大概需要 4 分钟. 前言 本教程详细介绍了如何使用ssm框架实现支付宝支付功能.本文章分为两大部分,分别是「支付宝测试环境代码测试」和「将支付宝支付整合到ssm框架」,详细的代码和图文解释, ...
- 解决IDEA中maven导入jar包
查 看: File------>Project Structure--------->Libraries如下面没有maven所引入的jar包则为该错误[1] 错误原因: 是 ...
- Netty通信网络参数配置
Netty服务端/客户端网络通信过程中常用的参数: Name Associated setter method "writeBufferHighWaterMark" 默认64 * ...
- nginx负载均衡的5种策略及原理
版权声明:本文为博主原创文章,遵循CC 4.0 BY-SA版权协议,转载请附上原文出处链接和本声明. 本文链接:https://blog.csdn.net/qq_35119422/article/de ...
- HIVE-计算累计和
eg:统计1-12月的累积销量,即1月为1月份的值,2月为1.2月份值的和,3月为123月份的和,12月为1-12月份值的和 SELECT month,SUM(amount) month_amou ...