vue vue-router 完美实现前进刷新,后退不刷新。附scrollBehavior源码解析
需求:在一个vue的项目中,我们需要从一个列表页面点击列表中的某一个详情页面,从详情页面返回不刷新列表,而从列表的上一个页面重新进入列表页面则需要刷新列表。
而浏览器的机制则是每一次的页面打开都会重新执行所有的程序,所以这个功能并不能直接实现。而vue-router给我们提供了一个叫scrollBehavior的回调函数,我门可以用这个方法结合keep-alive能很好的实现这个功能,下面第一步附上实现代码:
首先我们创建a,b,c,d四个页面,在路由的meta属性中添加需要缓存的页面标识(isKeepAlive):
import Vue from 'vue'

import Router from 'vue-router'

const HelloWorld = () => import('@/components/HelloWorld')

const A = () => import('@/components/router-return/router-a')

const B = () => import('@/components/router-return/router-b')

const C = () => import('@/components/router-return/router-c')

const D = () => import('@/components/router-return/router-d')

Vue.use(Router)

const routes = [

  {

    path: '/',

    name: 'HelloWorld',

    component: HelloWorld

  }, {

    path: '/a',

    name: 'A',

    component: A

  }, {

    path: '/b',

    name: 'B',

    component: B,

    meta: {

      isKeepAlive: true

    }

  }, {

    path: '/c',

    name: 'C',

    component: C

  }, {

    path: '/d',

    name: 'D',

    component: D

  }

]
然后我们修改app.vue页面:
<template>

  <div id="app">

    <img src="./assets/logo.png">

    <keep-alive>

      <router-view v-if="$route.meta.isKeepAlive"/>

    </keep-alive>

    <router-view v-if="!$route.meta.isKeepAlive"/>

  </div>

</template>
最后我们添加new Router方法的scrollBehavior的回调处理方法:
export default new Router({

  routes,

  scrollBehavior (to, from, savedPosition) {

    // 从第二页返回首页时savedPosition为undefined

    if (savedPosition || typeof savedPosition === 'undefined') {

      // 只处理设置了路由元信息的组件

      from.meta.isKeepAlive = typeof from.meta.isKeepAlive === 'undefined' ? undefined : false

      to.meta.isKeepAlive = typeof to.meta.isKeepAlive === 'undefined' ? undefined : true

      if (savedPosition) {

        return savedPosition

      }

    } else {

      from.meta.isKeepAlive = typeof from.meta.isKeepAlive === 'undefined' ? undefined : true

      to.meta.isKeepAlive = typeof to.meta.isKeepAlive === 'undefined' ? undefined : false

    }

  }

})
在scrollBehavior方法中的savedPosition参数,每一次点击进去的值为null,而点击浏览器的前进与后退则会返回上一次该页面离开时候的pageXOffset与pageYOffset的值,然后我们可以根据这个返回的值来修改路由信息里面的isKeepAlive值来控制是否显示缓存。
我们来看下vue-router里面scrollBehavior执行的源码:
在vue-router.js的1547行发现:
function handleScroll ( router, to,  from, isPop) {

  if (!router.app) {

    return

  }

  var behavior = router.options.scrollBehavior;

  if (!behavior) {

    return

  }

  {

    assert(typeof behavior === 'function', "scrollBehavior must be a function");

  }

  // wait until re-render finishes before scrolling

  router.app.$nextTick(function () {

    // 得到该页面之前的position值,如果没有缓存则返回null

    var position = getScrollPosition();

    var shouldScroll = behavior(to, from, isPop ? position : null);

    if (!shouldScroll) {

      return

    }

    if (typeof shouldScroll.then === 'function') {

      shouldScroll.then(function (shouldScroll) {

        // 移动页面到指定位置

        scrollToPosition((shouldScroll), position);

      }).catch(function (err) {

        {

          assert(false, err.toString());

        }

      });

    } else {

      // 移动页面到指定位置

      scrollToPosition(shouldScroll, position);

    }

  });

}
再看下上面方法中用到的几个主要方法的写法:
// getScrollPosition 得到移动的坐标

function getScrollPosition () {

  var key = getStateKey();

  if (key) {

    return positionStore[key]

  }

}

// scrollToPosition 页面移动方法

function scrollToPosition (shouldScroll, position) {

  var isObject = typeof shouldScroll === 'object';

  if (isObject && typeof shouldScroll.selector === 'string') {

    var el = document.querySelector(shouldScroll.selector);

    if (el) {

      var offset = shouldScroll.offset && typeof shouldScroll.offset === 'object' ? shouldScroll.offset : {};

      offset = normalizeOffset(offset);

      position = getElementPosition(el, offset);

    } else if (isValidPosition(shouldScroll)) {

      position = normalizePosition(shouldScroll);

    }

  } else if (isObject && isValidPosition(shouldScroll)) {

    position = normalizePosition(shouldScroll);

  }

  if (position) {

    window.scrollTo(position.x, position.y);

  }

}
然后我们看看vue-router是怎么缓存页面x,y的坐标的,上面的getScrollPosition是用来获取坐标的,那么肯定也有保存坐标的方法,在getScrollPosition的上面一个方法则是saveScrollPosition就是保存的方法:
// saveScrollPosition

function saveScrollPosition () {

  var key = getStateKey();

  if (key) {

    positionStore[key] = {

      x: window.pageXOffset,

      y: window.pageYOffset

    };

  }

}
而这个保存的方法会有一个key值是缓存的标识,继续查找getStateKey:
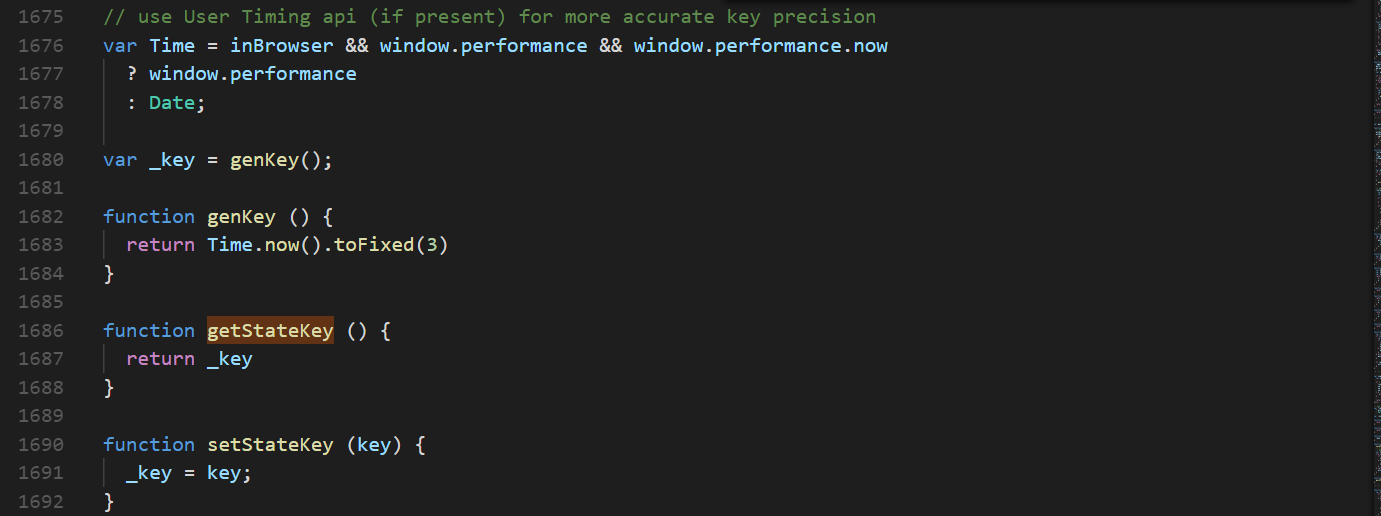
根据上面代码发现key值就是一个时间值。而setStateKey则是一个key值更新的方法,然后继续查找setStateKey执行的地方:
function setupScroll () {

  // Fix for #1585 for Firefox

  window.history.replaceState({ key: getStateKey() }, '');

  window.addEventListener('popstate', function (e) {

    saveScrollPosition();

    if (e.state && e.state.key) {

      setStateKey(e.state.key);

    }

  });

}
然后发现该方法执行的地方是popState执行的时候,而key的来源则是popState返回参数里面的state属性里面,而state值的设定则是pushstate执行的时候传进去的,所以我们继续查pushstate执行的方法:
function pushState (url, replace) {

  saveScrollPosition();

  // try...catch the pushState call to get around Safari

  // DOM Exception 18 where it limits to 100 pushState calls

  var history = window.history;

  try {

    if (replace) {

      history.replaceState({ key: _key }, '', url);

    } else {

      _key = genKey();

      history.pushState({ key: _key }, '', url);

    }

  } catch (e) {

    window.location[replace ? 'replace' : 'assign'](url);

  }

}
根据上面代码发现,每次push的时候都会去生成一个当前时间的key值保存在state里面,作用于popstate时使用。
那么到此scrollBehavior方法的整个执行逻辑就清楚了:该方法最主要的是运用了浏览器的popstate方法只会在浏览器回退与前进才会执行的机制,在页面进入时生成一个唯一的key值保存在state里面,离开的时候将页面滚动位置保存在state里面的唯一key值上。每次pushstate的时候key值都是最新的,没有缓存所以返回null,而执行popstate的时候state里面的key都有缓存,则返回上次离开时候的滚动坐标。
vue vue-router 完美实现前进刷新,后退不刷新。附scrollBehavior源码解析的更多相关文章
- vue单页应用前进刷新后退不刷新方案探讨
引言 前端webapp应用为了追求类似于native模式的细致体验,总是在不断的在向native的体验靠拢:比如本文即将要说到的功能,native由于是多页应用,新页面可以启用一个的新的webview ...
- Vue源码解析之数组变异
力有不逮的对象 众所周知,在 Vue 中,直接修改对象属性的值无法触发响应式.当你直接修改了对象属性的值,你会发现,只有数据改了,但是页面内容并没有改变. 这是什么原因? 原因在于: Vue 的响应式 ...
- vue系列---响应式原理实现及Observer源码解析(一)
_ 阅读目录 一. 什么是响应式? 二:如何侦测数据的变化? 2.1 Object.defineProperty() 侦测对象属性值变化 2.2 如何侦测数组的索引值的变化 2.3 如何监听数组内容的 ...
- 【vuejs深入二】vue源码解析之一,基础源码结构和htmlParse解析器
写在前面 一个好的架构需要经过血与火的历练,一个好的工程师需要经过无数项目的摧残. vuejs是一个优秀的前端mvvm框架,它的易用性和渐进式的理念可以使每一个前端开发人员感到舒服,感到easy.它内 ...
- 【vuejs深入三】vue源码解析之二 htmlParse解析器的实现
写在前面 一个好的架构需要经过血与火的历练,一个好的工程师需要经过无数项目的摧残. 昨天博主分析了一下在vue中,最为基础核心的api,parse函数,它的作用是将vue的模板字符串转换成ast,从而 ...
- vue UI库iview源码解析(2)
上篇问题 在上篇<iview源码解析(1)>中的index.js 入口文件的源码中有一段代码有点疑惑: /** * 在浏览器环境下默认加载组件 */ // auto install if ...
- Vue源码解析---数据的双向绑定
本文主要抽离Vue源码中数据双向绑定的核心代码,解析Vue是如何实现数据的双向绑定 核心思想是ES5的Object.defineProperty()和发布-订阅模式 整体结构 改造Vue实例中的dat ...
- Vue源码解析之nextTick
Vue源码解析之nextTick 前言 nextTick是Vue的一个核心功能,在Vue内部实现中也经常用到nextTick.但是,很多新手不理解nextTick的原理,甚至不清楚nextTick的作 ...
- 【VUE】Vue 源码解析
Vue 源码解析 Vue 的工作机制 在 new vue() 之后,Vue 会调用进行初始化,会初始化生命周期.事件.props.methods.data.computed和watch等.其中最重要的 ...
随机推荐
- 微信小程序开发前期准备
开发文档 官方开发文档 开发IDE 官方工具下载 UI组件 WeUI:是一套同微信原生视觉体验一致的基础样式库,由微信官方设计团队为微信内网页和微信小程序量身设计,新手建议使用: ZanUI-WeAp ...
- CSS的BFC和hasLayout及其应用场景
前端精选文摘:BFC 神奇背后的原理 一.BFC是什么? 先介绍 Box.Formatting Context的概念. Box: CSS布局的基本单位 Box 是 CSS 布局的对象和基本单位, 直观 ...
- ArrayList 与 List 关系与代码示例 - Java
关系 List 是 Java Interface, ArrayList 是 Java Class,它们都属于 java.util 包. Java List 是有序的集合(ordered collect ...
- GIT团队合作探讨之二--Pull Request
pull request是github/bitbucket给开发人员实现便利合作提供的一个feature.他们提供一个用户友好的web界面在进代码之前来讨论这些变更. 简单说,pull request ...
- SQL点点滴滴_常用函数
该文章转载自http://www.cnblogs.com/jiajiayuan/archive/2011/06/16/2082488.html 别人的总结,很详细. 以下所有例子均Studnet表为例 ...
- 【Leetcode】【Medium】Word Break
Given a string s and a dictionary of words dict, determine if s can be segmented into a space-separa ...
- 关于thrift的一些探索——thrift序列化技术
thrift的IDL,相当于一个钥匙.而thrift传输过程,相当于从两个房间之间的传输数据. 图-1 (因为Thrift采用了C/S模型,不支持双向通信:client只能远程调用server端的RP ...
- ESXi中的虚拟机如何使用U盘和加密Key
最近想在虚拟机中的主机使用通讯加密key来部署专门用于转发和加密的通讯前置机.故查询测试一下是不是能识别. 第一步:在虚拟宿主机上添加USB控制器,右键单击目标虚拟机,选中"编辑设置&quo ...
- 一道算法题-八皇后问题(C++实现)
八皇后问题 一.题意解析 国际象棋中的皇后,可以横向.纵向.斜向移动.如何在一个8X8的棋盘上放置8个皇后,使得任意两个皇后都不在同一条横线.竖线.斜线方向上?八皇后问题是一个古老的问题,于1848年 ...
- WAS缓存问题
在项目中经常遇见这样的问题:修改应用的配置文件web.xml后,无论重启应用还是重启WebSphere服务器,都不能重新加载web.xml,导致修改的内容无效. 这个问题困扰了我好久,即使删除了${w ...