
ListView实现下拉刷新(一)建立头布局
一、效果演示
ListView实现下拉刷新,是很常见的功能。下面是一个模拟的效果,如下图:
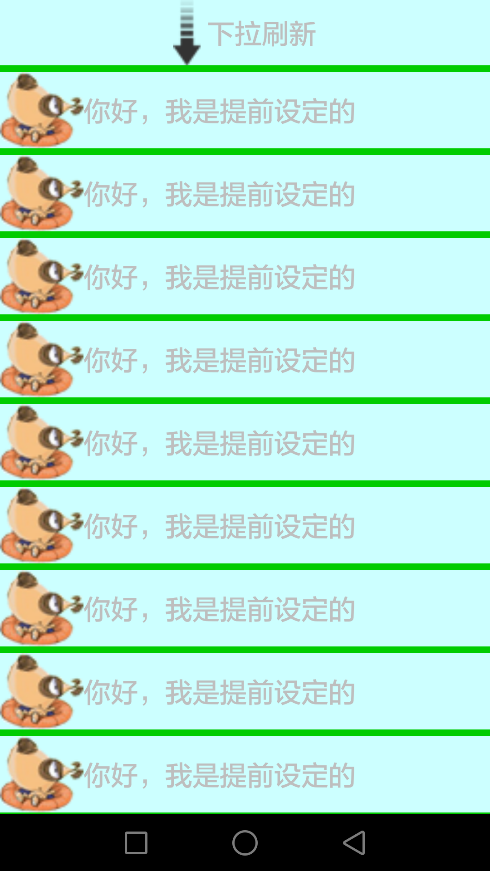



效果说明:当往下拉ListView的时候,顶部就会有一个“下拉刷新”的标识被拉 出来,再往下拉的时候,标识就会变成”松开刷新“,期间还伴随一个箭头的变化。此时松开手指,则会变成进度条提示正在刷新,刷新完成后,则加载进来刷新的数据。如此反复,就是下拉刷新的功能。
二、准备Demo
其实本质上,ListView实现下拉刷新和实现分页加载都是一样的,都是一个自定义的ListView而已。甚至可以说,原理基本相同,只不过下拉刷新头布局变化相对分页加载复杂一点。
因此,我们仍旧使用《listView实现分页加载》里面的Demo,即首先搭建一个正常下的ListView,准备点模拟的数据。可以点击下面的链接,查看Demo的编写:
http://www.cnblogs.com/fuly550871915/p/4866929.html
三、实现头布局
好了,模拟的东西都准备完成了。下面我们首先编写头布局。比较简单,就是一个箭头,进度条好文本而已。命名为header.xml。代码如下:
 <?xml version="1.0" encoding="utf-8"?>

 <LinearLayout xmlns:android="http://schemas.android.com/apk/res/android"

     android:layout_width="match_parent"

     android:layout_height="match_parent"

     android:orientation="horizontal"

     android:gravity="center">

     <ProgressBar

         android:id="@+id/progress_bar"

         android:layout_width="wrap_content"

         android:layout_height="wrap_content"

         android:visibility="gone"

         style="?android:attr/progressBarStyleSmall"/>

     <ImageView

          android:id="@+id/img_arrow"

         android:layout_width="wrap_content"

         android:layout_height="wrap_content"

         android:src="@drawable/down_arrow"/>

     <TextView

         android:id="@+id/textinfo"

         android:layout_width="wrap_content"

         android:layout_height="wrap_content"

         android:paddingLeft="5dp"

         android:textSize="20dp"

         android:text="下拉刷新"/>

 </LinearLayout>
然后,我们就开始自定义ListView吧。新建类MyListView,继承自ListView。在这里加上头布局即可。代码如下:
 package com.fuly.load;

 import android.content.Context;

 import android.util.AttributeSet;

 import android.view.LayoutInflater;

 import android.view.View;

 import android.widget.ListView;

 public class MyListView extends ListView{

     private View header;//头布局

     //三个构造方法都要重写

     public MyListView(Context context) {

         super(context);

         initView( context);

     }

     public MyListView(Context context, AttributeSet attrs) {

         super(context, attrs);

         initView( context);

     }

     public MyListView(Context context, AttributeSet attrs, int defStyle) {

         super(context, attrs, defStyle);

         initView( context);

     }

     public void initView(Context context){

         header = LayoutInflater.from(context).inflate(R.layout.header, null);

         //将头布局加进去

         this.addHeaderView(header);

     }

 }
自定义的ListView已经准备好了,下面就替换吧。修改activity_main.xml里的代码即可,如下:
 <LinearLayout xmlns:android="http://schemas.android.com/apk/res/android"

     xmlns:tools="http://schemas.android.com/tools"

     android:layout_width="match_parent"

     android:layout_height="match_parent"

      android:background="#ccffff">

     <com.fuly.load.MyListView

         android:id= "@+id/list_view"

         android:layout_width="match_parent"

         android:layout_height="match_parent"

         android:dividerHeight="5dp"

         android:divider="#00cc00"></com.fuly.load.MyListView>

 </LinearLayout>
至此,我们已经把带头布局的ListView做好了。运行一下程序,会发现就是效果图的第一张。
那么,怎么来隐藏头布局呢?这并不简单,是下一节要详细说的内容。
ListView实现下拉刷新(一)建立头布局的更多相关文章
- Android开发 - 下拉刷新和分段头悬停列表
项目源码 本文所述项目已开源,源码地址 为什么做PullToRefresh-PinnedSection-ListView 前段时间因为项目需求,需要在Android中对ListView同时增加下拉刷新 ...
- ListView实现下拉刷新(三)实现下拉刷新
该准备的东西都已经准备好了.在这篇文章里,我们就开始实现下拉刷新功能吧. 一.大体的逻辑分析 我们来简单分析一下需要做的逻辑吧.首先分析头布局有几种状态.不下拉时,为正常状态,此时头布局隐藏.下拉到一 ...
- Android UI--自定义ListView(实现下拉刷新+加载更多)
Android UI--自定义ListView(实现下拉刷新+加载更多) 关于实现ListView下拉刷新和加载更多的实现,我想网上一搜就一堆.不过我就没发现比较实用的,要不就是实现起来太复杂,要不就 ...
- android--------自定义控件ListView实现下拉刷新和上拉加载
开发项目过程中基本都会用到listView的下拉刷新和上滑加载更多,为了方便重写的ListView来实现下拉刷新,同时添加了上拉自动加载更多的功能. Android下拉刷新可以分为两种情况: 1.获取 ...
- ListView实现下拉刷新(二)隐藏头布局
一.问题分析 在上一篇中,我们将头布局加到了ListView上.但是没有隐藏他.你可能会想,隐藏还不简单,直接给它设置为GONE属性不就可以了吗,在需要的时候再设定为可见.没错,这正是ListView ...
- ListView实现下拉刷新和上拉加载功能
1 public class RefreshListView extends ListView implements OnScrollListener { private View mHeaderVi ...
- 自定义ListView实现下拉刷新,下拉加载的功能
package com.loaderman.myrefreshlistviewdemo; import android.content.Context; import android.util.Att ...
- 【转载】 Android PullToRefresh (ListView GridView 下拉刷新) 使用详解
Android下拉刷新pullToRefreshListViewGridView 转载请标明出处:http://blog.csdn.net/lmj623565791/article/details/3 ...
- Android PullToRefresh (ListView GridView 下拉刷新) 使用详解
转载请标明出处:http://blog.csdn.net/lmj623565791/article/details/38238749,本文出自:[张鸿洋的博客] 群里一哥们今天聊天偶然提到这个git ...
随机推荐
- Java中break、continue及标签等跳转语句的使用[上]
java 中跳转语句使用break.continue和标签,各自或组合完成相应的功能. 今天做题时遇到关于标签命名规范,顺便将跳转语句语法都看了一遍,很有收获. 在<Java编程思想>一书 ...
- 打开usb调试的方法
方法一: settings --> about tablet --> build number(疯狂点击) -->回退 developer options --> USB d ...
- 获取两个List中的不同元素,4种方法,逐步优化,学习使用
完全复制https://www.cnblogs.com/czpblog/archive/2012/08/06/2625794.html 先上测试结果 代码 package com.syl.test; ...
- Full postback triggered by LinkButton inside GridView inside UpdatePanel
GridView inside of a UpdatePanel,get the button to trigger a partial postback <asp:ScriptManager ...
- webservice随记
WebService:跨平台.系统.跨语言间相互调用 CXF:Axis(Apache)-> Axis2(Apache)XFire -> CXF(Celtrix + XFire)(Apach ...
- python 需求文件requirements.txt的创建及使用
在虚拟环境中使用pip生成: (venv) $ pip freeze >requirements.txt 当需要创建这个虚拟环境的完全副本,可以创建一个新的虚拟环境,并在其上运行以下命令: (v ...
- Spring和Hibernate结合的一个小例子
1.新建一个SpringHibernate的maven项目 2.pom文件的依赖为 <dependency> <groupId>junit</groupId> &l ...
- laravel后台注册登入
1.只需要在新安装的 Laravel 应用下运行 php artisan make:auth 和 php artisan migrate,这两个命令会生成用户登录注册所需要的所有东西 2.你会发现 h ...
- 洛谷P2831 愤怒的小鸟(状压dp)
题意 题目链接 Sol 这题....我样例没过就A了??..算了,就当是样例卡精度吧.. 直接状压dp一下,\(f[sta]\)表示干掉\(sta\)这个集合里面的鸟的最小操作数 转移的时候判断一下一 ...
- easyui扩展行默认展开 以及 去除滚动条
问题背景: 在做打印页面的时候,要求有详细的默认展开显示. 遇到的问题: 1)在用扩展行的时候,grid的所有行都添加了展开收起的图标,(第二行没有明细)如下 2)默认展示有详细行的时候,内 ...