
Laravel-Auth认证
1.建立数据表 admins
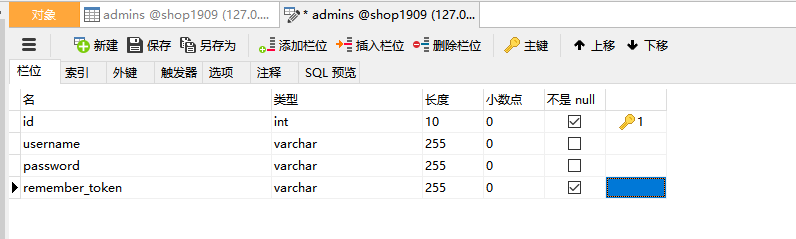
2.找到config下的auth.php 文件,加入如下代码
<?php

return [

    /*

    |--------------------------------------------------------------------------

    | Authentication Defaults

    |--------------------------------------------------------------------------

    |

    | This option controls the default authentication "guard" and password

    | reset options for your application. You may change these defaults

    | as required, but they're a perfect start for most applications.

    |

    */

    'defaults' => [

        'guard' => 'web',

        'passwords' => 'users',

    ],

    /*

    |--------------------------------------------------------------------------

    | Authentication Guards

    |--------------------------------------------------------------------------

    |

    | Next, you may define every authentication guard for your application.

    | Of course, a great default configuration has been defined for you

    | here which uses session storage and the Eloquent user provider.

    |

    | All authentication drivers have a user provider. This defines how the

    | users are actually retrieved out of your database or other storage

    | mechanisms used by this application to persist your user's data.

    |

    | Supported: "session", "token"

    |

    */

    'guards' => [

        'web' => [

            'driver' => 'session',

            'provider' => 'users',

        ],

        'api' => [

            'driver' => 'token',

            'provider' => 'users',

            'hash' => false,

        ],

        //加入admin,注意:admin 和app目录的admin.php名字要一致

        'admin' => [

            'driver' => 'session',

            'provider' => 'admins'

        ]

    ],

    /*

    |--------------------------------------------------------------------------

    | User Providers

    |--------------------------------------------------------------------------

    |

    | All authentication drivers have a user provider. This defines how the

    | users are actually retrieved out of your database or other storage

    | mechanisms used by this application to persist your user's data.

    |

    | If you have multiple user tables or models you may configure multiple

    | sources which represent each model / table. These sources may then

    | be assigned to any extra authentication guards you have defined.

    |

    | Supported: "database", "eloquent"

    |

    */

    'providers' => [

        'users' => [

            'driver' => 'eloquent',

            'model' => App\User::class,

        ],

        //admins 是刚才建立的admins表,名字同样也要保持一致

        'admins' => [

            'driver' => 'eloquent',

            'model' => App\Admin::class

        ]

        // 'users' => [

        //     'driver' => 'database',

        //     'table' => 'users',

        // ],

    ],

    /*

    |--------------------------------------------------------------------------

    | Resetting Passwords

    |--------------------------------------------------------------------------

    |

    | You may specify multiple password reset configurations if you have more

    | than one user table or model in the application and you want to have

    | separate password reset settings based on the specific user types.

    |

    | The expire time is the number of minutes that the reset token should be

    | considered valid. This security feature keeps tokens short-lived so

    | they have less time to be guessed. You may change this as needed.

    |

    */

    'passwords' => [

        'users' => [

            'provider' => 'users',

            'table' => 'password_resets',

            'expire' => 60,

            'throttle' => 60,

        ],

    ],

    /*

    |--------------------------------------------------------------------------

    | Password Confirmation Timeout

    |--------------------------------------------------------------------------

    |

    | Here you may define the amount of seconds before a password confirmation

    | times out and the user is prompted to re-enter their password via the

    | confirmation screen. By default, the timeout lasts for three hours.

    |

    */

    'password_timeout' => 10800,

];
3.在app下建立admin.php
<?php

namespace App;

use Illuminate\Foundation\Auth\User as Authenticatable;

class Admin extends Authenticatable

{

    protected $fillable = [

        'username', 'password',

    ];

    protected $hidden = [

        //remember_token 字段用于记住我的功能

        'password', 'remember_token',

    ];

    public static $rules = [

        'username'=>'required',

        'password'=>'required'

    ];

}

?>
4.建立AdminsController
<?php

namespace App\Http\Controllers;

use App\Http\Requests\UserRequest;

use Illuminate\Support\Facades\Auth;

class AdminsController extends Controller

{

    //

    public function login(){

        //echo bcrypt('123456');

        //die();

        return view('admins.login');

    }

    public function dologin(UserRequest $request){

        $credentials = $request->only('username', 'password');

        /**

         * 使用laravel自带的Auth登录

         * 1、密码使用的是hash加密 $crypt = password_hash($password, PASSWORD_DEFAULT);

         */

        if(Auth::guard('admin')->attempt($credentials)){

            return response()->json(['code' => 200, 'msg' => '登录成功']);

        }else{

            return response()->json(['code' => 403, 'msg' => '用户名或密码错误']);

        }

    }

}
5.建立登录视图页面
<link rel="stylesheet" href="https://stackpath.bootstrapcdn.com/bootstrap/3.4.1/css/bootstrap.min.css" integrity="sha384-HSMxcRTRxnN+Bdg0JdbxYKrThecOKuH5zCYotlSAcp1+c8xmyTe9GYg1l9a69psu" crossorigin="anonymous">

<div style="margin: 0 auto;width: 1000px">

    <h3>用户登录</h3>

    <hr>

    <form action="{{ url('/admins/dologin') }}" method="post">

        <div class="form-group">

            <input type="text" name="username" class="form-control" placeholder="请输入账号" style="width: 200px">

        </div>

        <div class="form-group">

            <input type="password"  name="password" class="form-control" placeholder="请输入密码" style="width: 200px">

        </div>

        <div class="form-group">

            <input type="text" name="code" class="form-control" placeholder="请输入验证码" style="width: 200px">

            <img src="{{captcha_src()}}" onclick="this.src='{{captcha_src()}}'+Math.random()">

        </div>

        @csrf

        <button type="submit" class="btn btn-info">登录</button>

        @if (count($errors) > 0)

            <div class="alert alert-danger">

                <ul>

                    @foreach ($errors->all() as $error)

                        <li>{{ $error }}</li>

                    @endforeach

                </ul>

            </div>

        @endif

    </form>

</div>
6.建立中间件,并配置中间件

Route::group(['prefix' =>'admin','middleware'=>['adminauth']],function(){

    Route::get('shop/list','ShopController@index');

});

Route::get('admins/login','AdminsController@login');

Route::post('admins/dologin','AdminsController@dologin');
<?php

namespace App\Http\Middleware;

use Closure;

use Illuminate\Support\Facades\Auth;

class AdminAuth

{

    /**

     * Handle an incoming request.

     *

     * @param \Illuminate\Http\Request $request

     * @param \Closure $next

     * @return mixed

     */

    public function handle($request, Closure $next, $guard = null)

    {

        //如果没有指定的话,默认 guard 是 web,

        //dump(Auth::guard($guard)->check()); 判断用户是否认证

        //Auth::guard($guard)->user() 获取用户信息

        //Auth::guard($guard)->guest() 是否是来宾

        if(Auth::guard($guard)->guest()){

            if($request->ajax() || $request->wantsJson()){

                return response('Unauthorized.', 401);

            }else{

                return redirect()->guest('admins/login');

            }

        }

        return $next($request);

    }

}
7.如果你在登录页面使用了验证码的话,可以借助独立验证器进行验证
<?php

namespace App\Http\Requests;

use Illuminate\Foundation\Http\FormRequest;

class UserRequest extends FormRequest

{

    /**

     * Determine if the user is authorized to make this request.

     *

     * @return bool

     */

    public function authorize()

    {

        return true;

    }

    /**

     * Get the validation rules that apply to the request.

     *

     * @return array

     */

    public function rules()

    {

        return [

            //

            'username' => 'required|max:30|min:6',

            'password' => 'required|min:6',

            'code' => 'required|captcha'

        ];

    }

    public function messages()

    {

        return [

            'username.required' => '账号不能为空',

            'username.max' => '账号过长',

            'username.min' => '账号格式不正确',

            'password.required' =>'密码不能为空',

            'password.min' => '密码过于简单',

            'code.required' =>'验证码不能为空',

            'code.captcha' => '验证码错误'

        ];

    }

}
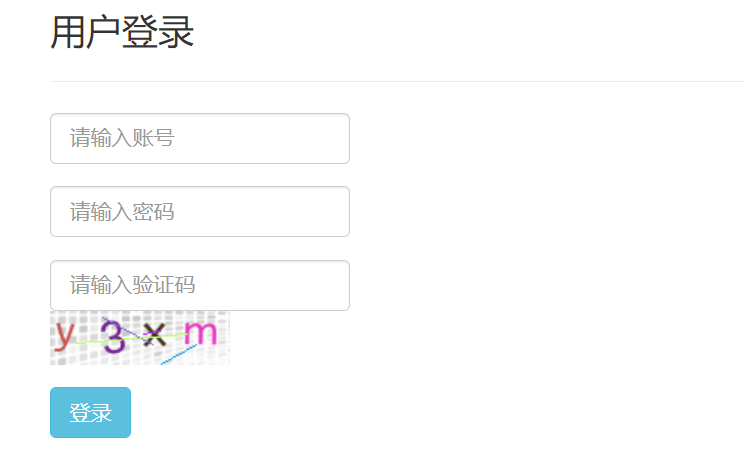
8.登录页面展示
Laravel-Auth认证的更多相关文章
- laravel中的Auth认证:
简介 Laravel 5.3 的 Auth 认证在 5.2 的基础上又有一些改变,本文说明如何在 Laravel 5.3 下做不同用户表的登录认证. Auth 认证原理简述 Laravel 的认证是使 ...
- Laravel Passport认证-多表、多字段解决方案
Laravel Passport认证-多表.多字段解决方案 2018年08月19日 09:31:01 醉卧码场君莫笑 阅读数:1632 1. 概述 API 通常使用令牌(token)进行认证并且在 ...
- Laravel用户认证
前期准备 Laravel的权限配置文件位于 config/auth.php,Laravel的认证组件由"guards"和"providers"组成, Guard ...
- Laravel用户认证系统的实现细节
原文地址:http://www.php.cn/php-weizijiaocheng-406076.html 这篇文章主要介绍了关于Laravel用户认证系统的实现细节,有着一定的参考价值,现在分享给大 ...
- java 发送带Basic Auth认证的http post请求
构造http header private static final String URL = "url"; private static final String APP_KEY ...
- Bootstrap+Thinkphp3.2+Auth认证+jquery-validator后台
Auth权限认证 本例采用auth权限认证,用户和用户组采用多对多关系处理,自动添加rule规则,带有jquery-validator插件,自动控制菜单显示或隐藏. config.php中的配置 ...
- Django学习之九: auth 认证组件
目录 Django auth 认证组件 配置使用auth组件及其中间件 request.user 可以直接在template模版中使用 auth组件常用api 获取认证model类 认证检测装饰器@l ...
- Django认证系统auth认证
使用Django认证系统auth认证 auth认证系统可以处理范围非常广泛的任务,且具有一套细致的密码和权限实现.对于需要与默认配置不同需求的项目,Django支持扩展和自定义认证;会将用户信息写入到 ...
- auth 认证模块
. auth认证模块: http://www.cnblogs.com/liwenzhou/p/9030211.html auth模块的知识点: . 创建超级用户 python manage.py cr ...
- iOS AFNetWorking下得Basic Auth认证请求方式
我新入职了一家公司,做了一个项目,服务器的大哥说他采用的是Basic Auth认证请求方式,一般我们用的都是OAuth的认证方式,下面我们就对比一下这两种认证方式 百度百科得到如下 Basic Aut ...
随机推荐
- JAVA 变量的概述
变量的概述 用于存储可变数据的容器. 变量存在的意义 计算机主要用于处理生活中的数据,由于生活中存在大量的可变数据,那么计算机就必须具备存储可变数据的能力. 比如: 1.时间每一秒都在 ...
- java-swing-事件监听-焦点监听器
感谢大佬:https://blog.csdn.net/weixin_44512194/article/details/93377551 开始不知道焦点是啥,其实就是打字的时候,这个一闪一闪的竖线. 与 ...
- 学习jsp篇:jsp Session介绍
1.Session基本介绍 Session---会话,它是一个内置对象.会话打个比方说就是浏览网站:开始到结束,或者说购物从开始到结束. 2.Session机制 客户端在第一次请求服务端时,服务端会产 ...
- TCP连接的状态转换图深度剖析
转载请注明来源:https://www.cnblogs.com/hookjc/ 在TCP/IP协议中,TCP协议提供可靠的连接服务,采用三次握手建立一个连接,如图1所示. (1)第一次握手:建立连接时 ...
- ajax、axios、fetch区别及优缺点
将jQuery的ajax.axios和fetch做个简单的比较,所谓仁者见仁智者见智,最终使用哪个还是自行斟酌 1.jQuery ajax $.ajax({ type: 'POST', url: ur ...
- 虫师Selenium2+Python_7、unittest单元测试框架
P173--通过unittest单元测试框架别写测试用例 from calculator import Count import unittest class TestCount(unittest ...
- 继承及属性查找+super()和mro()+多态
继承及属性查找+super()和mro()+多态 一. ★继承 1. 什么是继承? 继承就是新建类的一种方式,新建的类我们称为子类或者叫派生类,被继承的类我们称为父类或者基类 子类可以使用父类中的属性 ...
- 以鶸ice为例,手撸一个解释器(一)明确目标
代码地址 # HelloWorld.ice print("hello, world") 前言(废话) 其实从开始学习编译原理到现在已经有快半年的时间了,但是其间常常不能坚持看下去龙 ...
- Solution -「ExaWizards 2019 C」Snuke and Wizards
\(\mathcal{Description}\) Link. 给定一个长度为 \(n\) 的字符串 \(s\),每个字符上初始有一张卡片.\(q\) 次操作,每次指定 \(s\) 中字符为 ...
- 让数据可视化变得简单 – JavaScript 图形库
作者 | 董叶 公司决策层会围绕着数据来制定相应的策略,数据的重要性与日俱增,政府.金融机构.互联网大厂正在以前所未有的速度收集数据,面对扑面而来的数据,没有抽象.视觉层的帮助,我们很难快速理解掌握其 ...