C#自定义控件开发(2)—LED指示灯
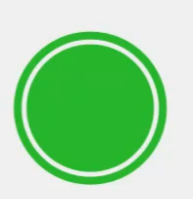
下面来开发一个LED指示灯控件,如下:
设计属性包括:
外环宽度,外环间隙,内环间隙,颜色【五种】,当前值。
由于该LED指示灯基本是完全独立设计的,并不是在某个控件的基础上进行的开发,因此,这里使
用用户控件的方式进行开发。通过GDI+方式对控件进行绘制。GDI的坐标系如下:
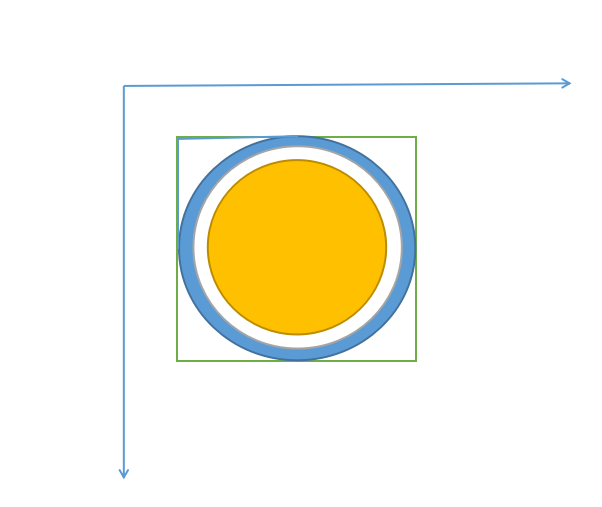
首先绘制外环,然后绘制内圆。
using System;

using System.Collections.Generic;

using System.ComponentModel;

using System.Data;

using System.Drawing;

using System.Linq;

using System.Text;

using System.Windows.Forms;

namespace JSControl

{

    public partial class LedControl : UserControl

    {

        public LedControl()

        {

            InitializeComponent();

            this.Size = new Size(40,40);//初始化控件大小

        }

        #region Filed

        private float outWidth = 4.0f;

        [Browsable(true)]

        [Category("自定义属性")]

        [Description("外环宽度")]

        public float OutWidth

        {

            get { return outWidth; }

            set

            {

                if (value <= 0 || value > 0.1f * this.Width)

                {

                    return;

                }

                outWidth = value;

                this.Invalidate();

            }

        }

        private float outGap = 3.0f;

        [Browsable(true)]

        [Category("自定义属性")]

        [Description("外环间隙")]

        public float OutGap

        {

            get { return outGap; }

            set

            {

                if (value <= 0 || value > 0.1f * this.Width || inGap <= value)

                {

                    return;

                }

                outGap = value;

                this.Invalidate();

            }

        }

        private float inGap = 8.0f;

        [Browsable(true)]

        [Category("自定义属性")]

        [Description("内环间隙")]

        public float InGap

        {

            get { return inGap; }

            set

            {

                if (value <= 0 || value <= outGap)

                {

                    return;

                }

                inGap = value;

                this.Invalidate();

            }

        }

        private Color color1 = Color.Gray;

        [Browsable(true)]

        [Category("自定义属性")]

        [Description("指示灯颜色")]

        public Color Color1

        {

            get { return color1; }

            set

            {

                color1 = value;

                this.Invalidate();

            }

        }

        private Color color2 = Color.LimeGreen;

        [Browsable(true)]

        [Category("自定义属性")]

        [Description("LimeGreen")]

        public Color Color2

        {

            get { return color2; }

            set

            {

                color2 = value;

                this.Invalidate();

            }

        }

        private Color color3 = Color.Red;

        [Browsable(true)]

        [Category("自定义属性")]

        [Description("Red")]

        public Color Color3

        {

            get { return color3; }

            set

            {

                color3 = value;

                this.Invalidate();

            }

        }

        private Color color4 = Color.DarkGoldenrod;

        [Browsable(true)]

        [Category("自定义属性")]

        [Description("DarkGoldenrod")]

        public Color Color4

        {

            get { return color4; }

            set

            {

                color4 = value;

                this.Invalidate();

            }

        }

        private Color color5 = Color.Blue;

        [Browsable(true)]

        [Category("自定义属性")]

        [Description("Blue")]

        public Color Color5

        {

            get { return color5; }

            set

            {

                color5 = value;

                this.Invalidate();

            }

        }

        //指示灯颜色索引

        private int currentValue = 0;

        [Browsable(true)]

        [Category("自定义属性")]

        [Description("当前值")]

        public int CurrentValue

        {

            get { return currentValue; }

            set

            {

                if (value > 4 || value < 0)

                {

                    return;

                }

                currentValue = value;

                this.Invalidate();

            }

        }

        #endregion

        #region verride

        private Graphics g;

        private Pen p;//画笔

        private SolidBrush sb;//画刷

        private int width;//控件宽度

        private int height;//控件高度

        protected override void OnPaint(PaintEventArgs e)

        {

            base.OnPaint(e);

            g = e.Graphics;

            width = this.Width;

            height = this.Height;

            //这里是为了设置渲染效果,消除锯齿,高效果显示

            g.TextRenderingHint = System.Drawing.Text.TextRenderingHint.ClearTypeGridFit;

            g.SmoothingMode = System.Drawing.Drawing2D.SmoothingMode.AntiAlias;

            g.SmoothingMode = System.Drawing.Drawing2D.SmoothingMode.HighQuality;

            if (inGap>0.5f*this.Height||inGap>0.5f*this.Width)

            {

                return;

            }

            Color CurrentColor = GetCurrentColor(this.currentValue);

            //设置画笔的宽度

            p = new Pen(CurrentColor, outWidth);

            //先绘制外环

            RectangleF rec = new RectangleF(outGap, outGap, this.width - 2 * outGap, this.height - 2 * outGap);

            g.DrawEllipse(p, rec);

            sb = new SolidBrush(CurrentColor);

            //再绘制内圆

            rec = new RectangleF(inGap, inGap, this.width - 2 * inGap, this.height - 2 * inGap);

            g.FillEllipse(sb, rec);

        }

        #endregion

        #region Private Methods

        /// <summary>

        /// 设置控件颜色

        /// </summary>

        /// <returns></returns>

        private Color GetCurrentColor(int currentColor)

        {

            List<Color> ColorList = new List<Color>();

            ColorList.Add(color1);

            ColorList.Add(color2);

            ColorList.Add(color3);

            ColorList.Add(color4);

            ColorList.Add(color5);

            return ColorList[currentValue];

        }

        #endregion

    }

}
this.Invalidate()表示进行重绘,调用它后将会执行
protected override void OnPaint(PaintEventArgs e){}中的代码进行重绘。
生成后,将和其他控件一样可以看到其属性。
C#自定义控件开发(2)—LED指示灯的更多相关文章
- newifi mini将led指示灯引出当gpio使用
之前买了个newifi mini的路由器,CPU是mt7620a的,有7个led指示灯.现在想要把控制led灯的gpio引出来,方便其他驱动或应用的开发. 一.硬件部分 1.联想路由 现在想要把USB ...
- iOS 自定义控件开发(中)
<iOS 自定义控件开发(上)> <iOS 自定义控件开发(中)> 接上篇iOS自定义控件开发之后,我们尝试另外一种. 在Xcode的右边,会看到如下的图 其中,上面有一个:C ...
- iOS 自定义控件开发(上)
工作需要,最近在进行iOS方面的图表工作.找了很多第三方库都无法实现效果,所以决定自己写一个控件. <iOS 自定义控件开发(上)> <iOS 自定义控件开发(中)> #0 目 ...
- C#自定义控件开发
自定义控件开发 一般而言,Visual Studio 2005中自带的几十种控件已经足够我们使用了,但是,在一些特殊的需求中,可能需要一些特殊的控件来与用户进行交互,这时,就需要我们自己开发新的.满足 ...
- led指示灯电路图大全(八款led指示灯电路设计原理图详解)
led指示灯电路图大全(八款led指示灯电路设计原理图详解) led指示灯电路图(一) 图1所示电路中只有两个元件,R选用1/6--1/8W碳膜电阻或金属膜电阻,阻值在1--300K之间. Ne为氖泡 ...
- 自定义控件开发的调试及DesignMode的状态处理
在开发Winform程序的时候,我们往往需要根据需要做一些自定义的控件模块,这样可以给系统模块重复利用,或者实现更好的效果等功能.但在使用的时候,我们又往往设计时刻发现一些莫名其妙的错误,那么我们该如 ...
- ZLComboBox自定义控件开发详解
[引言]距离上一回写博客已经有一些时日了,之前的爱莲iLinkIT系列主要是讲解了如何用NodeJS来实现一个简单的“文件传送”软件,属于JavaScript中在服务器端的应用. 今天,我们就回归到J ...
- .net的自定义JS控件,运用了 面向对象的思想 封装 了 控件(.net自定义控件开发的第一天)
大家好!我叫刘晶,很高兴你能看到我分享的文章!希望能对你有帮助! 首先我们来看下几个例子 ,就能看到 如何 自定义控件! 业务需求: 制作 一个 属于 自己的 按钮 对象 ,然后 像 ...
- s3c6410开发板LED驱动程序设计详细…
2 下面来看看tiny6410关于LED的原理图如图(1)所示: 图1 LED原理图 3 LED实例,代码如下所示:(代码摘自\光盘4\实验代码\3-3-1\src\main.c) main.c ...
随机推荐
- day01-GUI坦克大战01
JavaGUI-坦克大战 1.Java绘图坐标体系 坐标体系介绍:下图说明了一个Java坐标体系.坐标原点位于左上角,以像素为单位.在Java坐标体系中,第一个是x坐标,表示当前位置为水平方向,距离坐 ...
- 记录一下~~~Linux配置定时任务备份数据库dmp文件
1.创建备份目录: mkdir -p /dcits/sx_xmz/sx_data_bak chown -R oracle18c:oinstall /dcits/sx_xmz/sx_data_bak 2 ...
- 【读书笔记】C#高级编程 第十五章 反射
(一)在运行期间处理和检查代码 自定义特性允许把自定义元数据与程序元素关联起来.反射是一个普通术语,它描述了在运行过程中检查和处理程序元素的功能.例如,反射允许完成的任务: 枚举类型的成员 实例化新对 ...
- LFS(Linux From Scratch)构建过程全记录(七):进入Chroot并构建临时工具
写在前面 本章将完成临时系统构建的最后缺失部分和各种包构建所需的工具. 解决了所有循环依赖关系后,就可以使用与主机操作系统完全隔离的"chroot"环境进行构建. 注意:接下来的指 ...
- Activiti 7 源码学习
1. 启动分析 源码是 7.1.0.M6 首先从 ProcessEngineAutoConfiguration 开始 ProcessEngineAutoConfiguration 是activiti ...
- 第六章:Django 综合篇 - 9:序列化 serializers
Django的序列化工具让你可以将Django的模型'翻译'成其它格式的数据.通常情况下,这种其它格式的数据是基于文本的,并且用于数据交换\传输过程. 一.序列化数据 Django为我们提供了一个强大 ...
- 开源 Web 相册程序: Photoview 和数据可视化生成工具:Datawrapper
Photoview Photoview是一个开源 Web 相册程序,Go 语言写的,使用 Docker 安装,可以用来快速架设个人相册. github地址:https://github.com/pho ...
- Elasticsearch中text与keyword的区别
text类型 1:支持分词,全文检索,支持模糊.精确查询,不支持聚合,排序操作; 2:test类型的最大支持的字符长度无限制,适合大字段存储: 使用场景: 存储全文搜索数据, 例如: 邮箱内容.地址. ...
- Kubernetes 中部署 MySQL 集群
文章转载自:https://www.cnblogs.com/ludongguoa/p/15319861.html 一般情况下 Kubernetes 可以通过 ReplicaSet 以一个 Pod 模板 ...
- 修改 Docker容器 自动启动/不自动启动,挂载路径,存储位置
有时候创建容器时忘了添加参数 --restart=always,当 Docker 重启时,容器未能自动启动, 现在要添加该参数怎么办呢,方法有二: 1.Docker 命令修改 docker conta ...