Nginx 错误日志配置
1、Nginx错误日志信息介绍:
error_log的语法格式及参数说明:
error_log file level;
关键字 日志文件 错误日志级别
其中,关键字error_log 不能改变,日志文件可以指定任意存放日志的目录,错误日志级别常见的有{debug,info,notice,wam,error,crit,alert,emerg},级别越高记录的信息越少,场景一般是wam,error,crit这三个级别之一,注意不要配置info等低级别,会带来巨大的磁盘I/O消耗。
error_log的默认值:
#default: error_log logs/error.log error;
可以放置的标签段位:
#context: main,http,server,location
编辑主配置文件nginx.conf 增加访问日志配置:
[root@lamp01 conf]# vim nginx.conf

worker_processes  ;

error_log logs/error.log error;

events {

    worker_connections  ;

}

http {

    include       mime.types;

    default_type  application/octet-stream;

    sendfile        on;

    keepalive_timeout  ;

#nginx vhosts config

    include extra/www.conf;

    include extra/bbs.conf;

    include extra/status.conf;

}
刷新配置:
/application/nginx/sbin/nginx –t
/application/nginx/sbin/nginx –s reload
查看错误日志文件:
cat ../logs/error.log
[root@lamp01 conf]# cat ../logs/error.log

//08 :: [notice] #: signal process started

//08 :: [emerg] #: bind() to 0.0.0.0: failed (: Address already in us

e)2019//08 :: [emerg] #: bind() to 0.0.0.0: failed (: Address already in us
e)
2、Nginx访问日志介绍:
nginx软件会把每个用户访问网站的日志信息记录到指定的日志文件里,供网站提供分析用户浏览行为等,此功能由ngx_http_log_module模块来负责。
log_format 用来定义记录日志的格式(可以定义多种日志格式,取不同名字即可)
access_log 用来指定日志文件的路径及使用的何种日志格式记录日志。
nginx日志格式默认的参数配置如下:
log_format main '$remote_addr - $remote_user [$time_local] "$request" '
'$status $body_bytes_sent "$http_referer" '
'"$http_user_agent" "$http_x_forwarded_for"';
日志变量说明:
status http状态码,记录请求返回的状态,例如200、404、301等
request 用户的http请求起始行信息
time_local 记录访问时间与时区
http_referer 记录此次请求是从哪个链接访问过来的,可以根据referer进行防盗链设置
remote_addr 记录访问网站的客户端地址
remote_user 远程客户端用户名称
http_user_agent 记录客户端访问信息,例如:浏览器,手机客户端
body_bytes_sent 服务器发送给客户端的响应body字节数
http_x_forwarded_for 当前端有代理服务器时,设置web节点记录客户端地址配置,此参数生效的 前提是代理服务器上也要进行相关的x_forwarded_for设置
记录日志access_log参数说明:
语法:
access_log path [format [buffer=size [flush = time]] [if=condition]]
access_log path format gzip [=level] [buffer = size] [flush = time] [if = condition];
access_log syslog:server=address[,parameter=value] [format [if=condition]];
buffer=size 为存放访问日志的缓冲区大小,flush=time 为将缓冲区的日志刷到磁盘的时间,gzip[=level]表示压缩级别,[if = condition]:其他条件,一般的场景,这些参数都无需配置,极端优化才可能考虑这些参数。
access_log off off,表示不记录访问日志。
默认配置:access_log logs/access.log combined;
放置位置:http,server,location,if in location,limit_except
nginx记录日志的默认参数配置如下:
access_log logs/access.log main;
编辑主配置文件nginx.conf 增加错误日志配置:
[root@lamp01 conf]# vim nginx.conf

worker_processes  ;

error_log logs/error.log error;

events {

    worker_connections  ;

}

http {

    include       mime.types;

    default_type  application/octet-stream;

    sendfile        on;

    keepalive_timeout  ;

    log_format  main  '$remote_addr - $remote_user [$time_local] "$request" '

                      '$status $body_bytes_sent "$http_referer" '

                      '"$http_user_agent" "$http_x_forwarded_for"';

#nginx vhosts config

    include extra/www.conf;

    include extra/bbs.conf;

    include extra/status.conf;

    access_log logs/access_www.log main;

}
刷新配置查看效果:
[root@lamp01 conf]# /application/nginx/sbin/nginx -t

nginx: the configuration file /application/nginx-1.6./conf/nginx.conf syntax is ok

nginx: configuration file /application/nginx-1.6./conf/nginx.conf test is successful

[root@lamp01 conf]# /application/nginx/sbin/nginx -s reload

[root@lamp01 conf]# curl www.jyw1.com

www.jyw1.com

[root@lamp01 conf]# curl bbs.jyw2.com

bbs.jyw2.com

[root@lamp01 conf]# cat ../logs/access_www.log

192.168.43.118 - - [/Jan/::: +] "GET / HTTP/1.1"   "-" "curl/7.19.7 (

x86_64-redhat-linux-gnu) libcurl/7.19. NSS/3.14.0.0 zlib/1.2. libidn/1.18 libssh2/1.4." "-"192.168.43.17 - - [08/Jan/2019:23:12:25 +0800] "GET / HTTP/1.1" 200 13 "-" "Mozilla/5.0 (W

indows NT 6.1; WOW64) AppleWebKit/537.36 (KHTML, like Gecko) Chrome/58.0.3029.110 Safari/537.36 SE .X MetaSr 1.0" "-"
在高并发场景下加上buffer和flush,可以提高网站的性能:
access_log logs/access_www.log main gzip buffer=32k flush=5s;
3、nginx访问日志轮询切割介绍:
默认情况nginx会把所有的访问日志生成一个指定的访问日志文件access.log里,时间长了会导致日志个头很大,不利于分析日志和处理,因此,有必要对nginx按天或按小时进行切割成不同的文件保留,这里使用按天切割方法:
思路解析:
将正在写入的Nginx日志文件(access_www.log)重命名为带当天日期的格式文件(20190109_access_www.log),然后重新加载Nginx,生成新的Nginx日志(access_www.log)
具体切割脚本如下:
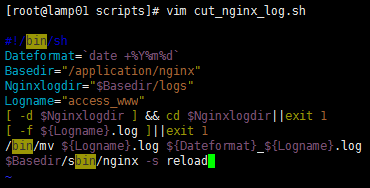
[root@lamp01 nginx]# cat /server/scripts/cut_nginx_log.sh

#!/bin/sh

Dateformat=`date +%Y%m%d -d -1day`         //定义时间

Basedir="/application/nginx"          //nginx安装目录

Nginxlogdir="$Basedir/logs"          //存放日志的目录

Logname="access_www"            //日志的名称

[ -d $Nginxlogdir ] && cd $Nginxlogdir||exit 1 //判断如果有存放目录就cd进去,否则退出

[ -f ${Logname}.log ]||exit 1   //判断如果不存在日志名称就执行下面命令,否则退出

/bin/mv ${Logname}.log ${Dateformat}_${Logname}.log  //把当前日志名重命名为时间日志名

$Basedir/sbin/nginx -s reload  //从新生成一个不带时间的日志文件
效果如下:
[root@lamp01 scripts]# vim cut_nginx_log.sh

[root@lamp01 scripts]# sh cut_nginx_log.sh

[root@lamp01 scripts]# ll /application/nginx/logs/

总用量 32

-rw-r--r--. 1 root  root     0 1月   9 00:00 20190109_access_www.log

-rw-r--r--. 1 root  root 15974 1月   7 22:59 access.log

-rw-r--r--. 1 root  root     0 1月   9 00:15 access_www.log

-rw-r--r--. 1 nginx root 11327 1月   9 00:15 error.log

-rw-r--r--. 1 root  root     5 1月   9 2019 nginx.pid

[root@lamp01 scripts]# date -s 2019-01-10

2019年 01月 10日 星期四 00:00:00 CST

[root@lamp01 scripts]# sh cut_nginx_log.sh

[root@lamp01 scripts]# ll /application/nginx/logs/

总用量 32

-rw-r--r--. 1 root  root     0 1月   9 00:00 20190109_access_www.log

-rw-r--r--. 1 root  root     0 1月  10 00:00 20190110_access_www.log

-rw-r--r--. 1 root  root 15974 1月   7 22:59 access.log

-rw-r--r--. 1 root  root     0 1月  10 00:00 access_www.log

-rw-r--r--. 1 nginx root 11447 1月  10 00:00 error.log

-rw-r--r--. 1 root  root     5 1月   9 21:35 nginx.pid

[root@lamp01 scripts]#
基于多个站点:修改多个站点配置文件
[root@lamp01 extra]# vim www.conf

[root@lamp01 extra]# vim bbs.conf

[root@lamp01 extra]# cat www.conf bbs.conf

    server {

        listen       80;

        server_name  www.jyw1.com jyw1.com;

        location / {

            root   html/www;

            index  index.html index.htm;

        }

       access_log logs/access_www.log main;

}

server {

        listen       80;

        server_name  bbs.jyw2.com jyw2.com;

        location / {

            root   html/bbs;

            index  index.html index.htm;

        }

       access_log logs/access_bbs.log main;

}
切割脚本修改如下:
[root@lamp01 scripts]# vim cut_nginx_log.sh

#!/bin/sh

Dateformat=`date +%Y%m%d`

Basedir="/application/nginx"

Nginxlogdir="$Basedir/logs"

Logname="access_www"

[ -d $Nginxlogdir ] && cd $Nginxlogdir||exit 1

[ -f ${Logname}.log ]||exit 1

/bin/mv ${Logname}.log ${Dateformat}_${Logname}.log

/bin/mv access_bbs.log ${Dateformat}_access_bbs.log

$Basedir/sbin/nginx -s reload
效果如下:
[root@lamp01 scripts]# date -s 2019-01-12

2019年 01月 12日 星期六 00:00:00 CST

[root@lamp01 scripts]# sh cut_nginx_log.sh

[root@lamp01 scripts]# ll /application/nginx/logs/

总用量 32

-rw-r--r--. 1 root  root     0 1月   9 00:00 20190109_access_www.log

-rw-r--r--. 1 root  root     0 1月  10 00:00 20190110_access_www.log

-rw-r--r--. 1 root  root     0 1月  12 00:00 20190112_access_bbs.log

-rw-r--r--. 1 root  root     0 1月  12 00:00 20190112_access_www.log

-rw-r--r--. 1 root  root     0 1月  12 00:01 access_bbs.log

-rw-r--r--. 1 root  root 15974 1月   7 22:59 access.log

-rw-r--r--. 1 root  root     0 1月  12 00:01 access_www.log

-rw-r--r--. 1 nginx root 11627 1月  12 00:01 error.log

-rw-r--r--. 1 root  root     5 1月   9 21:35 nginx.pid

[root@lamp01 scripts]#
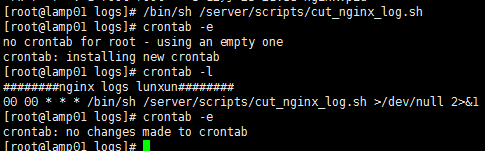
同时我们可以加入到定时任务里去:
Nginx 错误日志配置的更多相关文章
- Nginx错误日志配置信息详解
Nginx的错误日志可以配置在Main区块,也可以配置在虚拟主机区块中.Nginx软件会把自身运行的故障信息及用户访问的日志信息记录到指定的日志文件里,是我们调试Nginx服务的重要参考. error ...
- Nginx错误日志(error_log)配置及信息详解
Nginx错误日志信息介绍 Nginx的错误信息是调试Nginx服务的重要手段,属于核心功能模块(ngx_core_module)的参数,该参数的名字为error_log,可以放在Main区块中全局配 ...
- nginx的日志配置
本文转自:https://www.cnblogs.com/biglittleant/p/8979856.html 版权归属原作者!!!!!! nginx access日志配置 access_log日志 ...
- Nginx错误日志与优化专题
一.Nginx配置和内核优化 实现突破十万并发 二.一次Nignx的502页面的错误记录 (1)错误页面显示 错误日志: // :: [error] #: * recv() failed (: Con ...
- 场景2 nginx 错误日志格式:
nginx 错误日志格式: 2016/09/01 11:23:36 [error] 28388#0: *14549 open() "/var/www/zjzc-web-frontEnd/im ...
- nginx 错误日志分析
502 1.查看nginx错误日志 tailf /data/log/nginx/error.log // :: [error] #: * recv() failed (: Connection res ...
- nginx 错误日志分析 以及说明
1.日志简介 nginx日志主要有两种:访问日志和错误日志.访问日志主要记录客户端访问nginx的每一个请求,格式可以自定义:错误日志主要记录客户端访问nginx出错时的日志,格式不支持自定义.两种日 ...
- nginx错误日志级别
在配置nginx.conf 的时候,有一项是指定错误日志的,默认情况下你不指定也没有关系,因为nginx很少有错误日志记录的.但有时出现问题时,是有必要记录一下错误日志的,方便我们排查问题.error ...
- nginx网站日志配置
用yum安装的nginx的日志默认安装在路径:/var/log/nginx nginx配置文件:/etc/nginx/nginx.conf (总配置文件)/etc/nginx/conf.d/defau ...
随机推荐
- 课程五(Sequence Models),第一 周(Recurrent Neural Networks) —— 2.Programming assignments:Dinosaur Island - Character-Level Language Modeling
Character level language model - Dinosaurus land Welcome to Dinosaurus Island! 65 million years ago, ...
- Javascript:alert(1)可以这样写以绕过filter
在2011年的BlackHat DC 2011大会上Ryan Barnett给出了一段关于XSS的示例javascript代码: ($=[$=[]][(__=!$+$)[_=-~-~-~$]+({}+ ...
- 从零开始学 Web 之 Ajax(三)Ajax 概述,快速上手
大家好,这里是「 从零开始学 Web 系列教程 」,并在下列地址同步更新...... github:https://github.com/Daotin/Web 微信公众号:Web前端之巅 博客园:ht ...
- PHP-CPP开发扩展(一)
PHP-CPP是一个用于开发PHP扩展的C++库.PHP-CPP提供了一系列完善的文档.易于使用和扩展的类,让你可以相对快速的创建PHP的原生扩展. 为什么使用PHP-CPP 很快 用C++编写的代码 ...
- Java 范例 - 字节处理
前言 Java 编程中常会遇到需要进行字节处理的地方,本篇文章就来探讨编程中会遇到的字节处理问题. 字节序 字节序(endianness)是对于多字节数据来说的,它描述了多字节数据存储的顺序,分为大端 ...
- Vue + Element UI 实现权限管理系统 前端篇(十五):嵌套外部网页
嵌套外部网页 在有些时候,我们需要在我们的内容栏主区域显示外部网页.如查看服务端提供的SQL监控页面,接口文档页面等. 这个时候就要求我们的导航菜单能够解析嵌套网页的URL,并根据URL路由到相应的嵌 ...
- 面试:C++实现访问者模式
参考:深入应用C++11,访问者模式 #include <iostream> class ConcreteElement1; class ConcreteElement2; class V ...
- kubernetes1.13之后的kubeadm init config
1.kubernetes1.13之后kubeadm开始GA,由于1.13的kube-proxy有bug,删除ipvs的地方总是导致kube-proxy挂掉,所以建议直接用1.13.2,这个版本解决了b ...
- redhat 下搭建网站
1.修改yum源 把iso重新挂载到/media路径下,media是个只读的文件 vi /etc/yum.repos.d/rhel-source.repo //编辑yum源文件 ...
- xshell与xftp使用注意
1.xshell报ssh服务器拒绝了密码,请再试一次 xshell登录使用的用户名不能是root,要是服务器的用户名,否则连接时会报 ssh服务器拒绝了密码,请再试一次.将root改成服务器用户名即可 ...