
(转)vmware下给linux虚拟机扩容
“Well, here’s another fine mess you’ve gotten me into”
Let us pretend that you have an Ubuntu Server which has been running for several years and it has been doing it’s assigned task(s) nicely, until one day you make a change to your methodology/assumptions/workflow/tasks therefore the allocated Virtual Hard Drive (VHD) size is no longer sufficient. There are many reasons for this, but I ran into this issue twice in one weekended because I enabled a JDS as a Distribution Point (thus MySQL was eating needing a lot of space) and wanting to test multiple NetBoot NBI sources (because 10.10.2 seems to be causing imaging troubles). I need to increase the size of two different VHDs, however if you setup your Ubuntu Server via “Easy Install Mode” enlarging the VHD is not that strait forward.
Doing a quick search to see what VMware has to say about this issue returns less than helpful information for Ubuntu Servers by stating man fdisk. Google searching throws a lot of ideas, therefore I’m providing what I’ve learned from a couple of hours of research.
Increase size? I don’t think that word means what you think it means
First lets get a baseline of a default “Easy Install” of Ubuntu Server. We can see that we have a 20GB VHD by several ways:
- Looking at our VMware Fusion Setup
- Running
sudo fdisk -l - Running
df -H
Here is my test VM as it stands right now. You can see the VHD settings are for 20GB (really 21.5, guessing there is a rounding error somewhere), and that our primary partition is /dev/sda1 with 19GB drive.
sadmin@ubuntu:~$ sudo fdisk -l

Disk /dev/sda: 21.5 GB, 21474836480 bytes

255 heads, 63 sectors/track, 2610 cylinders, total 41943040 sectors

Units = sectors of 1 * 512 = 512 bytes

Sector size (logical/physical): 512 bytes / 512 bytes

I/O size (minimum/optimal): 512 bytes / 512 bytes

Disk identifier: 0x0001bae9

   Device Boot      Start         End      Blocks   Id  System

/dev/sda1   *        2048    37750783    18874368   83  Linux

/dev/sda2        37752830    41940991     2094081    5  Extended

/dev/sda5        37752832    41940991     2094080   82  Linux swap / Solaris

sadmin@ubuntu:~$ df -H | grep sda

/dev/sda1        19G  1.4G   17G   8% /
Now it would be really nice if VMware Fusion’s tools to increase the VHD worked as expected. If we could just simply move our slider (or type in a new value) for our desired HD space that would actually increase our storage space, that would be perfect!
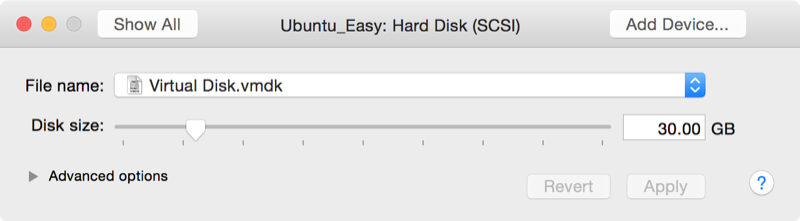 Result VMware Fusion VHD setting after adjusting from 20GB to 30GB.
We start our Ubuntu Server to verify that our new drive is now 30GB of storage, however what we see is the Virtual Environment believes we have 30GB (32.2 specifically) but our /dev/sda1 partition is still at 19GBs?!
sadmin@ubuntu:~$ sudo fdisk -l

Disk /dev/sda: 32.2 GB, 32212254720 bytes

255 heads, 63 sectors/track, 3916 cylinders, total 62914560 sectors

Units = sectors of 1 * 512 = 512 bytes

Sector size (logical/physical): 512 bytes / 512 bytes

I/O size (minimum/optimal): 512 bytes / 512 bytes

Disk identifier: 0x0001bae9

   Device Boot      Start         End      Blocks   Id  System

/dev/sda1   *        2048    37750783    18874368   83  Linux

/dev/sda2        37752830    41940991     2094081    5  Extended

/dev/sda5        37752832    41940991     2094080   82  Linux swap / Solaris

sadmin@ubuntu:~$ df -H | grep sda

/dev/sda1        19G  1.4G   17G   8% /
What we have done is expanded the allowable space to be used, but we didn’t actually adjust the partition size. We need to do that with some more awesome open source tools.
Steps to Increase your VMware Fusion partition
First we are going to use a Linux Live CD called GParted. Download their 234MB ISO to your VMware Fusion host so you can attached the ISO to the CD/DVD drive. Once attached, use the Startup Disk options in VMware Fusion to select the CD/DVD drive.
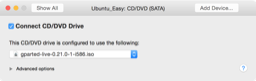
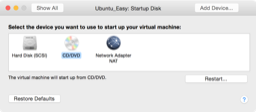 GParted attached as a CD/DVD drive, then booting from that drive.
Assuming you are a native English speaking individual and that you have a “US” keyboard setup, you can safely hit the Enter key for a couple of times to get to the GParted application. GParted will show you some critical information that we must overcome:
- Our original partition of 20GB is at the beginning
- Our swap space is in the middle
- Our extra space is at the end
Unfortunately with this GUI application you cannot just “drag” or “move” the extra space next to our original drive to expand your partition. Instead, we have to methodically move things around so everything lines up in the proper order. To do this we’ll perform the following steps in order:
- Enlarge the “extended” space to take over our unallocated area
- Move our swap space from the beginning to the end of our “extended” space
- Truncate the “extended” space to only focus on the swap space
- Enlarge our primary partition to use the new unallocated area
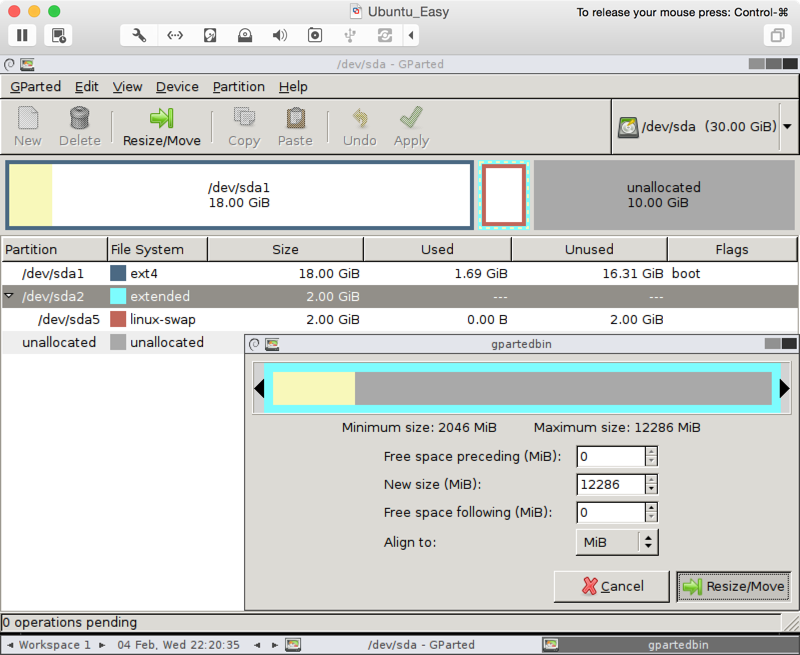 Select the /dev/sda2 "extended" and Resize/Move to take over the unallocated area, and hit apply.
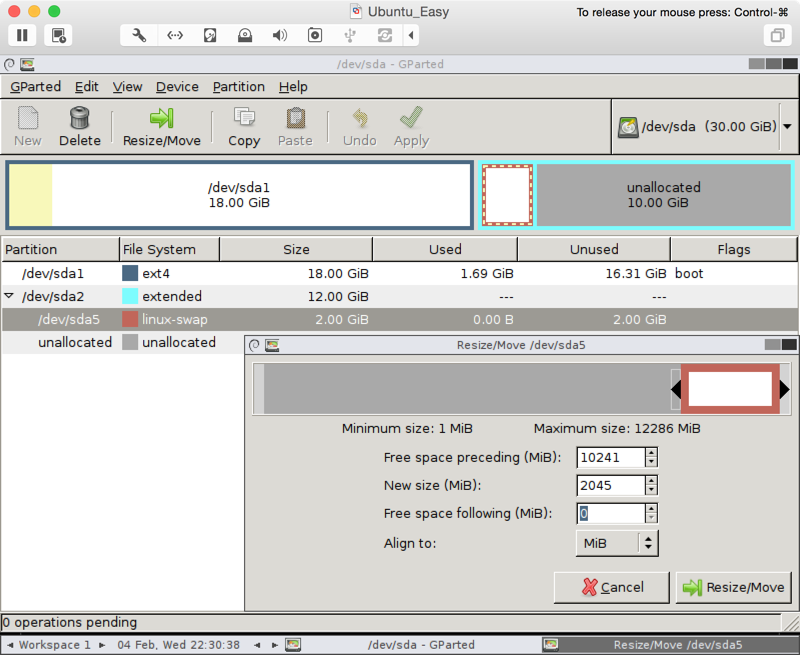 Select the /dev/sda5 "linux-swap" and Resize/Move to the end of our extended area, and hit apply.
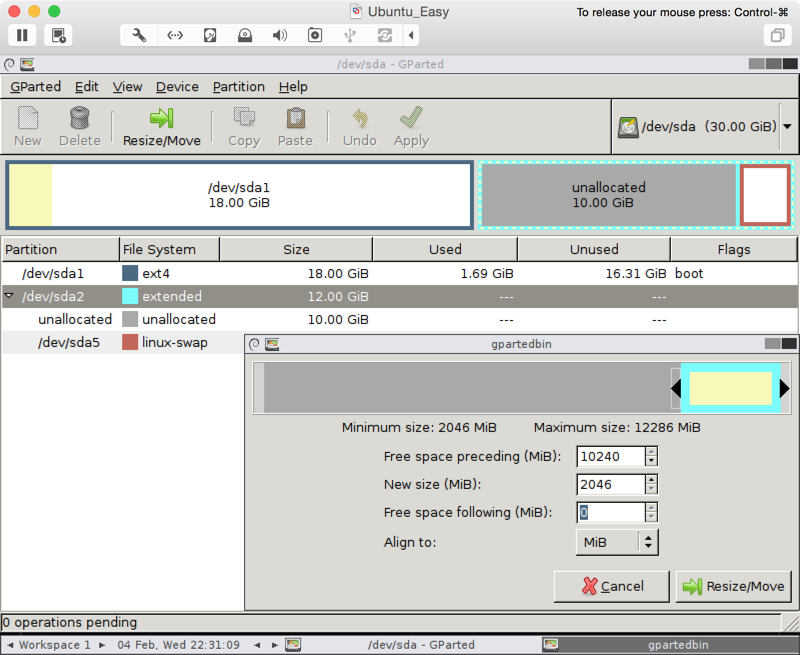 Select the /dev/sda2 "extended" to create new unallocated space preceding the "linux-swap" space.
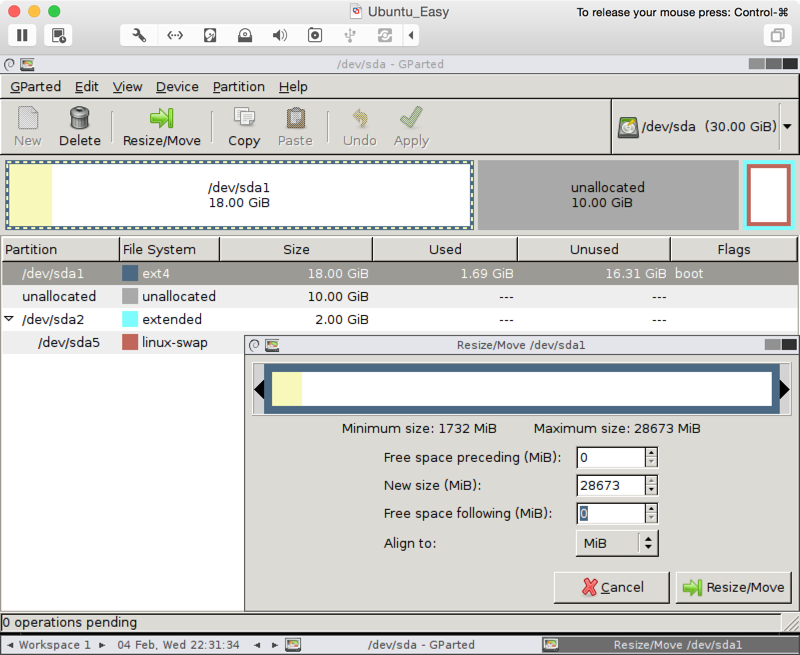 Select the /dev/sda1 and Resize/Move to take over our new unallocated area.
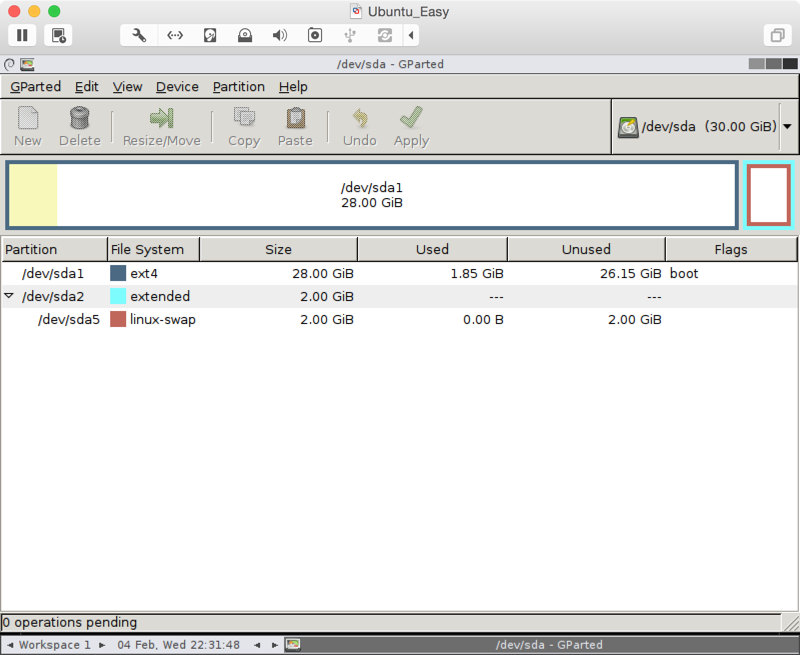 Verify our primary partition now has the 30GB storage (minus 2GB for swap in this example).
To verify everything is running again, change your startup disk back to your Hard Drive in VMware Fusion, restart your VM and run the same commands from the beginning.
sadmin@ubuntu:~$ sudo fdisk -l

Disk /dev/sda: 32.2 GB, 32212254720 bytes

255 heads, 63 sectors/track, 3916 cylinders, total 62914560 sectors

Units = sectors of 1 * 512 = 512 bytes

Sector size (logical/physical): 512 bytes / 512 bytes

I/O size (minimum/optimal): 512 bytes / 512 bytes

Disk identifier: 0x000752bd

   Device Boot      Start         End      Blocks   Id  System

/dev/sda1   *        2048    58724351    29361152   83  Linux

/dev/sda2        58724352    62914559     2095104    5  Extended

/dev/sda5        58726400    62914559     2094080   82  Linux swap / Solaris

sadmin@ubuntu:~$ df -H | grep sda

/dev/sda1        30G  1.4G   27G   5% /
reference:
https://www.justinrummel.com/resizing-a-vmware-fusion-ubuntu-server-virtual-hard-drive-via-easy-mode/
(转)vmware下给linux虚拟机扩容的更多相关文章
- VMware下安装linux虚拟机
安装VMware [下一步] [下一步] 点击[自定义],[下一步] 更改安装目录,[下一步] [下一步] [下一步] [跳过] [完成] 点击桌面图标 如下勾选,输入邮箱,[继续] [完成] 安装l ...
- Vmware 下安装linux虚拟机
由于想自己玩玩linux系统,就想着装一个linux的虚拟机,虚拟机vmware很好找,也很好用,但是linux镜像安装老是出问题,然后就找了很多版本的,最后实验成功一种,在这里分享给大家. 一.安装 ...
- 给VMware下的Linux扩容磁盘空间到根分区(以centos7.0为例)
一.扩展VMWare硬盘空间 关闭Vmware 的 Linux系统,这样,才能在VMWare菜单中设置: VM -> Settings... -> Hardware -> Hard ...
- VMware下安装Linux系统,ORACLE软件,DBCA建库
操作系统安装 在vmware下安装Linux (OEL5.6),用于数据库服务器 1.打开vmware,选择"创建新的虚拟机" 2.选择自定义安装 3.选择虚拟 ...
- VMware ESXi CentOS Linux虚拟机安装VMware Tools教
转自VMware ESXi CentOS Linux虚拟机安装VMware Tools教程 | 一米居 http://www.yimiju.com/articles/548.html 最近一周在学习和 ...
- VMware下的Linux系统中Windows的共享目录,不支持创建软连接
[问题] 在编译VMware下的Linux系统对从Windows中共享过来的文件,进行编译的时候,遇到: ln: creating symbolic link XXXXXX : Operation ...
- VMware下安装Linux(Centos)步骤
VMware下安装Linux(Centos)步骤 准备步骤:(安装软件教程采用 VMware 9 .Centos6.5 为例) 启动VMware的画面 点击File--->New Virtua ...
- win7下安装 LINUX虚拟机
文件名: VMware-workstation-full-10.0.6-2700073.exe 百度云共享链接: pan.baidu.com/s/1o6McGmI VMware workstation ...
- Vmware下的Linux系统,安装WPS报错:[Errno 256] No more mirrors to try
最近新装了虚拟环境Vmware下的Linux系统,准备看doc文档发现不能读取,才想起来一起都是重新开始的~没别的~开始安装吧: 1.关虚拟机Linux,添加cdrom镜像ISO文件--开虚拟机--- ...
随机推荐
- metamask源码学习-metamask-controller.js
The MetaMask Controller——The central metamask controller. Aggregates other controllers and exports a ...
- 分布式爬虫之elasticsearch基础6(bluk)
上篇文章介绍了在es里面批量读取数据的方法mget,本篇我们来看下关于批量写入的方法bulk. bulk api可以在单个请求中一次执行多个索引或者删除操作,使用这种方式可以极大的提升索引性能. bu ...
- centos7 rpm 安装mysql
1.wget https://dev.mysql.com/get/Downloads/MySQL-5.7/mysql-5.7.22-1.el7.x86_64.rpm-bundle.tar 2.tar ...
- Html5 标签四 (列表)
1.有序列表 2.无序列表 3.自定义列表 <!DOCTYPE html> <html lang="en"> <head> <meta c ...
- BSGS-Junior·大步小步算法
本文原载于:http://www.orchidany.cf/2019/02/06/BSGS-junior/#more \(\rm{0x01}\) \(\mathcal{Preface}\) \(\rm ...
- 开发板测试-GPRS
注意事项: 经过测试,为了使STM32和Air202的串口稳定通信,需要更改 以前电路感觉应该是三极管控制极4.7K电阻太大,又因为开关速度快,然后开关的时候导致不足以让三极管处于全部导通状态,所以电 ...
- 二、java三大特性--继承
在讲解之前我们先看一个例子 Husband.java public class Husband { private String name; private String sex; privatein ...
- C# 邮箱的使用
using System; using System.Collections.Generic; using System.ComponentModel; using System.Configurat ...
- Linux系列教程(四)——Linux常用命令之文件和目录处理命令
这个系列教程的前面我们讲解了如何安装Linux系统,以及学习Linux系统的一些方法.那么从这篇博客开始,我们就正式进入Linux命令的学习.学习命令,首先要跟大家纠正的一点就是,我们不需要记住每一条 ...
- SpringBoot 异常处理
异常处理最佳实践 根据我的工作经历来看,我主要遵循以下几点: 尽量不要在代码中写try...catch.finally把异常吃掉. 异常要尽量直观,防止被他人误解 将异常分为以下几类,业务异常,登录状 ...