
[spring mvc]Hello World入门
1.新建项目
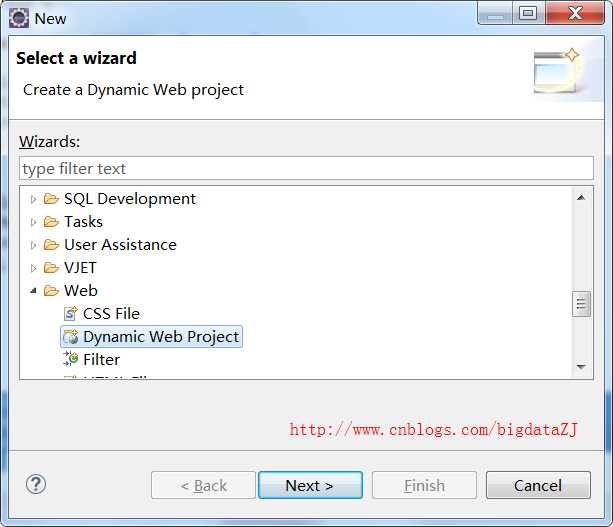
File->New->Other,选择Dynamic web project:
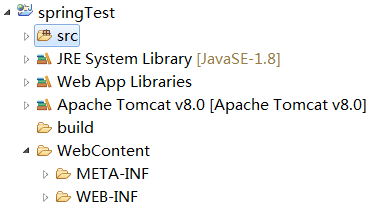
项目建好之后,目录结构如下:
2.WEB-INF/web.xml 中配置 dispatcherServlet
<?xml version="1.0" encoding="UTF-8"?>

<web-app xmlns:xsi="http://www.w3.org/2001/XMLSchema-instance"

    xmlns="http://xmlns.jcp.org/xml/ns/javaee"

    xsi:schemaLocation="http://xmlns.jcp.org/xml/ns/javaee http://xmlns.jcp.org/xml/ns/javaee/web-app_3_1.xsd"

    version="3.1">

    <welcome-file-list>

        <welcome-file>index.jsp</welcome-file>

    </welcome-file-list>

    <servlet>

        <servlet-name>spring-dispatcher</servlet-name>

        <servlet-class>org.springframework.web.servlet.DispatcherServlet</servlet-class>
        <!-- 配置Spring mvc下的配置文件 ,如果不配置,默认加载WEB-INF下XXX-servlet.xml(XXX为上面的<servlet-name>)-->

        <init-param>

            <param-name>contextConfigLocation</param-name>

            <param-value>classpath:spring/spring-*.xml</param-value>

        </init-param>

        <load-on-startup>1</load-on-startup>

    </servlet>

...

</web-app>
3.在src目录下新建spring-web.xml等
<?xml version="1.0" encoding="UTF-8"?>

  <beans xmlns="http://www.springframework.org/schema/beans"

      xmlns:xsi="http://www.w3.org/2001/XMLSchema-instance"

      xmlns:context="http://www.springframework.org/schema/context"

      xmlns:mvc="http://www.springframework.org/schema/mvc"

      xsi:schemaLocation="http://www.springframework.org/schema/beans http://www.springframework.org/schema/beans/spring-beans.xsd

          http://www.springframework.org/schema/context http://www.springframework.org/schema/context/spring-context-4.0.xsd

          http://www.springframework.org/schema/mvc http://www.springframework.org/schema/mvc/spring-mvc-4.0.xsd">

         <!-- 配置自动扫描的包 -->

         <context:component-scan base-package="com.jackie.springmvc"></context:component-scan>

         <!-- 配置视图解析器 如何把handler 方法返回值解析为实际的物理视图 -->

         <bean class="org.springframework.web.servlet.view.InternalResourceViewResolver">

             <property name = "prefix" value="/WEB-INF/views/"></property>

             <property name = "suffix" value = ".jsp"></property>

         </bean>

 </beans>
4.HelloWorld.java(com.jackie.springmvc.handlers下)
//1. 首先要在类的前面添加“Controller”注解,表示是spring的控制器
@Controller

 public class HelloWorld {
     //@RequestMapping, 是用于匹配请求的路径,比如这里匹配的请求路径就是“http://localhost:8080/springTest/springmvc/helloworld”

     @RequestMapping("/helloworld")

     public String hello(){

         System.out.println("hello world");
         //这个返回的字符串与上面springmvc.xml进行配合,springmvc.xml中声明了prefix和suffix,而夹在这两者之间的就是这里返回的字符串,所以执行完这个方法后,我们可以得到这样的请求资源路径“/WEB-INF/views/success.jsp”,这个success.jsp是需要我们新建的

         return "success";

     }

 }
5.index.jsp(WebContent下)
在新建success.jsp之前,我们需要有一个入口,也就是这里的index.jsp:
<%@ page language="java" contentType="text/html; charset=ISO-8859-1"

      pageEncoding="ISO-8859-1"%>

  <!DOCTYPE html PUBLIC "-//W3C//DTD HTML 4.01 Transitional//EN" "http://www.w3.org/TR/html4/loose.dtd">

  <html>

  <head>

  <meta http-equiv="Content-Type" content="text/html; charset=ISO-8859-1">

  <title>Insert title here</title>

  </head>

  <body>

 <a href="helloworld">hello world</a>

 </body>

 </html>
当访问index.jsp时,页面上会展示一个超链接,点击超链后,url中的地址就会发生跳转,由“http://localhost:8080/springTest/index.jsp”跳转到“http://localhost:8080/springTest/helloworld”,而这个url请求就会进入HelloWorld中的hello方法,因为其与该方法上的“/helloworld”匹配
6.success.jsp
<%@ page language="java" contentType="text/html; charset=utf-8"pageEncoding="utf-8"%>

<!DOCTYPE html PUBLIC "-//W3C//DTD HTML 4.01 Transitional//EN" "http://www.w3.org/TR/html4/loose.dtd">

<html>

<head>

<title>success</title>

</head>

<body>

<h4>Success Page</h4>

</body>

</html>
[spring mvc]Hello World入门的更多相关文章
- Spring MVC 教程,快速入门,深入分析
http://elf8848.iteye.com/blog/875830/ Spring MVC 教程,快速入门,深入分析 博客分类: SPRING Spring MVC 教程快速入门 资源下载: ...
- Spring MVC整合Mybatis 入门
本文记录使用Intellij创建Maven Web工程搭建Spring MVC + Mybatis 的一个非常简单的示例.关于Mybatis的入门使用可参考这篇文章,本文在该文的基础上,引入了Spri ...
- Spring MVC 教程,快速入门,深入分析[1-11]
资源下载: Spring_MVC_教程_快速入门_深入分析V1.1.pdf SpringMVC核心配置文件示例.rar 作者:赵磊 博客:http://elf8848.iteye.com ...
- [转]Spring MVC 教程,快速入门,深入分析
原文地址:http://elf8848.iteye.com/blog/875830 目录 一.前言 二.spring mvc 核心类与接口 三.spring mvc 核心流程图 四.spring mv ...
- Spring MVC 教程,快速入门,深入分析(转载)
作者:赵磊 博客:http://elf8848.iteye.com 下载: Spring的官方下载网址是:http://www.springsource.org/download (本文使用是的 ...
- 基于注解的Spring MVC的简单入门——简略版
网上关于此教程各种版本,太多太多了,因为我之前没搭过框架,最近带着两个实习生,为了帮他们搭框架,我只好...惭愧啊...基本原理的话各位自己了解下,表示我自己从来没研究过Spring的源码,所以工作了 ...
- Spring MVC 简介及入门小例子
说明:文章内容全部截选自实验楼教程[Spring MVC 简易教程] 一.什么是 Spring MVC Spring MVC 属于 SpringFrameWork 的后续产品,已经融合在 Spring ...
- Spring MVC之简单入门
一.Spring MVC简介: 1.什么是MVC 模型-视图-控制器(MVC)是一个众所周知的以设计界面应用程序为基础的设计模式.它主要通过分离模型(Model).视图(View)及控制器(Contr ...
- maven 纯注解一步一步搭建Spring Mvc项目(入门)
初次接触spring MVC项目,通过一段时间的学习,本文介绍一种以纯注解的方法去配置spring MVC环境,让那些配置的.xml文件统统见鬼吧. 什么是Spring MVC Spring MVC属 ...
随机推荐
- Spark2.0机器学习系列之3:决策树
概述 分类决策树模型是一种描述对实例进行分类的树形结构. 决策树可以看为一个if-then规则集合,具有“互斥完备”性质 .决策树基本上都是 采用的是贪心(即非回溯)的算法,自顶向下递归分治构造. 生 ...
- 虚拟机——安装虚拟机时,提示intel VT-x处于禁用状态
1.联想Lenovo扬天T4900C-00安转虚拟机提示: 按F12进入bios模式,修改Intel VT-x为启用,BIOS中依次选择:Advanced(高级)——CPU Configuration ...
- 微信小程序组件toast
操作反馈toast:官方文档 Demo Code: var toastNum = 2 var pageData = {} pageData.data = {} for(var i = 0; i < ...
- idea操作数据库
1.View-->>Tool Windows-->>Database. 2.点击“+”号-->>选择Data Source-->>选择需要连接的数据库类 ...
- 【android】 如何把gif图片下载到本地
以上图片大家可以看到,虽然是个jpg格式的文件,但是本质上是个动图. 但是发现在咱的图片模块下,本地存储的图片只有一帧,问题出在哪里呢? http获取到的byte[]数据是没问题的 断点跟踪了下,发现 ...
- EasyUI 的DataGrid中DateTime的格式化问题
想必用过EasyUI的朋友们都应该会遇到这样的情况吧:(下图) 在EasyUI中DataGrid中如果要显示DateTime的时间时候,便会显示上图这样的格式,很明显,这里的格式不会是我们想要的,我们 ...
- JavaScript 操作JSON总结
JSON(JavaScript Object Notation) 是一种轻量级的数据交换格式,采用完全独立于语言的文本格式,是理想的数据交换格式.同时,JSON是 JavaScript 原生格式,这意 ...
- Jmeter数据库mysql测试说明
主要分3个步骤,详细操作步骤如下: 一.环境准备 1.下载mysql驱动,下载地址:https://dev.mysql.com/downloads/connector/j/,Select Operat ...
- iOS 开发,混合使用 ARC 和非ARC
[前提知识] ARC:Automatic Reference Counting,自动引用计数 在开发 iOS 3 以及之前的版本的项目时我们要自己负责使用引用计数来管理内存,比如要手动 retain. ...
- 服务器抓包命令:tcpdump详解
官网地址:http://www.tcpdump.org/tcpdump_man.html 简介: tcpdump,就是:dump the traffic on a network,根据使用者的定义对网 ...