
python 链表
在C/C++中,通常采用“指针+结构体”来实现链表;而在Python中,则可以采用“引用+类”来实现链表。
节点类:
class Node:

    def __init__(self, data):

        self.data = data

        self.next = None
链表类:
class Linkedlist:

    def __init__(self):

        self.head = None

        self.tail = None
link_list = LinkedList()
def is_empty(self):

    return self.head is None
def append(self, data):

    node = Node(data)

    if self.head is None:

        self.head = node

        self.tail = node

    else:

        self.tail.next = node

        self.tail =node
def iter(self):

    if not iter.head:

        return

    cur = self.head

   yield cur.data

while cur.next:

    cur = cur.next

    yield cur.data

#先判断是不是空链表,yield head.data 再用while循环遍历
链表的头结点head 和 尾节点tail 都属于node.
insert:先将要插入的节点的next指向之后链表的head,然后将之前链表的next指向 将要插入的节点。
def insert(self, idx, value):

    cur = self.head

    cur_idx = 0

    if cur is None:

        raise Exception('That list is and empty list!')

    while cur_idx < idx-1:

        cur = cur.next

        if cur is None:

            raise Exception('List length less than index!')

        cur_idx += 1

    node = Node(value)

    node.next = cur.next

    cur.next = node

    if node.next is None:

        self.tail = node
def remove(self, idx):

    cur = self.head

    cur_idx = 0

    #空指针

    if self.head = None:

        raise Exception('This is an empty list')

    while cur_idx < idx-1:

        cur = cur.next

        #给出的索引大于链表的长度

        if cur is None:

            raise Exception('list length less than index')

        cur_idx +=1

    if idx == 0:    #当删除第一个节点时

        self.head = cur.next

        cur = cur.next

        return

    if self.head is self.tail: #当只有一个节点时

        self.head = None

        self.tail = None

        return

    cur.next = cur.next.next

    if cur.next is None:    #当删除最后一个节点时

        self.tail = cur
def size(self):

    i = 0

    cur = self.head

    if current is None:

        return 'The list is an empty list'

    while cur.next is not None:

        i +=1

        cur = cur.next

    return i
def search(self, item):

    current = self.head

    found = False

    while current is not None and not found:

        if current.data == item:

            found = True

        else:

            current = current.next

    return found
1,迭代
# -*- coding: utf-8 -*-

#!/bin/env python

# Python2.7

class Node(object):

    def __init__(self):

        self.value = None

        self.next = None

    def __str__(self):

        return str(self.value)

def reverse_list(head):

    if not head or not head.next:

        return head

    pre = None

    while head:

        next = head.next    # 缓存当前节点的向后指针,待下次迭代用

        head.next = pre     # 关键:把当前节点向前指针(pre)作为当前节点的向后指针

        pre = head          # 把当前指针赋值给 下次迭代 节点的 向前指针

        head = next         # 作为下次迭代时的(当前)节点

    return pre    # 返回头指针,头指针就是迭代最后一次的head(赋值给类pre)

if __name__ == '__main__':

    three = Node()

    three.value = 3

    two = Node()

    two.value = 2

    two.next = three

    one = Node()

    one.value = 1

    one.next = two

    head = Node()

    head.value = 0

    head.next = one

    newhead = reverse_list(head)

    while newhead:

        print newhead.value

        newhead = newhead.next
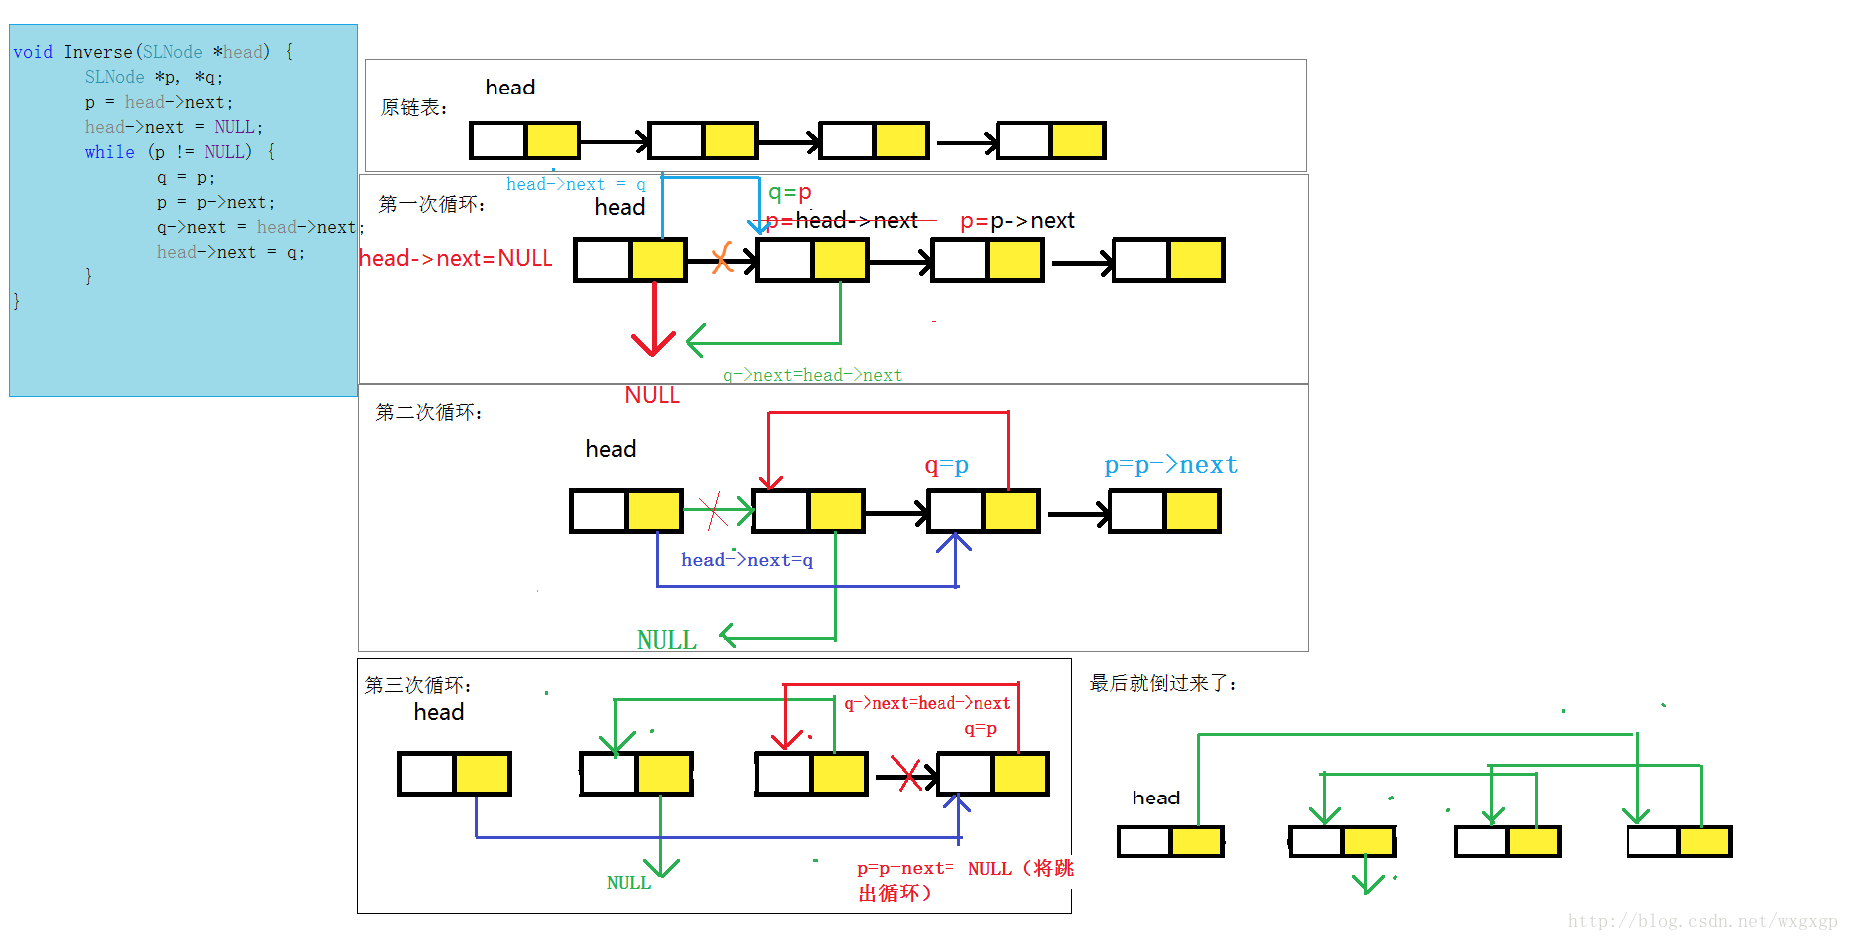
比较形象的图
2,递归
# 临界点:head.next为None

# 先递归到 把最后一个节点指向 newhead

# 然后一步步从后往前逆置

def reverse_recursion(head):

    if not head or not head.next:

        return head

    new_head = reverse_recursion(head.next)

    head.next.next = head

    head.next = None

    return new_head
python 链表的更多相关文章
- Python链表的实现与使用(单向链表与双向链表)
参考[易百教程]用Python实现链表及其功能 """ python链表的基本操作:节点.链表.增删改查 """ import sys cl ...
- Python链表操作(实现)
Python链表操作 在Python开发的面试中,我们经常会遇到关于链表操作的问题.链表作为一个非常经典的无序列表结构,也是一个开发工程师必须掌握的数据结构之一.在本文中,我将针对链表本身的数据结构特 ...
- python 链表表达式 map、filter易读版
链表推导式 [x for x in x] 链表推导式提供了一个创建链表的简单途径,无需使用 map(), filter() 以及 lambda.返回链表的定义通常要比创建这些链表更清晰.每一个链表推导 ...
- Python链表与反链表
# -*- coding:utf8 -*- #/usr/bin/env python class Node(object): def __init__(self, data, pnext = None ...
- python链表的实现
根据Problem Solving with Algorithms and Data Structures using Python 一书用python实现链表 书籍在线网址http://intera ...
- python链表的实现,有注释
class Node(): #node实现,每个node分为两部分:一部分含有链表元素,成数据域;另一部分为指针,指向下一个 __slots__=['_item' ...
- python 链表的反转
code #!/usr/bin/python # -*- coding: utf- -*- class ListNode: def __init__(self,x): self.val=x self. ...
- python 链表、堆、栈
简介 很多开发在开发中并没有过多的关注数据结构,当然我也是,因此,我写这篇文章就是想要带大家了解一下这些分别是什么东西. 链表 概念:数据随机存储,并且通过指针表示数据之间的逻辑关系的存储结构. 链表 ...
- Add Two Numbers(from leetcode python 链表)
给定两个非空链表来表示两个非负整数.位数按照逆序方式存储,它们的每个节点只存储单个数字.将两数相加返回一个新的链表. 你可以假设除了数字 0 之外,这两个数字都不会以零开头. 示例: 输入:(2 -& ...
随机推荐
- pip-grep
Pip-pop pip-grep主要是用于方便查看Requirements.txt中那些模块是安装了的.也就是通过输入的然后模块名称然后在Requirements.txt中进行查询.里面比较难的就是d ...
- Symfony 安装FOUSerBundle
第一按照官网安装 : https://symfony.com/doc/current/bundles/FOSUserBundle/index.html#main 可能版本无法安装 : $ compos ...
- IOS - 执行时 (多态)
一 多态概述 多态指同一操作作用于不同的对象.能够有不同的解释.产生不同的执行结果.它是面向对象程序设计(OOP)的一个重要特征,动态类型能使程序直到执行时才确定对象的所属类.其详细 ...
- 改善程序与设计的55个具体做法 day4
今天晚上回到小区门口,买了点冬枣,要结账的时候想起来,钥匙没带,落公司了! TNND,没办法再回趟公司,拿了钥匙,来回一个小时,汗~ 条款10:令operator=返回一个reference to * ...
- Android TableLayout 表格布局
TableLayout继承LinearLayout 有多少个TableRow对象就有多少行, 列数等于最多子控件的TableRow的列数 直接在TableLayout加控件,控件会占据一行 Table ...
- Vue-Quill-Editor回显不显示空格的处理办法
我自己在用VUE做一个博客网站,查了一下好多人都在用Vue-Quill-Editor,于是我也把这个插件加入到我的程序里,可是后来却出现了个问题,如图: 简单的代码如下: <template&g ...
- 20145210姚思羽《网络对抗技术》逆向及Bof基础实践
20145210姚思羽<网络对抗技术>逆向及Bof基础实践 实践目标 1.本次实践的对象是一个名为pwn1的linux可执行文件. 2.该程序正常执行流程是:main调用foo函数,foo ...
- Spring Cloud2.0之整合Consul作为注册中心
使用Consul来替换Eureka Consul简介 Consul 是一套开源的分布式服务发现和配置管理系统,由 HashiCorp 公司用 Go 语言开发. 它具有很多优点.包括: 基于 raft ...
- EntityFramework 学习 一 枚举
1. Convert an existing property to Enum: using (var ctx = new SchoolDBEntities()) { Teacher tchr = n ...
- Qt版权介绍:GPL, LGPL 以及 Commercial 授权
http://blog.csdn.net/changsheng230/article/details/6167933 Qt版权介绍:GPL, LGPL 以及 Commercial 授权 分类: Qt ...