django中的构造字典(二级菜单,评论树,购物车)
1.构造父子结构:
1.1需求样式
客户列表 customer_list /customer/list/

-----> 添加客户 customer_add /customer/add/

-----> 编辑客户 customer_edit /customer/edit/(?P<cid>\d+)/

-----> 删除客户 customer_del /customer/del/(?P<cid>\d+)/

-----> 批量导入客户 customer_import /customer/import/

-----> 下载客户模板 customer_tpl /customer/tpl/

账单列表 payment_list /payment/list/

-----> 添加账单 payment_add /payment/add/

-----> 编辑账单 payment_edit /payment/edit/(?P<pid>\d+)/

-----> 删除账单 payment_del /payment/del/(?P<pid>\d+)/
django中构造方式: ———>最重要的其实就是这里对于表结构的考虑
{

    1:{

        'title':'账单列表',

        'url':'/payment/list/',

        'name':'payment_list',

        children:[

            {'title':'删除账单','url':'/payment/list/','name':'payment_list'},

            {'title':'编辑账单','url':'/payment/list/','name':'payment_list'},

            {'title':'添加账单','url':'/payment/list/','name':'payment_list'},

        ]

    },

     2:{

        'title':'客户列表',

        'url':'/payment/list/',

        'name':'payment_list',

        children:[

            {'title':'下载客户模板','url':'/payment/list/','name':'payment_list'},

            {'title':'下载客户模板','url':'/payment/list/','name':'payment_list'},

            {'title':'下载客户模板','url':'/payment/list/','name':'payment_list'},

        ]

    }

}
models.py
class Menu(models.Model):

    """

    菜单表

    """

    title = models.CharField(max_length=32,unique=True)

    icon = models.CharField(max_length=32)

    def __str__(self):

        return self.title

class Permission(models.Model):

    """

    权限表

    """

    title = models.CharField(verbose_name='标题', max_length=32)

    url = models.CharField(verbose_name='含正则的URL', max_length=128)

    name = models.CharField(verbose_name='URL别名',max_length=32,null=True,blank=True)

    parent = models.ForeignKey(verbose_name='父权限',to='Permission',null=True,blank=True)

    menu = models.ForeignKey(verbose_name='菜单',to='Menu',null=True,blank=True)

    def __str__(self):

        return self.title
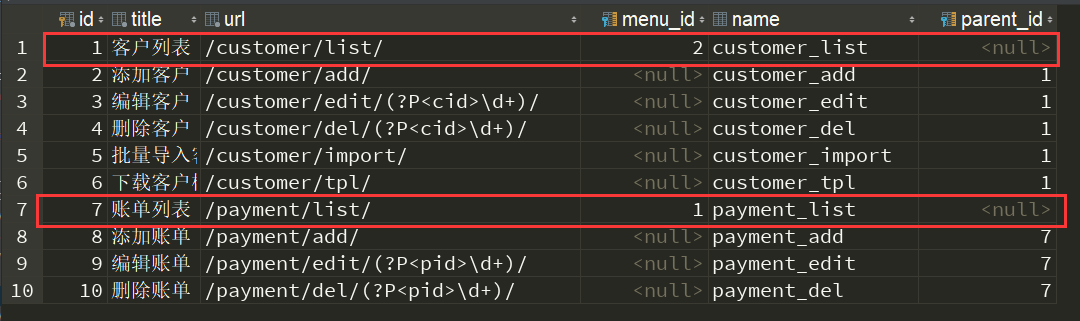
# 有parent_id没有menu_id表示是具有三级菜单
# 有menu_id没有parent_id则表示是具有二级菜单
# 两者不能同时都有值
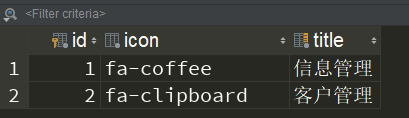
表数据
menu:
permission:
构造方式一:
def role_bbb(request):

    permission_queryset = models.Permission.objects.all().values("id","title","url","name","parent_id")

    root_permission_dict = {}

    for item in permission_queryset:

        if not item["parent_id"]:

            root_permission_dict[item["id"]] = {

                    "url":item["url"],

                    "title":item["title"],

                    "name":item["name"],

                    "children":[],

                }

    for item in permission_queryset:

        parent_id = item['parent_id']

        if parent_id:

            root_permission_dict[parent_id]['children'].append({

                'title': item['title'],

                'url': item['url'],

                'name': item['name']

            })

    # 打印测试

    for root in root_permission_dict.values():

        print(root["title"],root['name'],root['url'])

        for node in root['children']:

            print('----->', node['title'], node['name'], node['url'])

    return HttpResponse("+++++")
构造方式二:
def role_bbb(request):

    root_permission_dict = {}

    query = models.Permission.objects.filter(menu__isnull=False).values('id','title','url','name','parent_id')

    for item in query:

        root_permission_dict[item["id"]] = {

            'title': item['title'],

            'url': item['url'],

            'name': item['name'],

            'children': []

        }

    models.Permission.objects.filter(menu__isnull=True).values('id','title','url','name','parent_id')

    for item in query_dic:

        parent_id = item['parent_id']

        if parent_id:

            root_permission_dict[parent_id]['children'].append({

                'title': item['title'],

                'url': item['url'],

                'name': item['name']

            })

    # 打印测试

    for root in root_permission_dict.values():

        print(root["title"],root['name'],root['url'])

        for node in root['children']:

            print('----->', node['title'], node['name'], node['url'])

    return HttpResponse("+++++")
构造方式三:
def role_bbb(request):

    permission_queryset = models.Permission.objects.all().values("id", "title", "url", "name", "parent_id")

    root_permission_dict = {}

    for item in permission_queryset:

        if not item['parent_id']:

            root_permission_dict[item['id']] = {

                'title': item['title'],

                'url': item['url'],

                'name': item['name'],

                'children': []

            }

        else:

            pid = item["parent_id"]

            root_permission_dict[pid]["children"].append({

                'title': item['title'],

                'url': item['url'],

                'name': item['name']

            })

    return HttpResponse("+++++")
2.构造家族结构 ------>用于构造评论树
2.1需求
在实际应用中,我们对于一篇文章的评论通常包含了根评论,根评论下可以具有多个子评论,我们现在才可以通过构造数据结构来实现他所具有的功能
构造方式:
comment_list = [

    {'id': 1, 'title': '根评论', 'pid': None},

    {'id': 2, 'title': '根评论', 'pid': None},

    {'id': 3, 'title': 'id是1下的评论', 'pid': 1},

    {'id': 4, 'title': 'id是2下的评论', 'pid': 2},

    {'id': 5, 'title': 'id是1下的评论', 'pid': 1},

    {'id': 6, 'title': 'id是3下的评论', 'pid': 3},

    {'id': 7, 'title': 'id是6下的评论', 'pid': 6},

]
演示代码:
comment_dict = {}

for item in comment_list:

    item['children'] = []

    comment_dict[item['id']] = item

for row in comment_list:

    if not row['pid']:  # 判断根评论

        continue  # 跳过此次循环

    pid = row['pid']  # 获取pid

    # 最加到children中

    comment_dict[pid]['children'].append(row)

print(comment_dict)
效果:
{

    1: {

        'id': 1,

        'title': '根评论',

        'pid': None,

        'children': [{

            'id': 3,

            'title': 'id是1下的评论',

            'pid': 1,

            'children': [{

                'id': 6,

                'title': 'id是3下的评论',

                'pid': 3,

                'children': [{

                    'id': 7,

                    'title': 'id是6下的评论',

                    'pid': 6,

                    'children': []

                }]

            }]

        }, {

            'id': 5,

            'title': 'id是1下的评论',

            'pid': 1,

            'children': []

        }]

    },

    2: {

        'id': 2,

        'title': '根评论',

        'pid': None,

        'children': [{

            'id': 4,

            'title': 'id是2下的评论',

            'pid': 2,

            'children': []

        }]

    },

    3: {

        'id': 3,

        'title': 'id是1下的评论',

        'pid': 1,

        'children': [{

            'id': 6,

            'title': 'id是3下的评论',

            'pid': 3,

            'children': [{

                'id': 7,

                'title': 'id是6下的评论',

                'pid': 6,

                'children': []

            }]

        }]

    },

    4: {

        'id': 4,

        'title': 'id是2下的评论',

        'pid': 2,

        'children': []

    },

    5: {

        'id': 5,

        'title': 'id是1下的评论',

        'pid': 1,

        'children': []

    },

    6: {

        'id': 6,

        'title': 'id是3下的评论',

        'pid': 3,

        'children': [{

            'id': 7,

            'title': 'id是6下的评论',

            'pid': 6,

            'children': []

        }]

    },

    7: {

        'id': 7,

        'title': 'id是6下的评论',

        'pid': 6,

        'children': []

    }

}
这样可以构造,但是明显显得累赘,把子评论也全都打印了一遍
以上在做改进:
comment_dict = {}

for item in comment_list:

    item['children'] = []

    comment_dict[item['id']] = item

result = []

for row in comment_list:

    if not row['pid']:  # 判断根评论

        result.append(row)  # 添加到列表

    else:

        pid = row['pid']

        # 最加到children中

        comment_dict[pid]['children'].append(row)

print(result)
json序列化效果(想使用序列化格式工具转化,需要先转换成json格式才行,通过json.dumps):
[{

    "title": "根评论",

    "pid": null,

    "id": 1,

    "children": [{

        "title": "id是1下的评论",

        "pid": 1,

        "id": 3,

        "children": [{

            "title": "id是3下的评论",

            "pid": 3,

            "id": 6,

            "children": [{

                "title": "id是6下的评论",

                "pid": 6,

                "id": 7,

                "children": []

            }]

        }]

    }, {

        "title": "id是1下的评论",

        "pid": 1,

        "id": 5,

        "children": []

    }]

}, {

    "title": "根评论",

    "pid": null,

    "id": 2,

    "children": [{

        "title": "id是2下的评论",

        "pid": 2,

        "id": 4,

        "children": []

    }]

}]
django中的构造字典(二级菜单,评论树,购物车)的更多相关文章
- django自定义rbac权限组件(二级菜单)
一.目录结构 二.表结构设计 model.py from django.db import models # Create your models here. class Menu(models.Mo ...
- Html中鼠标悬停显示二级菜单的两种方法
<!DOCTYPE html> <html> <head> <meta charset="UTF-8"> <title> ...
- DJANGO结合jQuery cxSelect 作二级菜单过滤
EN,到这个阶段,基本功能算是完成了. 使用了jQuery cxSelect这个插件. http://code.ciaoca.com/jquery/cxselect/ 相关代码如下: html: &l ...
- Django--CRM--一级, 二级 菜单表
一. 一级菜单表 1. 首先要修改权限表的字段, 在权限表下面加上icon和 is_menu 的字段 2. 展示结果 # 我们既然想要动态生成一级菜单,那么就需要从数据库中拿出当前登录的用户的菜单表是 ...
- django中动态生成二级菜单
一.动态显示二级菜单 1.修改权限表结构 (1)分析需求,要求左侧菜单如下显示: 客户管理: 客户列表 账单管理: 账单列表 (2)修改rbac下的models.py,修改后代码如下: from dj ...
- django权限之二级菜单
遗漏知识点 1.构建表结构时,谁被关联谁就是主表,在层级删除的时候,删除子表的时候,主表不会被删除,反之删除主表的话,字表也会被删除, 使用related_name=None 反向查询,起名用的 ...
- Django - 权限(4)- queryset、二级菜单的默认显示、动态显示按钮权限
一.queryset Queryset是django中构建的一种数据结构,ORM查询集往往是queryset数据类型,我们来进一步了解一下queryset的特点. 1.可切片 使用Python 的切片 ...
- 巨蟒django之权限7:动态生成一级&&二级菜单
内容回顾: . 权限的控制 . 表结构设计 存权限的信息 用户表 - name 用户名 - pwd 密码 - roles 多对多 角色表 - name - permissions 多对多 权限表 - ...
- Django - 权限(3)- 动态显示二级菜单
一.动态显示二级菜单 上篇随笔中,我们实现了动态显示一级菜单,现在考虑这样一种情况,用户的菜单权限比较多,这个时候全部并列展现在左侧菜单就不合适了,所以,现在有这样一个需求,即把用户的菜单权限分类,划 ...
随机推荐
- RestTemplate中几种常见的请求方式
GET请求 第一种:getForEntity getForEntity方法的返回值是一个ResponseEntity<T>,ResponseEntity<T>是Spring对H ...
- SigmoidCrossEntropyLoss
http://blog.csdn.net/u012235274/article/details/51361290
- (转)Nagios 配置及监控
Nagios 配置及监控 原文:http://blog.csdn.net/linuxlsq/article/details/52606824 Nagios 监控 在互联网日益发展的今天,监控的重要性已 ...
- HDU 4081—— Qin Shi Huang's National Road System——————【次小生成树、prim】
Qin Shi Huang's National Road System Time Limit: 2000/1000 MS (Java/Others) Memory Limit: 32768/3 ...
- 轮播图jq版
轮播图的需求 1:图片自己轮播,并且下面的tabs小图标跟着显示 2.鼠标hover到tabs上面显示对应的图片 3.点击左右按钮,显示下一张图片. <div id="oLunbo&q ...
- iOS-swift-枚举和结构体
1.枚举 使用关键字 enum 创 建枚举. 枚举默认起始值为 0,可以自定义起始值. 在枚举中可以定义方法,和类中定义的一样. 使用关键字 rawValue 访问当前枚举的值. enum Rank: ...
- mysql 将null转代为0(转)
1.如果为空返回0 select ifnull(null,0) 2.如果为空返回0,否则返回1 select if(isnull(col),0,1) as col. MYSQL 中的IFNULL函数 ...
- Hibernate课程 初探一对多映射5-1 课程总结
1 单方一对多 xml one-to-many 配置 实体类 一方添加保存多方集合 2 单方多对一 xml many-to-one 配置 实体类 多方添加保存一方引用 3 常用属性 inver ...
- 超详细Hexo+Github博客搭建小白教程
原文链接:超详细Hexo+Github博客搭建小白教程 去年9月的时候开始搭建了第一个自己的独立博客,到现在也稍微像模像样了.很多小伙伴应该也想过搭建一个自己的博客,网上也有一堆详细教程.我在此稍稍总 ...
- (生产)better-scroll - 下拉刷新
Options 参数 startX: 0 开始的X轴位置 startY: 0 开始的Y轴位置 scrollY: true 滚动方向为 Y 轴 scrollX: 'true' 滚动方向为 X 轴 cli ...