win7-64bit下基于VMware12.5安装rhel-server-6.3-i386
1、安装rhel6
#关闭防火墙/etc/init.d/iptables stop#关闭Selinuxsetenforce permissive
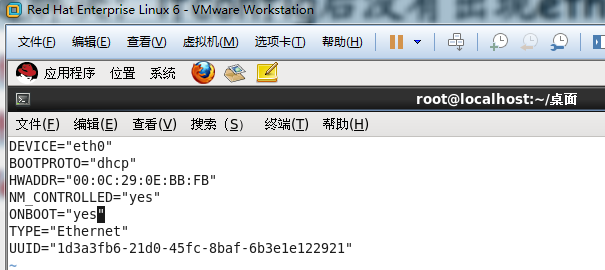
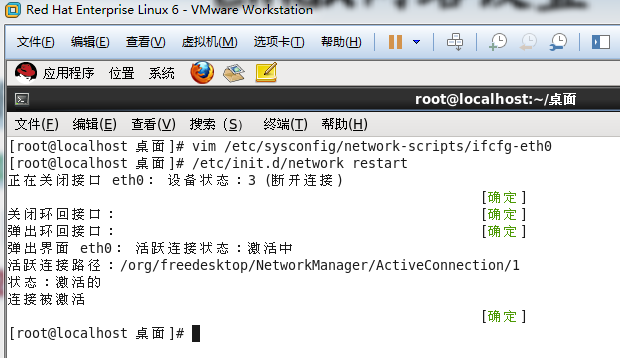
2、启用网络设备
3、安装VMware-Tools
./vmware-install.pl
4、安装vim
[root@localhost 桌面]# rpm -qa |grep vimvim-minimal-7.2.411-1.8.el6.i686vim-common-7.2.411-1.8.el6.i686vim-enhanced-7.2.411-1.8.el6.i686[root@localhost 桌面]#
5、安装ctags
[root@localhost 桌面]# rpm -qa |grep tagtaglib-1.6.1-1.1.el6.i686ctags-5.8-2.el6.i686[root@localhost 桌面]#
6、安装cscope
[root@localhost 桌面]# rpm -qa |grep cscopecscope-15.6-6.el6.i686[root@localhost 桌面]#
7、更新yum为网易源
查看rhel是否安装python
查看rhel是否安装yum
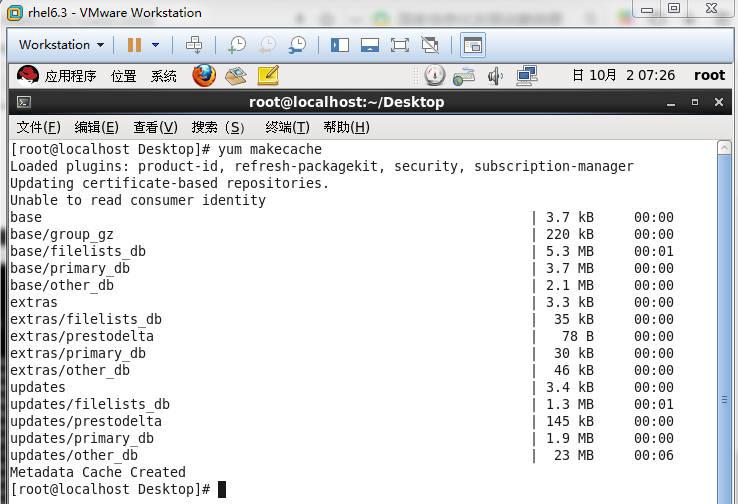
更换yum源 使用163的源
清除原有缓存
重建缓存
构建多个yum源
# CentOS-Base.repo## The mirror system uses the connecting IP address of the client and the# update status of each mirror to pick mirrors that are updated to and# geographically close to the client. You should use this for CentOS updates# unless you are manually picking other mirrors.## If the mirrorlist= does not work for you, as a fall back you can try the# remarked out baseurl= line instead.##[base]name=CentOS-6 - Base - 163.combaseurl=http://mirrors.163.com/centos/6/os/$basearch/#mirrorlist=http://mirrorlist.centos.org/?release=6&arch=$basearch&repo=osgpgcheck=1gpgkey=http://mirror.centos.org/centos/RPM-GPG-KEY-CentOS-6#released updates[updates]name=CentOS-6 - Updates - 163.combaseurl=http://mirrors.163.com/centos/6/updates/$basearch/#mirrorlist=http://mirrorlist.centos.org/?release=6&arch=$basearch&repo=updatesgpgcheck=1gpgkey=http://mirror.centos.org/centos/RPM-GPG-KEY-CentOS-6#additional packages that may be useful[extras]name=CentOS-6 - Extras - 163.combaseurl=http://mirrors.163.com/centos/6/extras/$basearch/#mirrorlist=http://mirrorlist.centos.org/?release=6&arch=$basearch&repo=extrasgpgcheck=1gpgkey=http://mirror.centos.org/centos/RPM-GPG-KEY-CentOS-6#additional packages that extend functionality of existing packages[centosplus]name=CentOS-6 - Plus - 163.combaseurl=http://mirrors.163.com/centos/6/centosplus/$basearch/#mirrorlist=http://mirrorlist.centos.org/?release=6&arch=$basearch&repo=centosplusgpgcheck=1enabled=0gpgkey=http://mirror.centos.org/centos/RPM-GPG-KEY-CentOS-6#contrib - packages by Centos Users[contrib]name=CentOS-6 - Contrib - 163.combaseurl=http://mirrors.163.com/centos/6/contrib/$basearch/#mirrorlist=http://mirrorlist.centos.org/?release=6&arch=$basearch&repo=contribgpgcheck=1enabled=0gpgkey=http://mirror.centos.org/centos/RPM-GPG-KEY-CentOS-6# CentOS-Base.repo## The mirror system uses the connecting IP address of the client and the# update status of each mirror to pick mirrors that are updated to and# geographically close to the client. You should use this for CentOS updates# unless you are manually picking other mirrors.## If the mirrorlist= does not work for you, as a fall back you can try the# remarked out baseurl= line instead.##[base]name=CentOS-6 - Base - mirrors.aliyun.comfailovermethod=prioritybaseurl=http://mirrors.aliyun.com/centos/6/os/$basearch/http://mirrors.aliyuncs.com/centos/6/os/$basearch/#mirrorlist=http://mirrorlist.centos.org/?release=6&arch=$basearch&repo=osgpgcheck=1gpgkey=http://mirrors.aliyun.com/centos/RPM-GPG-KEY-CentOS-6#released updates[updates]name=CentOS-6 - Updates - mirrors.aliyun.comfailovermethod=prioritybaseurl=http://mirrors.aliyun.com/centos/6/updates/$basearch/http://mirrors.aliyuncs.com/centos/6/updates/$basearch/#mirrorlist=http://mirrorlist.centos.org/?release=6&arch=$basearch&repo=updatesgpgcheck=1gpgkey=http://mirrors.aliyun.com/centos/RPM-GPG-KEY-CentOS-6#additional packages that may be useful[extras]name=CentOS-6 - Extras - mirrors.aliyun.comfailovermethod=prioritybaseurl=http://mirrors.aliyun.com/centos/6/extras/$basearch/http://mirrors.aliyuncs.com/centos/6/extras/$basearch/#mirrorlist=http://mirrorlist.centos.org/?release=6&arch=$basearch&repo=extrasgpgcheck=1gpgkey=http://mirrors.aliyun.com/centos/RPM-GPG-KEY-CentOS-6#additional packages that extend functionality of existing packages[centosplus]name=CentOS-6 - Plus - mirrors.aliyun.comfailovermethod=prioritybaseurl=http://mirrors.aliyun.com/centos/6/centosplus/$basearch/http://mirrors.aliyuncs.com/centos/6/centosplus/$basearch/#mirrorlist=http://mirrorlist.centos.org/?release=6&arch=$basearch&repo=centosplusgpgcheck=1enabled=0gpgkey=http://mirrors.aliyun.com/centos/RPM-GPG-KEY-CentOS-6#contrib - packages by Centos Users[contrib]name=CentOS-6 - Contrib - mirrors.aliyun.comfailovermethod=prioritybaseurl=http://mirrors.aliyun.com/centos/6/contrib/$basearch/http://mirrors.aliyuncs.com/centos/6/contrib/$basearch/#mirrorlist=http://mirrorlist.centos.org/?release=6&arch=$basearch&repo=contribgpgcheck=1enabled=0gpgkey=http://mirrors.aliyun.com/centos/RPM-GPG-KEY-CentOS-6
yum常用命令
更新和升级
1 安装
2 更新和升级
3 查找和显示
4 删除程序
5 清除缓存
8、安装tree
yum -y install tree dos2unix
9、安装vimrc
"=========================================================================" DesCRiption: 适合自己使用的vimrc文件,for Linux/Windows, GUI/Console"" Last Change: 2010年08月02日 15时13分"" Version: 1.80""=========================================================================set nocompatible " 关闭 vi 兼容模式syntax on " 自动语法高亮colorscheme molokai " 设定配色方案set number " 显示行号set cursorline " 突出显示当前行set ruler " 打开状态栏标尺set shiftwidth=4 " 设定 << 和 >> 命令移动时的宽度为 4set softtabstop=4 " 使得按退格键时可以一次删掉 4 个空格set tabstop=4 " 设定 tab 长度为 4set nobackup " 覆盖文件时不备份set autochdir " 自动切换当前目录为当前文件所在的目录filetype plugin indent on " 开启插件set backupcopy=yes " 设置备份时的行为为覆盖set ignorecase smartcase " 搜索时忽略大小写,但在有一个或以上大写字母时仍保持对大小写敏感set nowrapscan " 禁止在搜索到文件两端时重新搜索set incsearch " 输入搜索内容时就显示搜索结果set hlsearch " 搜索时高亮显示被找到的文本set noerrorbells " 关闭错误信息响铃set novisualbell " 关闭使用可视响铃代替呼叫set t_vb= " 置空错误铃声的终端代码" set showmatch " 插入括号时,短暂地跳转到匹配的对应括号" set matchtime=2 " 短暂跳转到匹配括号的时间set magic " 设置魔术set hidden " 允许在有未保存的修改时切换缓冲区,此时的修改由 vim 负责保存set guioptions-=T " 隐藏工具栏set guioptions-=m " 隐藏菜单栏set smartindent " 开启新行时使用智能自动缩进set backspace=indent,eol,start" 不设定在插入状态无法用退格键和 Delete 键删除回车符set cmdheight=1 " 设定命令行的行数为 1set laststatus=2 " 显示状态栏 (默认值为 1, 无法显示状态栏)set statusline=\ %<%F[%1*%M%*%n%R%H]%=\ %y\ %0(%{&fileformat}\ %{&encoding}\ %c:%l/%L%)\" 设置在状态行显示的信息set foldenable " 开始折叠set foldmethod=syntax " 设置语法折叠set foldcolumn=0 " 设置折叠区域的宽度setlocal foldlevel=1 " 设置折叠层数为" set foldclose=all " 设置为自动关闭折叠" nnoremap <space> @=((foldclosed(line('.')) < 0) ? 'zc' : 'zo')<CR>" 用空格键来开关折叠" return OS type, eg: windows, or linux, mac, et.st..function! MySys()if has("win16") || has("win32") || has("win64") || has("win95")return "windows"elseif has("unix")return "linux"endifendfunction" 用户目录变量$VIMFILESif MySys() == "windows"let $VIMFILES = $VIM.'/vimfiles'elseif MySys() == "linux"let $VIMFILES = $HOME.'/.vim'endif" 设定doc文档目录let helptags=$VIMFILES.'/doc'" 设置字体 以及中文支持if has("win32")set guifont=Inconsolata:h12:cANSIendif" 配置多语言环境if has("multi_byte")" UTF-8 编码set encoding=utf-8set termencoding=utf-8set formatoptions+=mMset fencs=utf-8,gbkif v:lang =~? '^\(zh\)\|\(ja\)\|\(ko\)'set ambiwidth=doubleendifif has("win32")source $VIMRUNTIME/delmenu.vimsource $VIMRUNTIME/menu.vimlanguage messages zh_CN.utf-8endifelseechoerr "Sorry, this version of (g)vim was not compiled with +multi_byte"endif" Buffers操作快捷方式!nnoremap <C-RETURN> :bnext<CR>nnoremap <C-S-RETURN> :bprevious<CR>" Tab操作快捷方式!nnoremap <C-TAB> :tabnext<CR>nnoremap <C-S-TAB> :tabprev<CR>"关于tab的快捷键" map tn :tabnext<cr>" map tp :tabprevious<cr>" map td :tabnew .<cr>" map te :tabedit" map tc :tabclose<cr>"窗口分割时,进行切换的按键热键需要连接两次,比如从下方窗口移动"光标到上方窗口,需要<c-w><c-w>k,非常麻烦,现在重映射为<c-k>,切换的"时候会变得非常方便.nnoremap <C-h> <C-w>hnnoremap <C-j> <C-w>jnnoremap <C-k> <C-w>knnoremap <C-l> <C-w>l"一些不错的映射转换语法(如果在一个文件中混合了不同语言时有用)nnoremap <leader>1 :set filetype=xhtml<CR>nnoremap <leader>2 :set filetype=css<CR>nnoremap <leader>3 :set filetype=javascript<CR>nnoremap <leader>4 :set filetype=php<CR>" set fileformats=unix,dos,mac" nmap <leader>fd :se fileformat=dos<CR>" nmap <leader>fu :se fileformat=unix<CR>" use Ctrl+[l|n|p|cc] to list|next|previous|jump to count the result" map <C-x>l <ESC>:cl<CR>" map <C-x>n <ESC>:cn<CR>" map <C-x>p <ESC>:cp<CR>" map <C-x>c <ESC>:cc<CR>" 让 Tohtml 产生有 CSS 语法的 html" syntax/2html.vim,可以用:runtime! syntax/2html.vimlet html_use_css=1" Python 文件的一般设置,比如不要 tab 等autocmd FileType python set tabstop=4 shiftwidth=4 expandtabautocmd FileType python map <F12> :!python %<CR>" 选中状态下 Ctrl+c 复制vmap <C-c> "+y" 打开javascript折叠let b:javascript_fold=1" 打开javascript对dom、html和css的支持let javascript_enable_domhtmlcss=1" 设置字典 ~/.vim/dict/文件的路径autocmd filetype javascript set dictionary=$VIMFILES/dict/javascript.dictautocmd filetype css set dictionary=$VIMFILES/dict/css.dictautocmd filetype php set dictionary=$VIMFILES/dict/php.dict"-----------------------------------------------------------------" plugin - bufexplorer.vim Buffers切换" \be 全屏方式查看全部打开的文件列表" \bv 左右方式查看 \bs 上下方式查看"-----------------------------------------------------------------"-----------------------------------------------------------------" plugin - taglist.vim 查看函数列表,需要ctags程序" F4 打开隐藏taglist窗口"-----------------------------------------------------------------if MySys() == "windows" " 设定windows系统中ctags程序的位置let Tlist_Ctags_Cmd = '"'.$VIMRUNTIME.'/ctags.exe"'elseif MySys() == "linux" " 设定windows系统中ctags程序的位置let Tlist_Ctags_Cmd = '/usr/bin/ctags'endifnnoremap <silent><F4> :TlistToggle<CR>let Tlist_Show_One_File = 1 " 不同时显示多个文件的tag,只显示当前文件的let Tlist_Exit_OnlyWindow = 1 " 如果taglist窗口是最后一个窗口,则退出vimlet Tlist_Use_Right_Window = 1 " 在右侧窗口中显示taglist窗口let Tlist_File_Fold_Auto_Close=1 " 自动折叠当前非编辑文件的方法列表let Tlist_Auto_Open = 0let Tlist_Auto_Update = 1let Tlist_Hightlight_Tag_On_BufEnter = 1let Tlist_Enable_Fold_Column = 0let Tlist_Process_File_Always = 1let Tlist_Display_Prototype = 0let Tlist_Compact_Format = 1"-----------------------------------------------------------------" plugin - mark.vim 给各种tags标记不同的颜色,便于观看调式的插件。" \m mark or unmark the word under (or before) the cursor" \r manually input a regular expression. 用于搜索." \n clear this mark (i.e. the mark under the cursor), or clear all highlighted marks ." \* 当前MarkWord的下一个 \# 当前MarkWord的上一个" \/ 所有MarkWords的下一个 \? 所有MarkWords的上一个"-----------------------------------------------------------------"-----------------------------------------------------------------" plugin - NERD_tree.vim 以树状方式浏览系统中的文件和目录" :ERDtree 打开NERD_tree :NERDtreeClose 关闭NERD_tree" o 打开关闭文件或者目录 t 在标签页中打开" T 在后台标签页中打开 ! 执行此文件" p 到上层目录 P 到根目录" K 到第一个节点 J 到最后一个节点" u 打开上层目录 m 显示文件系统菜单(添加、删除、移动操作)" r 递归刷新当前目录 R 递归刷新当前根目录"-----------------------------------------------------------------" F3 NERDTree 切换map <F3> :NERDTreeToggle<CR>imap <F3> <ESC>:NERDTreeToggle<CR>"-----------------------------------------------------------------" plugin - NERD_commenter.vim 注释代码用的," [count],cc 光标以下count行逐行添加注释(7,cc)" [count],cu 光标以下count行逐行取消注释(7,cu)" [count],cm 光标以下count行尝试添加块注释(7,cm)" ,cA 在行尾插入 /* */,并且进入插入模式。 这个命令方便写注释。" 注:count参数可选,无则默认为选中行或当前行"-----------------------------------------------------------------let NERDSpaceDelims=1 " 让注释符与语句之间留一个空格let NERDCompactSexyComs=1 " 多行注释时样子更好看"-----------------------------------------------------------------" plugin - DoxygenToolkit.vim 由注释生成文档,并且能够快速生成函数标准注释"-----------------------------------------------------------------let g:DoxygenToolkit_authorName="Asins - asinsimple AT gmail DOT com"let g:DoxygenToolkit_briefTag_funcName="yes"map <leader>da :DoxAuthor<CR>map <leader>df :Dox<CR>map <leader>db :DoxBlock<CR>map <leader>dc a /* */<LEFT><LEFT><LEFT>"-----------------------------------------------------------------" plugin – ZenCoding.vim 很酷的插件,HTML代码生成" 插件最新版:http://github.com/mattn/zencoding-vim" 常用命令可看:http://nootn.com/blog/Tool/23/"-----------------------------------------------------------------"-----------------------------------------------------------------" plugin – checksyntax.vim JavaScript常见语法错误检查" 默认快捷方式为 F5"-----------------------------------------------------------------let g:checksyntax_auto = 0 " 不自动检查"-----------------------------------------------------------------" plugin - NeoComplCache.vim 自动补全插件"-----------------------------------------------------------------let g:AutoComplPop_NotEnableAtStartup = 1let g:NeoComplCache_EnableAtStartup = 1let g:NeoComplCache_SmartCase = 1let g:NeoComplCache_TagsAutoUpdate = 1let g:NeoComplCache_EnableInfo = 1let g:NeoComplCache_EnableCamelCaseCompletion = 1let g:NeoComplCache_MinSyntaxLength = 3let g:NeoComplCache_EnableSkipCompletion = 1let g:NeoComplCache_SkipInputTime = '0.5'let g:NeoComplCache_SnippetsDir = $VIMFILES.'/snippets'" <TAB> completion.inoremap <expr><TAB> pumvisible() ? "\<C-n>" : "\<TAB>"" snippets expand keyimap <silent> <C-e> <Plug>(neocomplcache_snippets_expand)smap <silent> <C-e> <Plug>(neocomplcache_snippets_expand)"-----------------------------------------------------------------" plugin - matchit.vim 对%命令进行扩展使得能在嵌套标签和语句之间跳转" % 正向匹配 g% 反向匹配" [% 定位块首 ]% 定位块尾"-----------------------------------------------------------------"-----------------------------------------------------------------" plugin - vcscommand.vim 对%命令进行扩展使得能在嵌套标签和语句之间跳转" SVN/git管理工具"-----------------------------------------------------------------"-----------------------------------------------------------------" plugin – a.vim"-----------------------------------------------------------------
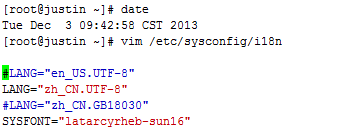
10、关闭防火墙和SELinux
#关闭防火墙/etc/init.d/iptables stop#关闭Selinuxsetenforce permissive
11、RHEL7开机自动运行程序的脚本(fedora20通用)
12、安装samba
yum -y install samba samba-client samba-common samba-winbind samba-winbind-clients
# service smb start# service smb status
# chkconfig smb on# chkconfig --list smbsmb 0:off 1:off 2:on 3:on 4:on 5:on 6:off
# cp -p /etc/samba/smb.conf /etc/samba/smb.conf.orig
[global]unix charset= UTF-8dos charset=GBKworkgroup = SHAREGROUP
[share]comment = RHEL6-Windows Sharepath=/home/sharepublic=yeswriteable = yes# 是否可写browseable = yes# 是否可浏览create mode = 0777# 创建文件时的默认属性directory mode = 0777# 创建目录时的默认属性valid users = root# 指定可访问用户
# smbpasswd -a rootNew SMB password:Retype new SMB password:Added user demo.#
# testparm
/etc/init.d/smb restart
win7-64bit下基于VMware12.5安装rhel-server-6.3-i386的更多相关文章
- WIN7环境下CUDA7.5的安装、配置和测试(Visual Studio 2010)
以下基于"WIN7(64位)+Visual Studio 2010+CUDA7.5". 系统:WIN7,64位 开发平台:Visual Studio 2010 显卡:NVIDIA ...
- win7 64bit下最新Apahe2.4.18+php7.0.2+MySQL5.7.10配置
原文:win7 64bit下最新Apahe2.4.18+php7.0.2+MySQL5.7.10配置 一.说明 以前配置apache+php+mysql都是参考网上的,一般都没有什么问题.最近公司有个 ...
- Detour3.0 win7 64bit下的安装
最近在做API hook相关的东西,用了inline hook后感觉不错,但是查找资料发现inline hook并不稳定 inline hook 的原理是在系统访问一个函数的时候先替换原函数入口处的内 ...
- Win7 64bit下值得推荐的免费看图软件
自从更换到Win7 64bit后, 用了十多年的AcdSee3.x不能再正常工作了. 找到了两个替代品: Faststone Image Viewer 和 XnView Faststone Image ...
- Win7 64bit下32bit的 ODBC 数据源问题
win764位有数据源,但是如果我们在win7 64bit中使用32位的数据源的时候,我们就需要对其进行配置,很有趣的是,64为的数据源我们可以在控制面板——系统与安全——管理工具——数据源,进入可对 ...
- Linux下基于源代码方式安装MySQL 5.6
MySQL为开源数据库,因此能够基于源代码实现安装.基于源代码安装有很多其它的灵活性. 也就是说我们能够针对自己的硬件平台选用合适的编译器来优化编译后的二进制代码.依据不同的软件平台环境调整相关的编译 ...
- <转>Win7系统下利用U盘安装Ubuntu_12.04实现双系统教程
目前网上流传的关于Linux 系统的安装教程可是说是五彩缤纷,之前想采用硬盘安装方式,由于配置问题未能正确安装,现研究了下U盘安装,根据互联网上的一些资料及自己的总结,在Windows7 系统下采用U ...
- Win7系统下利用U盘安装Ubuntu14.04麒麟版
转自http://www.360doc.cn/article/14743053_335473181.html 重要提示:在采用u盘安装ubuntu分区时,所有磁盘一定要全部设置成逻辑分区,包括根目录/ ...
- mongoDB在windows下基于配置文件的安装和权限配置方式
下载mongoDB http://www.mongodb.org/downloads 根据操作系统,选择需要下载的安装包 添加mongodb 安装目录 将解压的文件夹中内容拷贝,存放在想要安装的文件 ...
随机推荐
- 正则表达式与python中re模块
一个网站,正则表达式入门的,很好 http://www.jb51.net/tools/zhengze.html 下面这个包含对python中re的介绍,也是很不错的http://www.w3cscho ...
- BZOJ4517 [Sdoi2016]排列计数 【组合数 + dp】
题目 求有多少种长度为 n 的序列 A,满足以下条件: 1 ~ n 这 n 个数在序列中各出现了一次 若第 i 个数 A[i] 的值为 i,则称 i 是稳定的.序列恰好有 m 个数是稳定的 满足条件的 ...
- adb shell am命令
adb shell am命令是在cmd命令行可以通过命令来启动Activity,Boradcast,Service等,更多使用可以参考下面附件. 比如在cmd串口我们发送广播,广播action是&qu ...
- jsp实现文件下载,out = pageContext.pushBody();out.close();不用写到jsp中
测试jsp: <%@ page contentType="text/html; charset=gbk" %> <% try{ com.enfo.intrust. ...
- d3 svg简单学习
矩形 <rect x="/> 圆形 <circle cx="/> 椭圆 <ellipse cx="/> 线 <line x1=& ...
- 加速和简化构建Docker(基于Google jib)
赵安家 2019年02月11日阅读 1518 关注 加速和简化构建Docker(基于Google jib) 介绍 其实jib刚发布时就有关注,但是一直没有用于生产,原因有二 基于 spotify/do ...
- 剑指Offer 二进制中一的个数
链接:https://www.nowcoder.com/questionTerminal/8ee967e43c2c4ec193b040ea7fbb10b8 来源:牛客网 public class So ...
- 解决使用webbrowser请求url时数据传递丢失问题
问题: 使用“ this.webBrowser.Url = new Uri(webBrowserUrl);”方式请求Action(Java Web)并传递数据,在webBrowserUrl中携带的参数 ...
- poj 2112(二分+网络流)
Optimal Milking Time Limit: 2000MS Memory Limit: 30000K Total Submissions: 15749 Accepted: 5617 ...
- 洛谷——P2658 汽车拉力比赛
P2658 汽车拉力比赛 题目描述 博艾市将要举行一场汽车拉力比赛. 赛场凹凸不平,所以被描述为M*N的网格来表示海拔高度(1≤ M,N ≤500),每个单元格的海拔范围在0到10^9之间. 其中一些 ...