
RequireJS与Backbone简单整合
前言
昨天我们一起学习了Backbone,最后做了一个备忘录的例子,说是做了不如说是看了下官方提供的例子,所以最终我感觉我们还是没能掌握Backbone,今天还得做个其它例子先。
然后前面也只是草草学习了RequireJS,没做demo,这个周末又在看电影打游戏睡觉瞎折腾,转眼就周日下午了,突然诗性大起,于是作诗一首先:
古有通宵看A片,今有彻夜码代码
好吧,我们开始今天的学习吧,我们今天先用backbone做一个通讯录的东西,然后使用requireJS组装之。
部分参考:the5fire的技术博客
简单例子
做之前我们先来个简单的例子:
 <html xmlns="http://www.w3.org/1999/xhtml">

 <head>

     <title></title>

 </head>

 <body>

     <div id="contactapp">

         <header>

             <h1>

                 通讯录</h1>

         </header>

         <section id="main">

             <ul id="contact-list">

             </ul>

         </section>

         <div class="create">

             <input type="button" value="增加(弹出框)" id="addDia" />

         </div>

     </div>

 </body>

 <script src="js/jquery.js" type="text/javascript"></script>

 <script src="js/underscore.js" type="text/javascript"></script>

 <script src="js/backbone.js" type="text/javascript"></script>

 <script type="text/javascript">

     (function ($) {

         var Contact = Backbone.Model.extend({

             //创建一个contact对象,拥有name属性

             name: null

         });

         var ContackList = Backbone.Collection.extend({

             initialize: function (models, options) {

                 //contact集合

                 this.bind('add', options.view.addOne);

             }

         });

         var AppView = Backbone.View.extend({

             el: $('body'),

             initialize: function () {

                 //实例化集合,并传入AppView对象

                 this.contacts = new ContackList(null, { view: this });

             },

             events: {

                 'click #addDia': 'addDia'

             },

             addDia: function () {

                 var name = prompt('请输入姓名');

                 var c = new Contact({ name: name });

                 this.contacts.add(c);

             },

             addOne: function (model) {

                 $('#contact-list').append('<li>' + model.get('name') + '</li>');

             }

         });

         var app = new AppView();

     })(jQuery);

 </script>

 </html>

PS:感谢the5fire给出的例子,我和我的小伙伴一下都明白了。。。。
以上代码涉及到Backbone三个部分:View、Model、Collection,我们在addOne里面使用了jquery绑定dom以后会将之消除。
各位请看这个代码:
this.bind('add', options.view.addOne);
在集合中绑定了add事件,在addDia最后执行了,然后触发集合的事件,才最后将dom添加完成。
知识回顾(参考the5fire)
the5fire关于backbone的文章写的很好(http://www.the5fire.com),我们一起来看看顺便回顾下我们的知识。
model
Man = Backbone.Model.extend({

        initialize: function(){

            alert('Hey, you create me!');

        }

    });

var man = new Man;
这个是一个model最简单的model,initialize中的方法一来就会执行,这里就会弹出框:

对象赋值
Man = Backbone.Model.extend({

    initialize: function () {

        alert('Hey, you create me!');

    },

    defaults: {

        name: '张三',

        age: '38'

    }

});

var man = new Man;

alert(man.get('name'));

//man.set({ name: 'the5fire', age: '10' });
若是不赋值就使用默认值,若是赋值则采用给的值。
事件与方法
Man = Backbone.Model.extend({

    initialize: function(){

        alert('Hey, you create me!');

        //初始化时绑定监听

        this.bind("change:name",function(){

            var name = this.get("name");

            alert("你改变了name属性为:" + name);

        });

    },

    defaults: {

        name:'张三',

        age: '38'

    },

    aboutMe: function(){

        return '我叫' + this.get('name') + ',今年' + this.get('age') + '岁';

    }

});

var man = new Man;

man.set({name:'the5fire'})  //触发绑定的change事件,alert。
可以定义方法aboutMe,也可以在initialize中绑定事件以监听某个属性的变化。
验证及错误提示
Man = Backbone.Model.extend({

    initialize: function () {

        this.bind("error", function (model, error) {

            alert(error);

        });

    },

    validate: function (attributes) {

        if (attributes.name == '') {

            return "name不能为空!";

        }

    },

});

var man = new Man;

man.set({ name: '' }); //根据验证规则,弹出错误提示。
此处验证不通过便会触发错误提示。
PS:经测试并没有提示,问题后面跟进
PS:最后证明有反应,我调试页面用错了
对象持久化
对象持久化可以是服务器也可以是本地存储,具体就不展开了。
collection
集合其实就是model的有序集合,经过周末的学习,我们应该比较熟悉了:
Book = Backbone.Model.extend({

    defaults: {    // 感谢网友蓝色动力指正改为defaults

        title: 'default'

    },

    initialize: function () {

        //alert('Hey, you create me!');

    }

});

BookShelf = Backbone.Collection.extend({

    model: Book

});

var book1 = new Book({ title: 'book1' });

var book2 = new Book({ title: 'book2' });

var book3 = new Book({ title: 'book3' });

//var bookShelf = new BookShelf([book1, book2, book3]);

//注意这里面是数组,或者使用add

var bookShelf = new BookShelf;

bookShelf.add(book1);

bookShelf.add(book2);

bookShelf.add(book3);

bookShelf.remove(book3);

//基于underscore这个js库,还可以使用each的方法获取collection中的数据

bookShelf.each(function (book) {

    alert(book.get('title'));

});
fetch
我们若是要与服务器通讯获取数据,需要先为bookshelf定义url:
bookShelf.fetch({ url: '/getbooks/', success: function (collection, response) {

    collection.each(function (book) {

        alert(book.get('title'));

    });

}, error: function () {

    alert('error');

}

});
//对应的BookShelf的返回格式如下:

[{'title':'book1'},{'title':'book2'}.....]
此后我们需要将页面的dom与数据同步,所以会用到reset事件;
bookShelf.bind('reset',showAllBooks);
showAllBooks = function(){
bookShelf.each(function(book){
//将book数据渲染到页面。
});
}
<html>
<head>
<title>the5fire-backbone-collection</title>
</head>
<body>
</body>
<script src="http://ajax.googleapis.com/ajax/libs/jquery/1.4.4/jquery.min.js"></script>
<script src="http://ajax.cdnjs.com/ajax/libs/underscore.js/1.1.4/underscore-min.js"></script>
<script src="http://ajax.cdnjs.com/ajax/libs/backbone.js/0.3.3/backbone-min.js"></script>
<script>
(function ($) {
//collection是一个简单的models的有序集合
//1、一个简单的例子 Book = Backbone.Model.extend({
defaults : { // 感谢网友蓝色动力指正改为defaults
title:'default'
},
initialize: function(){
//alert('Hey, you create me!');
}
});
BookShelf = Backbone.Collection.extend({
model : Book
}); var book1 = new Book({title : 'book1'});
var book2 = new Book({title : 'book2'});
var book3 = new Book({title : 'book3'}); //var bookShelf = new BookShelf([book1, book2, book3]); //注意这里面是数组,或者使用add
var bookShelf = new BookShelf;
bookShelf.add(book1);
bookShelf.add(book2);
bookShelf.add(book3);
bookShelf.remove(book3);
/*
for(var i=0; i<bookShelf.models.length; i++) {
alert(bookShelf.models[i].get('title'));
}
*/
//基于underscore这个js库,还可以使用each的方法获取collection中的数据
bookShelf.each(function(book){
alert(book.get('title'));
}); //2、使用fetch从服务器端获取数据,使用reset渲染
bookShelf.bind('reset', showAllBooks);
bookShelf.fetch({url:'/getbooks/',success:function(collection,response){
collection.each(function(book){
alert(book.get('title'));
});
},error:function(){
alert('error');
}});
showAllBooks = function(){
bookShelf.each(function(book){
//将book数据渲染到页面。
});
}
//上述代码仅仅均为可正常执行的代码,不过关于服务器端的实例在后面会有。
})(jQuery);
</script>
</html>
完整参考代码
Router(之前好像没看到)
之前我们学习的时候好像错过了Router了,路由的出现是想控制URL呢,Backbone.Router会把#标签当做url路径。
 <html>

 <head>

     <title>the5fire-backbone-router</title>

 </head>

 <body>

     <a href="#/posts/120">Post 120</a>

 <a href="#/download/user/images/hey.gif">download gif</a>

 <a href="#/dashboard/graph">Load Route/Action View</a>

 </body>

 <script src="http://ajax.googleapis.com/ajax/libs/jquery/1.4.4/jquery.min.js"></script>

     <script src="http://ajax.cdnjs.com/ajax/libs/underscore.js/1.1.4/underscore-min.js"></script>

     <script src="http://documentcloud.github.com/backbone/backbone-min.js"></script>

     <script>

     (function ($) {

         //Backbone中的router,见名知意,router有路由的意思,显然这里是要控制url的。

         //Backbone.Router会把你连接中的#标签当做是url路径

         /**

         //1、来看一个简单的例子

         var AppRouter = Backbone.Router.extend({

             routes: {

                 "*actions" : "defaultRoute"

             },

             defaultRoute : function(actions){

                 alert(actions);

             }

         });

         var app_router = new AppRouter;

         Backbone.history.start();

         //2、既然是对url进行匹配那么它应该不仅仅只是简单的静态匹配,应该具有传递参数的功能,所以下面再来一个动态的router的例子.

         var AppRouter = Backbone.Router.extend({

             routes: {

                 "/posts/:id" : "getPost",

                 "*actions" : "defaultRoute"

             },

             getPost: function(id) {

                 alert(id);

             },

             defaultRoute : function(actions){

                 alert(actions);

             }

         });

         var app_router = new AppRouter;

         Backbone.history.start();

         **/

         //从上面已经可以看到匹配#标签之后内容的方法,有两种:一种是用“:”来把#后面的对应的位置作为参数;还有一种是“*”,它可以匹配所有的url,下面再来演练一下。

         var AppRouter = Backbone.Router.extend({

             routes: {

                 "/posts/:id" : "getPost",

                 "/download/*path": "downloadFile",  //对应的链接为<a href="#/download/user/images/hey.gif">download gif</a>

                         "/:route/:action": "loadView",      //对应的链接为<a href="#/dashboard/graph">Load Route/Action View</a>

                 "*actions" : "defaultRoute"

             },

             getPost: function(id) {

                 alert(id);

             },

             defaultRoute : function(actions){

                 alert(actions);

             },

             downloadFile: function( path ){

                 alert(path); // user/images/hey.gif

             },

             loadView: function( route, action ){

                 alert(route + "_" + action); // dashboard_graph

             }

         });

         var app_router = new AppRouter;

         Backbone.history.start();

     })(jQuery);

     </script>

 </html>
路由的例子
我们暂时不管这个,否则任务完成不了了。
View
这个看完,我们就要继续今天的学习了,这里用了太多时间啦。
backbone的view是用来显示model数据到页面的,同时监听dom事件并相应变化。
来看看我们的页面主体:
 <html xmlns="http://www.w3.org/1999/xhtml">

 <head>

     <title></title>

 </head>

 <body>

     <div id="search_container">

     </div>

     <script type="text/template" id="search_template">

         <label><%= search_label %></label>

         <input type="text" id="search_input" />

         <input type="button" id="search_button" value="Search" />

     </script>

 </body>

 <script src="js/jquery.js" type="text/javascript"></script>

 <script src="js/underscore.js" type="text/javascript"></script>

 <script src="js/backbone.js" type="text/javascript"></script>

 <script type="text/javascript">

     (function ($) {

         //此处添加下面的试验代码

     })(jQuery);

 </script>

 </html>
el属性
该属性引用dom中的一些元素,每个view都会有这个属性,没有声明就默认创建空div
(function ($) {

    SearchView = Backbone.View.extend({

        initialize: function () {

            //this.render();

        },

        render: function () {

            //使用underscore这个库,来编译模板

            var template = _.template($("#search_template").html(), {});

            //加载模板到对应的el属性中

            //this.el.html(template);   //感谢 子不语同学指正。

            $(this.el).html(template);

        }

    });

    var searchView = new SearchView({ el: $("#search_container") });

    searchView.render();  //这个reander的方法可以放到view的构造函数中

})(jQuery);
[这里有一个错误,因为这个例子里没有传入search_label这个变量,所以你运行的时候要把html的模板中的那个变量改掉才行。]
事件绑定
(function ($) {

    SearchView = Backbone.View.extend({

        initialize: function () {

            this.render();

        },

        render: function () {

            //使用underscore这个库,来编译模板

            var template = _.template($("#search_template").html(), {});

            //加载模板到对应的el属性中

            //this.el.html(template);

            $(this.el).html(template);

        },

        events: {  //就是在这里绑定的

            'click input[type=button]': 'doSearch'  //定义类型为button的input标签的点击事件,触发函数doSearch

        },

        doSearch: function (event) {

            alert("search for " + $("#search_input").val());

        }

    });

    var searchView = new SearchView({ el: $("#search_container") });

})(jQuery);
模板
此处的模板,就是以数据替换其中的特殊标签<%= search_label %>
 <html xmlns="http://www.w3.org/1999/xhtml">

 <head>

     <title></title>

 </head>

 <body>

     <div id="search_container">

     </div>

     <script type="text/template" id="search_template">

         <label><%= search_label %></label>

         <input type="text" id="search_input" />

         <input type="button" id="search_button" value="Search" />

     </script>

 </body>

 <script src="js/jquery.js" type="text/javascript"></script>

 <script src="js/underscore.js" type="text/javascript"></script>

 <script src="js/backbone.js" type="text/javascript"></script>

 <script type="text/javascript">

     (function ($) {

         SearchView = Backbone.View.extend({

             initialize: function () {

                 this.render('the5fire');

             },

             render: function (search_label) {

                 //使用underscore这个库,来编译模板

                 var template = _.template($("#search_template").html(), { search_label: search_label });

                 //加载模板到对应的el属性中

                 $(this.el).html(template);

             },

             events: {  //就是在这里绑定的

                 'click input[type=button]': 'doChange'

             },

             doChange: function (event) {

                 //通过model发送数据到服务器

                 this.render('the5fire' + $("#search_input").val());

             }

         });

         var searchView = new SearchView({ el: $("#search_container") });

     })(jQuery);

 </script>

 </html>
阶段总结
好了,知识回顾暂时到这里,我们要来我们的东西了,不然搞不完了。
HTML结构
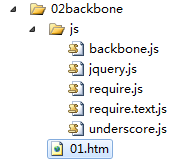
有点一头雾水的感觉,于是先上一张图吧:
 <html xmlns="http://www.w3.org/1999/xhtml">

 <head>

     <title></title>

 </head>

 <body>

     <div id="contactapp">

         <header>

             <h1>

                 通讯录</h1>

         </header>

         <section id="main">

             <ul id="contact-list">

             </ul>

         </section>

         <div class="create">

             <label>

                 姓名:<input type="text" id="name" /></label>

             <label>

                 电话:<input type="text" id="phone" /></label>

             <input type="button" value="保存" id="add" />

         </div>

     </div>

 </body>

 </html>

下面的输入框用以新建通讯项目,contact-list用以显示通讯录列表。整个页面非常简单,我们先就完成这个功能即可。
模型与集合
完了我们应该创建Contact模型了,我们先来随便写写代码看看有神马情况发生:
var Contact = Backbone.Model.extend({

    validate: function (attr) {

        if (!attr.name || attr.name.length > 5) {

            return '姓名格式错误';

        }

    }

});

var contact = new Contact();

var s = '';
这里根据backbone的Model的extend方法建立了Contact模型。
其中可能会有验证机制,我这里随便写了一个,电话其实也需要验证的。
而模型会有的方法,我们暂时不管他了,先来个集合吧:
<script src="js/underscore.js" type="text/javascript"></script>

<script src="js/backbone.js" type="text/javascript"></script>

<script src="js/backbone.localStorage.js" type="text/javascript"></script>

<script type="text/javascript">

var Contact = Backbone.Model.extend({

    validate: function (attr) {

        if (!attr.name || attr.name.length > 5) {

            return '姓名格式错误';

        }

    }

});

var ContackList = Backbone.Collection.extend({

    model: ContackList,

    localStorage: new Store('contacts')//所有信息保存至contacts空间下,注意此次用到了本地存储的东西

});

var s = '';

</script>
这里使用了本地存储,所以我们必须设置localStorage属性。
视图
现在我们来设置视图后:
 <html xmlns="http://www.w3.org/1999/xhtml">

 <head>

     <title></title>

 </head>

 <body>

     <div id="contactapp">

         <header>

             <h1>

                 通讯录</h1>

         </header>

         <section id="main">

             <ul id="contact-list">

             </ul>

         </section>

         <div class="create">

             <label>

                 姓名:<input type="text" id="name" /></label>

             <label>

                 电话:<input type="text" id="phone" /></label>

             <input type="button" value="保存" id="add" />

         </div>

     </div>

 </body>

 <script src="js/jquery.js" type="text/javascript"></script>

 <script src="js/underscore.js" type="text/javascript"></script>

 <script src="js/backbone.js" type="text/javascript"></script>

 <script src="js/backbone.localStorage.js" type="text/javascript"></script>

 <script type="text/javascript">

     (function ($) {

         var Contact = Backbone.Model.extend({

             validate: function (attr) {

                 if (!attr.name || attr.name.length > 5) {

                     return '姓名格式错误';

                 }

             }

         });

         var ContackList = Backbone.Collection.extend({

             model: ContackList,

             localStorage: new Store('contacts'), //所有信息保存至contacts空间下,注意此次用到了本地存储的东西

             initialize: function (models, options) {

                 this.bind('add', options.view.add);

             }

         });

         var AppView = Backbone.View.extend({

             el: $('body'),

             tmplate: _.template('<li><%= name %>:<%= phone %></li>'),

             initialize: function () {

                 _.bindAll(this, 'save', 'add');

                 this.contacts = new ContackList(null, { view: this });

                 this.list = $('#contact-list');

                 this.name = $('#name');

                 this.phone = $('#phone');

             },

             events: {

                 'click #add': 'save'

             },

             save: function () {

                 var model = new Contact({ name: this.name.val(), phone: this.phone.val() });

                 this.contacts.add(model);

             },

             add: function (model) {

                 var obj = model.toJSON();

                 $(this.list).append(this.tmplate(obj));

             }

         });

         var app = new AppView();

     })(jQuery);

 </script>

 </html>

我们的简单的界面终于出来了。。。。于是我们来优化加功能吧:
 <!DOCTYPE html>

 <html xmlns="http://www.w3.org/1999/xhtml">

 <head>

     <title></title>

 </head>

 <body>

     <div id="contactapp">

         <header>

             <h1>

                 通讯录</h1>

         </header>

         <section id="main">

             <ul id="contact-list">

             </ul>

         </section>

         <div class="create">

             <label>

                 姓名:<input type="text" id="name" /></label>

             <label>

                 电话:<input type="text" id="phone" /></label>

             <input type="button" value="保存" id="add" />

         </div>

     </div>

 </body>

 <script src="js/jquery.js" type="text/javascript"></script>

 <script src="js/underscore.js" type="text/javascript"></script>

 <script src="js/backbone.js" type="text/javascript"></script>

 <script src="js/backbone.localStorage.js" type="text/javascript"></script>

 <script type="text/javascript">

     (function ($) {

         var Contact = Backbone.Model.extend({

             initialize: function () {

                 this.bind("error", function (model, error) {

                     alert(error);

                 });

             },

             validate: function (attr) {

                 if (attr.name.length == '') {

                     return '姓名格式错误';

                 }

             }

         });

         var ContactList = Backbone.Collection.extend({

             model: Contact,

             localStorage: new Store('contacts') //所有信息保存至contacts空间下,注意此次用到了本地存储的东西

         });

         var list = new ContactList();

         var ContactView = Backbone.View.extend({

             tagName: 'li',

             template: _.template('<div><%= name %>:<%= phone %></div>'),

             events: {

                 'click li': 'test'

             },

             initialize: function () {

                 _.bindAll(this, 'render', 'remove');

                 this.model.bind('change', this.render);

                 this.model.bind('destroy', this.remove);

             },

             render: function () {

                 var html = this.template(this.model.toJSON());

                 //this.el是生成的空div

                 $(this.el).html(html);

                 //返回了当前视图

                 return this;

             },

             remove: function () {

                 $(this.el).remove();

             },

             test: function () {

                 alert(this);

                 var s = '';

             }

         });

         var AppView = Backbone.View.extend({

             el: $('body'),

             events: {

                 'click #add': 'save'

             },

             initialize: function () {

                 this.name = this.$('#name');

                 this.phone = this.$('#phone');

                 this.list = this.$('#contact-list');

                 _.bindAll(this, 'render', 'add', 'loadList', 'save');

                 //为集合绑定事件

                 list.bind('add', this.add);

                 //添加修改时触发

                 list.bind('refresh', this.loadList);

                 list.fetch();

             },

             //添加项目

             add: function (model) {

                 var view = new ContactView({ model: model });

                 this.list.append(view.render().el);

 //                view.model.save({ name: model.name, phone: model.phone });

                 var s = '';

             },

             loadList: function () {

                 list.each(this.add);

             },

             save: function () {

                 var name = this.name.val();

                 var phone = this.phone.val();

                 list.create({ name: name, phone: phone });

                 this.name.val('');

                 this.phone.val('');

             }

         });

         var app = new AppView();

     })(jQuery);

 </script>

 </html>
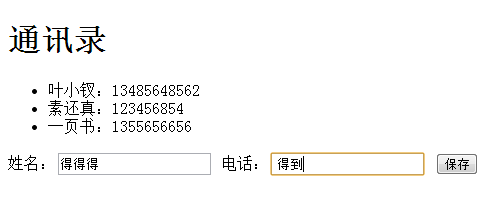

这个代码与上述代码有些不同,我们来理一理:
① 模型与集合变化不大
② 具有2个视图:
通讯录视图,我们后面通讯录会有编辑、删除或者其他功能,就在此上写
全局视图,AppView用于全局,可能还会显示整体状态。
③流程
因为我们只有一个通讯录列表,所以将之全局化出来了:
var list = new ContactList();
ContactView主要关注自身,与整体可以隔离开。
tagName指定了形成的dom的外层结构,不指定就是div
template会解析模板,我直接写到这里了,后面我们做点修改给个删除功能
template: _.template('<div><%= name %>:<%= phone %><a href="javascript:;">[删除]</a></div>'),
events就是绑定的事件
PS:具体代码各位自己看吧......
这里将删除事件加上就算阶段完成了:
 <!DOCTYPE html>

 <html xmlns="http://www.w3.org/1999/xhtml">

 <head>

     <title></title>

 </head>

 <body>

     <div id="contactapp">

         <header>

             <h1>

                 通讯录</h1>

         </header>

         <section id="main">

             <ul id="contact-list">

             </ul>

         </section>

         <div class="create">

             <label>

                 姓名:<input type="text" id="name" /></label>

             <label>

                 电话:<input type="text" id="phone" /></label>

             <input type="button" value="保存" id="add" />

         </div>

     </div>

 </body>

 <script src="js/jquery.js" type="text/javascript"></script>

 <script src="js/underscore.js" type="text/javascript"></script>

 <script src="js/backbone.js" type="text/javascript"></script>

 <script src="js/backbone.localStorage.js" type="text/javascript"></script>

 <script type="text/javascript">

     (function ($) {

         var Contact = Backbone.Model.extend({

             initialize: function () {

                 this.bind("error", function (model, error) {

                     alert(error);

                 });

             },

             validate: function (attr) {

                 if (attr.name.length == '') {

                     return '姓名格式错误';

                 }

             }

         });

         var ContactList = Backbone.Collection.extend({

             model: Contact,

             localStorage: new Store('contacts') //所有信息保存至contacts空间下,注意此次用到了本地存储的东西

         });

         var list = new ContactList();

         var ContactView = Backbone.View.extend({

             tagName: 'li',

             template: _.template('<div><%= name %>:<%= phone %><a href="javascript:;" class="delete">[删除]</a></div>'),

             events: {

                 'click .delete': 'destroy'

             },

             initialize: function () {

                 _.bindAll(this, 'render', 'remove');

                 this.model.bind('change', this.render);

                 this.model.bind('destroy', this.remove);

             },

             render: function () {

                 var html = this.template(this.model.toJSON());

                 //this.el是生成的空div

                 $(this.el).html(html);

                 //返回了当前视图

                 return this;

             },

             destroy: function () {

                 this.model.destroy();

             },

             remove: function () {

                 $(this.el).remove();

             }

         });

         var AppView = Backbone.View.extend({

             el: $('body'),

             events: {

                 'click #add': 'save'

             },

             initialize: function () {

                 this.name = this.$('#name');

                 this.phone = this.$('#phone');

                 this.list = this.$('#contact-list');

                 _.bindAll(this, 'render', 'add', 'loadList', 'save');

                 //为集合绑定事件

                 list.bind('add', this.add);

                 //添加修改时触发

                 list.bind('refresh', this.loadList);

                 list.fetch();

             },

             //添加项目

             add: function (model) {

                 var view = new ContactView({ model: model });

                 this.list.append(view.render().el);

                 //                view.model.save({ name: model.name, phone: model.phone });

                 var s = '';

             },

             loadList: function () {

                 list.each(this.add);

             },

             save: function () {

                 var name = this.name.val();

                 var phone = this.phone.val();

                 list.create({ name: name, phone: phone });

                 this.name.val('');

                 this.phone.val('');

             }

         });

         var app = new AppView();

     })(jQuery);

 </script>

 </html>
带删除功能的通讯录

阶段总结
我们又简单的回顾了下backbone,这次学习后我和我的小伙伴表示都懂了。。。。
整合requireJS
先上个图:
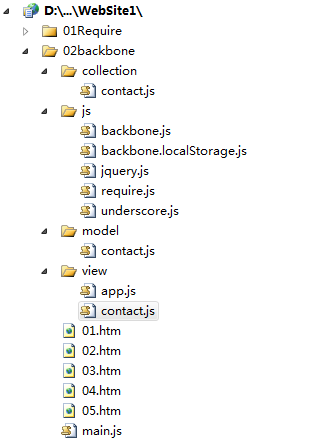
尼玛,一下多出了好多文件:
模型
define(function () {

    var Contact = Backbone.Model.extend({

        initialize: function () {

            this.bind("error", function (model, error) {

                alert(error);

            });

        },

        validate: function (attr) {

            if (attr.name.length == '') {

                return '姓名格式错误';

            }

        }

    });

    return Contact;

});
集合
define(['model/contact'], function (Contact) {

    var ContactList = Backbone.Collection.extend({

        model: Contact,

        localStorage: new Store('contacts') //所有信息保存至contacts空间下,注意此次用到了本地存储的东西

    });

    return ContactList;

});
contact视图
define(function () {

    var ContactView = Backbone.View.extend({

        tagName: 'li',

        template: _.template('<div><%= name %>:<%= phone %><a href="javascript:;" class="delete">[删除]</a></div>'),

        events: {

            'click .delete': 'destroy'

        },

        initialize: function () {

            _.bindAll(this, 'render', 'remove');

            this.model.bind('change', this.render);

            this.model.bind('destroy', this.remove);

        },

        render: function () {

            var html = this.template(this.model.toJSON());

            //this.el是生成的空div

            $(this.el).html(html);

            //返回了当前视图

            return this;

        },

        destroy: function () {

            this.model.destroy();

        },

        remove: function () {

            $(this.el).remove();

        }

    });

    return ContactView;

});
全局视图
define(['collection/contact', 'view/contact'], function (contact, ContactView) {

    window.list = new contact();

    var AppView = Backbone.View.extend({

        el: $('body'),

        events: {

            'click #add': 'save'

        },

        initialize: function () {

            this.name = this.$('#name');

            this.phone = this.$('#phone');

            this.list = this.$('#contact-list');

            _.bindAll(this, 'render', 'add', 'loadList', 'save');

            //为集合绑定事件

            list.bind('add', this.add);

            //添加修改时触发

            list.bind('refresh', this.loadList);

            list.fetch();

        },

        //添加项目

        add: function (model) {

            var view = new ContactView({ model: model });

            this.list.append(view.render().el);

            //                view.model.save({ name: model.name, phone: model.phone });

            var s = '';

        },

        loadList: function () {

            list.each(this.add);

        },

        save: function () {

            var name = this.name.val();

            var phone = this.phone.val();

            list.create({ name: name, phone: phone });

            this.name.val('');

            this.phone.val('');

        }

    });

    return AppView;

});
main函数
require.config({

    paths: {

        jquery: 'js/jquery',

        underscore: 'js/underscore',

        backbone: 'js/backbone',

        bl: 'js/backbone.localStorage'

    }

});

require(['jquery', 'underscore', 'backbone', 'bl', 'model/contact', 'collection/contact', 'view/contact', 'view/app'],

function ($, _, b, bl, model, collection, view, app) {

    var app = new app();

});
HTML页面
<html xmlns="http://www.w3.org/1999/xhtml">

<head>

    <title></title>

</head>

<body>

    <div id="contactapp">

        <header>

            <h1>

                通讯录</h1>

        </header>

        <section id="main">

            <ul id="contact-list">

            </ul>

        </section>

        <div class="create">

            <label>

                姓名:<input type="text" id="name" /></label>

            <label>

                电话:<input type="text" id="phone" /></label>

            <input type="button" value="保存" id="add" />

        </div>

    </div>

</body>

<script src="js/require.js" data-main="main" type="text/javascript"></script>

</html>
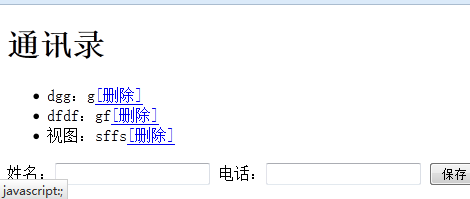
于是,我们功能完成了:
结语
我和我的小伙伴说,尼玛终于搞完了。。。。。。
RequireJS与Backbone简单整合的更多相关文章
- ckeditor与ckfinder简单整合使用
Ckeditor与ckfinder简单整合使用 功能:主要用来发送图文的email,图片上传到本地服务器,但是email的图片地址要写上该服务器的远程地址(图片地址:例如:http://www.bai ...
- SpringMVC入门二: 1规范结构, 2简单整合MyBatis
昨天拿springMVC写的helloworld结构不好, 这次先调整一下体系结构 , 然后简单整合一下MyBatis spring的配置还是以注解为主, 不过MyBatis的映射文件什么的还是拿xm ...
- spring+springMVC+mybatis简单整合
spring+springMVC+mybatis简单整合, springMVC框架是spring的子项目,所以框架的整合方式为,spring+Mybatis或springMVC+mybatis. 三大 ...
- Centos6.7配置Nginx+Tomcat简单整合
系统环境:Centos 6.7 软件环境:JDK-1.8.0_65.Nginx-1.10.3.Tomcat-8.5.8 文档环境:/opt/app/ 存放软件目录,至于mkdir创建文件就不用再说了 ...
- spring-boot-redis-cluster简单整合例子
代码地址如下:http://www.demodashi.com/demo/13184.html 一.前言 spring-boot项目整合redis很常见,Redis 一般上生产的时候都是以集群模式部署 ...
- springmvc+spring3+hibernate4框架简单整合,简单实现增删改查功能
转自:https://blog.csdn.net/thinkingcao/article/details/52472252 C 所用到的jar包 数据库表 数据库表就不用教大家了,一张表,很简 ...
- RabbitMQ(三):RabbitMQ与Spring Boot简单整合
RabbitMQ是目前非常热门的一款消息中间件,不管是互联网大厂还是中小企业都在大量使用.Spring Boot的兴起,极大地简化了Spring的开发,本文将使用Spring Boot与RabbitM ...
- 【spring boot】SpringBoot初学(8)– 简单整合redis
前言 到目前为止,把项目中需要用到的:properties读取.数据源配置.整合mybatis/JdbcTemplate.AOP.WebService.redis.filter.interceptor ...
- SpringBoot简单整合redis
Jedis和Lettuce Lettuce 和 Jedis 的定位都是Redis的client,所以他们当然可以直接连接redis server. Jedis在实现上是直接连接的redis serve ...
随机推荐
- 正定矩阵(positive definite matrix)
设M是n阶方阵,如果对任何非零向量z,都有zTMz> 0,其中zT 表示z的转置,就称M正定矩阵. 正定矩阵在合同变换下可化为标准型, 即对角矩阵. 所有特征值大于零的对称矩阵也是正定矩阵. ...
- Android Studio中获取SHA1或MD5的方法
原来在Eclipse中获取SHA1或者MD5,在IDE界面上就可以查找到. 切换到Android Studio后,如何查看呢?找了半天没找到.那就老办法命令行. 第一步.打开Android Studi ...
- 利用DNS Zone Transfers漏洞工具dnswalk
利用DNS Zone Transfers漏洞工具dnswalk DNS Zone Transfers(DNS区域传输)是指一台备用服务器使用来自主服务器的数据刷新自己的域(zone)数据库.当主服 ...
- 转:WaitForSingleObject()函数、WaitForMultipleObject()函数
http://blog.csdn.net/xiaobai1593/article/details/6672193 在多线程下面,有时候我们会希望等待某一线程完成了再继续做其他事情,要实现这个目的,可以 ...
- 螺旋方阵(4x4)(java实现)
代码如下: public class N { public static void main(String[] args) { final int N=4; int a[][]=new int[N][ ...
- T-SQL Recipes之Dynamic PIVOT and UNPIVOT
PIVOT PIVOT在行转列的时候经常用到,最便捷的方式就是通过示例来理解它的作用. 示例1 Query to Return Select Product Data from AdventureWo ...
- 20161023 NOIP 模拟赛 T2 解题报告
Task 2.回文串计数 (calc.pas/calc.c/calc.cpp) [题目描述] 虽然是一名理科生,Mcx常常声称自己是一名真正的文科生.不知为何,他对于背诵总有一种莫名的热爱,这也促使他 ...
- ES6中的const命令【转】
1.const声明一个只读常量,一旦声明,常量的值就不能改变 1 const PI=3.1415; 2 console.log(PI);//3.1415 3 4 PI=3;//Uncaught Typ ...
- Torch7学习笔记(三)Sequencialization
1.序列化 Torch提供4种高级方法来序列化或者反序列化任意Lua/Torch对象.这些方法都是从File对象抽象出来的,为了方便操作而创建. 前两种方法用来从文件序列化或者反序列化的: torch ...
- centos7 解决ftp和apache运行目录权限冲突问题
1.将ftp用户加入到apache用户组 usermod -a -G apache ftpadmin ftpadmin 为ftp用户 2.设置网站根目录/var/www的所有组为apache chow ...