
Spring学习(三)——@PropertySource,@ImportResource,@Bean注解
@PropertySource注解是将配置文件中 的值赋值给POJO
项目结构如下
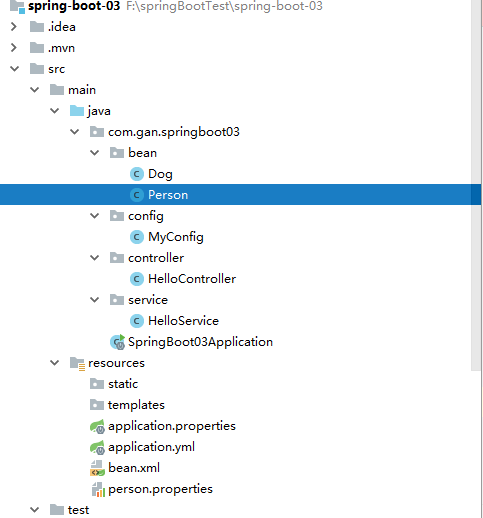
一.创建一个Person.Java文件:
import org.springframework.boot.context.properties.ConfigurationProperties;

import org.springframework.context.annotation.PropertySource;

import org.springframework.stereotype.Component;

import org.springframework.validation.annotation.Validated;

import javax.validation.constraints.Email;

import java.util.List;

import java.util.Map;

@Component

@ConfigurationProperties(prefix = "person")   //将全局配置文件(application.properties或者application.yml中的person)赋值给该bean
//下面这个注解的作用获取配置文件中的值,可以加载多个配置文件,放在{}里面,classpath表示类路径

@PropertySource(value={"classpath:person.properties"})

@Validated    //表明这个类中的数据赋值要进行数据效验

public class Person {

    private String lastName;

    private Integer age;

    private Boolean boss;

    private Map<String,Object> maps;

    private List<String> lists;

    public Map<String, Object> getMaps() {

        return maps;

    }

    public void setMaps(Map<String, Object> maps) {

        this.maps = maps;

    }

    public List<String> getLists() {

        return lists;

    }

    public void setLists(List<String> lists) {

        this.lists = lists;

    }

    public Dog getDog() {

        return dog;

    }

    public void setDog(Dog dog) {

        this.dog = dog;

    }

    private Dog dog;

    @Override

    public String toString() {

        return "Person{" +

                "lastName='" + lastName + '\'' +

                ", age=" + age +

                ", boss=" + boss +

                ", maps=" + maps +

                ", lists=" + lists +

                ", dog=" + dog +

                '}';

    }

    public String getLastName() {

        return lastName;

    }

    public void setLastName(String lastName) {

        this.lastName = lastName;

    }

    public Integer getAge() {

        return age;

    }

    public void setAge(Integer age) {

        this.age = age;

    }

    public Boolean getBoss() {

        return boss;

    }

    public void setBoss(Boolean boss) {

        this.boss = boss;

    }

}
dog类的如下:
package com.gan.springboot03.bean;

public class Dog {

    private String name;

    private Integer age;

    @Override

    public String toString() {

        return "Dog{" +

                "name='" + name + '\'' +

                ", age=" + age +

                '}';

    }

    public String getName() {

        return name;

    }

    public void setName(String name) {

        this.name = name;

    }

    public Integer getAge() {

        return age;

    }

    public void setAge(Integer age) {

        this.age = age;

    }

}
创建一个person.properties文件,该文件的作用是给Person赋值
person.lastName=张三

person.age=12

person.birth=2017/2/2

persion.boss=true

person.maps.k1=v1

person.maps.k2=12

person.dog.name=dog

person.dog.age=15
在测试类中测试有没有获取到Person的值
package com.gan.springboot03;

import com.gan.springboot03.bean.Person;

import org.junit.jupiter.api.Test;

import org.springframework.beans.factory.annotation.Autowired;

import org.springframework.boot.test.context.SpringBootTest;

import org.springframework.context.ApplicationContext;

import org.springframework.test.context.junit4.SpringRunner;

@SpringBootTest

public class SpringBoot03ApplicationTests {

    @Autowired

    public Person person;

    @Test

    public void contextLoads() {

        System.out.println(person);

    }

}
测试结果如下

@@ImportResource注解是获取bean.xml配置文件
一般情况下,都是在applicationContext中配置bean组件,例如
在service包下创建一个HelloService类,类中的代码如下:
package com.gan.springboot03.service;

public class HelloService {

}
创建一个配置文件用来把HelloService组件放入spring容器中
<?xml version="1.0" encoding="UTF-8"?>

<beans xmlns="http://www.springframework.org/schema/beans"

       xmlns:xsi="http://www.w3.org/2001/XMLSchema-instance"

       xsi:schemaLocation="http://www.springframework.org/schema/beans http://www.springframework.org/schema/beans/spring-beans.xsd">

    <bean id="helloService" class="com.gan.springboot03.service.HelloService"></bean>

</beans>
在核心类中,引入该配置文件
/**

 * @improtResource注解也可以加入多个配置文件,不过在开发中写一个配置文件再配置,很麻烦

 * springboot推荐使用组件,既创建一个配置类

 */

@ImportResource(locations = {"classpath:bean.xml"})

@SpringBootApplication

public class SpringBoot03Application {

    public static void main(String[] args) {

        SpringApplication.run(SpringBoot03Application.class, args);

    }

}
在测试类中测试
package com.gan.springboot03;

import com.gan.springboot03.bean.Person;

import org.junit.jupiter.api.Test;

import org.springframework.beans.factory.annotation.Autowired;

import org.springframework.boot.test.context.SpringBootTest;

import org.springframework.context.ApplicationContext;

import org.springframework.test.context.junit4.SpringRunner;

@SpringBootTest

public class SpringBoot03ApplicationTests {

    @Autowired

    ApplicationContext ioc;

    /**

     * 该方法是用来判断@importSource注解,该注解的作用是导入Spring里的配置文件

     * 一般是加载在主配置类上,既启动类上

     */

    @Test

    public void helloService(){

        //判断是否含有helloService这个bean

        Boolean b=ioc.containsBean("helloService");

        System.out.println(b);

    }
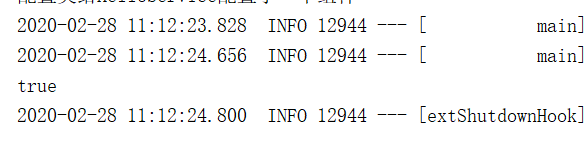
测试结果如下,返回true
@Bean注解是为了解决每创建一个bean,就创建一个Bean配置文件,再使用注解将配置文件引入到核心类中
再config包中创建一个类MyConfig,
package com.gan.springboot03.config;

import com.gan.springboot03.service.HelloService;

import org.springframework.context.annotation.Bean;

import org.springframework.context.annotation.Configuration;

/**

 * 配置类,用来加载Spring里面的配置文件

 * Configuration注解表明这是一个配置类

 */

@Configuration

public class MyConfig {

    /**

     * @Bean注解将方法的返回值添加到容器中,容器中这个组件默认的id就是方法名

     * @return

     */

    @Bean

    public HelloService helloService(){

        System.out.println("配置类给HelloService配置了一个组件");

        return new HelloService();

    }

}
核心类配置 如下:注解掉引入配置文件的那行代码
package com.gan.springboot03;

import org.springframework.boot.SpringApplication;

import org.springframework.boot.autoconfigure.SpringBootApplication;

import org.springframework.context.annotation.ImportResource;

/**

 * @improtResource注解也可以加入多个配置文件,不过在开发中写一个配置文件再配置,很麻烦

 * springboot推荐使用组件,既创建一个配置类

 */

//@ImportResource(locations = {"classpath:bean.xml"})

@SpringBootApplication

public class SpringBoot03Application {

    public static void main(String[] args) {

        SpringApplication.run(SpringBoot03Application.class, args);

    }

}
测试类如下:
package com.gan.springboot03;

import com.gan.springboot03.bean.Person;

import org.junit.jupiter.api.Test;

import org.springframework.beans.factory.annotation.Autowired;

import org.springframework.boot.test.context.SpringBootTest;

import org.springframework.context.ApplicationContext;

import org.springframework.test.context.junit4.SpringRunner;

@SpringBootTest

public class SpringBoot03ApplicationTests {

    @Autowired

    ApplicationContext ioc;

    /**

     * 该方法是用来判断@importSource注解,该注解的作用是导入Spring里的配置文件

     * 一般是加载在主配置类上,既启动类上

     */

    @Test

    public void helloService(){

        //判断是否含有helloService这个bean

        Boolean b=ioc.containsBean("helloService");

        System.out.println(b);

    }

}
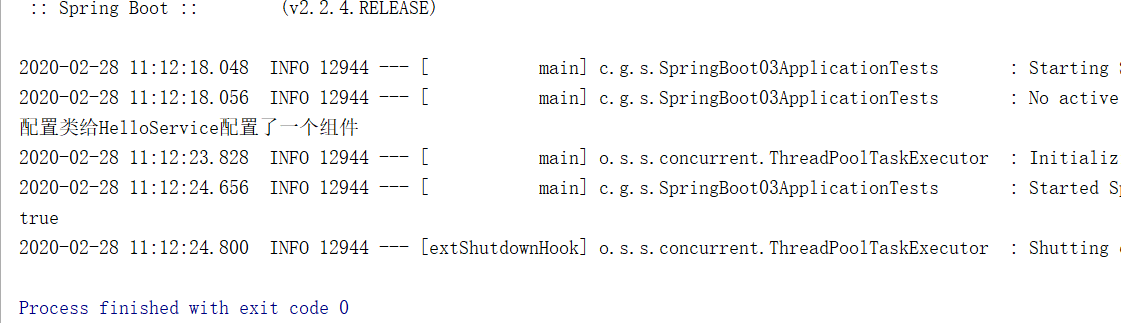
测试结果如下:返回一个true
Spring学习(三)——@PropertySource,@ImportResource,@Bean注解的更多相关文章
- Spring中三种配置Bean的方式
Spring中三种配置Bean的方式分别是: 基于XML的配置方式 基于注解的配置方式 基于Java类的配置方式 一.基于XML的配置 这个很简单,所以如何使用就略掉. 二.基于注解的配置 Sprin ...
- Spring学习笔记之依赖的注解(2)
Spring学习笔记之依赖的注解(2) 1.0 注解,不能单独存在,是Java中的一种类型 1.1 写注解 1.2 注解反射 2.0 spring的注解 spring的 @Controller@Com ...
- (转)Spring的三种实例化Bean的方式
http://blog.csdn.net/yerenyuan_pku/article/details/52832793 Spring提供了三种实例化Bean的方式. 使用类构造器实例化. <be ...
- Spring boot @PropertySource, @ImportResource, @Bean
@PropertySource:加载指定的配置文件 /** * 将配置文件中配置的每一个属性的值,映射到这个组件中 * @ConfigurationProperties:告诉SpringBoot将本类 ...
- Spring基础学习(三)—详解Bean(下)
一.Bean的生命周期 1.概述 Spring IOC容器可以管理Bean的生命周期,Spring 允许在Bean的生命周期的特定点执行定制的任务. Spring IOC容器对Be ...
- Spring学习(5)---Bean的定义及作用域的注解实现
Bean管理的注解实现 Classpath扫描与组件管理 类的自动检测与注册Bean <context:annotation-config/> @Component,@Repository ...
- Spring学习(七)bean装配详解之 【通过注解装配 Bean】【自动装配的歧义解决】
自动装配 1.歧义性 我们知道用@Autowired可以对bean进行注入(按照type注入),但如果有两个相同类型的bean在IOC容器中注册了,要怎么去区分对哪一个Bean进行注入呢? 如下情况, ...
- Spring学习(六)bean装配详解之 【通过注解装配 Bean】【基础配置方式】
通过注解装配 Bean 1.前言 优势 1.可以减少 XML 的配置,当配置项多的时候,XML配置过多会导致项目臃肿难以维护 2.功能更加强大,既能实现 XML 的功能,也提供了自动装配的功能,采用了 ...
- spring学习笔记 星球日two - 注解方式配置bean
注解要放在要注解的对象的上方 @Autowired private Category category; <?xml version="1.0" encoding=" ...
随机推荐
- Eclipse创建一个普通maven项目详细步骤
首先找到Eclipse最顶部左边的File,new一个 Maven Project项目 下一步,勾选第二个即可 下一步,选择 maven-archetype-webapp Group Id 写域名倒 ...
- 吴裕雄--天生自然JAVA数据库编程:使用JDBC连接ORACLE数据库
DROP TABLE person ; DROP SEQUENCE myseq ; CREATE SEQUENCE myseq ; CREATE TABLE person ( id INT PRIMA ...
- 学习Linux让我进入了知名企业
说起我学习Linux的原因是多方面的,大学时我学的是物理学师范专业,有部分计算机课程,但我觉得这些课程没什么实际作用,我自己对计算机比较感兴趣,我利用业余时间学习了很多计算机技术.在大学期间我参加了很 ...
- 【Winform】ProgressBar
var progressBar1 = new System.Windows.Forms.ProgressBar(); ; progressBar1.Maximum = ; progressBar1.V ...
- HTML速写
1. E 代表HTML标签. 2. E#id 代表id属性. 3. E.class 代表class属性. 4. E[attr=foo] 代表某一个特定属性. 5. E{foo} 代表标签包含的内容是f ...
- other#docker
阿里云docker镜像加速地址:https://cr.console.aliyun.com/#/accelerator docker 安装: yum install -y yum-utils devi ...
- 安装mysql server5.5 到start service未响应解决方法
打开C盘,然后修改 "组织" => "查看"(如下图) 里面的 "隐藏受保护的操作系统文件" (系统这是会弹出警告,不 ...
- Nifi简介及核心概念整理
简介 Apache NiFi 是一个易于使用.功能强大而且可靠的数据拉取.数据处理和分发系统,用于自动化管理系统间的数据流. 它支持高度可配置的指示图的数据路由.转换和系统中介逻辑,支持从多种数据源动 ...
- java格式化代码(java格式化代码工具类)
下别人的原来链接..... 支持效果不好要想格式化好需要解析语法树 7个积分我这里免费下 转自 https://download.csdn.net/download/jkl012789/ ...
- Docker 搭建开源 CMDB平台 “OpsManage” 之 Mariadb
整理了一下文档 今天来构建mariadb 主机还是 centos 172.16.0.200 构建第二个images 直接shell.sh 完成 #!/bin/bash echo " ...