
Linux开机LOGO更换以及附带问题
应用层更换Linux机器开机启动LOGO
平台开机Logo默认是编译进内核的,更换起来很不方便,通过改写内核源码,可以实现应用层直接更换内核Logo。
1.uboot相关修改
网上教程一般会这么改

"loadlogo=mmc read 0x15000000 0x5800 0x2800;\0" \

"run loadlogo; " \
核心代码是mmc read 0x15000000 0x5800 0x2800;这个命令的作用是从MMC或SD卡的第22528(0x5800)个扇区开始,读取10240(0x2800)个扇区的数据,并将这些数据存储到内存地址0x15000000处。这种操作通常用于将存储设备上的数据加载到内存中,以便进行进一步的处理或执行。目的是将图片文件放到0x15000000处,用于后面logo.c文件中使用。
但经过实践发现,这么改会存在"run loadlogo; "未执行的情况,从而导致LOGO更换不上。
故选择将最后一段改成:"else run netboot; fi; mmc read 0x15000000 0x5800 0x2800;" 解决。(可能还需要手动进uboot命令行,将bootcmd重置成默认)
2.kernel内核文件修改
修改drivers/video/logo/Kconfig文件
在最后新加一个LOGO_LINUX_CUSTOM_CLUT224的配置选项:
/* 在如下配置 */

config  LOGO_LINUX_CUSTOM_CLUT224

    bool "Custom 224-color linux logo"

    default y

endif # LOGO
修改drivers/video/logo/logo.c文件
到这一步可以有两种修改办法,这取决于后续LOGO图片是怎么处理的
首先在头部增加如下代码
/* logo's are marked __initdata. Use __init_refok to tell

 * modpost that it is intended that this function uses data

 * marked __initdata.

 */

#ifdef CONFIG_LOGO_LINUX_CUSTOM_CLUT224  //新增

#define IMAGE_HEAD_SIZE    	54

#define IMAGE_MAX_PIXEL    	2048000

#define IMAGE_MAX_SIZE (IMAGE_HEAD_SIZE+IMAGE_MAX_PIXEL+1024)

#define COLOR_MAX_NUM    	224        	/* linux logo just support 224 colors     		*/

#define IMAGE_MTD_NUM    	4        	/* the logo saved in MTD4 						*/

#define IMAGE_OFFSET    	0x0			/* the logo's offset int the mtd area     		*/

volatile static unsigned char* remapped_area;

static unsigned char logo_flash_clut224_data[IMAGE_MAX_PIXEL] __initdata = {0};

static unsigned char logo_flash_clut224_clut[COLOR_MAX_NUM * 3] __initdata = {0};

static struct linux_logo logo_flash_clut224 __initdata =

{

	.type      = LINUX_LOGO_CLUT224,

	.width     = 0,

	.height    = 0,

	.clutsize  = 0,

	.clut      = logo_flash_clut224_clut,

	.data      = logo_flash_clut224_data,

};

#endif

const struct linux_logo * __init_refok fb_find_logo(int depth)

{

	const struct linux_logo *logo = NULL;

	if (nologo)...
后续分成:LINUX上处理图片和WINDOWS上处理图片
如果图片在Linux上处理,在if (depth >= 8)做如下修改:
if (depth >= 8)

	{

#ifdef CONFIG_LOGO_LINUX_CUSTOM_CLUT224

		unsigned char head[60] = {0};

		unsigned char *image = NULL;

		unsigned char *clut = NULL;

		unsigned char *data = NULL;

		int clutsize = 0;

		int size      = 0;

		int offset    = 0;

		int width     = 0;

		int height    = 0;

		int count     = 0;

		int compress  = 0;

		int sizeimage = 0;

		int clrused   = 0;

		int i  = 0;

		int j  = 0;

		int fi = 0;

		int li = 0;

		unsigned int real_width = 0;

		unsigned int logo_index = 0;

		remapped_area = __phys_to_virt(0x15000000);

		memcpy(head, remapped_area, 58);

		printk("image head:%c%c\n", head[0], head[1]);

		if(head[0] == 'K' && head[1] == 'I'&& head[2] == 'K')

		{

			printk("right ppm image head");

			memcpy( &logo_flash_clut224.width, remapped_area+3, 4);

			memcpy( &logo_flash_clut224.height, remapped_area + 4+3, 4);

			memcpy( &logo_flash_clut224.clutsize, remapped_area + 8+3, 4);

			memcpy( logo_flash_clut224.data, remapped_area + 15, logo_flash_clut224.width * logo_flash_clut224.height);

			memcpy( logo_flash_clut224.clut, remapped_area + 15 + (logo_flash_clut224.width * logo_flash_clut224.height), logo_flash_clut224.clutsize * 3);

			logo=&logo_flash_clut224;

		}

		else

		{

#ifdef CONFIG_LOGO_LINUX_CLUT224

			printk("LINUX_clut224\n");

			logo = &logo_linux_clut224;

#endif

		}

#endif
如果选择在Windows上处理LOGO图片,代码改成
#ifdef CONFIG_LOGO_LINUX_CUSTOM_CLUT224

		unsigned char head[60] = {0};

		unsigned char *image = NULL;

		unsigned char *clut = NULL;

		unsigned char *data = NULL;

		int clutsize = 0;

		int size      = 0;

		int offset    = 0;

		int width     = 0;

		int height    = 0;

		int count     = 0;

		int compress  = 0;

		int sizeimage = 0;

		int clrused   = 0;

		int i  = 0;

		int j  = 0;

		int fi = 0;

		int li = 0;

		unsigned int real_width = 0;

		unsigned int logo_index = 0;

		remapped_area = __phys_to_virt(0x15000000);

		memcpy(head, remapped_area, 58);

		printk(" %s-%d:right image head:%c%c\n", __FILE__, __LINE__, head[0], head[1]);

		if(1)

		{

			printk("right ppm image head");

			memcpy( &logo_flash_clut224.width, remapped_area+4, 4);

			memcpy( &logo_flash_clut224.height, remapped_area + 8, 4);

			memcpy( &logo_flash_clut224.clutsize, remapped_area + 12, 4);

			memcpy( logo_flash_clut224.data, remapped_area + 16, logo_flash_clut224.width * logo_flash_clut224.height);

			memcpy( logo_flash_clut224.clut, remapped_area + 16 + (logo_flash_clut224.width * logo_flash_clut224.height), logo_flash_clut224.clutsize * 3);

			logo=&logo_flash_clut224;

		}

		else

		{

#ifdef CONFIG_LOGO_LINUX_CLUT224

			printk("LINUX_clut224\n");

			logo = &logo_linux_clut224;

#endif

		}

#endif
没错,就是因为后续图片格式会有所不一样,读取图片信息的方式也不同。
之后在然后重新编译内核。配置内核时,需要去掉logo路径下的其它选项,只保留Custom 224-color linux logo这一个选项。

3.LOGO图片修改
因为Logo图片中所使用的颜色数不能超过224种,如果超过将无法正常显示,因此我们需要制作符合要求的图像。
Linux环境下制作:
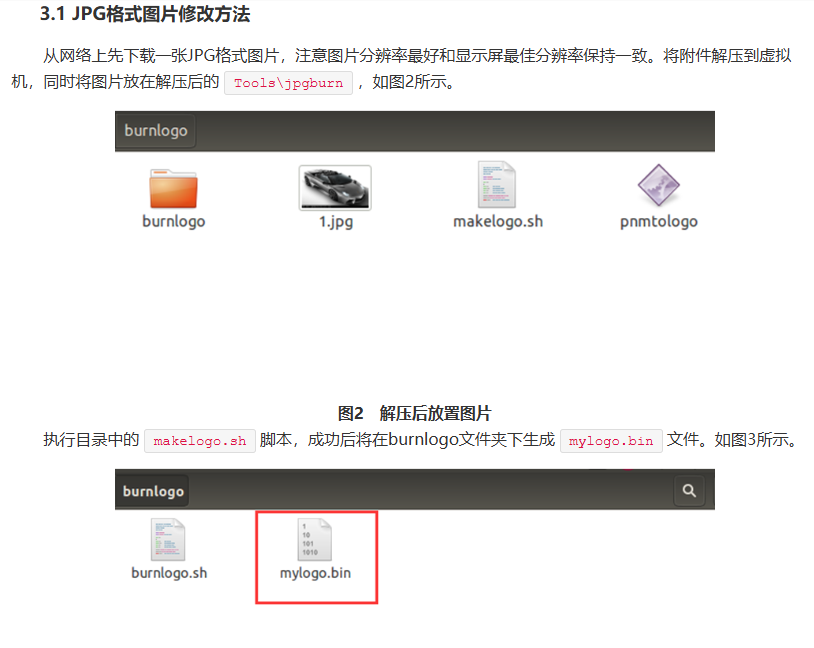
先下载附件res

Windows环境下制作:方法是我自己寻找制作的,因为有这种需求,安装包放在云盘中
链接:https://pan.baidu.com/s/1Yn7BtTh4GtVqoS-cc2nU8Q?pwd=1234
提取码:1234
按照文件中readme.txt一步步执行即可
两者都是为了把图片制作成mylogo.bin提供给logo.c解读,使LOGO修改生效
你用哪种方式,上述logo.c就改成哪种就行。
4.去除linux的开机光标
光标会导致LOGO图片显示时,左上角有黑块,方法如下:
在内核的当前目录进入到drivers/video/console/fbcon.c文件
将static void fb_flashcursor(void *private) 和 static void fbcon_cursor(struct vc_data *vc, int mode) 里的内容注释掉,使之变成空函数
我的建议是在这两个函数开头直接return;就行
参考连接:
如何修改 ARM Linux 系统的启动画面
去除linux的开机光标
应用层更换内核启动logo
Linux开机LOGO更换以及附带问题的更多相关文章
- Linux 开机 logo 修改
从内核被解压到文件系统被挂载,我们看到的经典画面是一个小企鹅.如果嫌小企鹅枯燥,我们可以把它换掉. 1. 准备图片 这里需要的是 ppm 图片,所以,我们需要把常见格式给转换为 .ppm 才能使用.c ...
- 八、启动linux内核并修改开机logo
1. 编译并烧写linux内核 1)先准备好内核源码包urbetter-linux2.6.28-v1.0.tgz,输入命令:tar -zxvf urbetter-linux2.6.28-v1.0.tg ...
- linux内核开机logo显示调试
要使内核支持开机logo显示需要配置内核 配置如下: make menuconfig: Device Drivers ---> Graphics support ---> ...
- 小白自制Linux开发板 九. 修改开机Logo
许久不见啊,今天我们继续来修改我们的系统. 通过前面的几篇文章我们已经能轻松驾驭我们的开发板了,但是现在都是追求个性化的时代,我们在开发板上打上了自己的Logo,那我们是否可以改变开机启动的Logo呢 ...
- Android5.1开机LOGO与开机动画【转】
本文转载自:http://blog.csdn.net/u014770862/article/details/52624627 android5.1中,开机LOGO部分和之前版本的并不相同,主要区别在于 ...
- 全网络最正确的让 Linux 开机进入字符界面的方法及设置 FrameBuffer 分辨率的方法
引言 这个标题有点长,是为了在标题中就把问题说清楚,以便搜索引擎能够把有需要的朋友准确地带到我这里来.目前在网络上,很多关于 Linux 方面的知识是过时的和错误的.我标题中指出的两个知识点就是其中的 ...
- 因为强行关机, 而导致的fedora23 不能重新启动, 卡在开机logo那里的 修复 解决方案
其实, fedora23的U盘live 也很好用, 很流畅, 主要还是 要用一个比较好的/快的 U盘. 这样live U盘在4GB(3.75GiB)的内存中还是较快的 原来的U盘live系统用得很卡, ...
- 开机logo以及两种修改开机动画方法
Android开机画面总共有三屏 一.第一屏:开机logo 1.选张png格式的图片,在Linux任意下执行(安装工具): sudo apt-get install pnmtoplainpm 2.在所 ...
- 安卓开机logo和开机动画的几种实现方法
安卓4.2可用方法2-4,第一种方法未验证. 从理论上来说,android 有4个开机启动画面. 第一个应该是U-BOOT的启动画面,有些设备为了满足按动电源即有显示,在UBOOT里加了开机画面,实现 ...
- 安卓修改开机logo和开机动画的方法
第一种和第二种方法亲测可用,安卓版本是4.2和安卓5.1均可.第二种方法待验证 以下三种方法 Android 开机其实总共会出现3个画面: 1.第一个就是 linux 系统启动,出现Linux小企鹅画 ...
随机推荐
- Python 中的抽象类和接口类
[抽象类] 抽象类是一个特殊的类,只能被继承,不能被实例化.它主要用于作为其他类的基类或模板. 抽象类可以包含抽象方法和具体方法.在抽象类中定义的抽象方法必须在子类中进行实现. from abc im ...
- 好未来:多云环境下基于 JuiceFS 建设低运维模型仓库
好未来,前身学而思,于 2010 年在美国纽约证券交易所上市.公司积极将大模型研究应用于教学产品中,近期推出了数学领域的千亿级大模型. 在大模型的背景下,存储系统需处理巨量数据和复杂文件操作,要求支持 ...
- ABP 接口访问变慢,缓存清理,请求超时
发布后过一个小时或者不久访问过慢 第一次访问慢,第二次访问变快 总结 发布后IIS 访问 过慢的原因考虑,IIS回收.缓存清理.去host项目里面配置缓存过期时间再去试验
- 使用expected_conditions的url_changes方法判断是否登录成功
使用expected_conditions的url_changes方法判断是否跳转页面登录成功 from selenium import webdriver from selenium.webdriv ...
- php操作sqlite3
距离上次接触sqlite3已经快一年了,去年这篇文章讲跟着菜鸟教程学python操作sqlite3,https://www.cnblogs.com/lizhaoyao/p/13717381.html ...
- [转载]Redis之缓存穿透、缓存击穿、缓存雪崩及其解决方法
原文地址:https://mp.weixin.qq.com/s?__biz=MzU2MDY0NDQwNQ==&mid=2247483949&idx=1&sn=6c643858d ...
- manim边做边学--圆柱体
Cylinder是Manim中用于创建圆柱体对象的类. Cylinder类在制作数学.物理或工程领域的动画时,可用于以下的场景中: 演示几何概念:使用Cylinder类创建圆柱体,并通过改变其参数和方 ...
- Kafka 1.1.1 源码编译
下载源码 git clone -b 1.1.1 https://github.com/apache/kafka.git --depth=1 使用这样的方式下载主要是解决两个问题:其一,下载指定分支 ...
- 在不同形式的for循环中使用break、continue、return的效果
我们在循环中,经常会有跳出循环,跳出本次循环继续下次循环等的场景,今天我们简单分享下.主要使用到的关键字是,break.continue.return.先将结果总结: ①在foreach中不能使用br ...
- 远程连接利器:玩转MobaXterm
今天这篇文章轻松不烧脑,主要是想和大家分享一下我在工作中常用的远程管理工具--MobaXterm.这款工具不仅功能强大,而且在日常的远程操作中极为高效,特别适合用来管理远程服务器.MobaXterm结 ...