
SRS流媒体服务器搭建+ffmpeg推流VLC取流观看
一、编译SRS
https://github.com/winlinvip/simple-rtmp-server
目前有1.0-release、2.0、3.0等版本
2.0官方文档地址:https://github.com/winlinvip/simple-rtmp-server/wiki/v2_CN_Home
1.如果是新系统,先安装git
CentOS:yum -y install git- 1
2.源码下载:
git clone https://code.csdn.net/winlinvip/srs-csdn.git- 1
3.git操作
a.改变SRS分支
切换到1.0分支

git pull && git checkout 1.0release

切换到2.0分支

git pull && git checkout 2.0release- 1
- 2
- 3
- 4
我把源码下载到了/mnt目录,然后我们cd /mnt
b.查看当前分支
cd /mnt/srs-csdn;git branch- 1
c.改变到2.0分支
git pull && git checkout 2.0release- 1
4.编译安装
cd /mnt/srs-csdn/trunk- 1
./configure -h #查看编译时的帮助,里面有一些指定的参数是情况加减,官方文档
开始编译:
./configure --prefix=/usr/local/srs --with-ssl --with-hls --with-hds --with-dvr --with-nginx --with-http-callback --with-http-server --with-stream-caster --with-http-api --with-ffmpeg --with-transcode --with-ingest --with-stat --with-librtmp --with-research --with-utest --with-gperf --with-gprof

make;make install- 1
- 2
- 3
第三方应用启动:
sudo ./objs/nginx/sbin/nginx   --- 启动nginx   for hls

./objs/ffmpeg/bin/ffmpeg       ---ffmpeg

python ./research/api-server/server.py 8085 ---to start the api-server- 1
- 2
- 3
SRS启动
cd /mnt/srs-csdn/trunk

./objs/srs -c conf/srs.conf

ps -ef | grep srs

./srs -v- 1
- 2
- 3
- 4
到此为止,SRS已编译安装完成!
二、配置RTMP
1.RTMP URL解释:
rtmp://HOST:PORT/app/stream_name

rtmp: 协议头

HOST:注意的IP地址或域名

app: 应用名称

stream_name:流名称- 1
- 2
- 3
- 4
- 5
2.SRS中RTMP配置信息
文件目录:/mnt/srs-csdn/trunk/conf/rtmp.conf
配置内容:
listen              1935;

pid                 ./objs/srs.pid;

chunk_size          60000;

ff_log_dir          ./objs;

srs_log_tank        file;

#配置日志答应到文件,需要和srs_log_level配合使用

srs_log_level       trace;

#制定配置文件的级别,默认级别是trace

srs_log_file        ./objs/srs.log;

#制定日志文件的位置。

max_connections     1000;

#最大连接数

daemon              on;

#以daemon的方式启动,如果要启动在console,那么需要配置daemon off;并且,需要配置srs_log_tank console;

utc_time            off;

#是否使用utc时间。如果该值为off则使用本地时间,如果开始使用utc时间。

vhost __defaultVhost__ {

#默认的vhost,在没有指明vhost的情况,默认使用这个vhost。

}- 1
- 2
- 3
- 4
- 5
- 6
- 7
- 8
- 9
- 10
- 11
- 12
- 13
- 14
- 15
- 16
- 17
- 18
- 19
3.ffmpeg推流 VLC播放
ffmpeg可执行程序目录:/mnt/srs-csdn/trunk/objs/ffmpeg/bin/ffmpeg
推流:
cd /mnt/srs-csdn/trunk/objs/ffmpeg/bin

./ffmpeg -i "abc.avi" -vcodec libx264 -vprofile baseline -level 30 -g 60 -vb 800k -strict experimental -acodec aac -ab 96000 -ar 48000 -ac 2 -f flv rtmp://192.168.1.62:1935/live/zb- 1
- 2
VLC取流:
rtmp://192.168.1.62:1935/live/zb- 1
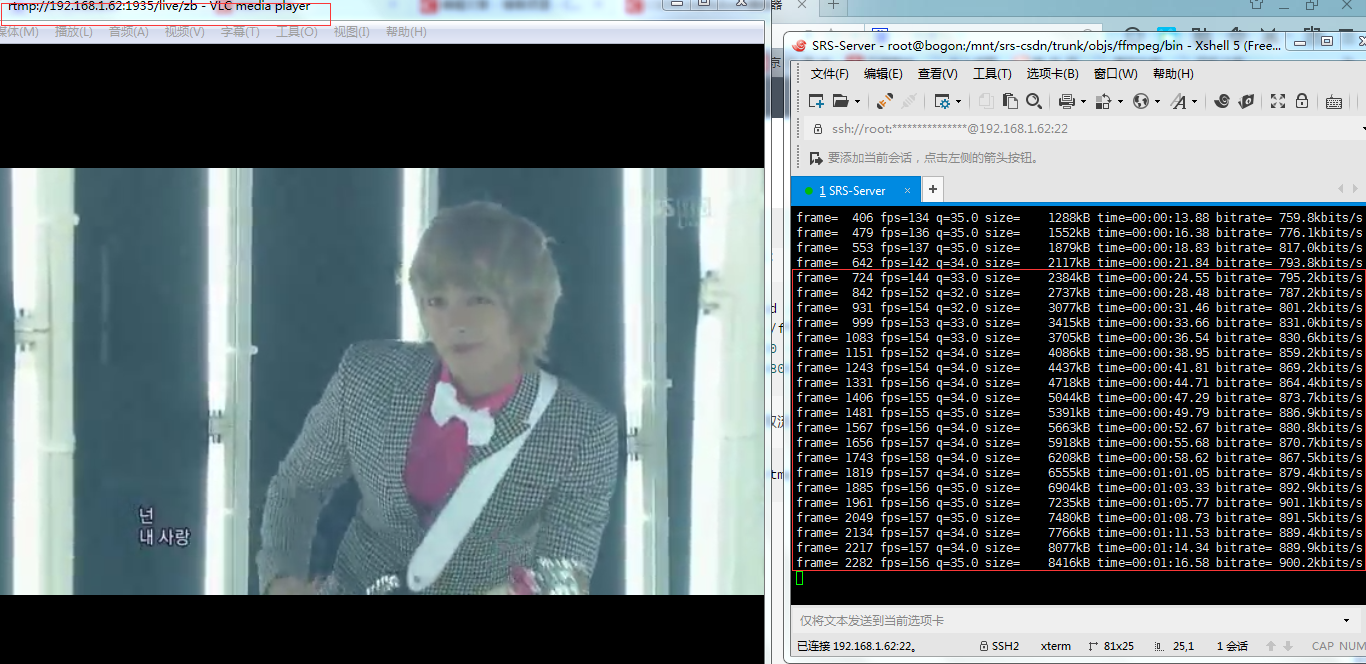
SRS服务器搭建,ffmpeg 本地推流,srs从本地拉流
|
1
2
3
4
5
6
7
8
9
10
11
12
13
14
15
|
参考: https://github.com/ossrs/srs/wiki/v2_CN_SampleFFMPEGgit clone https://github.com/ossrs/srscd srs/trunk./configuremakemake install./objs/srs -c conf/myconf.conf其中: ./configure --with-ffmpeg && make如果编译失败就去掉--with-ffmpeg,自己安装ffmpeg本地推流: ffmpeg -re -i /root/Videos/aaa.mp4 -c copy -f flv rtmp://192.168.2.125:1935/live/aaa |
配置文件myconf.conf:
|
1
2
3
4
5
6
7
8
9
10
11
12
13
14
15
16
17
18
19
20
21
22
23
24
25
26
27
28
29
30
31
32
33
34
35
36
37
38
39
40
41
42
43
|
# the config for srs use ffmpeg to transcode# @see https://github.com/ossrs/srs/wiki/v1_CN_SampleFFMPEG# @see full.conf for detail config.listen 1935;max_connections 1000;daemon off;srs_log_tank console;vhost __defaultVhost__ { transcode { enabled on; ffmpeg ./objs/ffmpeg/bin/ffmpeg; engine ff { enabled on; vfilter { } vcodec libx264; vthreads 4; vprofile main; vpreset medium; vparams { } acodec libfdk_aac; aparams { } output rtmp://127.0.0.1:[port]/[app]?vhost=[vhost]/[stream]_[engine]; } }#保存直播为flvdvr { # https://github.com/ossrs/srs/wiki/v2_CN_DVR enabled on; dvr_path ./objs/nginx/html/[app]/[stream].[timestamp].flv; dvr_plan session; dvr_duration 30; dvr_wait_keyframe on; time_jitter full; }} |
srs从本地拉流:
my.ingest.conf
|
1
2
3
4
5
6
7
8
9
10
11
12
13
14
15
16
17
18
19
|
listen 1935;max_connections 1000;daemon off;srs_log_tank console;vhost __defaultVhost__ { ingest livestream { enabled on; input { type file; url /root/Videos/zzzz.mp4; } ffmpeg /usr/local/bin/ffmpeg; engine { enabled off; output rtmp://127.0.0.1:1935/live/livestream; #rtmp://127.0.0.1:[port]/live?vhost=[vhost]/livestream; } }} |
关键是ffmpeg路径要是绝对的
SRS流媒体服务器搭建+ffmpeg推流VLC取流观看的更多相关文章
- 流媒体服务器搭建 ffmpeg + nginx
第一部分: mkdir ~/working 切换到~/working目录下 cd ~/working 获取nginx源码: wget http://nginx.org/download/nginx-1 ...
- Android视频直播:流媒体服务器搭建
一.前言 实时视频直播是这两年非常火的技术形态,已经渗透到教育.在线互娱等各种业务场景中.但要搭建一套实时视频直播系统,并非易事,下面针对直播系统的的搭建做一下说明: 1.1 通常的直播系统的技术模型 ...
- nginx-rtmp流媒体服务器搭建【转】
nginx-rtmp https://github.com/pengqiuyuan/nginx-rtmp nginx-rtmp 流媒体服务器的搭建(采集桌面,手机直播) 在线Demo,直播自己的pc机 ...
- 为SRS流媒体服务器添加HLS加密功能(附源码)
为SRS流媒体服务器添加HLS加密功能(附源码) 之前测试使用过nginx的HLS加密功能,会使用到一个叫做nginx-rtmp-module的插件,但此插件很久不更新了,网上搜索到一个中国制造的叫做 ...
- rtmp与hls流媒体服务器搭建:ubuntu下Nginx搭建初探与rtmp-module的添加
关键词:Nignx(http服务器):rtmp,hls(流媒体服务) 前言:感谢开源,感谢战斗民族.现在在做流媒体服务的一些工作,流媒体服务器搭建的网上教程多入牛毛,但是细细查看,发现很多同志贴上来的 ...
- 利用Nginx搭建RTMP视频直播,点播服务器,ffmpeg推流,回看
一.环境和工具 ubuntu 14.04 desktop 不用server的原因是一部分的演示用到了linux视频播放和直播软件,自己还要装桌面,麻烦. 不建议使用 最新的16TLS,我一开始 ...
- 流媒体服务器搭建 red5
简介 1. 流媒体指以流方式在网络中传送音频.视频和多媒体文件的媒体形式.相对于下载后观看的网络播放形式而言,流媒体的典型特征是把连续的音频和视频信息压缩后放到网络服务器上,用户边下载边观看,而不必等 ...
- windows server 2012 流媒体服务器搭建(直播与点播)
IIS Live Smooth Streaming(实时平滑流式处理)是微软下一代流媒体解决方案.该技术是在IIS web中集成媒体传输平台IIS media services,实现利用标准 HTTP ...
- SRS服务器搭建,ffmpeg 本地推流,srs从本地拉流
参考: https://github.com/ossrs/srs/wiki/v2_CN_SampleFFMPEG git clone https://github.com/ossrs/srs cd s ...
随机推荐
- Linker Scripts3--SECTIONS Command
1.前言 SECTIONS命令告诉链接器如何映射输入段到输出段以及在内存中如何放置输出段,SECTIONS命令的格式如下: SECTIONS { sections-command sections-c ...
- Suspend to RAM和Suspend to Idle分析,以及在HiKey上性能对比【转】
转自:https://www.cnblogs.com/arnoldlu/p/6253665.html 测试环境:AOSP 7.1.1+Kernel 4.4.17 HW:HiKey Ubuntu 14. ...
- NAND Flash底层原理,SLC MLC TLC比较【转】
转自:https://blog.csdn.net/qq_39560607/article/details/81714145 版权声明:请注明转载自Christa_RJ https://blog.csd ...
- Keepalived详解(四):通过vrrp_script实现对集群资源的监控【转】
一.通过vrrp_script实现对集群资源的监控: Keepalived基础HA功能时用到了vrrp_script这个模块,此模块专门用于对集群中服务资源进行监控.与此模块一起使用的还有track_ ...
- 转换简体中文和繁体中文 cconv-0.6.2 for win32 static
dos状态下 chcp 65001 echo "转换简体中文和繁体中文"|cconv -f utf-8 -t utf8-tw 显示 "轉換簡體中文和繁體中文" ...
- (并发编程)RLock(与死锁现象),Semaphore,Even事件,线程Queue
一.死锁现象与递归锁所谓死锁: 是指两个或两个以上的进程或线程在执行过程中,因争夺资源而造成的一种互相等待的现象,若无外力作用,它们都将无法推进下去.此时称系统处于死锁状态或系统产生了死锁,这些永远在 ...
- mysql select in 怎么优化
2017年7月10日 22:36:54 星期一 原理: 把select where in 变换成 "where = " 或者 "where between and &qu ...
- datatables日常使用集合
datatables CDN链接地址: <link rel="stylesheet" type="text/css" href="https:/ ...
- django.db.utils.OperationalError: (1049, "Unknown database 'djangodb'")
DATABASES = { 'default': { 'ENGINE':'django.db.backends.mysql', 'NAME': 'mysql', 'USER':'root', 'PAS ...
- android中的LaunchMode详解----四种加载模式
Activity有四种加载模式: standard singleTop singleTask singleInstance 配置加载模式的位置在AndroidManifest.xml文件中activi ...