C/C++与Matlab混合编程
Matlab 拥有丰富的功能,编程简单。不过,有些情况下,Matlab程序的执行速度比较慢。C/C++编译执行的程序速度比较快,编程难度上比Matlab要高一些。因此存在一种方案,就是使用Matlab实现我们的实验程序,用C/C++来实现Matlab程序中比较耗时的部分,从Matlab程序中调用C/C++的程序以实现加速。
Visual C++ 2015
1:配置环境
1.1:在vc++目录中
包含目录:(1):生成的mydll.h所在目录。
(2):matlab 内的include目录。
Include files
D:\Program Files\MATLAB\R2012a\extern\include
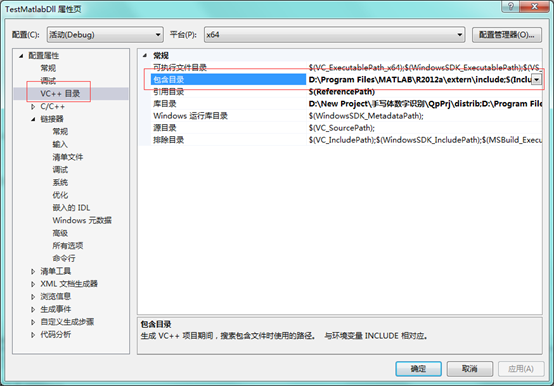
库目录:(1):mydll.lib所在目录。
(2):matlab的lib目录。
Library files
D:\New Project\手写体数字识别\QpPrj\distrib
D:\Program Files\MATLAB\R2012a\extern\lib\win64\microsoft

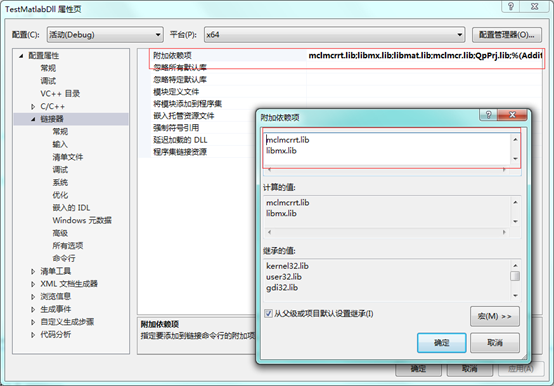
1.2:在连接器-》输入-》附加依赖项
mclmcrrt.lib
libmx.lib
libmat.lib
mclmcr.lib
QpPrj.lib
将编译好的dll复制到VC工程的Debug或者Release目录下,以使得dll可以被找到。还要把编译生成的QpPrj.h文件拷贝到VC工程里
代码实现:
#include <iostream>
#pragma comment(lib,"QpPrj.lib")
#include "QpPrj.h"
#include "mclmcr.h"
#include "matrix.h"
#include "mclcppclass.h" using namespace std; int main(int argc, char* argv[])
{
// 初始化
if (!QpPrjInitialize())
{
printf("Could not initialize !");
return -1;
} // 1.调用MyAdd
double a = 6;
double b = 9;
double c; // 为变量分配内存空间
mwArray mwA(1, 1, mxDOUBLE_CLASS); // 1,1表示矩阵的大小(所有maltab只有一种变量,就是矩阵,为了和Cpp变量接轨,设置成1*1的矩阵,mxDOUBLE_CLASS表示变量的精度)
mwArray mwB(1, 1, mxDOUBLE_CLASS);
mwArray mwC(1, 1, mxDOUBLE_CLASS); // set data,调用类里面的SetData函数给类赋值
mwA.SetData(&a, 1);
mwB.SetData(&b, 1); // using my add,掉我自己写的函数
// 调用示例: extern LIB_QpPrj_CPP_API void MW_CALL_CONV MyAdd(int nargout, mwArray& c, const mwArray& a, const mwArray& b);
MyAdd(1, mwC, mwA, mwB); // get data,调用类里面的Get函数获取取函数返回值
c = mwC.Get(1, 1);
printf("c is %f\n", c); // 2.调用TestChar
// extern LIB_QpPrj_CPP_API void MW_CALL_CONV TestChar(int nargout, mwArray& result, const mwArray& char0) double d = 4;
double e; // 为变量分配内存空间
mwArray mwInput(1, 1, mxDOUBLE_CLASS);
mwArray mwOutput(1, 1, mxDOUBLE_CLASS); mwInput.SetData(&d, 1); TestChar(1, mwOutput, mwInput);
e = mwOutput.Get(1, 1);
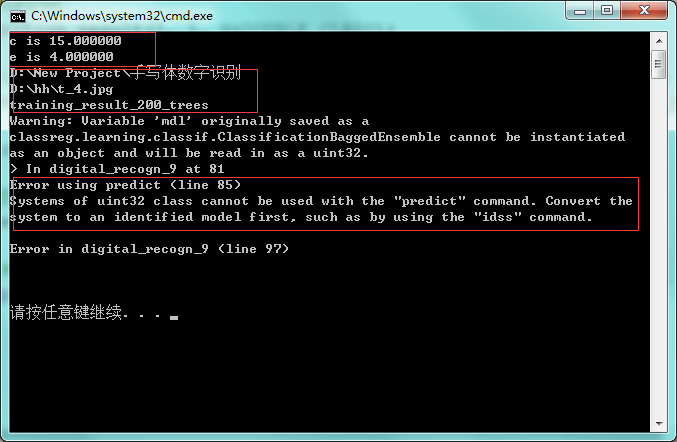
printf("e is %f\n", e); char training_result_path[] = "D:\\New Project\\手写体数字识别";
char digital_img_path[] = "D:\\hh\\t_4.jpg";
char training_result_file[] = "training_result_200_trees"; double f; cout << training_result_path << endl;
cout << digital_img_path << endl;
cout << training_result_file << endl; // 为变量分配内存空间
mwArray recognition_result(1, 1, mxDOUBLE_CLASS); // 调用示例:extern LIB_QpPrj_CPP_API void MW_CALL_CONV digital_recogn_9(int nargout, mwArray& recognition_result, const mwArray& training_result_path, const mwArray& digital_img_path, const mwArray& training_result_file);
digital_recogn_9(1, recognition_result, training_result_path, digital_img_path, training_result_file); f = recognition_result.Get(1, 1); // 终止调用的程序
QpPrjTerminate(); // terminate MCR
mclTerminateApplication(); return 0; }
... MWMCR::EvaluateFunction error ...
Error using predict (line 85)
Systems of uint32 class cannot be used with the "predict" command. Convert the system to an identified model first, such as by using the "idss" command.
 \
\
matlab代码
digital_recogn_9.m
function [recognition_result]
= digital_recogn_9( training_result_path , digital_img_path , training_result_file )
1 training_result_path
训练库路径 ' D:\New Project\手写体数字识别'
2 digital_img_path
传入的图片路径 ' D:\hh\t_4.jpg '
3 training_result_file
训练库文件名 ' training_result_200_trees '
调用示例:
digital_recogn_9('D:\New Project\手写体数字识别','D:\hh\t_4.jpg','training_result_200_trees')
|
function [recognition_result] = digital_recogn_9( training_result_path , digital_img_path , training_result_file )
input_number = imread(digital_img_path) ;
%%%%%%%%%%%% image trsformation input_number = 255 - rgb2gray(input_number) ; threshold_noise = 35 ;
for ii = 1:size(input_number,1) for jj = 1:size(input_number,2) if input_number( ii , jj ) < threshold_noise input_number( ii , jj ) = 0; end end end
%%%%%%%%%%%%%%%%%%%%%%%% projecting_width = sum(input_number, 1); projecting_height = sum(input_number, 2);
%%%%%%% cut off the boundary boundary_width = zeros( size( projecting_width ) ); boundary_height = zeros( size( projecting_height ) ); offset_width = 3; offset_height = 3;
aa = size( boundary_width , 2) - offset_width + 1 ; boundary_width ( 1 , offset_width : aa ) = 1 ;
bb = size( boundary_height , 1) - offset_height + 1 ; boundary_height ( offset_height : bb , 1 ) = 1 ;
projecting_width = projecting_width .* boundary_width ; projecting_height = projecting_height .* boundary_height ;
%%%%%%%%%%%%%%%%%%%%%%%%%%%%%%%%%% threshold_width = max ( projecting_width ) / size(projecting_width , 2 ) ; threshold_height = max ( projecting_height ) / size(projecting_height , 1 ) ;
s1 = ( projecting_width > threshold_width ) ; new_width = sum(s1) ;
s2 = ( projecting_height > threshold_height ) ; new_height = sum(s2) ;
trimming_img = zeros( new_height , new_width ); trimming_img = uint8(trimming_img) ; counter_height =1 ; for ii=1 : (size( input_number , 1 ) - 1) %%%%%%% select qualified rows if s2( ii , 1 )==true counter_height = counter_height +1 ; end
%%%%%%% select qualified columns counter_width =1 ; for jj=1 : (size( input_number , 2 ) - 1) if s1( 1 , jj )==true counter_width = counter_width +1 ; end
%%%%% copy pixels to new image if s2( ii , 1 ) == true || s1( 1 , jj ) == true s3 = input_number( ii , jj ); trimming_img( counter_height , counter_width ) = s3; end end end
%%%%%%%%%% flatten the image edge_length =16 ; %% 16*16=256 trimming_img = imresize( trimming_img , [edge_length , edge_length] ) ; %% 暂时注释 掉 %%imshow( trimming_img ) ;
flatten_img = reshape( trimming_img , 1 , 256 ) ;
%%%%%%%%%%%%%%%%%%%%% cd( training_result_path ) %% 加上分号,训练库文件名 ' training_result_200_trees ' training_result = load( training_result_file ); Xtest = training_result.Xtest ; mdl = training_result.mdl ;
%%%%%%%%%%%%%%%%%%%%% image_set = zeros( size(Xtest) ) ; image_set = uint8( image_set );
for ii=1:size(Xtest, 1) image_set( ii , : ) = flatten_img(: , :); end
%%%% Train and Predict Using a Single Classification Tree
Xtest = double( image_set ); %%ypred = predict(mdl, Xtest); ypred = predict(mdl, Xtest);
% % Confmat_bag = confusionmat(Ytest,ypred);
%% recognition_result = ypred(1,1);
recognition_result = ypred(1,1);
end |
MyAdd.m
|
function [c] = MyAdd(a, b) %UNTITLED Summary of this function goes here % Detailed explanation goes here c = a + b;
end
|
MyChar.m
|
function [result] = MyChar(str) %UNTITLED2 Summary of this function goes here % Detailed explanation goes here result = str;
end
|
C/C++与Matlab混合编程的更多相关文章
- C++和MATLAB混合编程-DLL
先小话一下DLL,DLL是动态链接库,是源代码编译后的二进制库文件和程序接口,和静态链接库不同的是,程序在编译时并不链接动态链接库的执行体,而是在文件中保留一个调用标记,在程序运行时才将动态链接库文件 ...
- java matlab混合编程之返回值Struct类型
java matlab混合编程的时候当返回值是Struct类型(matlab中的返回类型)如何来取得(java中)其值? 上网找,看到这个网页:http://www.mathworks.cn/cn/h ...
- WPF(C#)与MATLAB混合编程
WPF(C#)与MATLAB混合编程 WPF可以为开发者提供便捷地构建用户交互界面的解决方法,而matlab则在科学计算方面有着无与伦比的优势,因此在一些需要将科学算法转换为应用软件的项目中,需要应用 ...
- VC 与Matlab混合编程之引擎操作详解
Visual C++ 是当前主流的应用程序开发环境之一,开发环境强大,开发的程序执行速度快.但在科学计算方面函数库显得不够丰富.读取.显示数据图形不方便. Matlab 是一款将数值分析.矩阵计算.信 ...
- VS/Qt C++和Matlab混合编程
最近两天在搞C++和Matlab混合编程,这个中间过程真是让人心酸啊,最后还是搞定成功!现在把这个过程记录一下. 首先自己的电脑本来就安装着matlab2013b,按着网上的说法首先需要输入!mcc, ...
- C++和MATLAB混合编程求解多项式系数(矩阵相除)
摘要:MATLAB对于矩阵处理是非常高效的,而C++对于矩阵操作是非常麻烦的,因而可以采用C++与MATLAB混合编程求解矩阵问题. 主要思路就是,在MATLAB中编写函数脚本并使用C++编译为dll ...
- matlab混合编程向导(vc,vb,.net...)
一.matlab与vc混编 1.通过mcc将matlab的m文件转化为cpp,c文件或dll供vc调用: 这方面的实现推荐精华区Zosco和ljw总结的方法(x-6-1-4-3-1和2) ...
- Matlab混合编程
Matlab混合编程 混合编程目的 在Matlab中采用混合编程目的主要包括 利用已有的函数库,避免重复工作 加速计算,特别是减少循环所用时间 利用GPU等进行异构编程 混合编程方法-mex函数 目前 ...
- C#Matlab混合编程类 初始化问题解决方法
************** 异常文本 ************** System.TypeInitializationException: “myPlus.matClass”的类型初始值设定项引发异 ...
- 国内第一部C#.Net调用Matlab混合编程视频教程
本博客所有文章分类的总目录:[总目录]本博客博文总目录-实时更新 Matlab和C#混合编程文章目录:[目录]Matlab和C#混合编程文章目录 一.视频说明 2014年的5.1,我将这套视频教 ...
随机推荐
- 图解call、apply、bind的异同及各种实战应用演示
一.图解call.apply.bind的异同 JavaScript中函数可以通过3种方法改变自己的this指向,它们是call.apply.bind.它们3个非常相似,但是也有区别.下面表格可以很直观 ...
- ExtJS4笔记 Data
The data package is what loads and saves all of the data in your application and consists of 41 clas ...
- Trace文件过量生成问题解决
查看用户临时文件(trace文件)所在位置 如果是trace文件(.trc)大导致的 SQL>show parameters user_dump_dest 在路径下查看 alert_log 文件 ...
- 从.NET和Java之争谈IT这个行业[转]
一.有些事情难以回头 开篇我得表名自己的立场:.NET JAVA同时使用者,但更加偏爱.NET.原因很简单 1.NET语言更具开放性,从开源协议和规范可以看出; 2.语言更具优势严谨; 3.开发工具V ...
- SPARK支持的常见文件格式
SequenceFile读写文件Scala\java类型对应表
- 变量在SSIS包中的使用
2010~2011年经常使用SSIS包采集加工数据,后来换了工作就很少使用.最近又开始用那玩意采集数据,努力回想之前是怎样操作的,网上各种找各种纠结.趁这次使用记录下日常操作步骤,以备以后不时之需. ...
- 游戏制作之路:游戏引擎选择、Mac下和Windows下UnrealEngine 4体验对比、文档及其他
UnrealEngine 4和Unity3d的选择 订阅了UrealEngine4(UE4)开发者.我开始做网站用的是ASP.NET和C#,之后做网站虽然换用更方便的PHP(因为做的都是小网站).我想 ...
- Ubuntu 安装BCM 43142无线网卡驱动
ubuntu14.04 安装 bcm43142无线网卡 用命令lspci 查看无线网卡类型 然后下载对应的无线网卡驱动. 之后,使用下列命令安装,即可搜索无线热点了: sudo apt-get ins ...
- java获取获得Timestamp类型的当前系统时间。以及java.util.date 、java.sql.Date之间的转换
java获取取得Timestamp类型的当前系统时间java获取取得Timestamp类型的当前系统时间 格式:2010-11-04 16:19:42 方法1: Timestamp d = new T ...
- Windows消息传递机制详解
Windows是一个消息(Message)驱动系统.Windows的消息提供了应用程序之间.应用程序与Windows系统之间进行通信的手段.应用程序想要实现的功能由消息来触发,并且靠对消息的响应和处理 ...