
ubuntu14.04_install_gitlab_platform
/**
author: lihaibo
URL:http://www.cnblogs.com/horizonli/p/5321770.html
*/
下面是干货
【第一部分 安装】
环境:ubuntu 14.04
gitlab包:gitlab-ce_7.14.3-ce.1_amd64.deb
1. 安装配置依赖项
sudo apt-get install curl openssh-server ca-certificates postfix
(如果已经安装了Postfix来发送邮件请在安装期间选择 'Internet Site' . 你也可以用Sendmail或者 使用自定义的SMTP服务器来代替Postfix. 如果希望使用 Exim, 请 把它当做SMTP来配置.)
2. 添加并安装GitLab软件包
curl -LJO http://mirror.tuna.tsinghua.edu.cn/gitlab-ce/ubuntu/pool/trusty/main/g/gitlab-ce/gitlab-ce-XXX.deb
(在浏览器中输入http://mirror.tuna.tsinghua.edu.cn/gitlab-ce/ubuntu/pool/trusty/main/g/gitlab-ce就能看到要选择的gitlab版本软件 XXX表示版本号,
我用的是gitlab-ce_7.14.3-ce.1_amd64.deb)
dpkg -i gitlab-ce-XXX.deb                         #在安装的过程中会有一个让其输入主机名称,这时候如果不想设置名称,可以直接设置为IP地址,以方便登录
                             #如果设置为了主机名称,在自己本机(hosts)中或者DNS中要添加对服务器名称的dns解析。
示例:
#上面的那个命令安装完成后会显示如下的提示:
gitlab: GitLab should be reachable at http://ubuntu   #这个http://ubuntu就是待会要登录的gitlab主页,所以需要将其主机的解析加入到hosts文件中,
                               #如果上面命令中填的是IP,则不用添加到hosts中

gitlab: Otherwise configure GitLab for your system by editing /etc/gitlab/gitlab.rb file

gitlab: And running reconfigure again.

gitlab:

gitlab: For a comprehensive list of configuration options please see the Omnibus GitLab

readme

gitlab: https://gitlab.com/gitlab-org/omnibus-gitlab/blob/master/README.md

gitlab:

It looks like GitLab has not been configured yet; skipping the upgrade script.
3. 配置和使用GitLab
sudo gitlab-ctl reconfigure
4. 在浏览器访问GitLab主机名
如果安装gitlab的linux主机IP是192.168.0.10或者ubuntu(ubuntu为gitlab服务器的名字),就在浏览器中输入192.168.0.10或者http://ubuntu,刷新一次,会让输入新的root密码。登录成功。如下图:

5.gitlab的一般使用
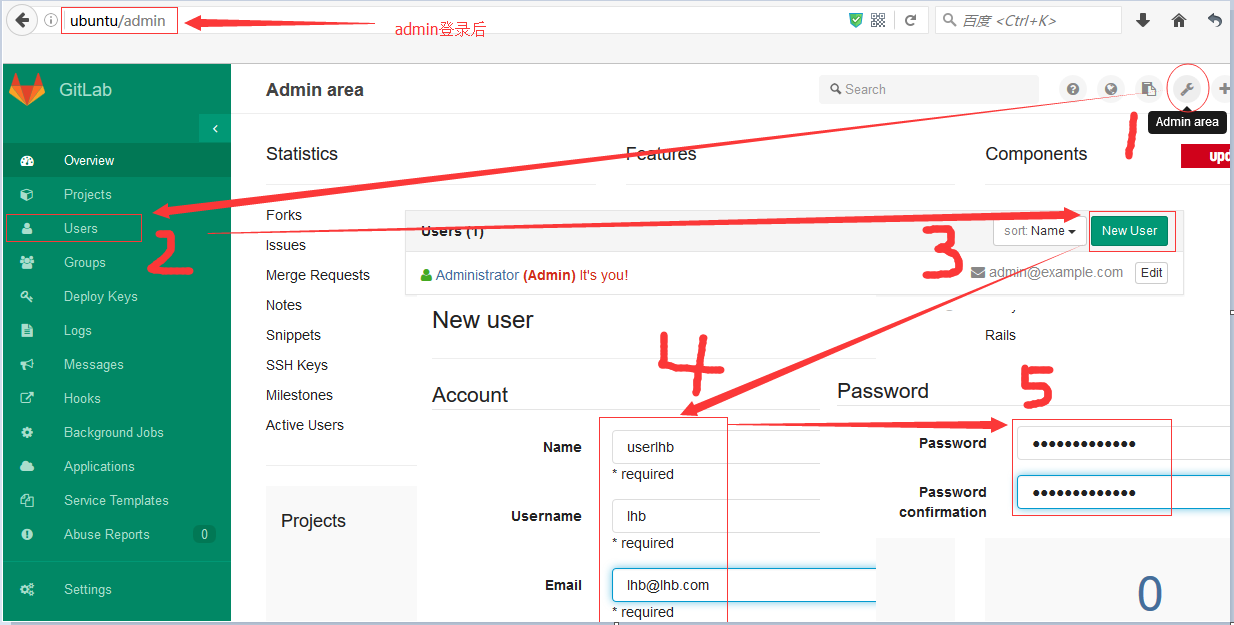
创建用户
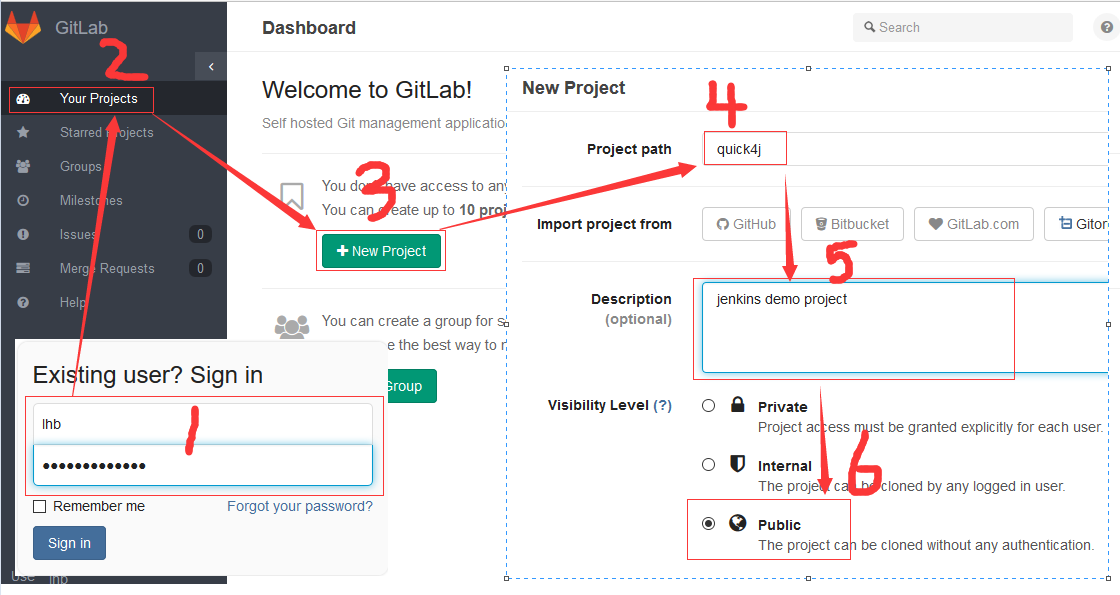
创建project
第二部分 安装过程的问题解决
==================【安装过程的一些问题总结】===========
1.安装过程中如果需要翻qiang怎么办?
如果遇到这种情况,最好的方式就是翻墙。
其次可以参考这篇文章http://www.360doc.com/content/15/0603/14/21631240_475362133.shtml(需自行测试,结果自行负责)
2.忘记了gitlab的登录用户密码?
使用root用户输入下面的命令
root@ubuntu:~# gitlab-rails console production
等一会后会出现一个提示符:输入
irb(main)::> u = User.where(id:).first #id: 后面的数字可以更改为其他数字进行查询
当我查询到id=2的时候,发现了我自己定义的用户 name=lhb (上面第五步中创建的用户):
 irb(main)::> u = User.where(id:).first

 => #<User id: , email: "lhb@lhb.com", encrypted_password: "$2a$10$tQDpBEmPDiURBZANES/EBOjhZQSnaaHPjjyifoTmWXZ...", reset_password_token: "130bf1320e41004ed28d7093738a56b62543edd2ec1f34c12d...", reset_password_sent_at: "2016-03-25 16:21:26", remember_created_at: nil, sign_in_count: , current_sign_in_at: nil, last_sign_in_at: nil, current_sign_in_ip: nil, last_sign_in_ip: nil, created_at: "2016-03-25 16:21:26", updated_at: "2016-03-25 16:47:46", name: "lhb", admin: true, projects_limit: , skype: "", linkedin: "", twitter: "", authentication_token: "ppCXaBYk1q3AT4KTwZts", theme_id: , bio: nil, failed_attempts: , locked_at: nil, username: "lhb", can_create_group: false, can_create_team: false, state: "active", color_scheme_id: , notification_level: , password_expires_at: nil, created_by_id: , last_credential_check_at: nil, avatar: nil, confirmation_token: nil, confirmed_at: "2016-03-25 16:21:26", confirmation_sent_at: nil, unconfirmed_email: nil, hide_no_ssh_key: false, website_url: "", notification_email: "lhb@lhb.com", hide_no_password: false, password_automatically_set: false, location: nil, encrypted_otp_secret: nil, encrypted_otp_secret_iv: nil, encrypted_otp_secret_salt: nil, otp_required_for_login: false, otp_backup_codes: nil, public_email: "", dashboard: , project_view: , consumed_timestep: nil, layout: , hide_project_limit: false, unlock_token: nil, otp_grace_period_started_at: nil, ldap_email: false, external: true>
修改lhb用户名密码:
 irb(main)::> u.password = 'password'                  #更新password为你需要的密码

 => "password"

 irb(main)::> u.password_confirmation = 'password'       #更新password为你需要的密码

 => "passwrod"
保存更改:
 irb(main)::> u.save!                        #符号(!)一定要加上

 => true
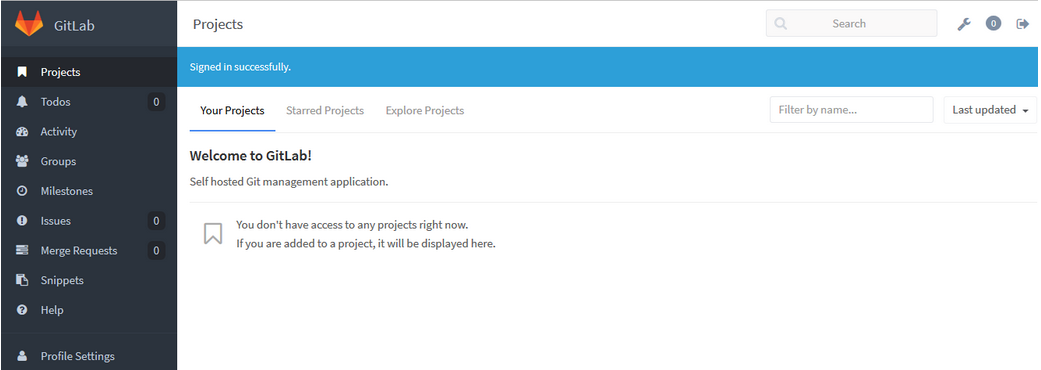
测试更改了密码的用户:

登录成功后的界面
>>>>>>>>>>>>>>>>>>>>>>>>>>参考
https://about.gitlab.com/downloads/
http://gitlab.cc/downloads/
http://roland.kierkels.net/git/reset-your-gitlab-root-password-from-a-terminal/
http://www.360doc.com/content/15/0603/14/21631240_475362133.shtml
ubuntu14.04_install_gitlab_platform的更多相关文章
- win8.1硬盘安装ubuntu14.04双系统
在网上找了很多方法都失败了,原因是大多数方法都是用mbr方式安装的,如grub4dos,easybcd.以至于连自己都怀疑win8能不能用硬盘安装,差点就去买个u盘来安装了,就在打算放弃的时候在ubu ...
- VMware下对虚拟机Ubuntu14系统所在分区sda1进行磁盘扩容
VMware下对虚拟机Ubuntu14系统所在分区sda1进行磁盘扩容 一般来说,在对虚拟机里的Ubuntu下的磁盘进行扩容时,都是添加新的分区,而并不是对其系统所在分区进行扩容,如在此链接中http ...
- ubuntu14 安装及卸载vmware
原帖http://blog.sina.com.cn/s/blog_73dac6b50101gp4f.html 适用于ubuntu14和vmware player 12.5
- Ubuntu14.04配置Mono+Jexus
总所周知,ASP.NET是微软公司的一项技术,是一个网站服务端开发的一种技术,它可以在通过HTTP请求文档时再在Web服务器上动态创建它们,就是所谓动态网站开发,它依赖运行于 IIS 之中的程序 .但 ...
- Asp.Net跨平台:Ubuntu14.0+Mono+Jexus+Asp.Net
Asp.Net跨平台的文章园子里有很多,这里给自己搭建的情况做一下总结,方便以后查看. 参考网站: http://www.linuxdot.net/(Linux DotNET大本营 ) http ...
- ubuntu14.04安装及web环境的搭建
在进行接下来的工作之前首先得准备一个Ubuntu的启动U盘以及腾出一个至少50G的系统盘(在网上看到有人用20G的,不知道效果怎么样).关于Ubuntu启动U盘大家可以参考这个帖子 http://ti ...
- Ubuntu14.04解决远程root-ssh拒绝登录
(1)查看ip地址是否冲突 我在单位的虚拟机ip地址是192.168.14.85,与其它机器冲突了.改成了192.168.14.83 (2)关闭Ubuntu14.04的防火墙 root@stgman- ...
- Ubuntu14.04安装python3.5
Ubuntu14.04系统会自带python2.7,请不要卸载它,不同版本的Python可以共存. #sudo add-apt-repository ppa:fkrull/deadsnakes #su ...
- ubuntu14.04下搭建python+mysql环境
简略记录ubuntu14.04下搭建python操作的mysql服务器的过程和其中遇到的问题及解决方法. 第一部分: 安装mysql 安装步骤:1. sudo apt-get install mysq ...
随机推荐
- Dependency Scopes(maven)
Dependency scope 是用来限制Dependency的作用范围的, 影响maven项目在各个生命周期时导入的package的状态. 自从2.0.9后,新增了1种,现在有了6种scope: ...
- HttpServletRequest修改/添加header和cookie参数
实现功能: 所有接口经过过滤器,获取每个接口的自定义头部(token) 判断如果是app访问,则给头部设置cookie,值为自定义token的值. 即:使用过滤器实现修改请求头headers 实现步骤 ...
- thinkphp3.2 控制器导入模型
方法一: public function index(){ $Member = new MemberModel(); $money = $Member->Money(); print_r($mo ...
- Peckham添加引用文件模糊匹配智能提示
下载地址:https://github.com/markohlebar/Peckham 跟VVDocumenter规范注释生成器的安装方式一样: 下载开源工程在Xcode重新编译运行会自动安装此插 ...
- mysql触发器应用和创建表错误代码: 1118 Row size too large. 解决
1.针对数据库查询问题的方便,可以建立重要表的log备份记录表,在主表的添加,修改,删除添加触发器,修改触发器增加触发字段的点,限制条件. 数据库log表查问题比从线上多台服务器上下载日志文件相对方便 ...
- Nginx 反向代理的正确配置
server { listen 80; server_name 127.0.0.1; #charset koi8-r; #access_log logs/host.access.log main; l ...
- mysql查询两个日期之间相差多少天?
需求描述: 在mysql中,查看两个日期之间相差多少天 操作过程: 1.通过datediff函数,查看两个日期之间相差多少天 mysql> select datediff('2018-06-26 ...
- 单例模式__new__
单例模式,使用__new__ __new__是构造函数, __init__是初始化方法,先调用了__new__返回了实例,__init__给这个实例初始化绑定一些属性. class Singleton ...
- MTK 系统禁止通知状态栏下拉
之前看了网上很多修改,感觉太繁琐,修改代码太多,最后感觉还是自己找找,看能不能简单点 diff --git a/android/frameworks/base/packages/SystemUI/sr ...
- 8 -- 深入使用Spring -- 1...4 重写占位符配置器
8.1.5 重写占位符配置器 (PropertyOverrideConfigurer) PropertyOverrideConfigurer是Spring提供的另一个容器后处理器.PropertyOv ...