TableLayout跟TableRow 是一组搭配应用的布局,TableLayout置底,TableRow在TableLayout的上方,而Button、TextView等控件就在TableRow之上,别的,TableLayout之上也可以零丁放控件。TableLayout是一个应用错杂的布局,最简单的用法就仅仅是拖沓控件做出个界面,但实际上,会经常在代码里应用TableLayout,例如做出表格的结果。本文首要介绍TableLayout的根蒂根基应用办法。
重要的几个属性如下:
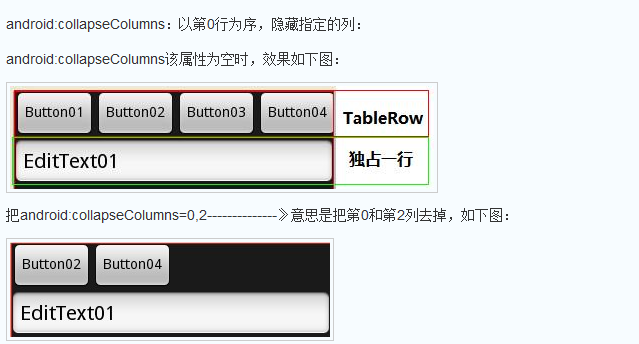
1.android:collapseColumns://隐藏指定的列
①设置 TableLayout 内的 TableRow 中需要隐藏的列的列索引,多个用“,”隔开
②以第0行为序,隐藏指定的列:把android:collapseColumns=0,3 意思是把第0和第3列隐藏
2.android:shrinkColumns://收缩指定的列以适合屏幕、不会挤出屏幕 ① 设置 TableLayout 内的 TableRow 中需要拉伸(该列会拉伸到所有可用空间)的列的列索引,多列个用“,”隔开(多列 每列填充空隙大小一样)
②以第0行为序,自动延伸指定的列填充可用部分: 当LayoutRow里面的控件还没有布满布局时,shrinkColumns不起作用。
③设置了shrinkColumns=1,4,布局完全没有改变,因为LayoutRow里面还剩足够的空间。当LayoutRow布满控件时,设置了shrinkColumns=2,5,则控件自动向垂直方向填充空间

3.android:stretchColumns://尽量把指定的列表填充空白部分
①设置 TableLayout 内的 TableRow 中需要收缩(为了使其他列不会被挤到屏幕 外,此列会自动收缩)的列的列索引,多个用“,”隔开
② 以第0行为序,尽量把指定的列填充空白部分:设置stretchColumns=2,5,第1,4列被尽量填充同时向右填充,直到2,5被压挤到最后边)。

补充:
①表格布局的子对象不能指定 layout_width 属性.宽度永远是 MATCH_PARENT。
②不过子对象可以定义 layout_height 属性;其默认值是WRAP_CONTENT. 如果子对象是 TableRow,其高度永远是 WRAP_CONTENT。
实例:

001 |
<LinearLayout xmlns:android="http://schemas.android.com/apk/res/android" |
002 |
xmlns:tools="http://schemas.android.com/tools" |
003 |
android:layout_width="match_parent" |
004 |
android:layout_height="match_parent" |
005 |
android:orientation="vertical" |
006 |
tools:context=".AndroidTableLayoutActivity" > |
008 |
<!-- 定义第一个表格,指定第2列允许收缩,第3列允许拉伸 --> |
011 |
android:id="@+id/tablelayout01" |
012 |
android:layout_width="match_parent" |
013 |
android:layout_height="wrap_content" |
014 |
android:shrinkColumns="1" |
015 |
android:stretchColumns="2" > |
017 |
<!-- 直接添加按钮,自己占用一行 --> |
020 |
android:id="@+id/btn01" |
021 |
android:layout_width="wrap_content" |
022 |
android:layout_height="wrap_content" |
023 |
android:text="独自一行" > |
029 |
android:id="@+id/btn02" |
030 |
android:layout_width="wrap_content" |
031 |
android:layout_height="wrap_content" |
036 |
android:id="@+id/btn03" |
037 |
android:layout_width="wrap_content" |
038 |
android:layout_height="wrap_content" |
039 |
android:text="允许被收缩允许被收缩允许被收缩允许被收缩" > |
043 |
android:id="@+id/btn04" |
044 |
android:layout_width="wrap_content" |
045 |
android:layout_height="wrap_content" |
046 |
android:text="允许被拉伸允许被拉伸允许被拉伸" > |
050 |
<!-- 定义第2个表格,指定第2列隐藏 --> |
053 |
android:id="@+id/tablelayout02" |
054 |
android:layout_width="match_parent" |
055 |
android:layout_height="wrap_content" |
056 |
android:collapseColumns="1" > |
061 |
android:id="@+id/btn05" |
062 |
android:layout_width="wrap_content" |
063 |
android:layout_height="wrap_content" |
068 |
android:id="@+id/btn06" |
069 |
android:layout_width="wrap_content" |
070 |
android:layout_height="wrap_content" |
071 |
android:text="被隐藏列" > |
075 |
android:id="@+id/btn07" |
076 |
android:layout_width="wrap_content" |
077 |
android:layout_height="wrap_content" |
078 |
android:text="允许被拉伸" > |
082 |
<!-- 定义第3个表格,指定第2列填满空白 --> |
085 |
android:id="@+id/tablelayout03" |
086 |
android:layout_width="match_parent" |
087 |
android:layout_height="wrap_content" |
088 |
android:stretchColumns="1" > |
093 |
android:id="@+id/btn08" |
094 |
android:layout_width="wrap_content" |
095 |
android:layout_height="wrap_content" |
100 |
android:id="@+id/btn09" |
101 |
android:layout_width="wrap_content" |
102 |
android:layout_height="wrap_content" |
103 |
android:text="填满剩余空白" > |
107 |
<!-- 定义第3个表格,指定第2列横跨2列 --> |
110 |
android:id="@+id/tablelayout04" |
111 |
android:layout_width="match_parent" |
112 |
android:layout_height="wrap_content" > |
117 |
android:id="@+id/btn10" |
118 |
android:layout_width="wrap_content" |
119 |
android:layout_height="wrap_content" |
124 |
android:id="@+id/btn11" |
125 |
android:layout_width="wrap_content" |
126 |
android:layout_height="wrap_content" |
127 |
android:layout_column="2" |
128 |
android:text="填满剩余空白" > |
- Android ActionBar详解(三):ActionBar实现切换Tabs标签
实现切换Tabs标签; Activity代码: public class ActionBarTabs extends Activity { @Override protected void onCre ...
- Html5移动端页面自适应布局详解(阿里rem布局)
在移动设备上进行网页的重构或开发,首先得搞明白的就是移动设备上的viewport,通读网上的各种对于viewport的解释之后 大概viewport可以理解为三种 1.layout viewport ...
- (转)android Fragments详解三:实现Fragment的界面
为fragment添加用户界面 fragment一般作为activity的用户界面的一部分,把它自己的layout嵌入到activity的layout中. 一个 要为fragment提供layo ...
- 【转】Android编译系统详解(三)——编译流程详解
原文网址:http://www.cloudchou.com/android/post-276.html 本文原创作者:Cloud Chou. 欢迎转载,请注明出处和本文链接 1.概述 编译Androi ...
- Android Fragment详解(三): 实现Fragment的界面
为fragment添加用户界面: Fragment一般作为activity的用户界面的一部分,把它自己的layout嵌入到activity的layout中. 一个 要为fragment提供layout ...
- Android ActionBar详解(三)--->ActionBar的Home导航功能
FirstActivity如下: package cc.testsimpleactionbar2; import android.os.Bundle; import android.app.Activ ...
- Android Loader详解三:重启与回调
重启装载器 当你使用initLoader()时,如果指定ID的装载器已经存在,则它使用这个装载器.如果不存在呢,它将创建一个新的.但是有时你却是想丢弃旧的然后开始新的数据. 要想丢弃旧数据,你应使用r ...
- Android 布局详解
Android 布局详解 1.重用布局 当一个布局文件被多处使用时,最好<include>标签来重用布局. 例如:workspace_screen.xml的布局文件,在另一个布局文件中被重 ...
- Grid 网格布局详解
Grid网格布局详解: Grid布局与Flex布局有着一定的相似性,Grid布局是将容器划分成行和列,产生单元格,可以看做是二维布局. 基本概念: 采用网格布局的区域,称为"容器" ...
随机推荐
- 【BZOJ】【2946】【POI2000】公共串
后缀数组 好感动,复习了下后缀数组居然写出来了……(感谢ykz大神) 求最长公共子串……WA了一发是因为:[不同字符串之间要用不同的特殊字符隔开]否则就会匹配到相同→_→比如都是aaa结尾,如果用相同 ...
- maven中net.sf.json报错的解决方法
今天在用maven添加net.sf.json的jar包的时候,代码如下: <dependency> <groupId>net.sf.json-lib</groupId&g ...
- json的好处-新一代数据传输利器
JSON是一种轻量级的数据交换格式!和xml一样. 为什么不XML XML的冗余太大,不过XML阅读起来比较方面,所以并没有被json完全取代,很多时候都是并存.比如sina微博的开发平台有一个JSO ...
- 基于at91rm9200的i2c分析(DS1307实时时钟芯片)
board-ek.c 构造i2c_board_info结构体 static struct i2c_board_info __initdata ek_i2c_devices[] = { { ...
- 混沌数学之Chua's circuit(蔡氏电路)
蔡氏电路(英语:Chua's circuit),一种简单的非线性电子电路设计,它可以表现出标准的混沌理论行为.在1983年,由蔡少棠教授发表,当时他正在日本早稻田大学担任访问学者[1].这个电路的制作 ...
- IOS 实现界面本地化(国际化)
在制作应用程序的时候,可以使用本地化功能,将应用程序的内容翻译成多种语言,在不同的区域显示不同的语言.下面就通过简体中文本地化设置来讲解一下本地化的简单使用. 一.让应用程序支持中文语言环境 选择需要 ...
- (转)[原创]在ios android设备上使用 Protobuf (使用源码方式)
自:http://game.ceeger.com/forum/read.php?tid=13479 如果你的工程只能以.Net 2.0而不能以.Net 2.0 subset运行,请看另外一个方法. 地 ...
- 一次真实的蓝屏分析 ntkrnlmp.exe
故事背景: 话说我一直都是远程公司的电脑,在我晚上11点敲代码敲得正爽的时候,被远程的主机挂掉了,毫无征兆的挂掉了,我特么还好有闲着没事就ctrl + s保存代码的习惯,要不然白敲了那么久,我以为是公 ...
- Dynamic Programming for TSP
See how Dynamic programming working for TSP: Check this link: http://www.youtube.com/watch?v=IUzE1Mb ...
- Discuz常见小问题-如何修改favourite图标
1做好一个ico图标之后,直接替换目录下的对应文件即可, 如果没效果刷新浏览器或更新后台CSS缓存.