阿里云作为yum源操作
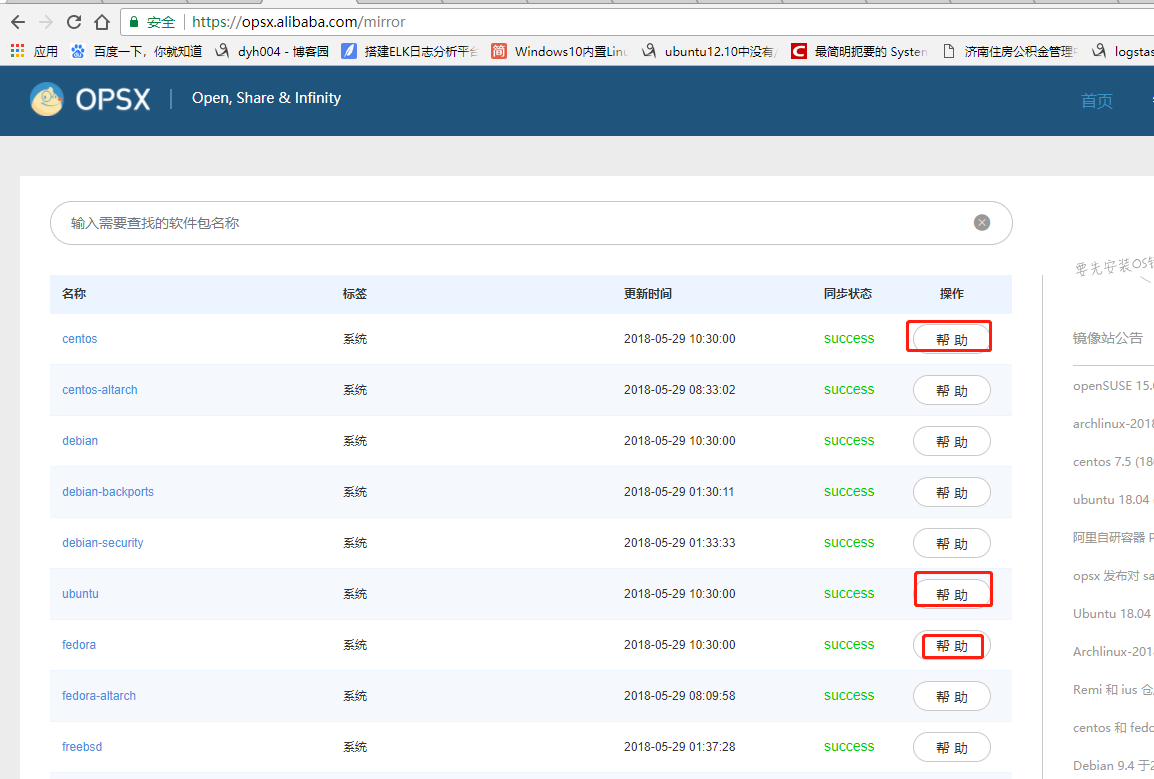
阿里云提供的yum镜像地址为:https://opsx.alibaba.com/mirror
找到自己的使用系统,点击帮助,可以查看更换说明
替换centOS的yum源,如下图
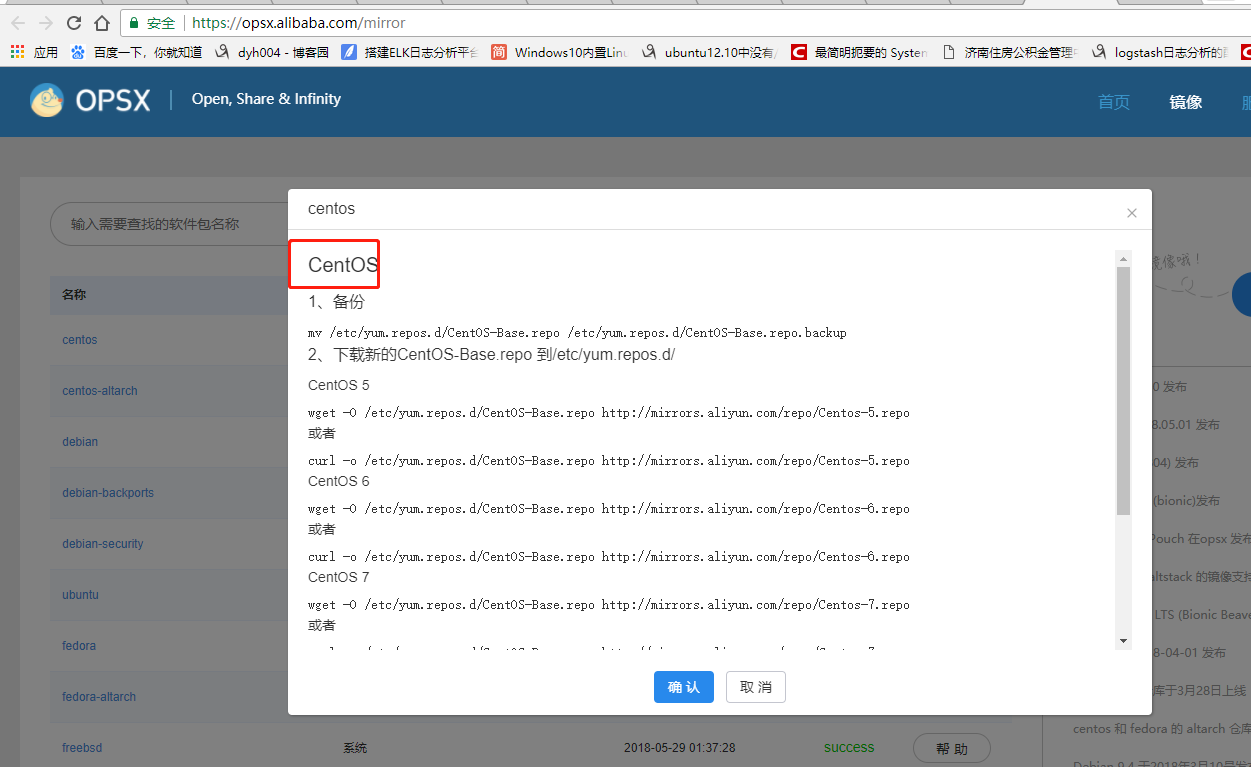
具体操作:
CentOS

、备份

mv /etc/yum.repos.d/CentOS-Base.repo /etc/yum.repos.d/CentOS-Base.repo.backup

、下载新的CentOS-Base.repo 到/etc/yum.repos.d/

CentOS

wget -O /etc/yum.repos.d/CentOS-Base.repo http://mirrors.aliyun.com/repo/Centos-5.repo

或者

curl -o /etc/yum.repos.d/CentOS-Base.repo http://mirrors.aliyun.com/repo/Centos-5.repo

CentOS

wget -O /etc/yum.repos.d/CentOS-Base.repo http://mirrors.aliyun.com/repo/Centos-6.repo

或者

curl -o /etc/yum.repos.d/CentOS-Base.repo http://mirrors.aliyun.com/repo/Centos-6.repo

CentOS

wget -O /etc/yum.repos.d/CentOS-Base.repo http://mirrors.aliyun.com/repo/Centos-7.repo

或者

curl -o /etc/yum.repos.d/CentOS-Base.repo http://mirrors.aliyun.com/repo/Centos-7.repo

、之后运行yum makecache生成缓存

相关链接

官方主页: http://www.centos.org/

邮件列表: http://www.centos.org/modules/tinycontent/index.php?id=16

论坛: http://www.centos.org/modules/newbb/

文档: http://www.centos.org/docs/

Wiki: http://wiki.centos.org/
替换fedora的yum源
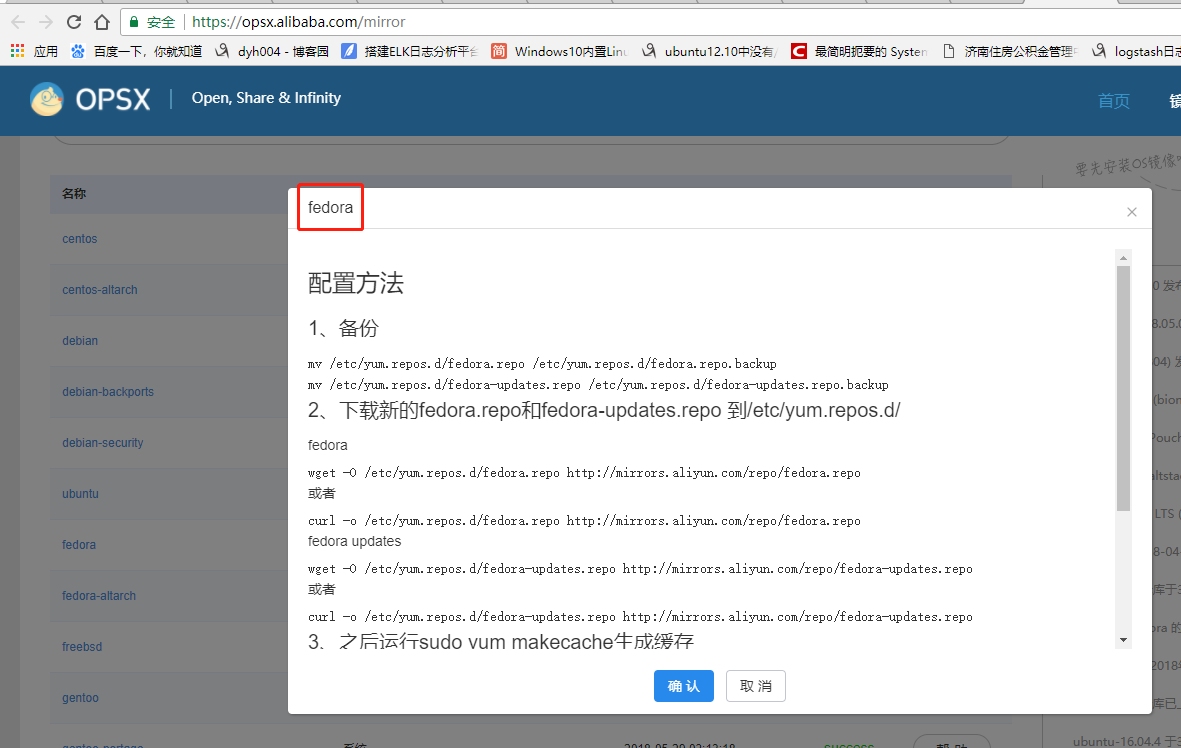
具体操作,如下:
配置方法

、备份

mv /etc/yum.repos.d/fedora.repo /etc/yum.repos.d/fedora.repo.backup

mv /etc/yum.repos.d/fedora-updates.repo /etc/yum.repos.d/fedora-updates.repo.backup

、下载新的fedora.repo和fedora-updates.repo 到/etc/yum.repos.d/

fedora

wget -O /etc/yum.repos.d/fedora.repo http://mirrors.aliyun.com/repo/fedora.repo

或者

curl -o /etc/yum.repos.d/fedora.repo http://mirrors.aliyun.com/repo/fedora.repo

fedora updates

wget -O /etc/yum.repos.d/fedora-updates.repo http://mirrors.aliyun.com/repo/fedora-updates.repo

或者

curl -o /etc/yum.repos.d/fedora-updates.repo http://mirrors.aliyun.com/repo/fedora-updates.repo

、之后运行sudo yum makecache生成缓存

相关链接

官方主页: http://fedoraproject.org/

邮件列表: http://fedoraproject.org/wiki/Communicate

论坛: http://forums.fedoraforum.org/

文档: http://docs.fedoraproject.org/

Wiki: http://fedoraproject.org/wiki/

镜像列表: http://mirrors.fedoraproject.org/publiclist
替换ubunt的yum源:
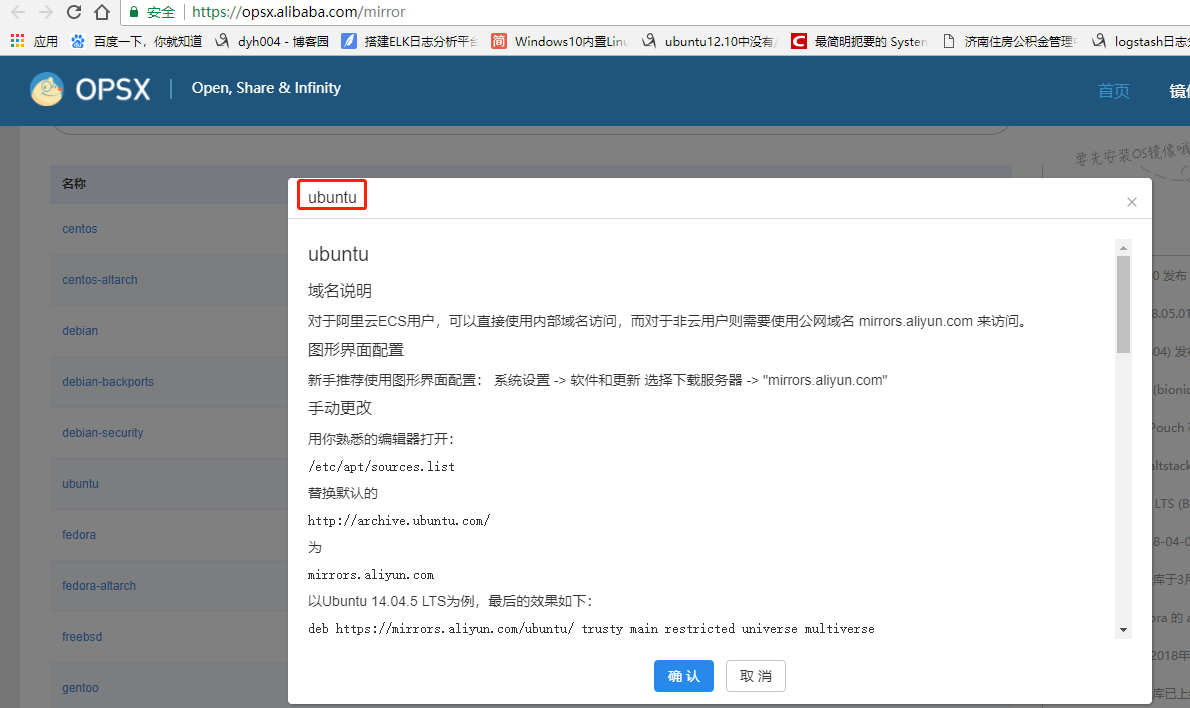
具体操作:
ubuntu

域名说明

对于阿里云ECS用户,可以直接使用内部域名访问,而对于非云用户则需要使用公网域名 mirrors.aliyun.com 来访问。

图形界面配置

新手推荐使用图形界面配置: 系统设置 -> 软件和更新 选择下载服务器 -> "mirrors.aliyun.com"

手动更改

用你熟悉的编辑器打开:

/etc/apt/sources.list

替换默认的

http://archive.ubuntu.com/

为

mirrors.aliyun.com

以Ubuntu 14.04. LTS为例,最后的效果如下:

deb https://mirrors.aliyun.com/ubuntu/ trusty main restricted universe multiverse

deb-src https://mirrors.aliyun.com/ubuntu/ trusty main restricted universe multiverse

deb https://mirrors.aliyun.com/ubuntu/ trusty-security main restricted universe multiverse

deb-src https://mirrors.aliyun.com/ubuntu/ trusty-security main restricted universe multiverse

deb https://mirrors.aliyun.com/ubuntu/ trusty-updates main restricted universe multiverse

deb-src https://mirrors.aliyun.com/ubuntu/ trusty-updates main restricted universe multiverse

deb https://mirrors.aliyun.com/ubuntu/ trusty-backports main restricted universe multiverse

deb-src https://mirrors.aliyun.com/ubuntu/ trusty-backports main restricted universe multiverse

## Not recommended

# deb https://mirrors.aliyun.com/ubuntu/ trusty-proposed main restricted universe multiverse

# deb-src https://mirrors.aliyun.com/ubuntu/ trusty-proposed main restricted universe multiverse

ubuntu 16.04 配置如下

deb http://mirrors.aliyun.com/ubuntu/ xenial main

deb-src http://mirrors.aliyun.com/ubuntu/ xenial main

deb http://mirrors.aliyun.com/ubuntu/ xenial-updates main

deb-src http://mirrors.aliyun.com/ubuntu/ xenial-updates main

deb http://mirrors.aliyun.com/ubuntu/ xenial universe

deb-src http://mirrors.aliyun.com/ubuntu/ xenial universe

deb http://mirrors.aliyun.com/ubuntu/ xenial-updates universe

deb-src http://mirrors.aliyun.com/ubuntu/ xenial-updates universe

deb http://mirrors.aliyun.com/ubuntu/ xenial-security main

deb-src http://mirrors.aliyun.com/ubuntu/ xenial-security main

deb http://mirrors.aliyun.com/ubuntu/ xenial-security universe

deb-src http://mirrors.aliyun.com/ubuntu/ xenial-security universe

ubuntu 18.04(bionic) 配置如下

deb http://mirrors.aliyun.com/ubuntu/ bionic main restricted universe multiverse

deb-src http://mirrors.aliyun.com/ubuntu/ bionic main restricted universe multiverse

deb http://mirrors.aliyun.com/ubuntu/ bionic-security main restricted universe multiverse

deb-src http://mirrors.aliyun.com/ubuntu/ bionic-security main restricted universe multiverse

deb http://mirrors.aliyun.com/ubuntu/ bionic-updates main restricted universe multiverse

deb-src http://mirrors.aliyun.com/ubuntu/ bionic-updates main restricted universe multiverse

deb http://mirrors.aliyun.com/ubuntu/ bionic-proposed main restricted universe multiverse

deb-src http://mirrors.aliyun.com/ubuntu/ bionic-proposed main restricted universe multiverse

deb http://mirrors.aliyun.com/ubuntu/ bionic-backports main restricted universe multiverse

deb-src http://mirrors.aliyun.com/ubuntu/ bionic-backports main restricted universe multiverse

参考链接

官方主页: http://www.ubuntu.com/

邮件列表: http://www.ubuntu.com/support/community/mailinglists

论坛: http://ubuntuforums.org/

中文论坛: http://forum.ubuntu.org.cn/

Wiki: https://wiki.ubuntu.com/

帮助: https://help.ubuntu.com/
同样的道理,替换其他系统yum源(阿里作为yum源的操作)
阿里云作为yum源操作的更多相关文章
- 更改yum网易 阿里云的yum源。
一,鉴于用国外的Yum源,速度比较慢,所以想到将国外的yum源,改为国内的Yum源,著名的有网易 阿里云源.如何更改呢? 二,更改yum源为网易的. 首先备份/etc/yum.repos.d/Cent ...
- CemtOS7更改yum网易 阿里云的yum源。
一,鉴于用国外的Yum源,速度比较慢,所以想到将国外的yum源,改为国内的Yum源,著名的有网易 阿里云源.如何更改呢? 二,更改yum源为网易的. 首先备份/etc/yum.repos.d/Cent ...
- 更改yum网易、阿里云的yum源
更改yum源为网易的. 首先备份/etc/yum.repos.d/CentOS-Base.repomv /etc/yum.repos.d/CentOS-Base.repo /etc/yum.repos ...
- CentOS7用阿里云Docker Yum源在线安装Docker 17.03.2
参考文档 安装步骤 删除已安装的Docker 配置阿里云Docker Yum源 安装指定版本 启动Docker服务 参考文档 官方Docker安装文档:https://docs.docker. ...
- CentOS7用阿里云Docker Yum源在线安装Docker
一.参考文档 官方Docker安装文档:https://docs.docker.com/install/linux/docker-ce/centos 阿里云Docker安装文档:https://yq. ...
- CentOS 7 配置阿里云本地yum源
删除原有的yum源: rm -f /etc/yum.repos.d/* 重新下载阿里云的yum源: wget -O /etc/yum.repos.d/CentOS-Base.repo http://m ...
- 如何在 Centos7 中使用阿里云的yum源
如何在 Centos7 中使用阿里云的yum源 1. 备份原来的yum源 mv /etc/yum.repos.d/CentOS-Base.repo /etc/yum.repos.d/CentOS-Ba ...
- centos配置ADSL拨号 配置阿里云的yum源
如果系统yum源有问题可以更改yum源配置阿里云的yum源1)下载repo文件 wget http://mirrors.aliyun.com/repo/Centos-7.repo(没有 wget命令可 ...
- CentOS7使用阿里云的yum源
替换成阿里云的yum源速度更快一些,替换很简单,简单记录一下步骤 1.备份原来的yum源 sudo cp /etc/yum.repos.d/CentOS-Base.repo /etc/yum.repo ...
随机推荐
- windows网络编程中文 笔记(二)
IPv4 地址段 IPv4地址类别 种类 网络部分 第1个数字 端点数字 A 8位 0-127 16777216 B 16位 128-191 65526 C 24位 193-223 ...
- Windows Server 2012更新补丁后导致Micosoft ODBC for Oracle出现问题
上周由于WannaCry勒索病毒肆虐全球,14号系统管理员更新了一系列补丁后,导致一Windows Server 2012服务器上面部署的一些老旧的应用无法使用Microsoft ODBC for O ...
- 登录views
import osimport hashlibfrom django.shortcuts import render,render_to_response,redirect,HttpResponseR ...
- Elasticsearch拼音分词和IK分词的安装及使用
一.Es插件配置及下载 1.IK分词器的下载安装 关于IK分词器的介绍不再多少,一言以蔽之,IK分词是目前使用非常广泛分词效果比较好的中文分词器.做ES开发的,中文分词十有八九使用的都是IK分词器. ...
- memset memcmp memcpy memmove 自己实现
memset memcmp memcpy memmove 自己实现 memset #include <stdio.h> #include <memory.h> #include ...
- [Hive_add_10] Hive 的 serde (序列化 & 反序列化) 操作
0. 说明 serde 是序列化和反序列化 serialize & deserialize 是将文件中的字段映射成 Hive 中的列 1. 验证 1.1 openCSVSerde CSV 为逗 ...
- 4.6Python数据处理篇之Matplotlib系列(六)---plt.hist()与plt.hist2d()直方图
目录 目录 前言 (一)直方图 (二)双直方图 目录 前言 今天我们学习的是直方图,导入的函数是: plt.hist(x=x, bins=10) 与plt.hist2D(x=x, y=y) (一)直方 ...
- 基于WIN8.1:新手篇→tomcat安装配置
一.JDK配置 下载安装JDK和tomcat 打开电脑属性,高级系统设置进行环境变量配置 新建系统变量,变量值为JDK安装路径,并在系统变量path最后加上“%JAVA_HOME%\bin;%JAVA ...
- hashcode相等两个类一定相等吗?equals呢?相反呢?
hashCode相等,equals也不一定相等, 两个类也不一定相等 equals相同, 说明是同一个对象, 那么hashCode一定相同 哈希表是结合了直接寻址和链式寻址两种方式,所需要的就是将需要 ...
- mysql统计一年12月的数据
效果图: select end) as 一月份, end) as 二月份, end) as 三月份, end) as 四月份, end) as 五月份, end) as 六月份, end) as 七月 ...