React Native & Android & iOS
React Native & Android & iOS
React Native & Android & iOS
https://facebook.github.io/react-native/
https://facebook.github.io/react-native/docs/getting-started
https://github.com/facebook/react-native
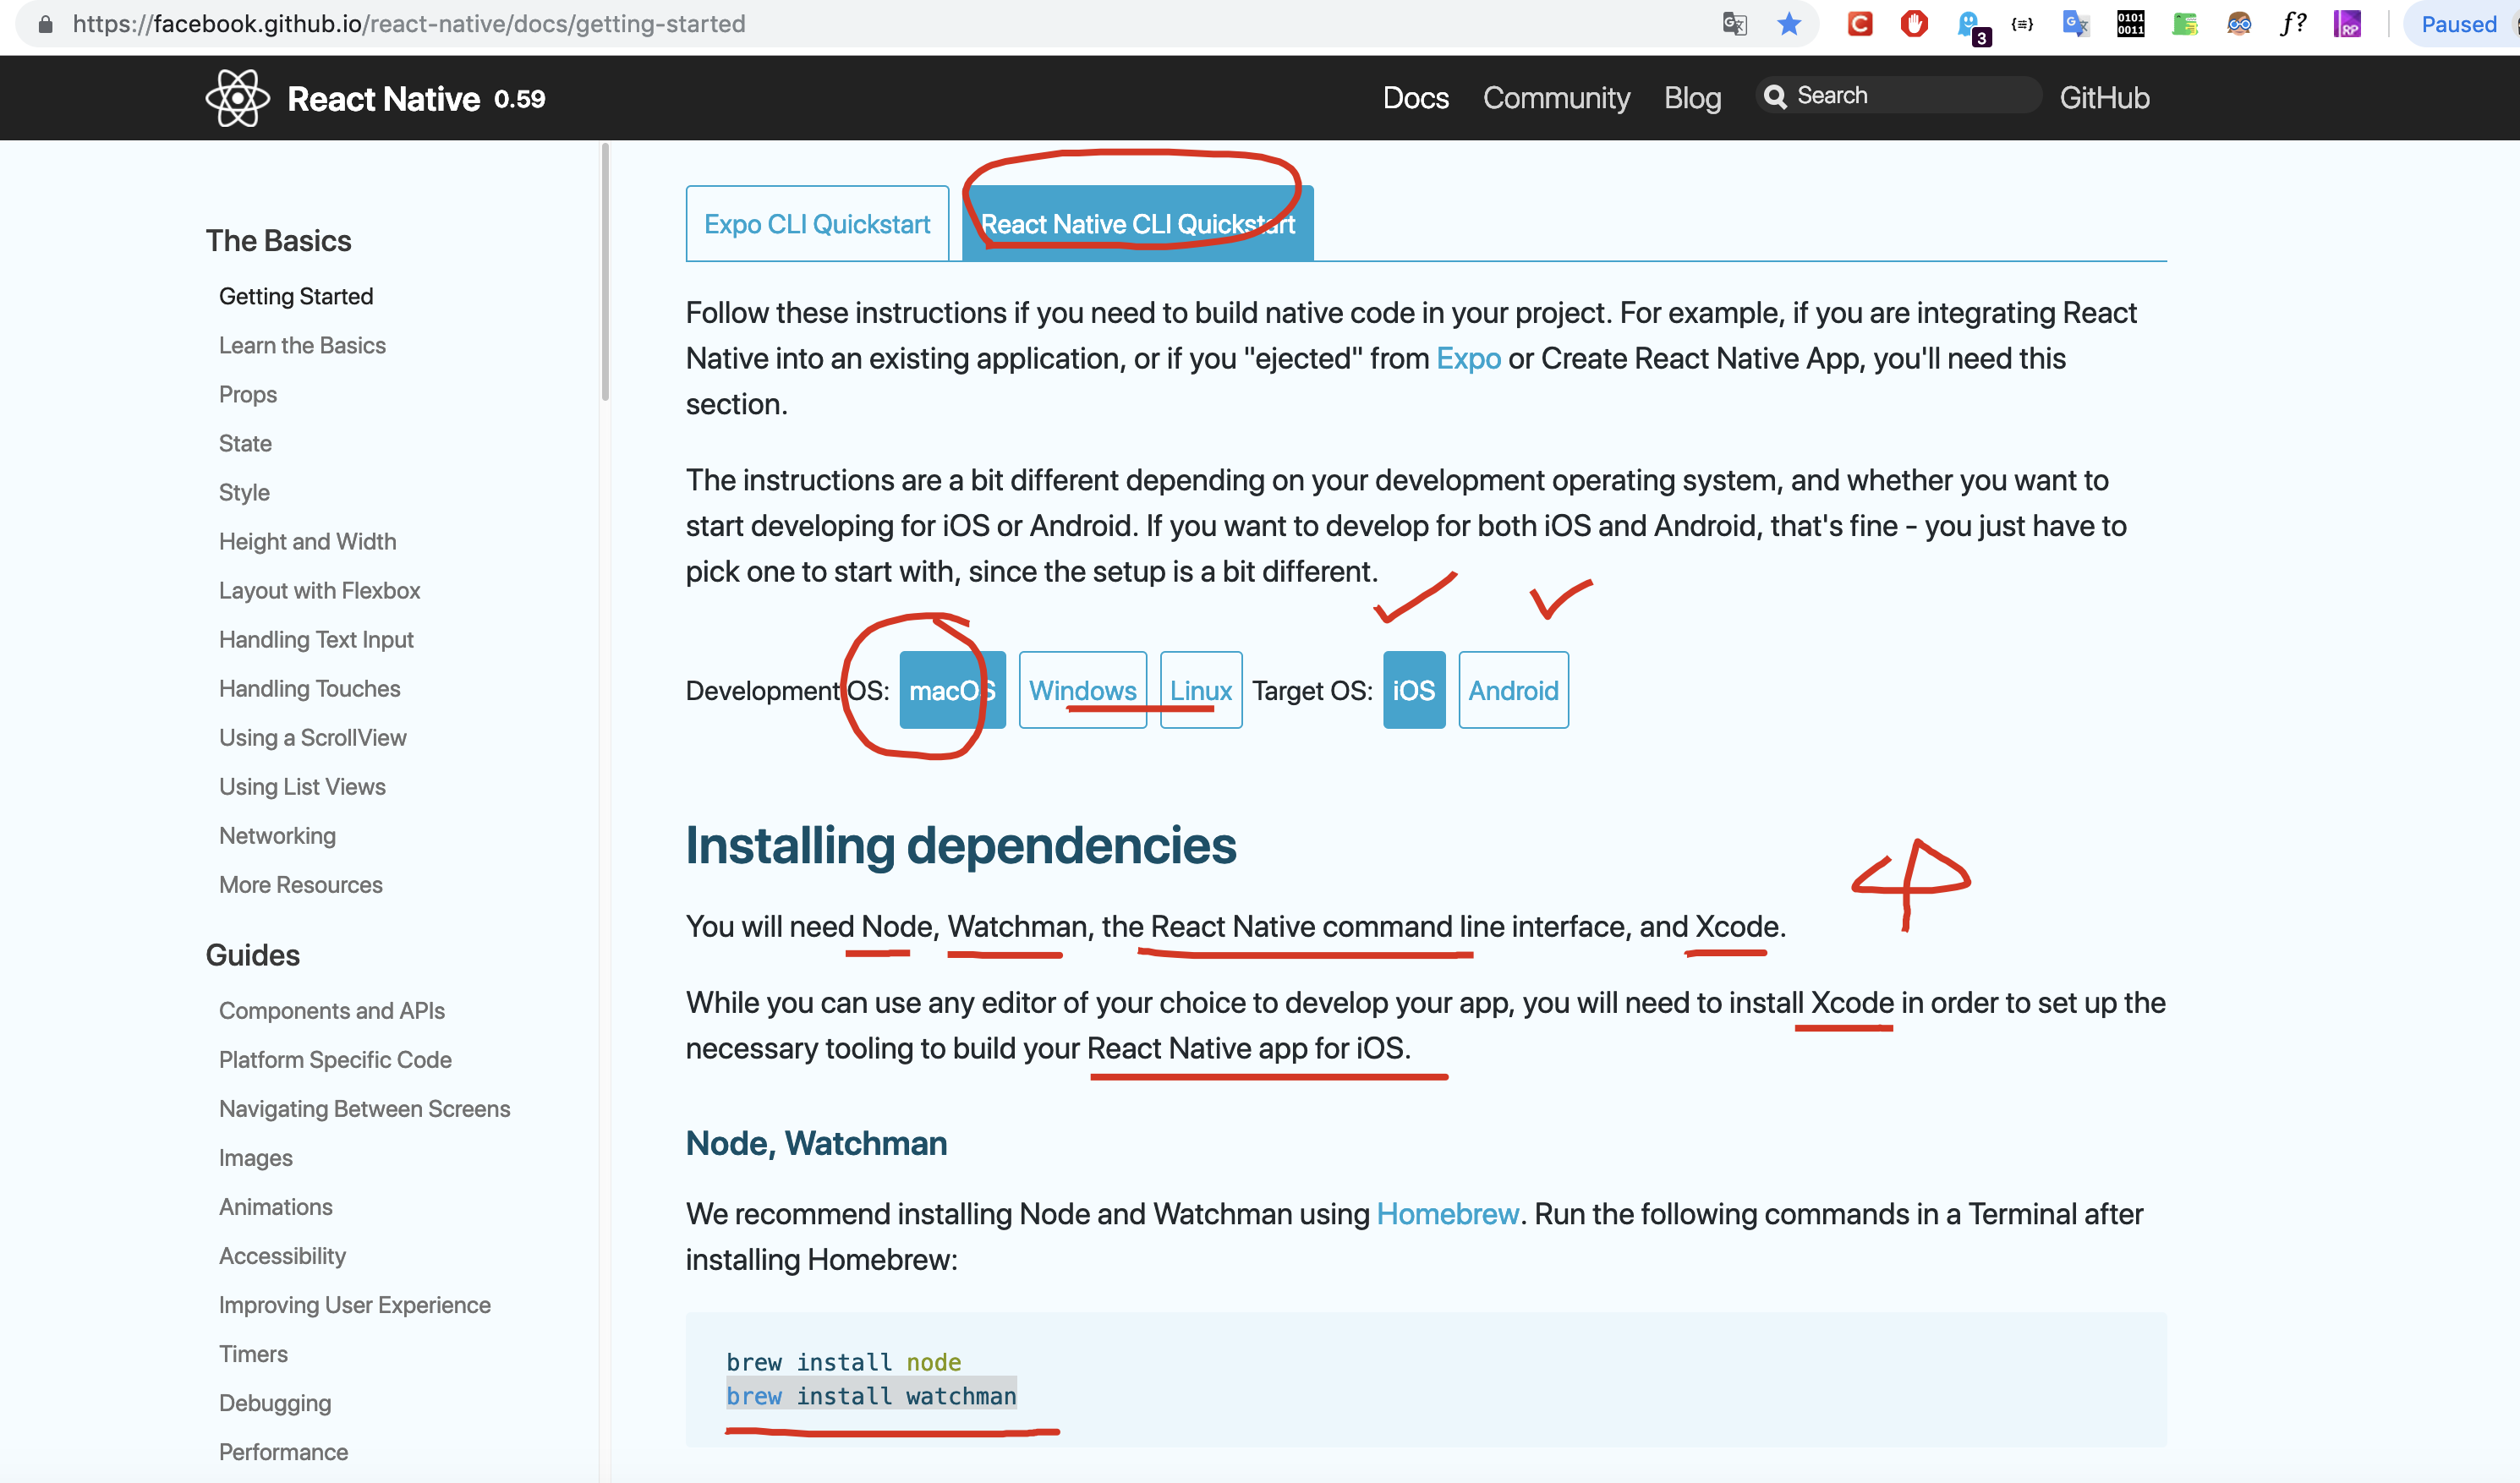
# Xcode & Android Studio
# Watchman is a tool by Facebook for watching changes in the filesystem.
$ brew install watchman
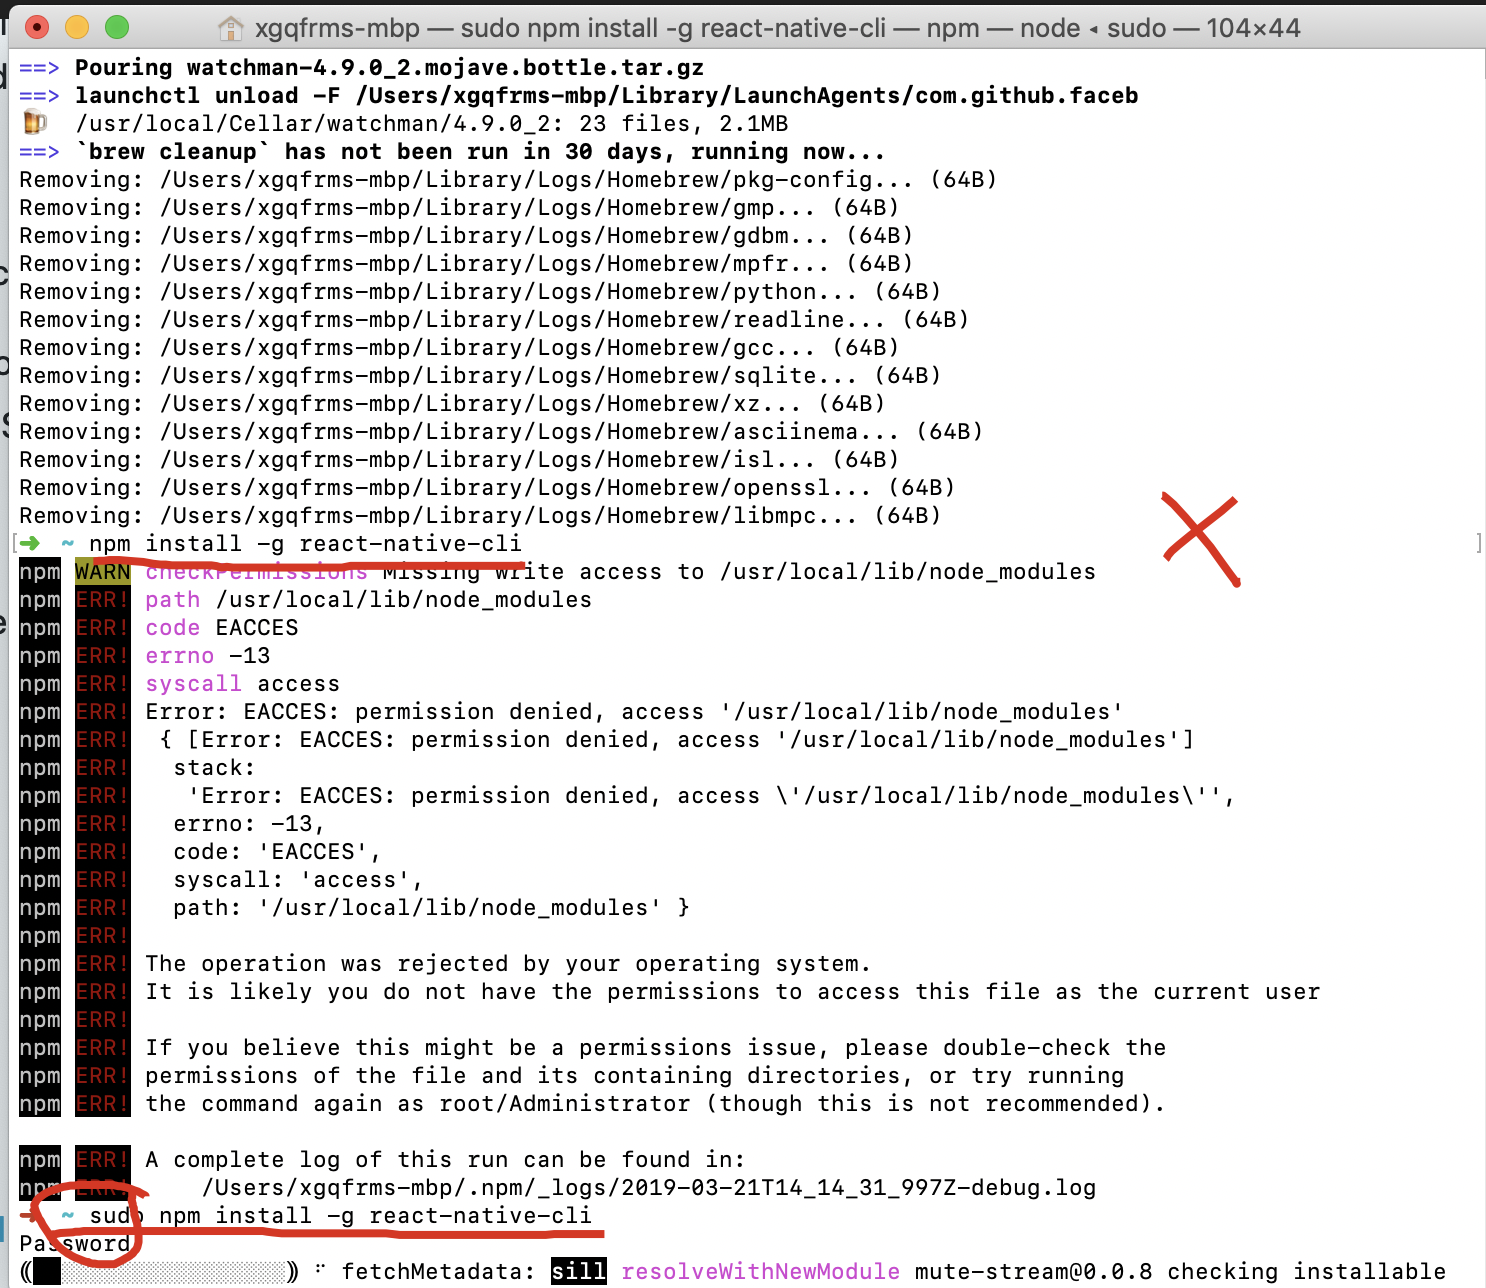
$ npm i -g react-native-cli
# OR
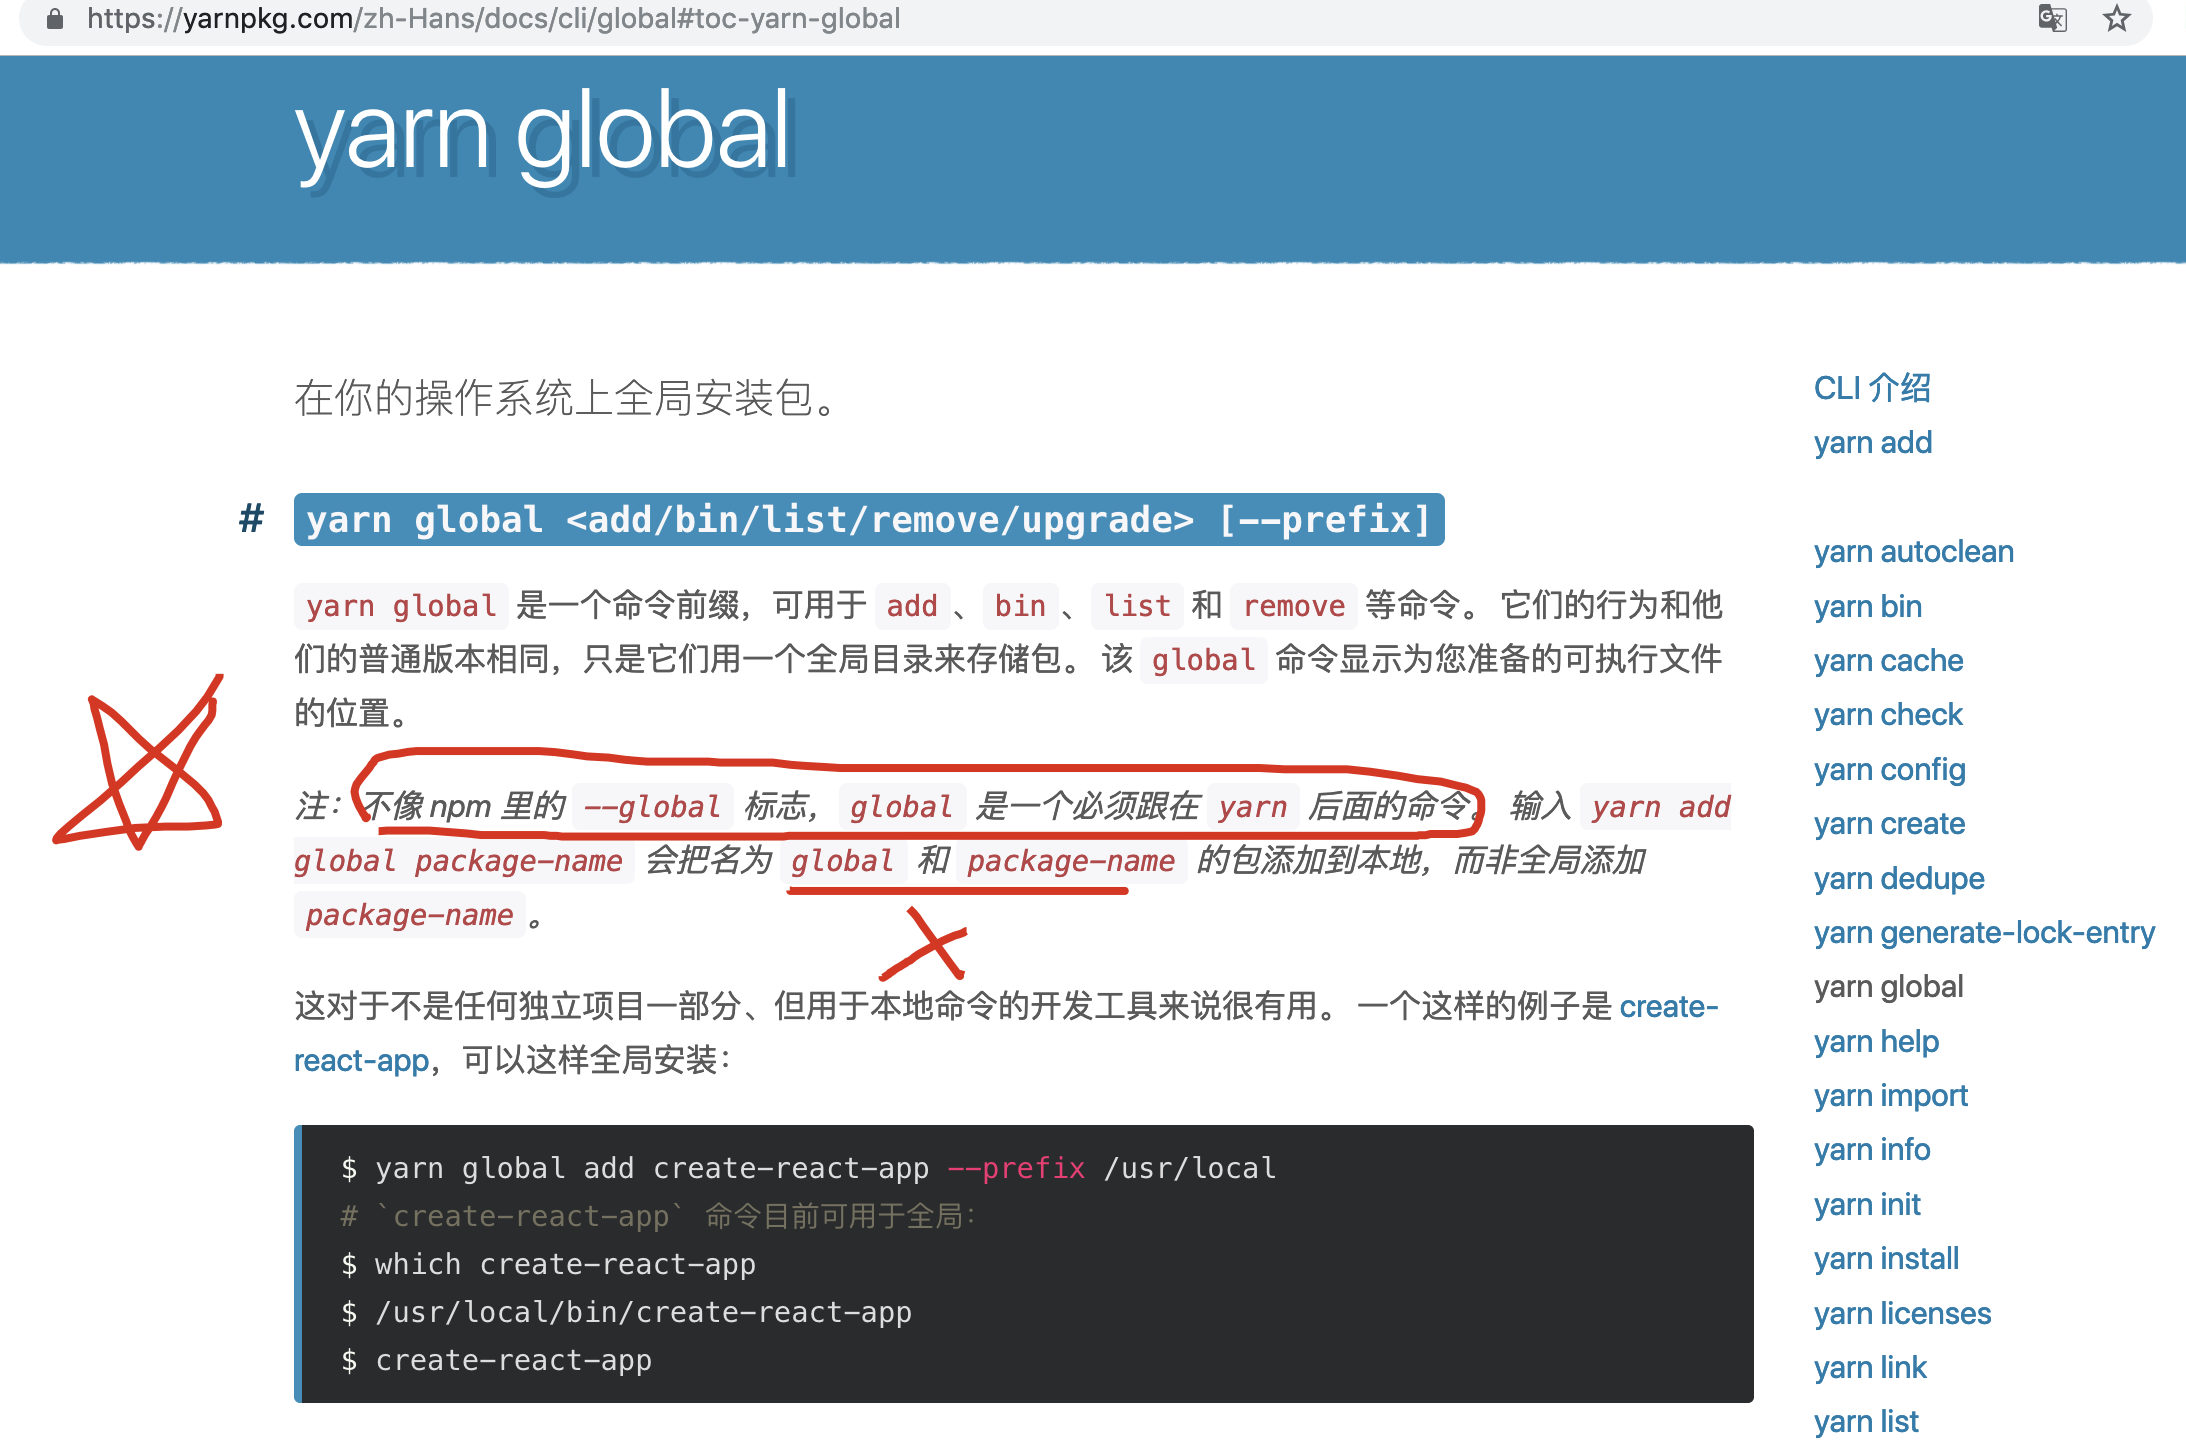
$ yarn global add react-native-cli
yarn & global
https://yarnpkg.com/zh-Hans/docs/cli/add
https://yarnpkg.com/zh-Hans/docs/cli/global
0.59.0
Latest release
https://github.com/facebook/react-native/releases
$ react-native init AwesomeProject

# Using a specific version
$ react-native init AwesomeProject --version X.XX.X
$ react-native init AwesomeProject --version react-native@next
$ react-native init demo_app

$ react-native init demo_app  --version 0.59.0
$ react-native init demo_app  --version react-native@next
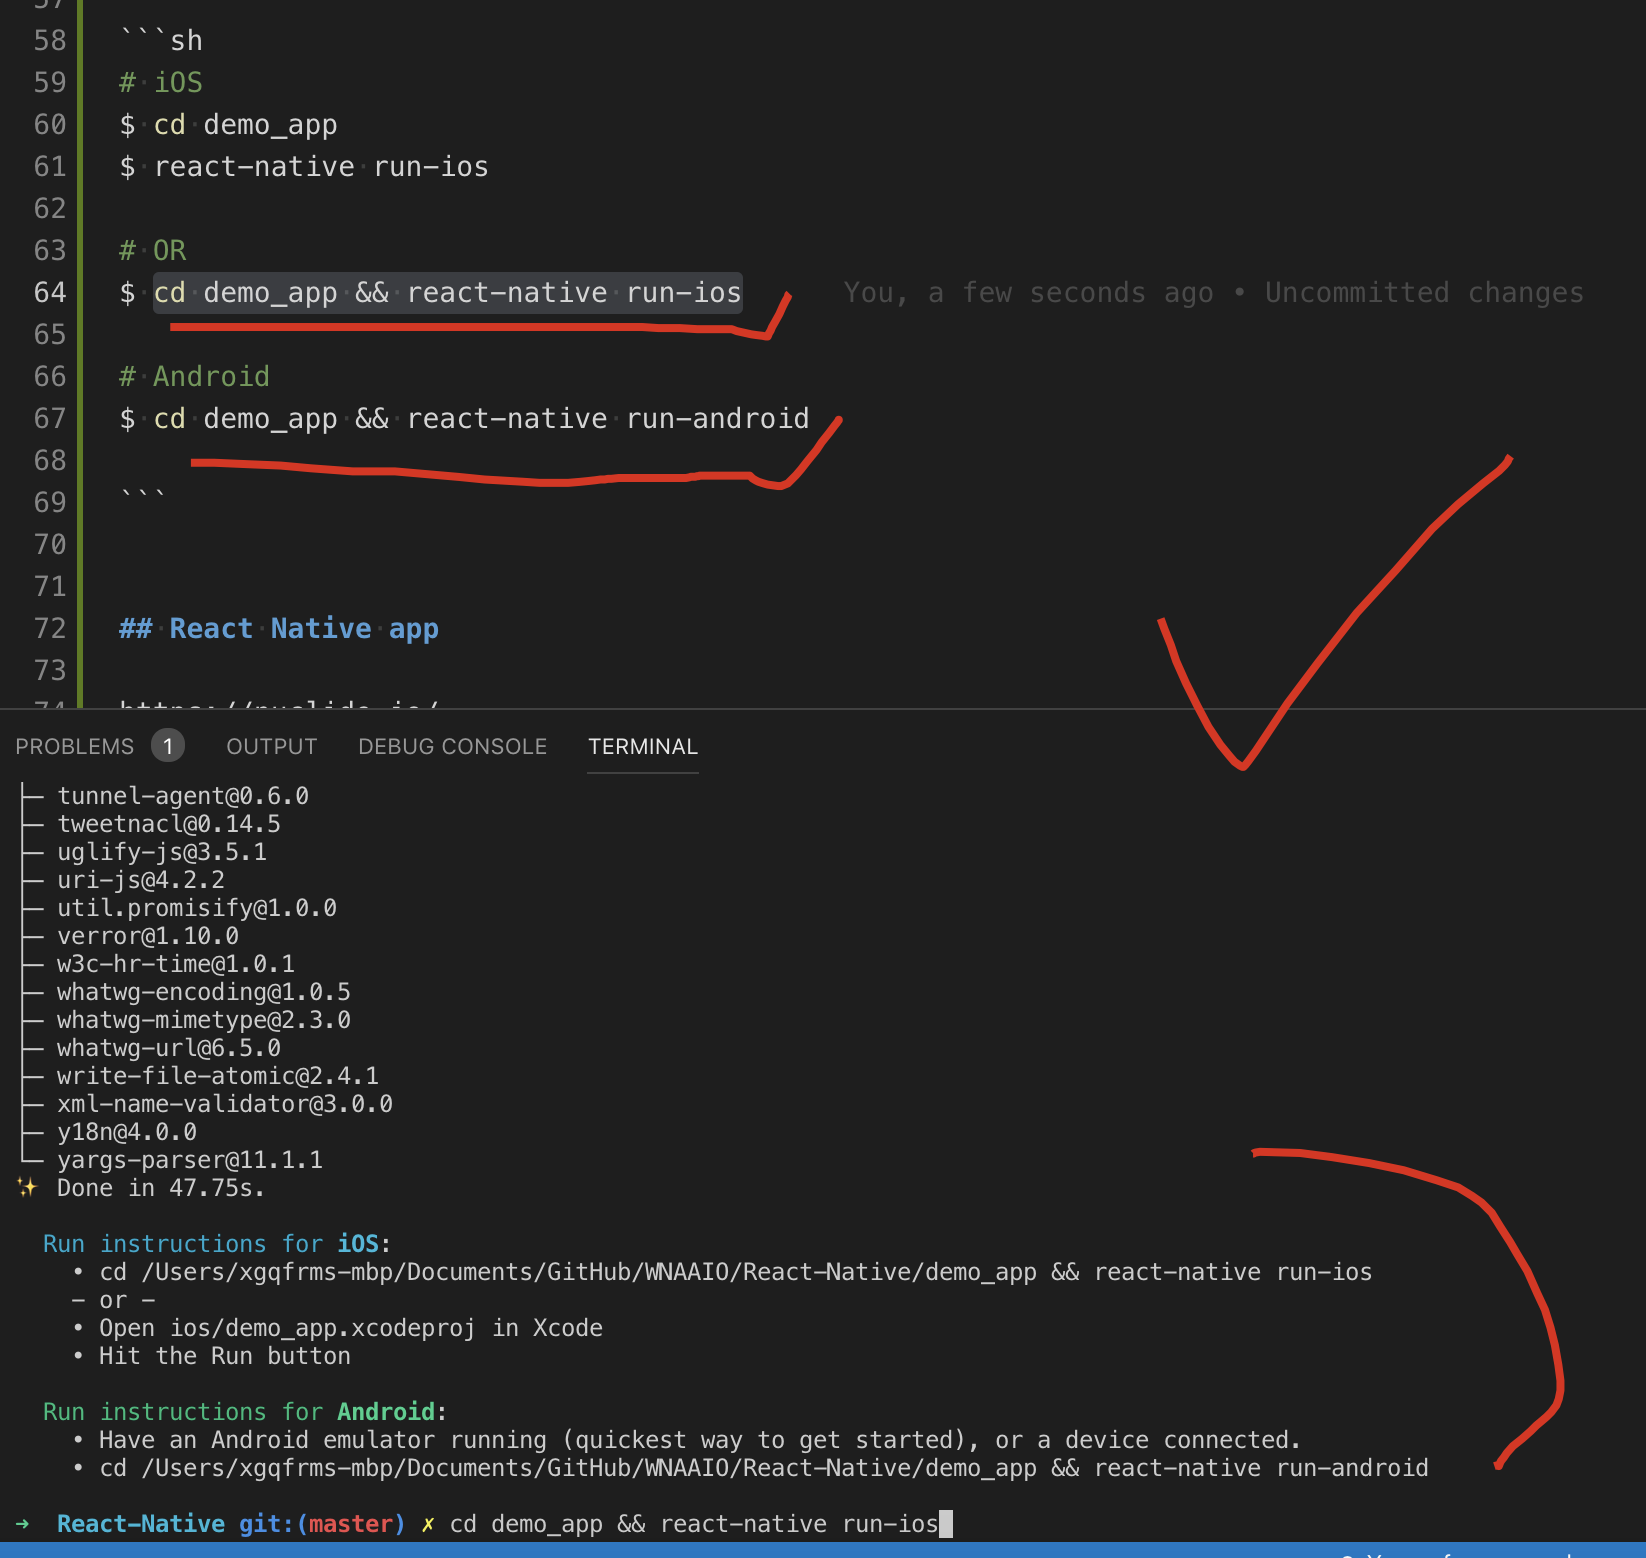
iOS & Android
# iOS
$ cd demo_app
$ react-native run-ios

# OR
$ cd demo_app && react-native run-ios

# Android
$ cd demo_app && react-native run-android
React Native Tutorial
https://www.tutorialspoint.com/react_native/index.htm
https://www.tutorialspoint.com/react_native/react_native_tutorial.pdf
https://www.raywenderlich.com/247-react-native-tutorial-building-android-apps-with-javascript
https://www.toptal.com/react-native/cold-dive-into-react-native-a-beginners-tutorial
https://school.shoutem.com/lectures/build-react-native-mobile-app-tutorial/
React
demo
https://jscomplete.com/repl/
"use strict";

/**
 *
 * @author xgqfrms
 * @license MIT
 * @copyright  React Refs
 * @description
 * @augments
 * @example
 *
 */

import React, { Component, PureComponent } from "react";
import ReactDOM from "react-dom";
import PropTypes from "prop-types";

class ReactInput extends React.Component {
    render(props) {
        return (
            <div>
                <input type="text" onChange={this.props.handleInput} />
                {/* <input type="text" ref="c" onChange={this.props.handleInput} /> */}
                <code>{this.props.message}</code>
            </div>
        );
    }
}

class ReactRefs extends React.Component {
    constructor(props) {
        super(props);
        this.state = {
            inputA: "aaa",
            inputB: "bbb",
            inputC: "ccc",
        };
        this.updateValueA = this.updateValueA.bind(this);
        this.updateValueB = this.updateValueB.bind(this);
        this.handleInput = this.handleInput.bind(this);
    }
    updateValueA(e) {
        this.setState({
            // inputA: this.refs.a.value,
            inputA: e.target.value,
            // e.target === this.refs.a
        });
    }
    updateValueB() {
        this.setState({
            inputB: this.refs.b.value,
            // this.refs.b
        });
    }
    handleInput() {
        this.setState({
            inputC: this.c.refs.input.value,
            // this.c === components (ReactInput)
        });
    }
    render() {
        return (
            <section>
                <h1>{this.props.name}</h1>
                <div>
                    <input type="text" ref="a" onChange={(e) => this.updateValueA(e)} />
                    <code>{this.state.inputA}</code>
                </div>
                <div>
                    <input type="text" ref="b" onChange={this.updateValueB} />
                    <code>{this.state.inputB}</code>
                </div>
                <ReactInput
                    ref={component => this.c = component}
                    onChange={this.handleInput}
                    message={this.state.inputC}
                />
            </section>
        );
    }
}

ReactRefs.defaultProps = {
    name: "xgqfrms",
};

ReactRefs.propTypes = {
    name: PropTypes.string.isRequired,
};

export {ReactInput, ReactRefs};
export default ReactRefs;

ReactDOM.render(<ReactRefs />, mountNode);
React and Redux
https://learn.freecodecamp.org/front-end-libraries/react/
https://learn.freecodecamp.org/front-end-libraries/redux/
https://learn.freecodecamp.org/front-end-libraries/react-and-redux/
https://learn.freecodecamp.org/front-end-libraries/react-and-redux/manage-state-locally-first
"use strict";

/**
 *
 * @author xgqfrms
 * @license MIT
 * @copyright xgqfrms
 * @created 2019-01-01
 *
 * @description react-redux
 * @augments
 * @example
 *
 */

import React, { Component, PureComponent } from "react";
// import ReactDOM from "react-dom";
// import PropTypes from "prop-types";

// class DisplayMessages extends Component {
class DisplayMessages extends React.Component {
    // change code below this line
    constructor(props) {
        super(props);
        this.state = {
            messages: [],
            input: "",
        };
        this.handleChanget = this.handleChange.bind(this);
        this.submitMessage = this.submitMessage.bind(this);
    }
    // add handleChange() and submitMessage() methods here
    handleChange(e) {
        this.setState({
            // input: this.refs.a.value,
            input: e.target.value,
            // e.target === this.refs.a
        });
    }
    submitMessage() {
        let {
            input,
            messages,
        } = this.state;
        // messages.push(input);
        // console.log(`messages =`, JSON.stringify(messages, null, 4));
        let new_messages = [...messages, input];
        console.log(`new_messages =`, JSON.stringify(new_messages, null, 4));
        this.setState({
            input: "",
            // messages: messages,
            messages: new_messages,
        });
    }
    // change code above this line
    render() {
        let {
            input,
            messages,
        } = this.state;
        return (
            <div>
                <h2>Type in a new Message:</h2>
                { /* render an input, button, and ul here */ }
                {/* <input type="text" ref="a" onChange={(e) => this.handleChange(e)} /> */}
                <input type="text" value={input} onChange={(e) => this.handleChange(e)} />
                <button onClick={this.submitMessage}>click</button>
                <ul>
                    {
                        messages.map(
                            (item, i) => {
                                return <li key={i}>{item}</li>;
                            }
                        )
                    }
                </ul>
                { /* change code above this line */ }
            </div>
        );
    }
};
help
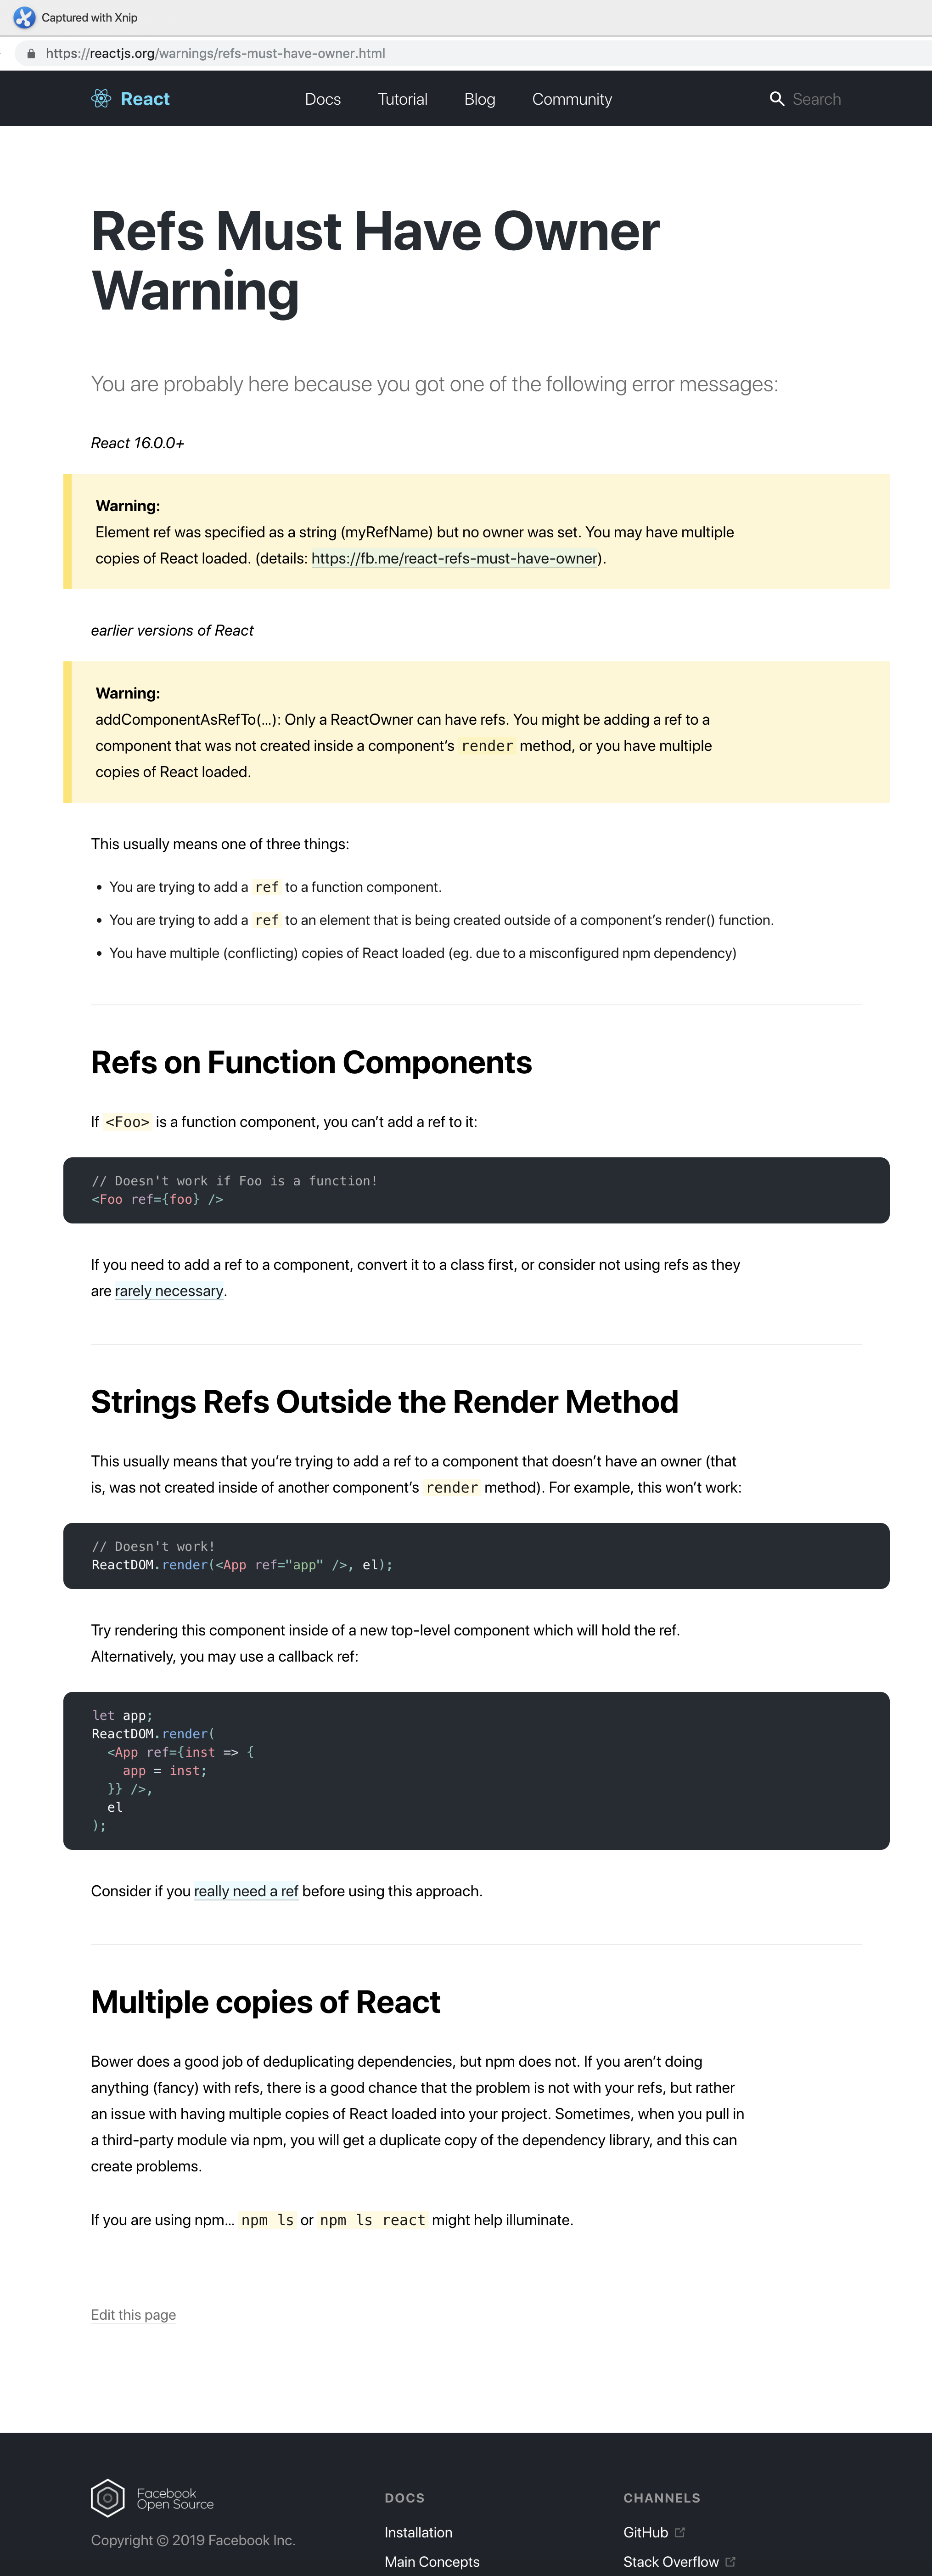
refs
https://zh-hans.reactjs.org/docs/error-decoder.html/?invariant=254&args[]=a
https://fb.me/react-refs-must-have-owner
https://reactjs.org/warnings/refs-must-have-owner.html
update state & ...arr
https://www.freecodecamp.org/forum/search?q=manage-state-locally-first
https://www.freecodecamp.org/forum/t/manage-state-locally-first-having-trouble/192075
https://www.freecodecamp.org/forum/t/manage-state-locally-first/190958
https://www.freecodecamp.org/forum/t/manage-state-locally-first/245357
React Native 中文文档
0.59
https://reactnative.cn/docs/
Android SDK

React Native & Android & iOS的更多相关文章
- React Native & Android & iOS & APK
React Native & Android & iOS & APK https://play.google.com/apps/publish/signup/ $ 25 bui ...
- react-native —— 在Windows下搭建React Native Android开发环境
在Windows下搭建React Native Android开发环境 前段时间在开发者头条收藏了 @天地之灵_邓鋆 分享的<在Windows下搭建React Native Android开发环 ...
- React native android 最常见的10个问题
这里逐条记录下最容易遇到的React native android 相关case: 1. app启动后,红色界面,unable load jsbundle : 解决办法:一般来说就是,你是用dev-s ...
- React Native Android原生模块开发实战|教程|心得|怎样创建React Native Android原生模块
尊重版权,未经授权不得转载 本文出自:贾鹏辉的技术博客(http://blog.csdn.net/fengyuzhengfan/article/details/54691503) 告诉大家一个好消息. ...
- react-native —— 在Mac上配置React Native Android开发环境排坑总结
配置React Native Android开发环境总结 1.卸载Android Studio,在终端(terminal)执行以下命令: rm -Rf /Applications/Android\ S ...
- Windows 10 & React Native & Android
Windows 10 & React Native & Android https://facebook.github.io/react-native/docs/getting-sta ...
- React Native Android启动白屏的一种解决方案上
我们用RN去开发Android应用的时候,我们会发现一个很明显的问题,这个问题就是启动时每次都会有1~3秒的白屏时间,直到项目加载出来 为什么会出现这个问题? RN开发的应用在启动时,首先会将js b ...
- React Native Android 环境搭建
因为工作需要,最近正在学习React Native Android.温故而知新,把学习的内容记录下来巩固一下知识,也给有需要的人一些帮助. 需要说明的是,我刚接触React Native也不久,对它的 ...
- React Native & Android & Text Input
React Native & Android & Text Input react native clear input value https://stackoverflow.com ...
随机推荐
- ubantu搭建oj——第一天(6.11)
oj第一份作业: 按照DMOJ的文档将代码搬运到ubantu上 sudo apt install git gcc g++ make python-dev libxml2-dev libxslt1-de ...
- 001_自定义过滤及添加文件内容脚本(nginx)
一.工作中遇到sed添加及修改在nginx末尾添加太麻烦了 需求:随意查找添加一条以前不存在的内容加到"}"前一行 实现: #!/usr/bin/env python # codi ...
- Linux并发与同步专题 (4) Mutex互斥量
关键词:mutex.MCS.OSQ. <Linux并发与同步专题 (1)原子操作和内存屏障> <Linux并发与同步专题 (2)spinlock> <Linux并发与同步 ...
- oracle 创建表空间TABLESPACE
题外话: 在oracle中,我们的数据库用户都有一个默认表空间归属,当在该用户下创建表或其他对象时默认会将其归属在默认表空间: 不排除后期修改了用户默认表空间的情况存在,此后新加入的对象默认会放置在新 ...
- djongo:Django和MongoDB连接器
在Django项目中使用MongoDB作为后端数据库,且不改变Django的ORM框架.实现Django用户管理程序对MongoDB数据库中文件的增加和修改. 用法 1.pip install djo ...
- RabbitMQ详解(一)------简介与安装
RabbitMQ 这个消息中间件,其实公司最近的项目中有用到,但是一直没有系统的整理,最近看完了<RabbitMQ实战 高效部署分布式消息队列>这本书,所以顺便写写. 那么关于 Rabb ...
- 使用Sharding-Proxy进行分库分表
Sharding-Proxy的使用 1.官网下载 sharding-jdbc的官网http://shardingsphere.io/document/current/cn/manual/shardin ...
- 【原创】研发应该懂的binlog知识(上)
引言 为什么写这篇文章? 大家当年在学MySQL的时候,为了能够迅速就业,一般是学习一下MySQL的基本语法,差不多就出山找工作了.水平稍微好一点的童鞋呢还会懂一点存储过程的编写,又或者是懂一点索引的 ...
- SpringBoot集成Shiro安全框架
跟着我的步骤:先运行起来再说 Spring集成Shiro的GitHub:https://github.com/yueshutong/shiro-imooc 一:导包 <!-- Shiro安全框架 ...
- 任务调度工具Quartz入门笔记
一,导包 1)官网下载:http://www.quartz-scheduler.org/downloads/ 2)Maven <dependency> <groupId>org ...