
SpringBoot启动过程原理(转)
1.1 Springboot启动:
@SpringBootApplication

public class ServerApplication {

    public static void main(String[] args) {

        SpringApplication.run(ServerApplication.class,args);

    }

}
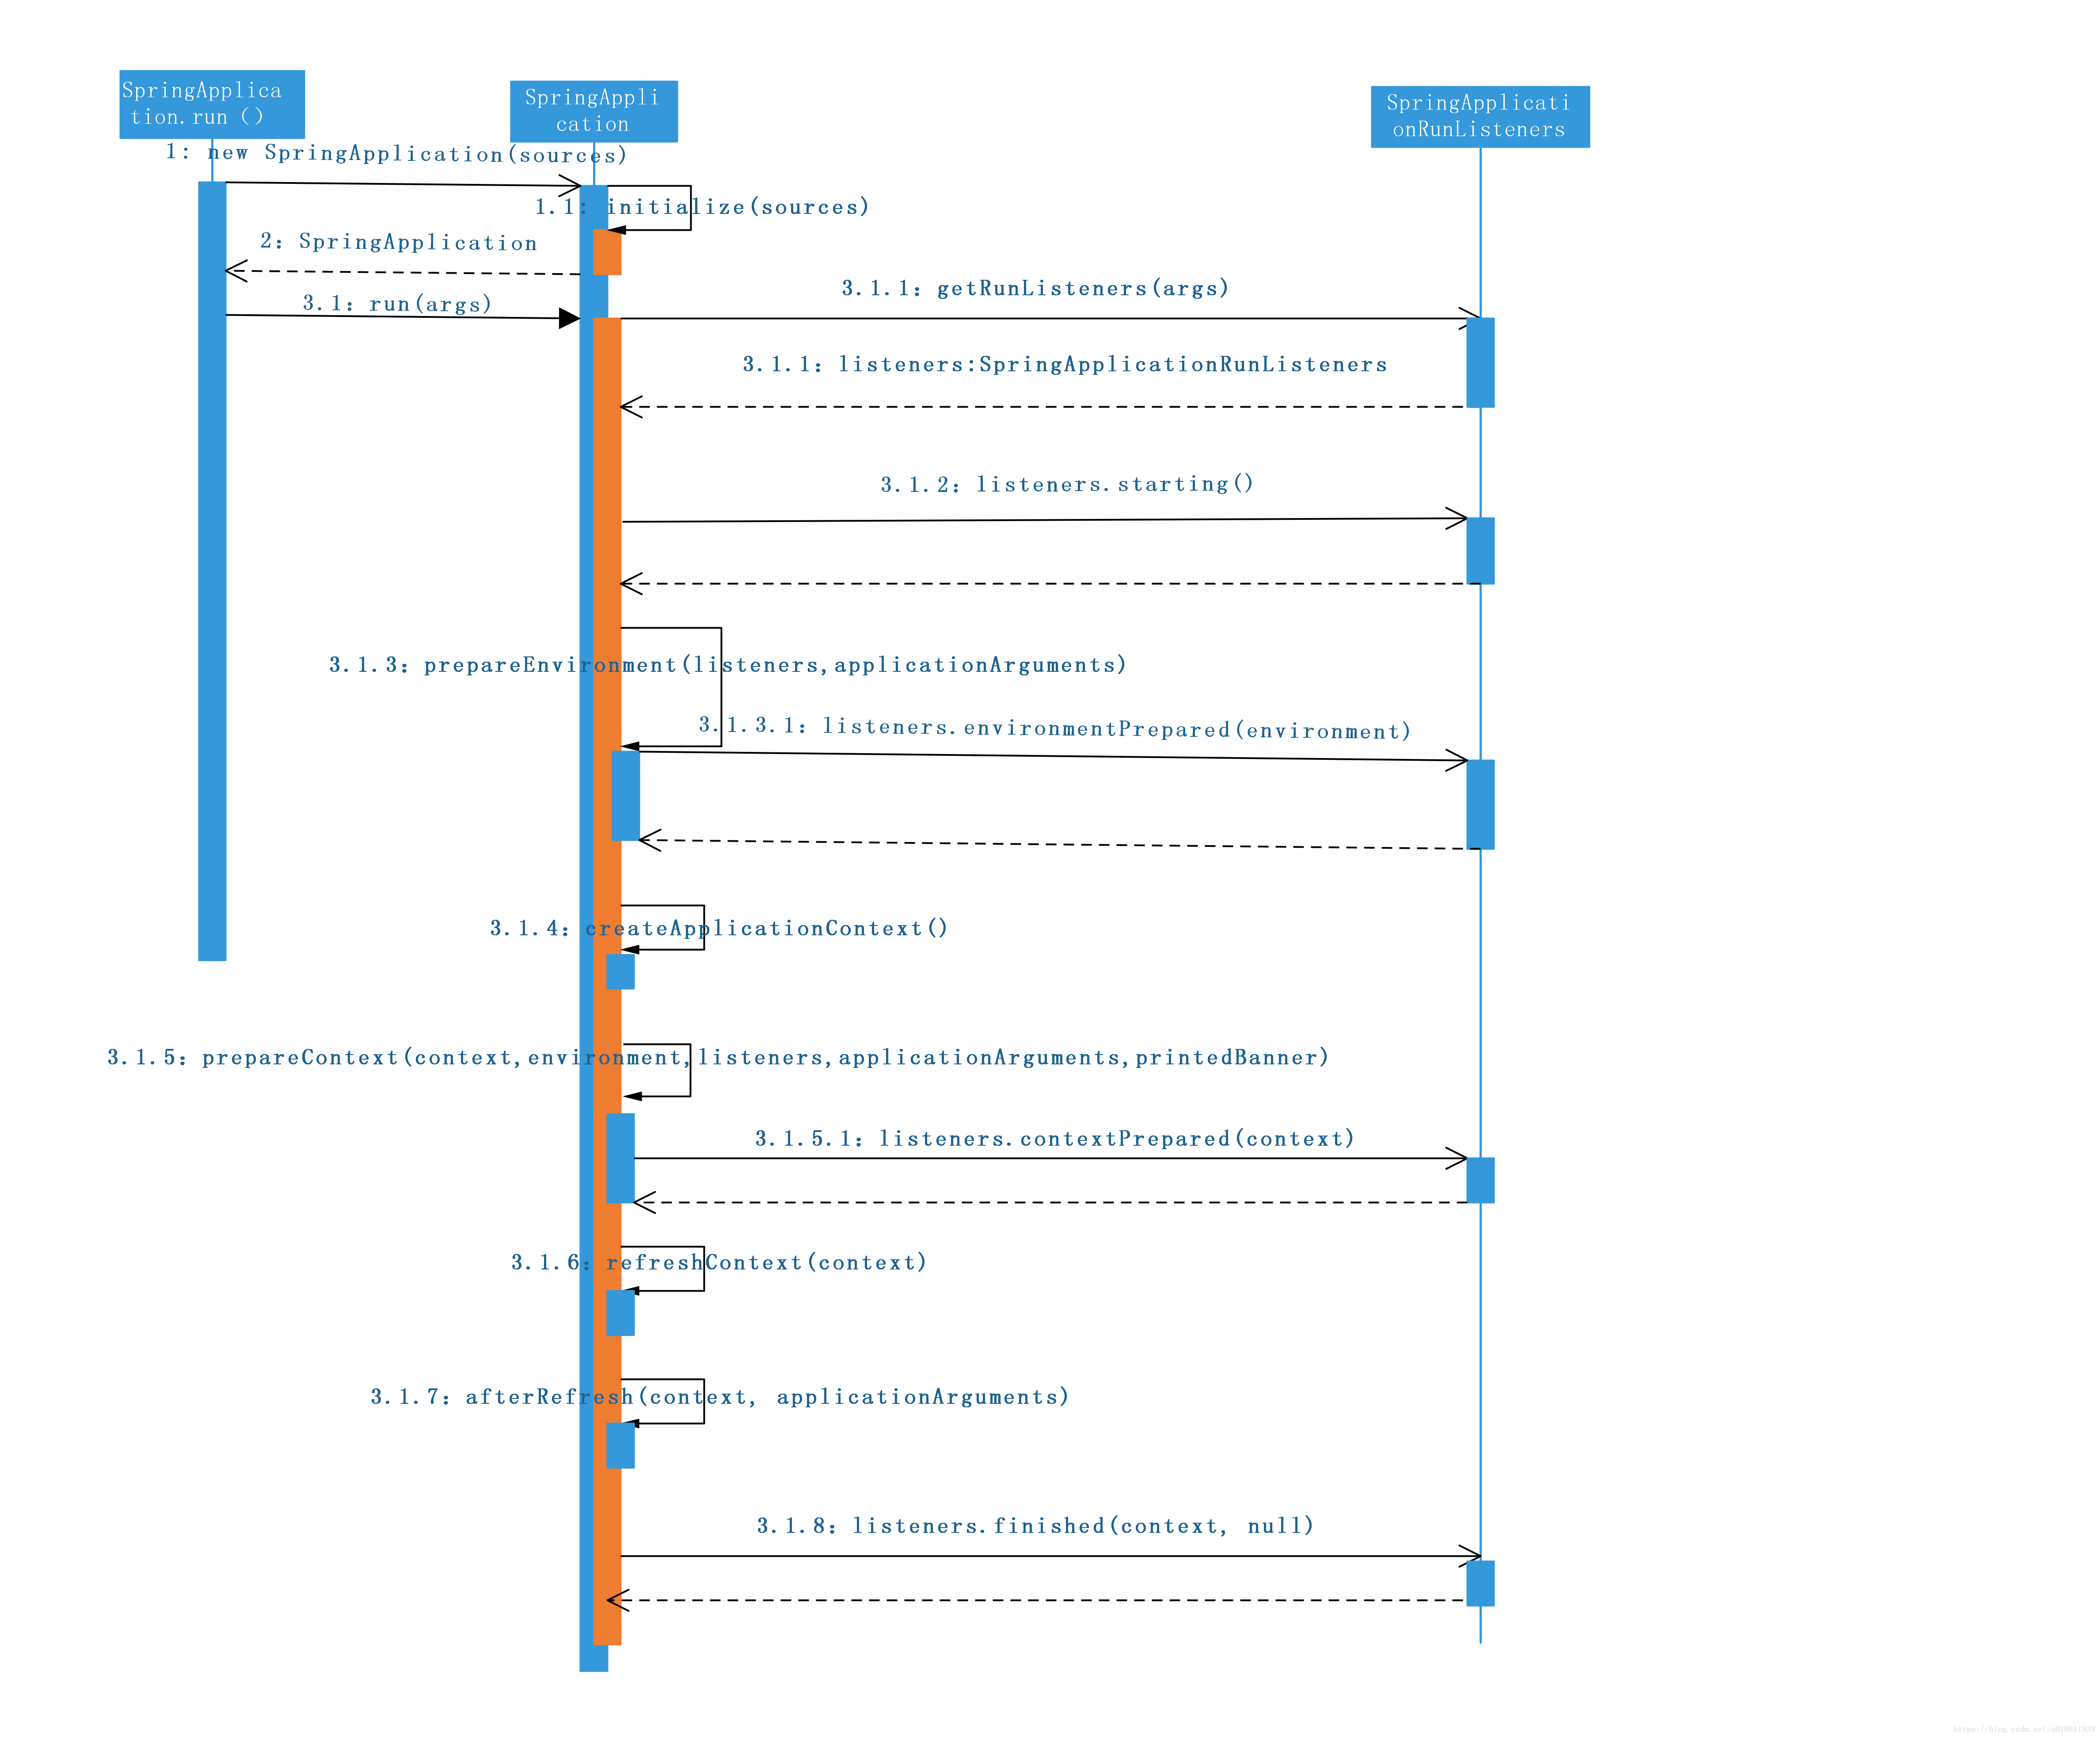
从上面代码看,调用了SpringApplication的静态方法run。这个run方法会构造一个SpringApplication的实例,然后再调用这里实例的run方法就表示启动SpringBoot。具体对象处理流程看下边时序图:
概述:
构造SpringApplication的实例(时序图步骤1-2)
调用SpringApplication.run()方法(时序图步骤3)
构造SpringApplicationRunListeners 实例(时序图步骤3.1.1)
发布ApplicationStartedEvent事件(时序图步骤3.1.2)
SpringApplicationRunListeners 实例准备环境信息(时序图步骤3.1.3)
创建ApplicationContext对象(时序图步骤3.1.4)
ApplicationContext实例准备环境信息(时序图步骤3.1.5)
刷新的上下文(时序图步骤3.1.6)
注:文章按照该顺序讲解【1.2 启动加载过程分析】
时序图:
1.2 启动加载过程分析
1.2.1 构造SpringApplication的实例(时序图步骤1-2)
代码
public static ConfigurableApplicationContext run(Object[] sources, String[] args) {

    // 步骤1

    return new SpringApplication(sources).run(args);

}

public SpringApplication(Object... sources) {

    // 步骤1.1

    initialize(sources);

}

@SuppressWarnings({ "unchecked", "rawtypes" })

private void initialize(Object[] sources) {

    if (sources != null && sources.length > 0) {

        this.sources.addAll(Arrays.asList(sources));

    }

    this.webEnvironment = deduceWebEnvironment();

    //加载META-INF/spring.factories路径ApplicationContextInitializer.class

    getSpringFactoriesInstances(

            ApplicationContextInitializer.class));

    setListeners((Collection)

    //加载META-INF/spring.factories路径ApplicationListener.class

    getSpringFactoriesInstances(ApplicationListener.class));

    this.mainApplicationClass = deduceMainApplicationClass();

}
1.2.2 步骤3.1.1:
代码
private SpringApplicationRunListeners getRunListeners(String[] args) {

        Class<?>[] types = new Class<?>[] { SpringApplication.class, String[].class };

        // (1)

        return new SpringApplicationRunListeners(logger, getSpringFactoriesInstances(

                SpringApplicationRunListener.class, types, this, args));

    }
分析
(1). 通过ClassLoader.getResources加载META-INF/spring.factories路径下的
文件信息,从中找key为SpringApplicationRunListener对应类,并实例化。
1.2.3 步骤3.1.2:
代码
public void starting() {

    for (SpringApplicationRunListener listener : this.listeners) {

        listener.starting();

    }

}

@Override

@SuppressWarnings("deprecation")

public void starting() {

    this.initialMulticaster.multicastEvent(new ApplicationStartedEvent(this.application, this.args));

}
分析
发布ApplicationStartedEvent事件。
1.2.4 步骤3.1.3:
代码
private ConfigurableEnvironment prepareEnvironment(

        SpringApplicationRunListeners listeners,

        ApplicationArguments applicationArguments) {

    // Create and configure the environment

    // ⑴. 得到环境对象ConfigurableEnvironment,没有则创建一个StandardServletEnvironment

    ConfigurableEnvironment environment = getOrCreateEnvironment();

    // ⑵. 配置环境信息(激活环境,通过从系统环境变量里取)

    configureEnvironment(environment, applicationArguments.getSourceArgs());

    // ⑶. 发布ApplicationEnvironmentPreparedEvent事件,加载配置文件,具体请看(ConfigFileApplicationListener)。

    listeners.environmentPrepared(environment);

    if (isWebEnvironment(environment) && !this.webEnvironment) {

        environment = convertToStandardEnvironment(environment);

    }

    return environment;

}

protected void configureEnvironment(ConfigurableEnvironment environment,String[] args) {

    configurePropertySources(environment, args);

    // 配置ConfigurableEnvironment中的激活属性

    configureProfiles(environment, args);

}

protected void configureProfiles(ConfigurableEnvironment environment, String[] args) {

    environment.getActiveProfiles(); // ensure they are initialized

    // additionalProfiles是项目启动时在main中SpringApplication.setAdditionalProfiles("")配置的

    Set<String> profiles = new LinkedHashSet<>(this.additionalProfiles);

    // 获取环境变量中设置的spring.profiles.active属性

    profiles.addAll(Arrays.asList(environment.getActiveProfiles()));

    // 赋值 activeProfiles

    environment.setActiveProfiles(StringUtils.toStringArray(profiles));

}
分析
⑴. 得到环境对象ConfigurableEnvironment,没有则创建一个StandardServletEnvironment
⑵. 配置激活环境信息,通过从系统环境变量里取或启动时通过SpringApplication.setAdditionalProfiles("")添加进来的
⑶. 发布ApplicationEnvironmentPreparedEvent事件,加载Spring配置文件信息,例如application.properties等。具体请看Spring Boot 属性文件(三)
步骤3.1.4:
分析
创建ApplicationContext对象 ,本文启动的是SERVLET所以会创建AnnotationConfigServletWebServerApplicationContext对象
protected ConfigurableApplicationContext createApplicationContext() {

    Class<?> contextClass = this.applicationContextClass;

    if (contextClass == null) {

        try {

            switch (this.webApplicationType) {

            case SERVLET:

                contextClass = Class.forName(DEFAULT_SERVLET_WEB_CONTEXT_CLASS);

                break;

            case REACTIVE:

                contextClass = Class.forName(DEFAULT_REACTIVE_WEB_CONTEXT_CLASS);

                break;

            default:

                contextClass = Class.forName(DEFAULT_CONTEXT_CLASS);

            }

        }

        catch (ClassNotFoundException ex) {

            throw new IllegalStateException(

                        "Unable create a default ApplicationContext, "

                                + "please specify an ApplicationContextClass",ex);

        }

    }

    return (ConfigurableApplicationContext) BeanUtils.instantiateClass(contextClass);

}

public AnnotationConfigServletWebServerApplicationContext() {

        this.reader = new AnnotatedBeanDefinitionReader(this);

        this.scanner = new ClassPathBeanDefinitionScanner(this);

}
会创建AnnotatedBeanDefinitionReader对象检测是否需要将一下对象放到Spring上下文中
// 用户配置Configuration注解,实现了BeanDefinitionRegistryPostProcessor接口,在容器刷新时,处理后置工厂处理器用来扫描Spring,注册Bean

ConfigurationClassPostProcessor

// 用于配置Autowired注解,实现了MergedBeanDefinitionPostProcessor接口

AutowiredAnnotationBeanPostProcessor

// 用于配置Required注解,实现了MergedBeanDefinitionPostProcessor接口

RequiredAnnotationBeanPostProcessor

// 用于配置JSR-250注解,实现了InstantiationAwareBeanPostProcessor接口

CommonAnnotationBeanPostProcessor

// 用于配置JPA注解

PersistenceAnnotationBeanPostProcessor

// 用于配置EventListener注解,实现了SmartInitializingSingleton接口

EventListenerMethodProcessor

// EventListener工厂

DefaultEventListenerFactory
步骤3.1.5:
代码
private void prepareContext(ConfigurableApplicationContext context,

            ConfigurableEnvironment environment, SpringApplicationRunListeners listeners,

            ApplicationArguments applicationArguments, Banner printedBanner) {

    // ⑴.对ApplicationContext设置环境变量;

    context.setEnvironment(environment);

    // ⑵.配置属性ResourceLoader和ClassLoader属性;

    postProcessApplicationContext(context);

    // ⑶.循环初始化继承ApplicationContextInitializer接口的类

    applyInitializers(context);

    listeners.contextPrepared(context);

    if (this.logStartupInfo) {

        logStartupInfo(context.getParent() == null);

        logStartupProfileInfo(context);

    }

    // Add boot specific singleton beans

    context.getBeanFactory().registerSingleton("springApplicationArguments",

            applicationArguments);

    if (printedBanner != null) {

        context.getBeanFactory().registerSingleton("springBootBanner", printedBanner);

    }

    // Load the sources

    Set<Object> sources = getSources();

    Assert.notEmpty(sources, "Sources must not be empty");

    load(context, sources.toArray(new Object[sources.size()]));

    listeners.contextLoaded(context);

}

@Override

public void setEnvironment(ConfigurableEnvironment environment) {

    super.setEnvironment(environment);

    this.reader.setEnvironment(environment);

    this.scanner.setEnvironment(environment);

}
分析:
⑴.对ApplicationContext设置环境变量;
⑵.配置属性ResourceLoader和ClassLoader属性;
⑶.调用步骤1查询出来ApplicationContextInitializer子类,循环调用initialize()方法。
@SuppressWarnings({ "rawtypes", "unchecked" })

    protected void applyInitializers(ConfigurableApplicationContext context) {

        for (ApplicationContextInitializer initializer : getInitializers()) {

            Class<?> requiredType = GenericTypeResolver.resolveTypeArgument(

                    initializer.getClass(), ApplicationContextInitializer.class);

            Assert.isInstanceOf(requiredType, context, "Unable to call initializer.");

            initializer.initialize(context);

        }

    }
⑷.发布ApplicationPreparedEvent事件。
步骤3.1.6
代码:
@Override

public void refresh() throws BeansException, IllegalStateException {

    synchronized (this.startupShutdownMonitor) {

        // ⑴.准备刷新的上下文环境

        prepareRefresh();

        // ⑵.初始化BeanFactory

        ConfigurableListableBeanFactory beanFactory = obtainFreshBeanFactory();

        // ⑶.对BeanFactory进行各种功能填充

        prepareBeanFactory(beanFactory);

        try {

            // ⑷.子类覆盖方法做额外的处理

            postProcessBeanFactory(beanFactory);

            // ⑸.激活各种BeanFactory处理器

            invokeBeanFactoryPostProcessors(beanFactory);

            // ⑹.注册拦截Bean创建的Bean处理,这里只是注册,真正调用是再拿去Bean的时候

            registerBeanPostProcessors(beanFactory);

            // ⑺.为上下文初始化Message源,即不同语言的消息体,国际化处理

            initMessageSource();

            // ⑻.初始化应用消息广播器,并放到applicationEventMulticaster bean中

            initApplicationEventMulticaster();

            // ⑼.留给子类来初始化其他bean

            onRefresh();

            // ⑽.在所有注册的bean中查找Listener bean,注册到消息广播中

            registerListeners();

            // ⑾.初始化剩下的单实例(非惰性)

            finishBeanFactoryInitialization(beanFactory);

            // ⑿.完成刷新过程,通知生命周期处理器lifecycleProcessor刷新过程,同时发出ContextRefreshEvent通知别人

            finishRefresh();

        }

        catch (BeansException ex) {

            if (logger.isWarnEnabled()) {

                logger.warn("Exception encountered during context initialization - " +

                        "cancelling refresh attempt: " + ex);

            }

            // Destroy already created singletons to avoid dangling resources.

            destroyBeans();

            // Reset 'active' flag.

            cancelRefresh(ex);

            // Propagate exception to caller.

            throw ex;

        }

        finally {

            // Reset common introspection caches in Spring's core, since we

            // might not ever need metadata for singleton beans anymore...

            resetCommonCaches();

        }

    }

}
分析:
⑴.准备刷新的上下文环境
⑵.初始化BeanFactory
⑶.对BeanFactory进行各种功能填充
⑷.子类覆盖方法做额外的处理,这里会调用子类AnnotationConfigServletWebServerApplicationContext注入
⑸.激活各种BeanFactory处理器
⑹.注册拦截Bean创建的Bean处理,这里只是注册,真正调用是再拿去Bean的时候
⑺.为上下文初始化Message源,即不同语言的消息体,国际化处理
⑻.初始化事件派发器,并放到applicationEventMulticaster bean中
⑼.留给子类来初始化其他bean
⑽.在所有注册的bean中查找Listener bean,注册到事件派发器中
⑾.初始化剩下的单实例(非惰性)
⑿.完成刷新过程,通知生命周期处理器lifecycleProcessor刷新过程,同时发出ContextRefreshEvent通知别人
⑷.子类覆盖方法做额外的处理
@Override

protected void postProcessBeanFactory(ConfigurableListableBeanFactory beanFactory) {

    super.postProcessBeanFactory(beanFactory);

    if (this.basePackages != null && this.basePackages.length > 0) {

        this.scanner.scan(this.basePackages);

    }

    if (!this.annotatedClasses.isEmpty()) {

        this.reader.register(ClassUtils.toClassArray(this.annotatedClasses));

    }

}

@Override

protected void postProcessBeanFactory(ConfigurableListableBeanFactory beanFactory) {

    // 添加后置处理器,在创建Tomcat时会利用这个后置处理器来初始化Tomcat Server类

    beanFactory.addBeanPostProcessor(

            new WebApplicationContextServletContextAwareProcessor(this));

    beanFactory.ignoreDependencyInterface(ServletContextAware.class);

    registerWebApplicationScopes();

}
添加后置处理器,在创建Tomcat时会利用这个后置处理器来初始化Tomcat Server类
⑸.激活各种BeanFactory处理器
主要利用**步骤3.1.4:**创建AnnotatedBeanDefinitionReader对象往Spring容器中注入的ConfigurationClassPostProcessor来处理组件的注入
具体请看容器刷新,
⑺.为上下文初始化Message源,即不同语言的消息体,国际化处理
protected void initMessageSource() {

    ConfigurableListableBeanFactory beanFactory = getBeanFactory();

    if (beanFactory.containsLocalBean(MESSAGE_SOURCE_BEAN_NAME)) {

        this.messageSource = beanFactory.getBean(MESSAGE_SOURCE_BEAN_NAME, MessageSource.class);

        // Make MessageSource aware of parent MessageSource.

        if (this.parent != null && this.messageSource instanceof HierarchicalMessageSource) {

            HierarchicalMessageSource hms = (HierarchicalMessageSource) this.messageSource;

            if (hms.getParentMessageSource() == null) {

                // Only set parent context as parent MessageSource if no parent MessageSource

                // registered already.

                hms.setParentMessageSource(getInternalParentMessageSource());

            }

        }

        if (logger.isDebugEnabled()) {

            logger.debug("Using MessageSource [" + this.messageSource + "]");

        }

    }

    else {

    //

        // Use empty MessageSource to be able to accept getMessage calls.

        DelegatingMessageSource dms = new DelegatingMessageSource();

        dms.setParentMessageSource(getInternalParentMessageSource());

        this.messageSource = dms;

        beanFactory.registerSingleton(MESSAGE_SOURCE_BEAN_NAME, this.messageSource);

        if (logger.isDebugEnabled()) {

            logger.debug("Unable to locate MessageSource with name '" + MESSAGE_SOURCE_BEAN_NAME +

                    "': using default [" + this.messageSource + "]");

        }

    }

}
如果容器中没有则创建一个DelegatingMessageSource国际化,并将它注册到Spring容器中
⑻.初始化事件派发器,并放到applicationEventMulticaster bean中
protected void initApplicationEventMulticaster() {

    ConfigurableListableBeanFactory beanFactory = getBeanFactory();

    if (beanFactory.containsLocalBean(APPLICATION_EVENT_MULTICASTER_BEAN_NAME)) {

        this.applicationEventMulticaster =

                beanFactory.getBean(APPLICATION_EVENT_MULTICASTER_BEAN_NAME, ApplicationEventMulticaster.class);

        if (logger.isDebugEnabled()) {

            logger.debug("Using ApplicationEventMulticaster [" + this.applicationEventMulticaster + "]");

        }

    }

    else {

        this.applicationEventMulticaster = new SimpleApplicationEventMulticaster(beanFactory);

        beanFactory.registerSingleton(APPLICATION_EVENT_MULTICASTER_BEAN_NAME, this.applicationEventMulticaster);

        if (logger.isDebugEnabled()) {

            logger.debug("Unable to locate ApplicationEventMulticaster with name '" +

                    APPLICATION_EVENT_MULTICASTER_BEAN_NAME +

                    "': using default [" + this.applicationEventMulticaster + "]");

        }

    }

}
如果容器中没有则创建一个SimpleApplicationEventMulticaster事件派发器,并将它注册到Spring容器中
⑼.留给子类来初始化其他bean
主要目的是初始化Tomcat等内置服务器
SpingBoot启动过程二
⑽.在所有注册的bean中查找Listener bean,注册到事件派发器中
protected void registerListeners() {

        // Register statically specified listeners first.

        for (ApplicationListener<?> listener : getApplicationListeners()) {

            getApplicationEventMulticaster().addApplicationListener(listener);

        }

        // Do not initialize FactoryBeans here: We need to leave all regular beans

        // uninitialized to let post-processors apply to them!

        // 从容器中获取所有的事件监听器,添加到事件派发器

        String[] listenerBeanNames = getBeanNamesForType(ApplicationListener.class, true, false);

        for (String listenerBeanName : listenerBeanNames) {

            getApplicationEventMulticaster().addApplicationListenerBean(listenerBeanName);

        }

        // Publish early application events now that we finally have a multicaster...

        // 如果早期有些事件,则在此将其派发出去

        Set<ApplicationEvent> earlyEventsToProcess = this.earlyApplicationEvents;

        this.earlyApplicationEvents = null;

        if (earlyEventsToProcess != null) {

            for (ApplicationEvent earlyEvent : earlyEventsToProcess) {

                getApplicationEventMulticaster().multicastEvent(earlyEvent);

            }

        }

    }
⑾.初始化剩下的单实例(非惰性)
protected void finishBeanFactoryInitialization(ConfigurableListableBeanFactory beanFactory) {

    if (beanFactory.containsBean(CONVERSION_SERVICE_BEAN_NAME) &&

            beanFactory.isTypeMatch(CONVERSION_SERVICE_BEAN_NAME, ConversionService.class)) {

        beanFactory.setConversionService(

                beanFactory.getBean(CONVERSION_SERVICE_BEAN_NAME, ConversionService.class));

    }

    if (!beanFactory.hasEmbeddedValueResolver()) {

        beanFactory.addEmbeddedValueResolver(strVal -> getEnvironment().resolvePlaceholders(strVal));

    }

    String[] weaverAwareNames = beanFactory.getBeanNamesForType(LoadTimeWeaverAware.class, false, false);

    for (String weaverAwareName : weaverAwareNames) {

        getBean(weaverAwareName);

    }

    beanFactory.setTempClassLoader(null);

    beanFactory.freezeConfiguration();

    // 实例化单实例bean

    beanFactory.preInstantiateSingletons();

}

@Override

public void preInstantiateSingletons() throws BeansException {

    if (logger.isDebugEnabled()) {

        logger.debug("Pre-instantiating singletons in " + this);

    }

    // 获取容器中所有的Bean,实例化

    List<String> beanNames = new ArrayList<>(this.beanDefinitionNames);

    for (String beanName : beanNames) {

        RootBeanDefinition bd = getMergedLocalBeanDefinition(beanName);

        // 如果不是抽象,是单实例,并且不是懒加载

        if (!bd.isAbstract() && bd.isSingleton() && !bd.isLazyInit()) {

        // 没有实现FactoryBean接口的Bean

            if (isFactoryBean(beanName)) {

                Object bean = getBean(FACTORY_BEAN_PREFIX + beanName);

                if (bean instanceof FactoryBean) {

                    final FactoryBean<?> factory = (FactoryBean<?>) bean;

                    boolean isEagerInit;

                    if (System.getSecurityManager() != null && factory instanceof SmartFactoryBean) {

                        isEagerInit = AccessController.doPrivileged((PrivilegedAction<Boolean>)

                                        ((SmartFactoryBean<?>) factory)::isEagerInit,

                                getAccessControlContext());

                    }

                    else {

                        isEagerInit = (factory instanceof SmartFactoryBean &&

                                ((SmartFactoryBean<?>) factory).isEagerInit());

                    }

                    if (isEagerInit) {

                        getBean(beanName);

                    }

                }

            }

            else {

                getBean(beanName);

            }

        }

    }

    // Trigger post-initialization callback for all applicable beans...

    for (String beanName : beanNames) {

        Object singletonInstance = getSingleton(beanName);

        if (singletonInstance instanceof SmartInitializingSingleton) {

            final SmartInitializingSingleton smartSingleton = (SmartInitializingSingleton) singletonInstance;

            if (System.getSecurityManager() != null) {

                AccessController.doPrivileged((PrivilegedAction<Object>) () -> {

                    smartSingleton.afterSingletonsInstantiated();

                    return null;

                }, getAccessControlContext());

            }

            else {

                smartSingleton.afterSingletonsInstantiated();

            }

        }

    }

}
首先判断Bean不是抽象,是单实例,不是懒加载,再判断Bean没有实现FactoryBean,则调用getBean()方法创建Bean
1 getBean方法创建Bean
@Override

public Object getBean(String name) throws BeansException {

    return doGetBean(name, null, null, false);

}

@SuppressWarnings("unchecked")

protected <T> T doGetBean(final String name, @Nullable final Class<T> requiredType,

        @Nullable final Object[] args, boolean typeCheckOnly) throws BeansException {

    final String beanName = transformedBeanName(name);

    Object bean;

    // Eagerly check singleton cache for manually registered singletons.

    Object sharedInstance = getSingleton(beanName);

    if (sharedInstance != null && args == null) {

        if (logger.isDebugEnabled()) {

            if (isSingletonCurrentlyInCreation(beanName)) {

                logger.debug("Returning eagerly cached instance of singleton bean '" + beanName +

                        "' that is not fully initialized yet - a consequence of a circular reference");

            }

            else {

                logger.debug("Returning cached instance of singleton bean '" + beanName + "'");

            }

        }

        bean = getObjectForBeanInstance(sharedInstance, name, beanName, null);

    }    else {

        ........省略

        // 如果实现了dependsOn则现将dependsOn创建出来

        String[] dependsOn = mbd.getDependsOn();

        if (dependsOn != null) {

            for (String dep : dependsOn) {

                if (isDependent(beanName, dep)) {

                    throw new BeanCreationException(mbd.getResourceDescription(), beanName,

                            "Circular depends-on relationship between '" + beanName + "' and '" + dep + "'");

                }

                registerDependentBean(dep, beanName);

                try {

                    getBean(dep);

                }

                catch (NoSuchBeanDefinitionException ex) {

                    throw new BeanCreationException(mbd.getResourceDescription(), beanName,

                            "'" + beanName + "' depends on missing bean '" + dep + "'", ex);

                }

            }

        }

        // 单实例Bean创建

        if (mbd.isSingleton()) {

            sharedInstance = getSingleton(beanName, () -> {

                try {

                    return createBean(beanName, mbd, args);

                }

                catch (BeansException ex) {

                    destroySingleton(beanName);

                    throw ex;

                }

            });

            bean = getObjectForBeanInstance(sharedInstance, name, beanName, mbd);

        }

    }

}
1.1 createBean
@Override

protected Object createBean(String beanName, RootBeanDefinition mbd, @Nullable Object[] args)

        throws BeanCreationException {

....省略

    try {

    // 处理InstantiationAwareBeanPostProcessor类型的后置处理器

        Object bean = resolveBeforeInstantiation(beanName, mbdToUse);

        if (bean != null) {

            return bean;

        }

    }

    catch (Throwable ex) {

    }

    try {

    // 创建Bean

        Object beanInstance = doCreateBean(beanName, mbdToUse, args);

        if (logger.isDebugEnabled()) {

            logger.debug("Finished creating instance of bean '" + beanName + "'");

        }

        return beanInstance;

    }

    catch (BeanCreationException | ImplicitlyAppearedSingletonException ex) {

    }

    catch (Throwable ex) {

    }

}
会先调用resolveBeforeInstantiation,判断当前后置处理器是否是InstantiationAwareBeanPostProcessor,如果是,则提前执行applyBeanPostProcessorsBeforeInstantiation,如果applyBeanPostProcessorsBeforeInstantiation方法返回的结果不是null,则执行applyBeanPostProcessorsAfterInitialization方法,如果最终结果不是null则直接返回不是则进行doCreateBean方法
protected Object resolveBeforeInstantiation(String beanName, RootBeanDefinition mbd) {

    Object bean = null;

    if (!Boolean.FALSE.equals(mbd.beforeInstantiationResolved)) {

        // Make sure bean class is actually resolved at this point.

        if (!mbd.isSynthetic() && hasInstantiationAwareBeanPostProcessors()) {

            Class<?> targetType = determineTargetType(beanName, mbd);

            if (targetType != null) {

            bean = applyBeanPostProcessorsBeforeInstantiation(targetType, beanName);

                if (bean != null) {

                    bean = applyBeanPostProcessorsAfterInitialization(bean, beanName);

                }

            }

        }

        mbd.beforeInstantiationResolved = (bean != null);

    }

    return bean;

}
1.1.1 doCreateBean方法
protected Object doCreateBean(final String beanName, final RootBeanDefinition mbd, final @Nullable Object[] args)throws BeanCreationException {

    BeanWrapper instanceWrapper = null;

    ....省略

    // 创建bean实例

    final Object bean = instanceWrapper.getWrappedInstance();

    ....省略

    synchronized (mbd.postProcessingLock) {

        if (!mbd.postProcessed) {

            try {

               // 触发后置处理器MergedBeanDefinitionPostProcessor

                applyMergedBeanDefinitionPostProcessors(mbd, beanType, beanName);

            }

            catch (Throwable ex) {

                throw new BeanCreationException(mbd.getResourceDescription(), beanName,

                        "Post-processing of merged bean definition failed", ex);

            }

            mbd.postProcessed = true;

        }

    }

        ....省略

    Object exposedObject = bean;

    try {

        // 为bean属性赋值

        populateBean(beanName, mbd, instanceWrapper);

        exposedObject = initializeBean(beanName, exposedObject, mbd);

    }

}
创建Bean,触发后置处理器MergedBeanDefinitionPostProcessor,执行postProcessMergedBeanDefinition方法
1.1.1.1populateBean方法
protected void populateBean(String beanName, RootBeanDefinition mbd, @Nullable BeanWrapper bw) {

    if (!mbd.isSynthetic() && hasInstantiationAwareBeanPostProcessors()) {

        for (BeanPostProcessor bp : getBeanPostProcessors()) {

            if (bp instanceof InstantiationAwareBeanPostProcessor) {

                InstantiationAwareBeanPostProcessor ibp = (InstantiationAwareBeanPostProcessor) bp;

                    // 执行后置处理器InstantiationAwareBeanPostProcessor的postProcessAfterInstantiation方法

                if (!ibp.postProcessAfterInstantiation(bw.getWrappedInstance(), beanName)) {

                    continueWithPropertyPopulation = false;

                    break;

                }

            }

        }

    }

        ....省略

        if (hasInstAwareBpps || needsDepCheck) {

        if (pvs == null) {

            pvs = mbd.getPropertyValues();

        }

        PropertyDescriptor[] filteredPds = filterPropertyDescriptorsForDependencyCheck(bw, mbd.allowCaching);

        if (hasInstAwareBpps) {

            for (BeanPostProcessor bp : getBeanPostProcessors()) {

                if (bp instanceof InstantiationAwareBeanPostProcessor) {

                // 执行后置处理器InstantiationAwareBeanPostProcessor的postProcessPropertyValues方法

                    InstantiationAwareBeanPostProcessor ibp = (InstantiationAwareBeanPostProcessor) bp;

                    pvs = ibp.postProcessPropertyValues(pvs, filteredPds, bw.getWrappedInstance(), beanName);

                    if (pvs == null) {

                        return;

                    }

                }

            }

        }

        if (needsDepCheck) {

            checkDependencies(beanName, mbd, filteredPds, pvs);

        }

    }

    ....省略

// 为属性赋值

    if (pvs != null) {

        applyPropertyValues(beanName, mbd, bw, pvs);

    }

}
1.1.1.2 initializeBean方法
protected Object initializeBean(final String beanName, final Object bean, @Nullable RootBeanDefinition mbd) {

    if (System.getSecurityManager() != null) {

        AccessController.doPrivileged((PrivilegedAction<Object>) () -> {

            invokeAwareMethods(beanName, bean);

            return null;

        }, getAccessControlContext());

    }

    else {

    // 处理Aware接口

        invokeAwareMethods(beanName, bean);

    }

    Object wrappedBean = bean;

    if (mbd == null || !mbd.isSynthetic()) {

    // 后置处理器触发postProcessBeforeInitialization方法

        wrappedBean = applyBeanPostProcessorsBeforeInitialization(wrappedBean, beanName);

    }

    try {

    // 执行初始化方法

        invokeInitMethods(beanName, wrappedBean, mbd);

    }

    catch (Throwable ex) {

        throw new BeanCreationException(

                (mbd != null ? mbd.getResourceDescription() : null),

                beanName, "Invocation of init method failed", ex);

    }

    if (mbd == null || !mbd.isSynthetic()) {

        // 后置处理器触发postProcessAfterInitialization方法

        wrappedBean = applyBeanPostProcessorsAfterInitialization(wrappedBean, beanName);

    }

    return wrappedBean;

}
其它:
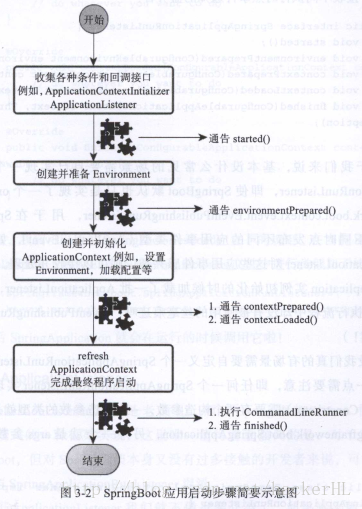
SpringBoot_run()启动流程
SpringApplication实例初始化:
a)、根据classpath里面是否存在特征类(org.springframework.web.context.ConfigurableWebApplicationCobtext)来决定创建为web应用使用ApplicationContext类型,还是标准Standalone应用使用的ApplicationContext类型。
b)、使用SpringFactoriesLoader在classpath中查找并加载所有可用的ApplicationContextInitiazier
c)、使用SpringFactoriesLoader在classpath中查找并加载所有可用的ApplicationListener
d)、推断并main方法的定义类
SpringApplication实例初始化完成,遍历SpringFactoriesLoader可以找到并加载的SpringApplicationRunListnner,调用他们的start()方法。
创建并配置当前SpringBoot应用将要使用的Envrioment(包括配置要使用的PropertySource以及Profile)
遍历调用所有SpringApplicationRunListener的environmentPrepared()的方法——即通知【run监听器SpringBoot应用的使用环境已经搭建完成】
创建对应类型的ApplicationContext,根据条件决定是否添加ShutdownHook,决定是否使用自定义的BeanNameGenerator、ResourceLoader。将之前准备好的Enviroment设置给创建好的ApplicationContext使用
完成创建ApplicationContext,通过SpringFactoriesLoader查找并加载classpath中所有可用的ApplicationContextInitializer的Initialize()方法来对ApplicationContext进行进一步的处理
遍历所有的SpringApplicationRunListenner的contextPrepared()方法,通知【run监听器】ApplicationContext已经准备好了。
将之前通过@EnableAutoConfiguration获取的所有配置以及其他形式的IOC容器配置加载到已经准备完毕的ApplicationContext
遍历所有的SpringApplicationRunListener的contextLoaded()方法,通知【run监听器和ApplicationContext装填完毕】
调用ApplicationContext的refresh()——完成填充IOC容器
查找当前ApplicationContext中是否注册有CommandLineRunner,如果有,则遍历执行它们。
遍历执行SpringApplicationRunListener的finished()。
——启动完毕
————————————————
原文链接:https://blog.csdn.net/hackerHL/article/details/78270780
原文链接:https://blog.csdn.net/u010811939/article/details/80592461
SpringBoot启动过程原理(转)的更多相关文章
- SpringBoot启动过程原理
最近这两年springboot突然火起来了,那么我们就来看看springboot的运行原理. 一.springboot的三种启动方式: 1.运行带有main方法的2.通过命令 Java -jar命令3 ...
- Spring Boot 学习笔记一(SpringBoot启动过程)
SpringBoot启动 Spring Boot通常有一个名为*Application的入口类,在入口类里有一个main方法,这个main方法其实就是一个标准的java应用的入口方法. 在main方法 ...
- Tomcat启动过程原理详解 -- 非常的报错:涉及了2个web.xml等文件的加载流程
Tomcat启动过程原理详解 发表于: Tomcat, Web Server, 旧文存档 | 作者: 谋万世全局者 标签: Tomcat,原理,启动过程,详解 基于Java的Web 应用程序是 ser ...
- SpringBoot启动流程原理解析(二)
在上一章我们分析了SpingBoot启动流程中实例化SpingApplication的过程. return new SpringApplication(primarySources).run(args ...
- (四)SpringBoot启动过程的分析-预处理ApplicationContext
-- 以下内容均基于2.1.8.RELEASE版本 紧接着上一篇(三)SpringBoot启动过程的分析-创建应用程序上下文,本文将分析上下文创建完毕之后的下一步操作:预处理上下文容器. 预处理上下文 ...
- (三)SpringBoot启动过程的分析-创建应用程序上下文
-- 以下内容均基于2.1.8.RELEASE版本 紧接着上一篇(二)SpringBoot启动过程的分析-环境信息准备,本文将分析环境准备完毕之后的下一步操作:ApplicationContext的创 ...
- (一)SpringBoot启动过程的分析-启动流程概览
-- 以下内容均基于2.1.8.RELEASE版本 通过粗粒度的分析SpringBoot启动过程中执行的主要操作,可以很容易划分它的大流程,每个流程只关注重要操作为后续深入学习建立一个大纲. 官方示例 ...
- (五)SpringBoot启动过程的分析-刷新ApplicationContext
-- 以下内容均基于2.1.8.RELEASE版本 紧接着上一篇[(四)SpringBoot启动过程的分析-预处理ApplicationContext] (https://www.cnblogs.co ...
- springboot启动过程(1)-初始化
1 springboot启动时,只需要调用一个类前面加了@SpringBootApplication的main函数,执行SpringApplication.run(DemoApplication. ...
随机推荐
- eclipse3.62开发第一个java程序HelloWorld
[学习笔记] 用eclipse3.62开发第一个java程序: 使用eclipse之前们需要先配置一下jdk.window/preference/java/installed JREs,详细请见视频. ...
- HADOOP 与 jupyterlab 链接
首先 咱们先把jdk1.0.0_60.tar.gz 和 hadoop-2.7.2.tar.gz 的压缩包放到root根目录下的opt文件夹下 如图: 然后 ...
- windons下一些软件的地址
idea http://download.jetbrains.8686c.com/idea/ideaIC-2018.3.1.exe
- go 结构的方法总结
方法可以与命名类型或命名类型的指针关联. 刚刚看到的两个 Abs 方法.一个是在 *Vertex 指针类型上,而另一个在 MyFloat 值类型上. 有两个原因需要使用指针接收者.首先避免在每个方法调 ...
- scratch少儿编程第一季——06、人在江湖混,没有背景怎么行。
各位小伙伴大家好: 到上期我们学习了动作模块的全部指令.接下我们用动作模块做一个小小项目,来总结我们前面学的内容. 在做项目之前我们先来换一个背景. 在左下角舞台区,点击打开背景库,选择自己所需要的背 ...
- 微信小程序wx:key以及wx:key=" *this"详解:
今天写微信小程序无意中看到控制台给出了这样一行提示: 求解百度才知道,给大家分享一下: 1.wx:for定义 官方文档:在组件上使用 wx:for 控制属性绑定一个数组,即可使用数组中各项的数据重复渲 ...
- JFinal(2)JFinal 学习资料
JFinal 学习资料 :http://pan.baidu.com/s/1hsOcQ0G 密码:7lq3 , jfinal社区收费会员内部部分资料,博主网络搜集而来
- Python练习_函数进阶_day10
1. 1.作业 1,写函数,接收n个数字,求这些参数数字的和.(动态传参) 2,读代码,回答:代码中,打印出来的值a,b,c分别是什么?为什么? a=10 b=20 def test5(a,b): p ...
- canvas验证码实现
1 <!DOCTYPE html> <html> <!-- head --> <head> <meta charset="utf-8&q ...
- SQL将同样标识的查询结果查重并用逗号拼接
SELECT B.TaskID , LEFT(SamList, LEN(SamList) - 1) AS ResultListFROM ( SELECT TaskID , ( SELECT Sampl ...