Python爬虫:requests 库详解,cookie操作与实战
第三方库 requests是基于urllib编写的。比urllib库强大,非常适合爬虫的编写。
安装: pip install requests
简单的爬百度首页的例子:
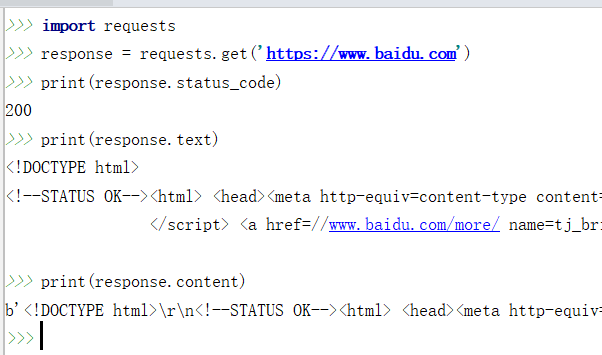
response.text 和 response.content的区别:
- response.text是解过码的字符串。比较容易出现乱码
- response.content 未解码的二进制格式(bytes). 适用于文本,图片和音乐。如果是文本,可以使用 response.content.decode('utf-8') 解码
requests 库支持的请求方法:
import requests

requests.get("http://xxxx.com/")

requests.post("http://xxxx.com/post", data = {'key':'value'})

requests.put("http://xxxx.com/put", data = {'key':'value'})

requests.delete("http://xxxx.com/delete")

requests.head("http://xxxx.com/get")

requests.options("http://xxxx.com/get")
发送带参数的get 请求:
在get方法里设置字典格式的params参数即可。requests 方法会自动完成url的拼接
import requests

params = {

    "wd": "python", "pn": 10,

}

response = requests.get('https://www.baidu.com/s', params=params)

print(response.url)

print(response.text)
'''
需要设置header,百度会进行反爬验证
'''
发送带数据的post 请求:
只需要在post方法里设置data参数即可。 raise_for_status()会表示成功或失败
import requests

post_data = {'username': 'value1', 'password': 'value2'}

response = requests.post("http://xxx.com/login/", data=post_data)

response.raise_for_status()
post 文件的例子:
>>> import requests

>>> url = 'http://httpbin.org/post'

>>> files = {'file': open('report.xls', 'rb')}

>>> r = requests.post(url, files=files)
设置与查看请求头(headers):
很多网站有反爬机制,如果一个请求不携带请求头headers,很可能被禁止访问。
import requests

headers = {

    "User-Agent": "Mozilla/5.0 (Macintosh; Intel Mac OS X 10_12_4) AppleWebKit/"

                 "537.36 (KHTML, like Gecko) Chrome/58.0.3029.110 Safari/537.36"

}

response1 =requests.get("https://www.baidu.com", headers=headers)

response2 =requests.post("https://www.xxxx.com", data={"key": "value"},

headers=headers)

print(response1.headers)

print(response1.headers['Content-Type'])

print(response2.text)
设置代理Proxy:
有的网站反爬机制会限制单位时间内同一IP的请求次数,我们可以通过设置 IP proxy代理来应对这个反爬机制。
import requests

proxies = {

  "http": "http://10.10.1.10:3128",

  "https": "http://10.10.1.10:1080",

}

requests.get("http://example.org", proxies=proxies)
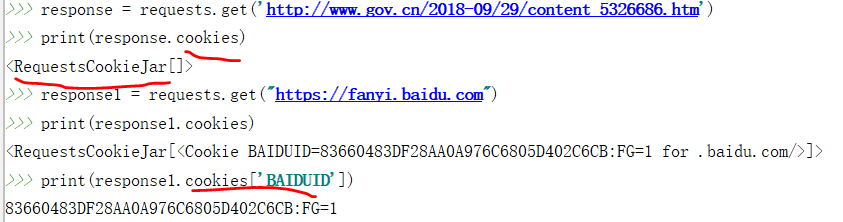
Cookie的获取和添加:
有时候我们需要爬取登录后才能访问的页面,这时我们就需要借助cookie来实现模拟登陆和会话维持了。
当用户首次发送请求时,服务器端一般会生成并存储一小段信息,包含在response数据里。如果这一小段信息存储在客户端(浏览器或磁盘),我们称之为cookie.如果这一小段信息存储在服务器端,我们称之为session(会话).这样当用户下次发送请求到不同页面时,请求自动会带上cookie,这样服务器就制定用户之前已经登录访问过了。
可以通过打印 response.cookies来获取查看cookie内容,从而知道首次请求后服务器是否生成了cookie.
发送请求时添加cookie的方法:
- 设置cookies参数
import requests

headers = {

    "User-Agent": "Mozilla/5.0 (Macintosh; Intel Mac OS X 10_12_4) AppleWebKit/"

                 "537.36 (KHTML, like Gecko) Chrome/58.0.3029.110 Safari/537.36"

}

cookies = {"cookie_name": "cookie_value", }

response = requests.get("https://www.baidu.com", headers=headers, cookies=cookies) - 先实例化一个 RequestCookieJar的类,然后把值set进去,最后在get,post方法里面指定cookie参数

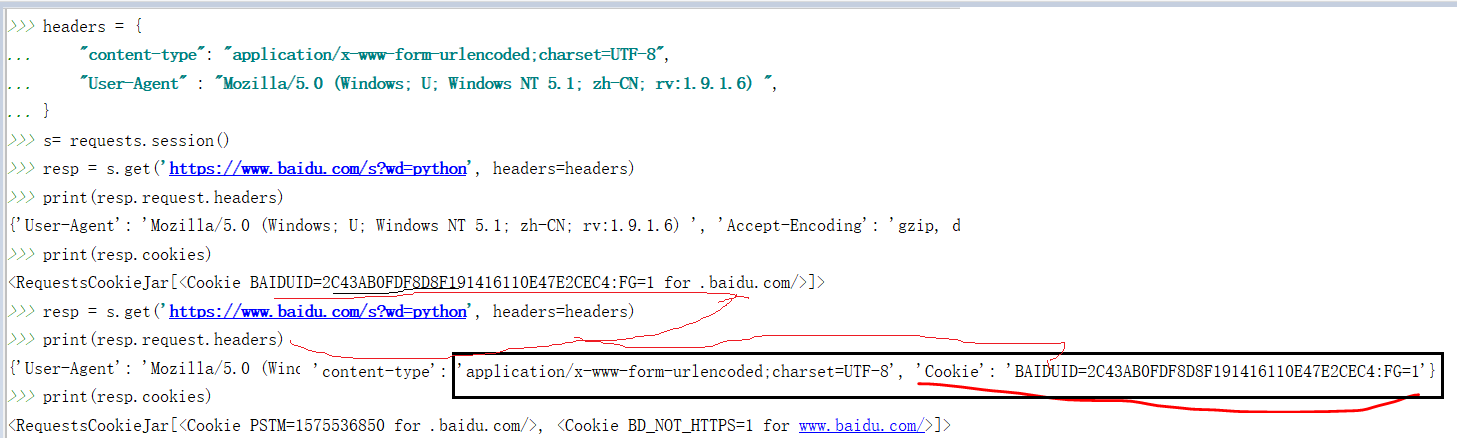
Session会话的维持:
session 与cookie不同,因为session一般存储在服务器端。session对象能够帮我们跨请求保持某些参数,也会在同一个session实例发出的所有请求之间保持cookies.
为了保持会话的连续,我们最好的办法是先创建一个session对象,用它打开一个url,而不是直接使用 request.get方法打开一个url.
每当我们使用这个session对象重新打开一个url时,请求头都会带上首次产生的cookie,实现了会话的延续。
例子:
爬百度前20条搜索记录。(结果还是有点问题的,因为跳转的太多了,搜出不是对应的大条目)
#coding: utf-8

'''

爬取百度搜索前20个搜索页面的标题和链接

'''

import requests

import sys

from bs4 import BeautifulSoup as bs

import re

import chardet

headers = {

'Accept': 'text/javascript, application/javascript, application/ecmascript, application/x-ecmascript, */*; q=0.01',

'Accept-Encoding': 'gzip, deflate, br',

'Accept-Language':'zh-CN,zh;q=0.9',

'Connection': 'keep-alive',

'User-Agent': 'Mozilla/5.0 (Windows NT 10.0; WOW64) AppleWebKit/537.36 (KHTML, like Gecko) Chrome/73.0.3683.86 Safari/537.36',

'X-Requested-With': 'XMLHttpRequest'

}

def main(keyword):

    file_name = "{}.txt".format(keyword)

    f = open(file_name,'w+', encoding='utf-8')

    f.close()

    for pn in range(0,20,10):

        params = {'wd':keyword,'pn':pn}

        response = requests.get("https://www.baidu.com/s",params=params,headers=headers)

        soup = bs(response.content,'html.parser')

        urls = soup.find_all(name='a',attrs={"href": re.compile('.')})

        for i in urls:

            if 'http://www.baidu.com/link?url=' in i.get('href'):

                a = requests.get(url=i.get('href'),headers=headers)

                print(i.get('href'))

                soup1 = bs(a.content,'html.parser')

                title = soup1.title.string

                with open(keyword+'.txt','r',encoding='utf-8') as f:

                    if a.url not in f.read():

                        f = open(keyword+'.txt','a',encoding='utf-8')

                        f.write(title + '\n')

                        f.write(a.url + '\n')

                        f.close()

if __name__ == '__main__':

    keyword ='Django'

    main(keyword)

    print("下载完成")
Python爬虫:requests 库详解,cookie操作与实战的更多相关文章
- python的requests库详解
快速上手 迫不及待了吗?本页内容为如何入门 Requests 提供了很好的指引.其假设你已经安装了 Requests.如果还没有,去安装一节看看吧. 首先,确认一下: Requests 已安装 Req ...
- python的requests用法详解
Requests是一个Python语言写的http相关设置或者请求的一个库 安装:pip install Requests或者pip3 install requests 使用的时候要import re ...
- Python爬虫—requests库get和post方法使用
目录 Python爬虫-requests库get和post方法使用 1. 安装requests库 2.requests.get()方法使用 3.requests.post()方法使用-构造formda ...
- Python爬虫学习==>第八章:Requests库详解
学习目的: request库比urllib库使用更加简洁,且更方便. 正式步骤 Step1:什么是requests requests是用Python语言编写,基于urllib,采用Apache2 Li ...
- python WEB接口自动化测试之requests库详解
由于web接口自动化测试需要用到python的第三方库--requests库,运用requests库可以模拟发送http请求,再结合unittest测试框架,就能完成web接口自动化测试. 所以笔者今 ...
- python接口自动化测试之requests库详解
前言 说到python发送HTTP请求进行接口自动化测试,脑子里第一个闪过的可能就是requests库了,当然python有很多模块可以发送HTTP请求,包括原生的模块http.client,urll ...
- 爬虫学习--Requests库详解 Day2
什么是Requests Requests是用python语言编写,基于urllib,采用Apache2 licensed开源协议的HTTP库,它比urllib更加方便,可以节约我们大量的工作,完全满足 ...
- Python爬虫 requests库基础
requests库简介 requests是使用Apache2 licensed 许可证的HTTP库. 用python编写. 比urllib2模块更简洁. Request支持HTTP连接保持和连接池,支 ...
- Python爬虫--Requests库
Requests Requests是用python语言基于urllib编写的,采用的是Apache2 Licensed开源协议的HTTP库,requests是python实现的最简单易用的HTTP库, ...
随机推荐
- Tomcat中不能通过访问自己IP,但可以通过localhost/127.0.0.1访问
一.问题如下:局域网内,自己机器部署了一个tomcat应用,在本机上可以通过如下方式访问引用. http://localhost:8080/xxxx http://127.0.0.1:8080/xx ...
- xsy 2414【CF587C】Duff in the Army
Description [题目描述]: 最近有一场战争发生,Duff是战争里一名士兵,Malek是她的长官. 他们的国家——Andarz Gu有n个城市(编号为1到n),总共有n-1条道路,每条道路连 ...
- Linux基础-12-yum管理软件包
1. yum的功能 yum是Yellow dog Updater, Modified的缩写,目的就是为了解决RPM的依赖关系的问题,方便使用者进行软件的安装.升级等等工作. 2. 光盘挂载和镜像挂载 ...
- git 如何取消add操作
可以直接使用命令 git reset HEAD 这个是整体回到上次一次操作 绿字变红字(撤销add) 如果是某个文件回滚到上一次操作: git reset HEAD 文件名 红字变无 (撤销 ...
- python入门-windows下python环境搭建
1. 下载安装包 选择executable版,根据自己电脑的操作系统选择是32位还是64为. python3.6-64位下载 python3.6-32位下载 2. 安装python 下载之后是这样的 ...
- Java内存模型之分析volatile
前篇博客[死磕Java并发]—–深入分析volatile的实现原理 中已经阐述了volatile的特性了: volatile可见性:对一个volatile的读,总可以看到对这个变量最终的写: vola ...
- HANA数据库无法停止
Symptom: 使用命令HDB stop多次,每次报错为timeout ----------------------- sdpadm@PRDDB01:/usr/sap/SDP/HDB66/prder ...
- DBShop后台RCE之曲线救国
本文最早发布在朋友的公众号 黑客信徒 中,文章是自己写的 不存在抄袭 特此申明 --------------------- 前言 DBShop是一款基于ZendFramework2框架的电子商务系统 ...
- USB驱动分析
INIT函数: 这是内核模块的初始化函数,其所作的工作只有注册定义好的USB驱动结构体. USB驱动结构体如下: Usb_driver中的probe函数是驱动和设备匹配成功后调用. Usb_drive ...
- [LeetCode] 234. 回文链表 ☆(翻转链表)
描述 请判断一个链表是否为回文链表. 示例 1: 输入: 1->2输出: false示例 2: 输入: 1->2->2->1输出: true 进阶:你能否用 O(n) 时间复杂 ...