从零搭建DotnetCore2.0
没时间介绍了,废话不说先上车

以下所有扯淡都是建立在.NETCore2.0环境已经搭建好
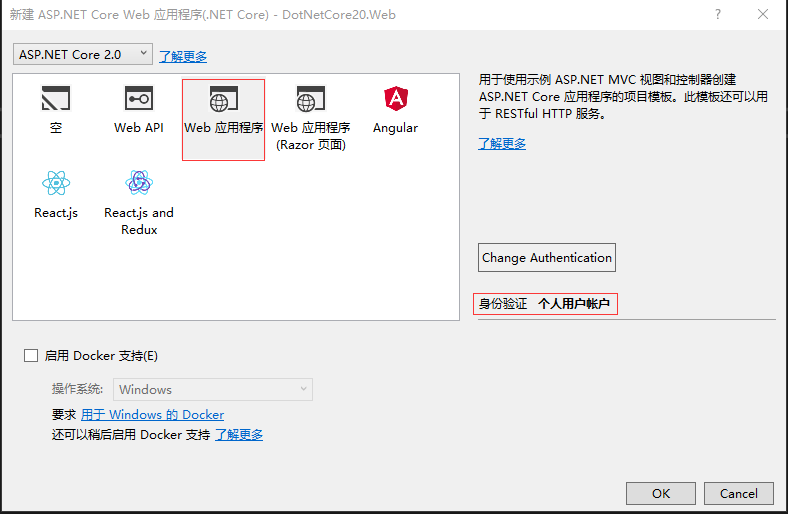
右键解决方案>新建项目>
选择Web>ASP.NETCoreWeb应用程序(.NET Core)

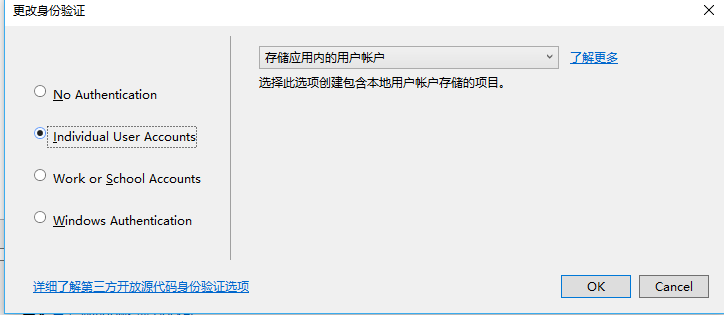
选择Web应用程序,暂时不选择启用Docker,身份验证选择个人用户账户(会自动生成一系列和用户认证的代码)
随后生代码层次目录如下:

其中会包含身份信息的相关实现,比如相关实体信息(user)之类的,如果想对扩展微软自动的生成的用户实体类,可在Models中的ApplicationUser下扩展,
在此ApplicationUser中添加属性即可:比如添加叫WeChatId属性,添加后如下:
using System;

using System.Collections.Generic;

using System.Linq;

using System.Threading.Tasks;

using Microsoft.AspNetCore.Identity;

namespace DotNetCore20.Web.Models

{

    // Add profile data for application users by adding properties to the ApplicationUser class

    public class ApplicationUser : IdentityUser

    {

        /// <summary>

        /// 微信Id

        /// </summary>

        public string WeChatId { get; set; }

    }

}
在之后生成运行并迁移,数据库的AspNetUsers中就会多出WeChatId 属性.
一:安装引用
nugnet恢复引用失效时,可在程序包管理控制台输入:
dotnet restore 即可

会发现在恢复指令后在NuGet中会有一个Microsoft.VisualStudio.Web.CodeGeneration.Design的报错,信息如下:
已使用“.NETPortable,Version=v0.0,Profile=Profile259, .NETFramework,Version=v4.6.1”而不是项目目标框架“.NETCoreApp,Version=v2.0”还原了包“Microsoft.Composition 1.0.27”。这可能会导致兼容性问题
这个库是ASP.NET Core的代码生成工具。包含用于生成控制器和视图的dotnet-aspnet-codegenerator命令,暂时可先卸载,不影响项目运行.
对项目类库的引用有以下几种方式
1.Nuget去安装(官网https://www.nuget.org/packages/)
2.右键依赖项点击菜单中的添加引用
3.可在程序包管理控制台输入:Install-Package 引用类库名称
4.可右键编辑csproj工程文件进行添加,然后执行dotnet restore
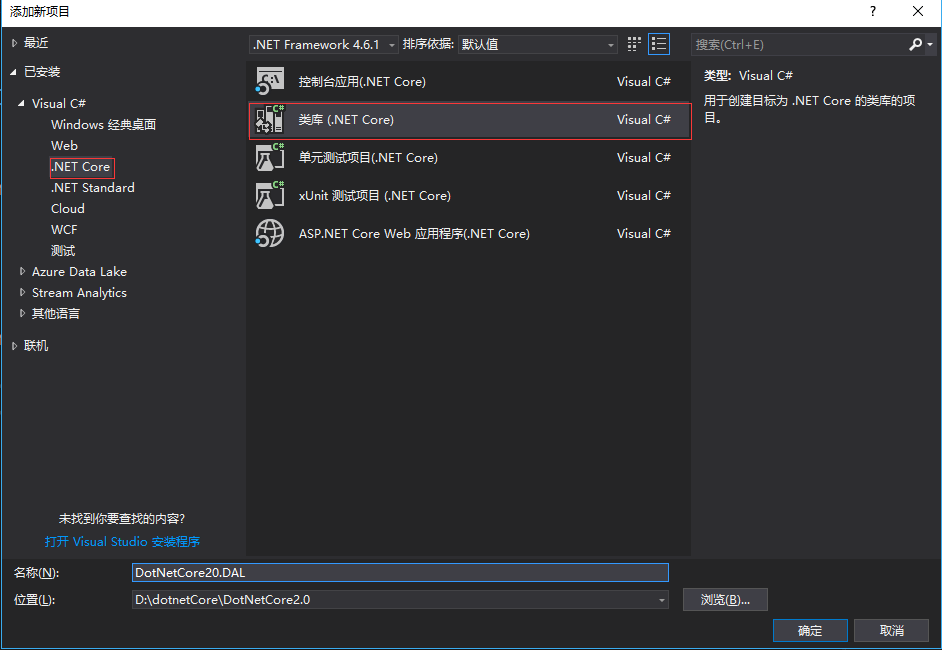
二.创建实体程序集
右键解决方案>添加项目>

首先创建抽象类,供Entity实体继承,主要为每个实体提供公用属性
using System;

using System.Collections.Generic;

using System.ComponentModel.DataAnnotations;

using System.Runtime.Serialization;

using System.Text;

namespace DotNetCore20.Entity.Core

{

    /// <summary>

    /// DB表基底

    /// </summary>

    [Serializable]

    public abstract partial class BaseEntity

    {

        /// <summary>

        /// Id

        /// </summary>

        [DataMember]

        public long Id { get; set; }

        /// <summary>

        /// DB 資料版號

        /// </summary>

        [Timestamp]

        public byte[] RowVersion { get; set; }

        /// <summary>

        /// 创建时间

        /// </summary>

        [DataMember]

        public DateTime CreateTime { get; set; }

        /// <summary>

        /// 更新时间

        /// </summary>

        [DataMember]

        public DateTime UpdateTime { get; set; }

        /// <summary>

        /// 状态

        /// </summary>

        [DataMember]

        public EnumState State { get; set; }

    }

    /// <summary>

    /// 状态

    /// </summary>

    public enum EnumState

    {

        /// <summary>

        /// 删除

        /// </summary>

        Delete = ,

        /// <summary>

        /// 正常

        /// </summary>

        Normal = ,

    }

}
添加一个UserExtend用户扩展类(Entity):
using DotNetCore20.Entity.Core;

using System;

using System.Runtime.Serialization;

namespace DotNetCore20.Entity

{

    [DataContract]

    public class UserExtend : BaseEntity

    {

        /// <summary>

        /// 用户Id

        /// </summary>

        [DataMember]

        public long UserId { get; set; }

        /// <summary>

        /// 昵称

        /// </summary>

        [DataMember]

        public long NickName { get; set; }

    }

}
三.创建数据层
添加引用
DAL层需要用到EF实体映射相关和我们自己前面定义的Entity中的UserExtend实体表,所以要添加相关引用,DotNetCore20.Entity和 Microsoft.EntityFrameworkCore.Tools
快捷键:Ctrl+Alt+o 打开程序包管理器输入以下:
install-package Microsoft.EntityFrameworkCore.Tools

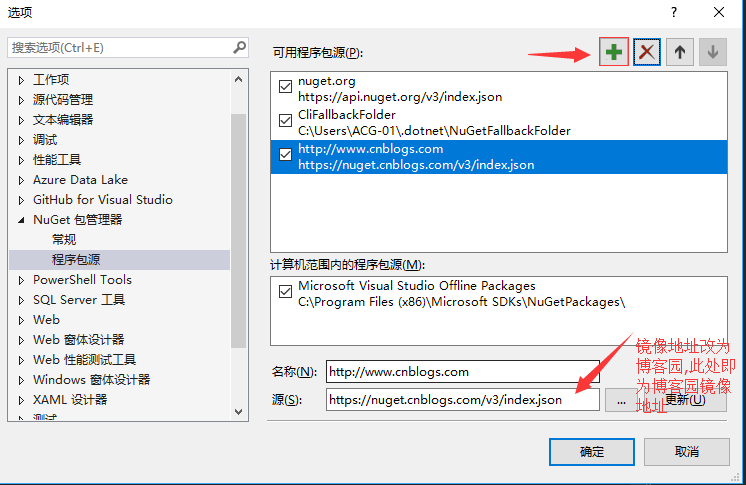
如果是网络限制下载失败,推荐把nuget镜像改为博客园资源,方法如下:
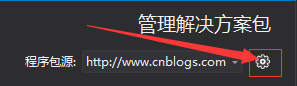
右键解决方案>管理解决方案的nuget程序包.显示如下:
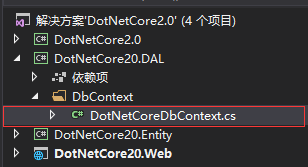
新建一个数据上下文类,目录结构如下:
DotNetCoreDbContext内部代码改为以下:
using DotNetCore20.Entity;

using Microsoft.EntityFrameworkCore;

namespace DotNetCore20.DAL.DbContext

{

    public class DotNetCoreDbContext : Microsoft.EntityFrameworkCore.DbContext

    {

        public DotNetCoreDbContext(DbContextOptions<DotNetCoreDbContext> options) : base(options)

        {

        }

        public DbSet<UserExtend> UserExtend { get; set; }

    }

}
在此基本的实体映射相关的代码都完毕,现在还有一步,就是数据库连接字符串的配置
首先打开appsettings.json文件,在ConnectionStrings节点下增加以下
"DotNetCoreConnection": "Server=(localdb)\\mssqllocaldb;Database=DotNetCoreDb;Trusted_Connection=True;MultipleActiveResultSets=true"
增加后如下:
{

    "ConnectionStrings": {

        "DefaultConnection": "Server=(localdb)\\mssqllocaldb;Database=DotNetCoreDefaultDb;Trusted_Connection=True;MultipleActiveResultSets=true",

        "DotNetCoreConnection": "Server=(localdb)\\mssqllocaldb;Database=DotNetCoreDb;Trusted_Connection=True;MultipleActiveResultSets=true"

    },

  "Logging": {

    "IncludeScopes": false,

    "Debug": {

      "LogLevel": {

        "Default": "Warning"

      }

    },

    "Console": {

      "LogLevel": {

        "Default": "Warning"

      }

    }

  }

}
再打开web网站下的Startup文件,在ConfigureServices方法中添加一下行:
//自定义数据库连接字符串

            services.AddDbContext<DotNetCoreDbContext>(options =>

                options.UseSqlServer(Configuration.GetConnectionString("DotNetCoreConnection")));
增加后如下:
using System;

using System.Collections.Generic;

using System.Linq;

using System.Threading.Tasks;

using Microsoft.AspNetCore.Builder;

using Microsoft.AspNetCore.Diagnostics.EntityFrameworkCore;

using Microsoft.AspNetCore.Identity;

using Microsoft.AspNetCore.Http;

using Microsoft.EntityFrameworkCore;

using Microsoft.AspNetCore.Hosting;

using Microsoft.Extensions.Configuration;

using Microsoft.Extensions.DependencyInjection;

using Microsoft.Extensions.Options;

using DotNetCore20.Web.Data;

using DotNetCore20.Web.Models;

using DotNetCore20.Web.Services;

using DotNetCore20.DAL.DbContext;

namespace DotNetCore20.Web

{

    public class Startup

    {

        public Startup(IConfiguration configuration)

        {

            Configuration = configuration;

        }

        public IConfiguration Configuration { get; }

        // This method gets called by the runtime. Use this method to add services to the container.

        public void ConfigureServices(IServiceCollection services)

        {

            services.AddDbContext<ApplicationDbContext>(options =>

                options.UseSqlServer(Configuration.GetConnectionString("DefaultConnection")));

            //自定义数据库连接字符串

            services.AddDbContext<DotNetCoreDbContext>(options =>

                options.UseSqlServer(Configuration.GetConnectionString("DotNetCoreConnection")));

            services.AddIdentity<ApplicationUser, IdentityRole>()

                .AddEntityFrameworkStores<ApplicationDbContext>()

                .AddDefaultTokenProviders();

            // Add application services.

            services.AddTransient<IEmailSender, AuthMessageSender>();

            services.AddTransient<ISmsSender, AuthMessageSender>();

            services.AddMvc();

        }

        // This method gets called by the runtime. Use this method to configure the HTTP request pipeline.

        public void Configure(IApplicationBuilder app, IHostingEnvironment env)

        {

            if (env.IsDevelopment())

            {

                app.UseDeveloperExceptionPage();

                app.UseBrowserLink();

                app.UseDatabaseErrorPage();

            }

            else

            {

                app.UseExceptionHandler("/Home/Error");

            }

            app.UseStaticFiles();

            app.UseAuthentication();

            app.UseMvc(routes =>

            {

                routes.MapRoute(

                    name: "default",

                    template: "{controller=Home}/{action=Index}/{id?}");

            });

        }

    }

}
运行程序,点击登陆(只要访问数据库的操作都可),出现错误页面:
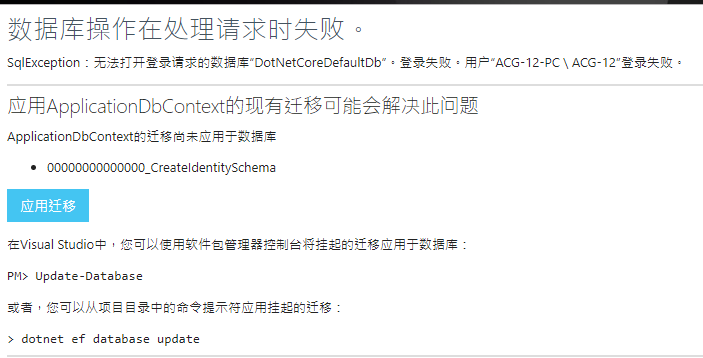
点击应用迁移 ,即自动迁移数据库.
由于两个数据库,只会自动迁移关于用户的表AspNetUsers,
所以还得VS中程序包管理器中下命令迁移.
Add-Migration firstMigration -Context DotNetCoreDbContext
以上命令执行后再执行以下命令:
Update-Database -Context DotNetCoreDbContext;
然后查看数据库会发现多出两个数据库,
以DotNetCoreDefaultDb生成的为例,会生成如下表:

其中AspNetUsers就中会有之前添加的WeChatId字段

然后再次运行程序:

这样一个完整的 Asp.NetCore2.0网站就初步运行起来了
下一篇将在DAL层增加Repository和UnitWorks,完成简单crud的统一管理
从零搭建DotnetCore2.0的更多相关文章
- 从零搭建vue3.0项目架构(附带代码、步骤详解)
前言: GitHub上我开源了vue-cli.vue-cli3两个库,文章末尾会附上GitHub仓库地址.这次把2.0的重新写了一遍,优化了一下.然后按照2.0的功能和代码,按照vue3.0的语法,完 ...
- 从零搭建基于golang的个人博客网站
原文链接 : http://www.bugclosed.com/post/14 从零搭建个人博客网站需要包括云服务器(虚拟主机),域名,程序环境,博客程序等方面.本博客 就是通过这几个环节建立起来的, ...
- SpringBoot整合Shiro实现基于角色的权限访问控制(RBAC)系统简单设计从零搭建
SpringBoot整合Shiro实现基于角色的权限访问控制(RBAC)系统简单设计从零搭建 技术栈 : SpringBoot + shiro + jpa + freemark ,因为篇幅原因,这里只 ...
- 从零搭建docker+jenkins 自动化部署环境
从零搭建docker+jenkins+node.js自动化部署环境 本次案例基于CentOS 7系统 适合有一定docker使用经验的人阅读 适合有一定linux命令使用经验的人阅读 1.docker ...
- 从零搭建Spring Boot脚手架(1):开篇以及技术选型
1. 前言 目前Spring Boot已经成为主流的Java Web开发框架,熟练掌握Spring Boot并能够根据业务来定制Spring Boot成为一个Java开发者的必备技巧,但是总是零零碎碎 ...
- 从零搭建一个IdentityServer——项目搭建
本篇文章是基于ASP.NET CORE 5.0以及IdentityServer4的IdentityServer搭建,为什么要从零搭建呢?IdentityServer4本身就有很多模板可以直接生成一个可 ...
- 从零搭建TypeScript与React开发环境
前言 平时进行开发大多数是基于vue-cli或者create-react-app等官方或者公司内部搭建的脚手架. 我们业务仔做的最多就是npm i和npm run dev或者npm start,然 ...
- 从零搭建一个IdentityServer——聊聊Asp.net core中的身份验证与授权
OpenIDConnect是一个身份验证服务,而Oauth2.0是一个授权框架,在前面几篇文章里通过IdentityServer4实现了基于Oauth2.0的客户端证书(Client_Credenti ...
- 以Aliyun体验机为例,从零搭建LNMPR环境(上)
使用云服务器搭建 Web 运行环境,尤其是搭建常见的 LNMPR(Linux+Nginx+MySQL+PHP+Redis) 环境,对于开发人员是必备的职场基本技能之一.在这里,借着搭建我的" ...
随机推荐
- Include promo/activity effect into the prediction (extended ARIMA model with R)
I want to consider an approach of forecasting I really like and frequently use. It allows to include ...
- Virtualbox让kali虚拟机共享主机的无线网络连接
今天在测试虚拟机下安装kali系统时,遇到一个问题,默认安装完kali系统后,虚拟机不能上网.虚拟机网络配置使用的是默认的网络地址转换(NAT)选项. 网上查了很多,都说使用NAT模式时虚拟机不用做任 ...
- ORACLE的监听日志太大,客户端无法连接
数据库sqlplus能连接,plsql连接失败,也不报错,就定位到了是不是监听出了什么问题,删除监听,重建监听,重启监听,各种尝试都没解决问题. 却是监听日志太大导致的问题,一下是处理步骤: 查看监听 ...
- ReactNative学习之Html基本标签使用
前言: 前面简单学习了html简单标签的使用,今天学习一下其他的标签的使用. HTML的超链接 1.)创建一个超链接 <div> <p> <a href="ht ...
- Eclipse导入项目常见问题----乱码问题03
有时打开导入的项目文件时,会出现如下图情况: 解决方法 如下图步骤所示: 此时,我们可以看到文件正常了 jdk版本问题(有个红色感叹号)01:http://blog.csdn.net/baidu_37 ...
- java基础(一章)
java基础(一章) 1. java是一种面向对象的高级编程语言. 2. java包括: javase(java基础) ...
- 隐马尔科夫模型HMM(三)鲍姆-韦尔奇算法求解HMM参数
隐马尔科夫模型HMM(一)HMM模型 隐马尔科夫模型HMM(二)前向后向算法评估观察序列概率 隐马尔科夫模型HMM(三)鲍姆-韦尔奇算法求解HMM参数(TODO) 隐马尔科夫模型HMM(四)维特比算法 ...
- 11.并发包阻塞队列之LinkedBlockingQueue
在上文<10.并发包阻塞队列之ArrayBlockingQueue>中简要解析了ArrayBlockingQueue部分源码,在本文中同样要介绍的是Java并发包中的阻塞队列LinkedB ...
- python爬虫之re正则表达式库
python爬虫之re正则表达式库 正则表达式是用来简洁表达一组字符串的表达式. 编译:将符合正则表达式语法的字符串转换成正则表达式特征 操作符 说明 实例 . 表示任何单个字符 [ ] 字符集,对单 ...
- STL的空间配置器std_alloc 笔记
STL的空间配置器std_alloc 笔记 C++的内存分配基本操作是 ::operator new(),内存释放是 ::operator delete(),这里个全局函数相当于C的malloc和fr ...