基于Vue.js的大型报告页项目实现过程及问题总结(一)
今年5月份的时候做了一个测评报告项目,需要在网页正常显示的同时且可打印为pdf,当时的技术方案采用jquery+template的方式,因为是固定模板所以并没有考虑报告的模块化区分,九月底产品提出新的需求,由于报告页数动辄上千页,所以希望用户自行选择内容生成报告,这个时候原项目就不够灵活了,与小伙伴商量决定将这个项目使用vue进行重构,对报告模块进行细分封装组件复用,大概一个月的工期,中途遇到n多坑,趁着今天有时间将实现思路整理出来并将出现的问题总结一下
整体的实现思维导图如下:
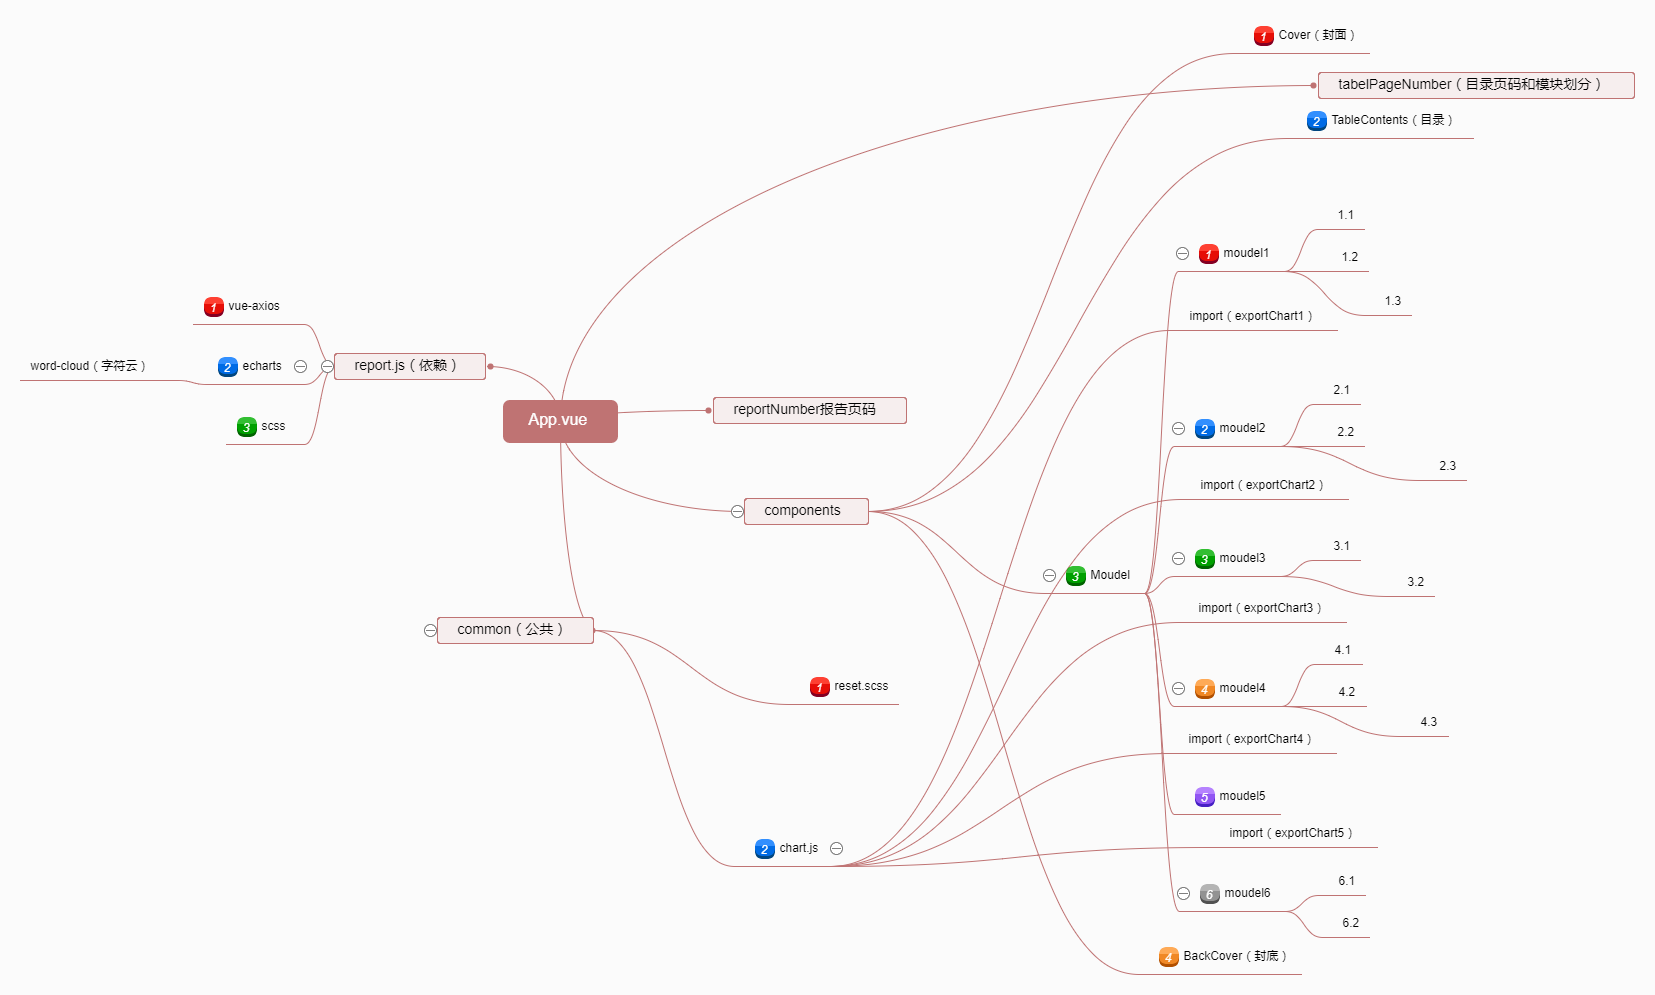
需要考虑的:
1.可生成PDF版且可打印
2.根据后台获取的json生成包含相应模块的报告
3.组件内基于echarts封装图表的引用
4.目录模块的页码定位
5.如何进行模块内的细分(如1.2.1.3);
6.webpack对多页面编译的配置
Ps:转PDF插件使用的是OpenHtmlToPdf具体配置方法可自行百度,在这里不过多赘述。
关于pdf的一点小坑(知识点朋友们!):
网页打印A4纸的尺寸是(1123*793),在使用OpenHtmlToPdf时无法使用css3百分之八十的属性,像translate等,还有就是margin-top不会生效,使用padding-top代替吧,打印生无法请求ajax,如需打印请将数据先存储到本地再行打印,可根据不同浏览方式判断两种方案。
以下实现全部是基于Vue-cli快速构建的项目中实现的,vue-cli的安装网上有很多详细的教程不过多说了
1.新建项目,命令行执行代码:
vue init webpack vuetest
命令输入后,会进入安装阶段,需要用户输入一些信息
Project name (vuetest) 项目名称,可以自己指定,也可直接回车,按照括号中默认名字(注意这里的名字不能有大写字母,如果有会报错Sorry, name can no longer contain capital letters),阮一峰老师博客为什么文件名要小写 ,可以参考一下。
Project description (A Vue.js project) 项目描述,也可直接点击回车,使用默认名字
Author (........) 作者,不用说了,你想输什么就输什么吧
接下来会让用户选择
Runtime + Compiler: recommended for most users 运行加编译,既然已经说了推荐,就选它了
Runtime-only: about 6KB lighter min+gzip, but templates (or any Vue-specificHTML) are ONLY allowed in .vue files - render functions are required elsewhere 仅运行时,已经有推荐了就选择第一个了
Install vue-router? (Y/n) 是否安装vue-router,这是官方的路由,大多数情况下都使用,vue-router官网 。这里就输入“y”后回车即可。
Use ESLint to lint your code? (Y/n) 是否使用ESLint管理代码,ESLint是个代码风格管理工具,是用来统一代码风格的,并不会影响整体的运行,这也是为了多人协作,新手就不用了,一般项目中都会使用。ESLint官网
接下来也是选择题Pick an ESLint preset (Use arrow keys) 选择一个ESLint预设,编写vue项目时的代码风格,因为我选择了使用ESLint
Standard (https://github.com/feross/standard) 标准,有些看不明白,什么标准呢,去给提示的standardgithub地址看一下, 原来时js的标准风格
AirBNB (https://github.com/airbnb/javascript) JavaScript最合理的方法,这个github地址说的是JavaScript最合理的方法
none (configure it yourself) 这个不用说,自己定义风格
具体选择哪个因人而异吧 ,我选择标准风格
Setup unit tests with Karma + Mocha? (Y/n) 是否安装单元测试,我选择安装
Setup e2e tests with Nightwatch(Y/n)? 是否安装e2e测试 ,我选择安装
完成
初始的目录结构大概是这样的

由于是多页面应用所以需要在src下建一个modle文件夹里面是两个不同的项目

注意:
这里的index.html是入口文件,一定不能少,这这里做中转默认进入demo1的页面
<body>

    <script>

        location.href = "module/demo1.html";

    </script>

</body>
下面对多页面进行配置,主要操作config和build这两个文件夹
/build

    build.js               #构建生产代码

    dev-client.js

    dev-server.js          #执行本地服务器

    utils.js               #额外的通用方法

    webpack.base.conf.js   #默认的webpack配置

    webpack.dev.conf.js    #本地开发的webpack配置

    webpack.prod.conf.js   #构建生产的webpack配置

/config   配置文件

    dev.env.js

    index.js

    pord.env.js

    test.env.js

/src

    assets                  #放资源

    components              #组件

    /module                 #页面模块

        /home               #子页面

            index.html      #模版页面

            index.js        #js入口

        // 注意,这里的html和js的文件名要一致,如上面就是index

/dist                       #最后打包生成的资源

    /js

    /css

    /home
修改默认的webpack配置webpack.base.conf.js
生成需要的入口文件
var path = require('path')
var config = require('../config')
var utils = require('./utils')
var projectRoot = path.resolve(__dirname, '../')
var glob = require('glob');
var entries = getEntry(['./src/demo1/index/*.js', './src/module/demo2/*.js']); // 获得入口js文件
var env = process.env.NODE_ENV
// check env & config/index.js to decide weither to enable CSS Sourcemaps for the
// various preprocessor loaders added to vue-loader at the end of this file
var cssSourceMapDev = (env === 'development' && config.dev.cssSourceMap)
var cssSourceMapProd = (env === 'production' && config.build.productionSourceMap)
var useCssSourceMap = cssSourceMapDev || cssSourceMapProd
module.exports = {
entry: entries,
output: {
path: config.build.assetsRoot,
publicPath: process.env.NODE_ENV === 'production' ? config.build.assetsPublicPath : config.dev.assetsPublicPath,
filename: '[name].js'
},
resolve: {
extensions: ['', '.js', '.vue','.json'],
fallback: [path.join(__dirname, '../node_modules')],
alias: {
'vue$': 'vue/dist/vue',
'src': path.resolve(__dirname, '../src'),
'common': path.resolve(__dirname, '../src/common'),
'components': path.resolve(__dirname, '../src/components')
}
},
resolveLoader: {
fallback: [path.join(__dirname, '../node_modules')]
},
module: {
loaders: [{
test: /\.vue$/,
loader: 'vue'
},
{
test: /\.js$/,
loader: 'babel',
include: projectRoot,
exclude: /node_modules/
},
{
test: /\.json$/,
loader: 'json'
},
{
test: /\.(png|jpe?g|gif|svg)(\?.*)?$/,
loader: 'url',
query: {
limit: 10000,
name: utils.assetsPath('img/[name].[hash:7].[ext]')
}
},
{
test: /\.(woff2?|eot|ttf|otf)(\?.*)?$/,
loader: 'url',
query: {
limit: 10000,
name: utils.assetsPath('fonts/[name].[hash:7].[ext]')
}
}
]
},
vue: {
loaders: utils.cssLoaders({
sourceMap: useCssSourceMap
}),
postcss: [
require('autoprefixer')({
browsers: ['last 2 versions']
})
]
}
}
function getEntry(globPath) {
var entries = {},
basename, tmp, pathname;
if (typeof (globPath) != "object") {
globPath = [globPath]
}
globPath.forEach((itemPath) => {
glob.sync(itemPath).forEach(function (entry) {
basename = path.basename(entry, path.extname(entry));
if (entry.split('/').length > 4) {
tmp = entry.split('/').splice(-3);
pathname = tmp.splice(0, 1) + '/' + basename; // 正确输出js和html的路径
entries[pathname] = entry;
} else {
entries[basename] = entry;
}
});
});
return entries;
}
修改本地开发的webpack配置webpack.dev.conf.js
这里是和本地服务器有关的配置
这里是根据目录生成对应的页面
var path = require('path');
var config = require('../config')
var webpack = require('webpack')
var merge = require('webpack-merge')
var utils = require('./utils')
var baseWebpackConfig = require('./webpack.base.conf')
var HtmlWebpackPlugin = require('html-webpack-plugin')
var glob = require('glob')
// add hot-reload related code to entry chunks
Object.keys(baseWebpackConfig.entry).forEach(function (name) {
baseWebpackConfig.entry[name] = ['./build/dev-client'].concat(baseWebpackConfig.entry[name])
})
module.exports = merge(baseWebpackConfig, {
module: {
loaders: utils.styleLoaders({ sourceMap: config.dev.cssSourceMap })
},
// eval-source-map is faster for development
devtool: '#eval-source-map',
plugins: [
new webpack.DefinePlugin({
'process.env': config.dev.env
}),
// https://github.com/glenjamin/webpack-hot-middleware#installation--usage
new webpack.optimize.OccurenceOrderPlugin(),
new webpack.HotModuleReplacementPlugin(),
new webpack.NoErrorsPlugin()
]
})
function getEntry(globPath) {
var entries = {},
basename, tmp, pathname;
if (typeof (globPath) != "object") {
globPath = [globPath]
}
globPath.forEach((itemPath) => {
glob.sync(itemPath).forEach(function (entry) {
basename = path.basename(entry, path.extname(entry));
if (entry.split('/').length > 4) {
tmp = entry.split('/').splice(-3);
pathname = tmp.splice(0, 1) + '/' + basename; // 正确输出js和html的路径
entries[pathname] = entry;
} else {
entries[basename] = entry;
}
});
});
return entries;
}
var pages = getEntry(['./src/module/*.html','./src/module/**/*.html']);
for (var pathname in pages) {
// 配置生成的html文件,定义路径等
var conf = {
filename: pathname + '.html',
template: pages[pathname], // 模板路径
inject: true, // js插入位置
// necessary to consistently work with multiple chunks via CommonsChunkPlugin
chunksSortMode: 'dependency'
};
if (pathname in module.exports.entry) {
conf.chunks = ['manifest', 'vendor', pathname];
conf.hash = true;
}
module.exports.plugins.push(new HtmlWebpackPlugin(conf));
}
修改构建生产的webpack配置webpack.prod.conf.js
var path = require('path')

var config = require('../config')

var utils = require('./utils')

var webpack = require('webpack')

var merge = require('webpack-merge')

var baseWebpackConfig = require('./webpack.base.conf')

var ExtractTextPlugin = require('extract-text-webpack-plugin')

var HtmlWebpackPlugin = require('html-webpack-plugin')

var CleanPlugin = require('clean-webpack-plugin')//webpack插件,用于清除目录文件

var glob = require('glob');

var env = config.build.env

var webpackConfig = merge(baseWebpackConfig, {

  module: {

    loaders: utils.styleLoaders({ sourceMap: config.build.productionSourceMap, extract: true })

  },

  devtool: config.build.productionSourceMap ? '#source-map' : false,

  output: {

    path: config.build.assetsRoot,

    filename: utils.assetsPath('js/[name].[chunkhash].js'),

    chunkFilename: utils.assetsPath('js/[id].[chunkhash].js')

  },

  vue: {

    loaders: utils.cssLoaders({

      sourceMap: config.build.productionSourceMap,

      extract: true

    })

  },

  plugins: [

    // http://vuejs.github.io/vue-loader/workflow/production.html

    new webpack.DefinePlugin({

      'process.env': env

    }),

    new webpack.optimize.UglifyJsPlugin({

      compress: {

        warnings: false

      }

    }),

    new CleanPlugin(['../dist']), //清空生成目录

    new webpack.optimize.OccurenceOrderPlugin(),

    // extract css into its own file

    new ExtractTextPlugin(utils.assetsPath('css/[name].[contenthash].css')),

    // generate dist index.html with correct asset hash for caching.

    // you can customize output by editing /index.html

    // see https://github.com/ampedandwired/html-webpack-plugin

    // split vendor js into its own file

    new webpack.optimize.CommonsChunkPlugin({

      name: 'vendor',

      minChunks: function (module, count) {

        // any required modules inside node_modules are extracted to vendor

        return (

          module.resource &&

          /\.js$/.test(module.resource) &&

          module.resource.indexOf(

            path.join(__dirname, '../node_modules')

          ) === 0

        )

      }

    }),

    // extract webpack runtime and module manifest to its own file in order to

    // prevent vendor hash from being updated whenever app bundle is updated

    new webpack.optimize.CommonsChunkPlugin({

      name: 'manifest',

      chunks: ['vendor']

    })

  ]

})

if (config.build.productionGzip) {

  var CompressionWebpackPlugin = require('compression-webpack-plugin')

  webpackConfig.plugins.push(

    new CompressionWebpackPlugin({

      asset: '[path].gz[query]',

      algorithm: 'gzip',

      test: new RegExp(

        '\\.(' +

        config.build.productionGzipExtensions.join('|') +

        ')$'

      ),

      threshold: 10240,

      minRatio: 0.8

    })

  )

}

module.exports = webpackConfig

function getEntry(globPath) {

  var entries = {},

    basename, tmp, pathname;

  if (typeof (globPath) != "object") {

    globPath = [globPath]

  }

  globPath.forEach((itemPath) => {

    glob.sync(itemPath).forEach(function (entry) {

      basename = path.basename(entry, path.extname(entry));

      if (entry.split('/').length > 4) {

        tmp = entry.split('/').splice(-3);

        pathname = tmp.splice(0, 1) + '/' + basename; // 正确输出js和html的路径

        entries[pathname] = entry;

      } else {

        entries[basename] = entry;

      }

    });

  });

  return entries;

}

var pages = getEntry(['./src/module/*.html','./src/module/**/*.html']);

for (var pathname in pages) {

  // 配置生成的html文件,定义路径等

  var conf = {

    filename: pathname + '.html',

    template: pages[pathname],   // 模板路径

    inject: true,              // js插入位置

    // necessary to consistently work with multiple chunks via CommonsChunkPlugin

    chunksSortMode: 'dependency'

  };

  if (pathname in module.exports.entry) {

    conf.chunks = ['manifest', 'vendor', pathname];

    conf.hash = true;

  }

  module.exports.plugins.push(new HtmlWebpackPlugin(conf));

}
修改配置文件config
修改index.js
在build.js中会引用assetsRoot,这里就是对应的根目录,改成你想要输出的地址就好了。ps:这里是相对地址

assetsPublicPath会被引用插入到页面的模版中,这个是你资源的根目录
// see http://vuejs-templates.github.io/webpack for documentation.

var path = require('path')

module.exports = {

  build: {

    env: require('./prod.env'),

    index: path.resolve(__dirname, '../dist/index.html'),

    assetsRoot: path.resolve(__dirname, '../dist'),

    assetsSubDirectory: 'static',

    assetsPublicPath: '../',

    productionSourceMap: true,

    // Gzip off by default as many popular static hosts such as

    // Surge or Netlify already gzip all static assets for you.

    // Before setting to `true`, make sure to:

    // npm install --save-dev compression-webpack-plugin

    productionGzip: false,

    productionGzipExtensions: ['js', 'css']

  },

  dev: {

    env: require('./dev.env'),

    port: 8080,

    assetsSubDirectory: 'static',

    assetsPublicPath: '/',

    proxyTable: {},

    // CSS Sourcemaps off by default because relative paths are "buggy"

    // with this option, according to the CSS-Loader README

    // (https://github.com/webpack/css-loader#sourcemaps)

    // In our experience, they generally work as expected,

    // just be aware of this issue when enabling this option.

    cssSourceMap: false

  }

}
ok,配置结束,一个基本的多页面应用已经成功建成
接下来就进入正题了,放在下一篇来写。。。。。。。
基于Vue.js的大型报告页项目实现过程及问题总结(一)的更多相关文章
- 基于Vue.js的大型报告页项目实现过程及问题总结(二)
距离上一篇文章过去了二十多天了,期间一直想把第二部分写完,结果在测试过程中遇到了各种坑爹的问题,到今天才算基本完成,也许还有后续,但趁着今天有时间就写出来吧,也算对这个项目的一个总结了 遇到最大问题: ...
- 基于animate.css动画库的全屏滚动小插件,适用于vue.js(移动端、pc)项目
功能简介 基于animate.css动画库的全屏滚动,适用于vue.js(移动端.pc)项目. 安装 npm install vue-animate-fullpage --save 使用 main.j ...
- Vue项目中使用基于Vue.js的移动组件库cube-ui
cube-ui 是滴滴公司的技术团队基于 Vue.js 实现的精致移动端组件库.很赞,基本场景是够用了,感谢开源!感谢默默奉献的你们. 刚爬完坑,就来总结啦!!希望对需要的朋友有小小的帮助. (一)创 ...
- 新建一个基于vue.js+Mint UI的项目
上篇文章里面讲到如何新建一个基于vue,js的项目(详细文章请戳用Vue创建一个新的项目). 该项目如果需要组件等都需要自己去写,今天就学习一下如何新建一个基于vue.js+Mint UI的项目,直接 ...
- 基于 Vue.js 之 iView UI 框架非工程化实践记要 使用 Newtonsoft.Json 操作 JSON 字符串 基于.net core实现项目自动编译、并生成nuget包 webpack + vue 在dev和production模式下的小小区别 这样入门asp.net core 之 静态文件 这样入门asp.net core,如何
基于 Vue.js 之 iView UI 框架非工程化实践记要 像我们平日里做惯了 Java 或者 .NET 这种后端程序员,对于前端的认识还常常停留在 jQuery 时代,包括其插件在需要时就引 ...
- 「免费开源」基于Vue和Quasar的前端SPA项目crudapi后台管理系统实战之自定义组件(四)
基于Vue和Quasar的前端SPA项目实战之序列号(四) 回顾 通过上一篇文章 基于Vue和Quasar的前端SPA项目实战之布局菜单(三)的介绍,我们已经完成了布局菜单,本文主要介绍序列号功能的实 ...
- 基于VUE.JS的移动端框架Mint UI
Mint UI GitHub:github.com/ElemeFE/mint 项目主页:mint-ui.github.io/# Demo:elemefe.github.io/mint- 文档:mint ...
- 基于Vue、web3的以太坊项目开发及交易内幕初探 错误解决总结
基于Vue.web3的以太坊项目开发及交易内幕初探 本文通过宏观和微观两个层面窥探以太坊底层执行逻辑. 宏观层面描述创建并运行一个小型带钱包的发币APP的过程,微观层面是顺藤摸瓜从http api深入 ...
- [译]基于Vue.js的10个最佳UI框架,用于构建移动应用程序
原文查看10 Best Vue.js based UI Frameworks for Building Mobile Apps 如果您期待使用Vue.js构建移动应用程序,那么您可以选择许多可用的UI ...
随机推荐
- 开发中mysql和oracle的区别
首先就不描述mysql与oracle在整个数据库系统上的区别了,仅从程序员开发的角度来说: 1.主键: mysql一般会用到一个自增的属性,例如设置一个id字段,类型设置为auto increment ...
- Wrong FS: hdfs://......, expected: file:///
单机版使用的是FileSystem类的静态函数: FileSystem hdfs = FileSystem.get(conf) 伪分布式下需要使用Path来获得 Path path = new Pat ...
- JS(二)
上周给大家介绍了一下JS基础中一点东西,今天给大家介绍一下JS基础中一个重要部分,循环和函数. 04-JS中的循环结构 一.[循环结构的步骤] 1.首先要先声明循环变量. 2.判断循环条件 3.执行循 ...
- NavigationController的返回按钮自定义
假设需求时这样: NavigationController下有2个视图,从A视图会Push到B视图,默认情况下,当显示视图B时,视图B的导航bar上会出现返回按钮,按钮标题文字默认为A视图的title ...
- windows下实现linux的远程访问以及linux上文件的上传和下载
在网络性能.安全性.可管理性上,Linux有着其他系统无法比拟的强大优势,而服务器对这些方面要求特别高,因此Linux常常被用来做服务器使用.而当我们需要维护linux服务器的时候,就需要远程访问li ...
- P1013
问题 D: P1013 时间限制: 1 Sec 内存限制: 128 MB提交: 33 解决: 21[提交][状态][讨论版] 题目描述 " 找啊找啊找GF,找到一个好GF,吃顿饭啊拉拉手 ...
- Optional乱用Empty之No value present
前言 看到好多文章都是推荐采用Optinal的,而经常我遇到问题的时候就想:如果设计成optional的话就不会忽略这种NullPointException错误了.然而,optional并不是想用就随 ...
- js中 && 与 || 的妙用
在js逻辑运算中,0."".null.false.undefined.NaN都会判为false,其他都为true(好像没有遗漏了吧,请各位确认下).这个一定要记住,不然应用||和& ...
- DNS—正、反向解析;委派;主从;子域;转发;智能dns等的实现
前言:DNS,耳熟能详的东西,内容太多,小编也不太好讲清,只能写几个实验详解,供大家参考. 一.简单介绍 1.DNS:通过主机名,最终得到该主机名对应的IP地址的过程叫做域名解析(或主机名解析). 端 ...
- 学习PID
最近在想自己的文章有些是不是写的太难以理解了呢.........竟然好多人看了还是会直接问我很多问题....... 其实PID哈靠自己想像就能自己写出来自己的代码,也许是网上的讲的太过的高深什么积分微 ...