Spring Boot实战:集成Swagger2
一、Swagger简介
上一篇文章中我们介绍了Spring Boot对Restful的支持,这篇文章我们继续讨论这个话题,不过,我们这里不再讨论Restful API如何实现,而是讨论Restful API文档的维护问题。
在日常的工作中,我们往往需要给前端(WEB端、IOS、Android)或者第三方提供接口,这个时候我们就需要给他们提供一份详细的API说明文档。但维护一份详细的文档可不是一件简单的事情。首先,编写一份详细的文档本身就是一件很费时费力的事情,另一方面,由于代码和文档是分离的,所以很容易导致文档和代码的不一致。这篇文章我们就来分享一种API文档维护的方式,即通过Swagger来自动生成Restuful API文档。
那什么是Swagger?我们可以直接看下官方的描述:
THE WORLD'S MOST POPULAR API TOOLING

Swagger is the world’s largest framework of API developer tools for the OpenAPI Specification(OAS),

enabling development across the entire API lifecycle, from design and documentation, to test and deployment.
这段话首先告诉大家Swagger是世界上最流行的API工具,并且Swagger的目的是支撑整个API生命周期的开发,包括设计、文档以及测试和部署。这篇文章中我们会用到Swagger的文档管理和测试功能。
对Swagger的作用有了基本的认识后,我们现在来看看怎么使用。
二、Swagger与Spring boot集成
第一步:引入对应jar包:
 <dependency>

    <groupId>io.springfox</groupId>

    <artifactId>springfox-swagger2</artifactId>

    <version>2.6.0</version>

</dependency>

<dependency>

    <groupId>io.springfox</groupId>

    <artifactId>springfox-swagger-ui</artifactId>

    <version>2.6.0</version>

</dependency>
第二步,基本信息配置:
@Configuration

@EnableSwagger2

public class Swagger2Config {

    @Bean

    public Docket createRestApi() {

        return new Docket(DocumentationType.SWAGGER_2)

                .apiInfo(apiInfo())

                .select()

                .apis(RequestHandlerSelectors.basePackage("com.pandy.blog.rest"))

                .paths(PathSelectors.regex("/rest/.*"))

                .build();

    }

    private ApiInfo apiInfo() {

        return new ApiInfoBuilder()

                .title("Blog系统Restful API")

                .description("Blog系统Restful API")

                .termsOfServiceUrl("http://127.0.0.1:8080/")

                .contact("liuxiaopeng")

                .version("1.0")

                .build();

    }

}
基础的配置是对整个API文档的描述以及一些全局性的配置,对所有接口起作用。这里涉及到两个注解:
@Configuration是表示这是一个配置类,是JDK自带的注解,前面的文章中也已做过说明。
@EnableSwagger2的作用是启用Swagger2相关功能。
在这个配置类里面我么实例化了一个Docket对象,这个对象主要包括三个方面的信息:
(1)整个API的描述信息,即ApiInfo对象包括的信息,这部分信息会在页面上展示。
(2)指定生成API文档的包名。
(3)指定生成API的路径。按路径生成API可支持四种模式,这个可以参考其源码:
public class PathSelectors {

    private PathSelectors() {

        throw new UnsupportedOperationException();

    }

    public static Predicate<String> any() {

        return Predicates.alwaysTrue();

    }

    public static Predicate<String> none() {

        return Predicates.alwaysFalse();

    }

    public static Predicate<String> regex(final String pathRegex) {

        return new Predicate<String>() {

            public boolean apply(String input) {

                return input.matches(pathRegex);

            }

        };

    }

    public static Predicate<String> ant(final String antPattern) {

        return new Predicate<String>() {

            public boolean apply(String input) {

                AntPathMatcher matcher = new AntPathMatcher();

                return matcher.match(antPattern, input);

            }

        };

    }

}
从源码可以看出,Swagger总共支持任何路径都生成、任何路径都不生成以及正则匹配和ant 模式匹配四种方式。大家可能比较熟悉的是前三种,最后一种ant匹配,如果不熟悉ant的话就直接忽略吧,前三种应该足够大家在日常工作中使用了。
有了上面的配置我们就可以看到效果了,我在com.pandy.blog.rest这个包下面有一个ArticleRestController这个类,源码如下:
@RestController

public class ArticleRestController {

    @Autowired

    private ArticleService articleService;

    @RequestMapping(value = "/rest/article", method = POST, produces = "application/json")

    public WebResponse<Map<String, Object>> saveArticle(@RequestBody Article article) {

        article.setUserId(1L);

        articleService.saveArticle(article);

        Map<String, Object> ret = new HashMap<>();

        ret.put("id", article.getId());

        WebResponse<Map<String, Object>> response = WebResponse.getSuccessResponse(ret);

        return response;

    }

    @RequestMapping(value = "/rest/article/{id}", method = DELETE, produces = "application/json")

    public WebResponse<?> deleteArticle(@PathVariable Long id) {

        Article article = articleService.getById(id);

        article.setStatus(-1);

        articleService.updateArticle(article);

        WebResponse<Object> response = WebResponse.getSuccessResponse(null);

        return response;

    }

    @RequestMapping(value = "/rest/article/{id}", method = PUT, produces = "application/json")

    public WebResponse<Object> updateArticle(@PathVariable Long id, @RequestBody Article article) {

        article.setId(id);

        articleService.updateArticle(article);

        WebResponse<Object> response = WebResponse.getSuccessResponse(null);

        return response;

    }

    @RequestMapping(value = "/rest/article/{id}", method = GET, produces = "application/json")

    public WebResponse<Article> getArticle(@PathVariable Long id) {

        Article article = articleService.getById(id);

        WebResponse<Article> response = WebResponse.getSuccessResponse(article);

        return response;

    }

    @RequestMapping(value = "/test/{id}", method = GET, produces = "application/json")

    public WebResponse<?> getNoApi(){

        WebResponse<?> response = WebResponse.getSuccessResponse(null);

        return response;

    }

}
启动Spring boot,然后访问:http://127.0.0.1:8080/swagger-ui.html即可看到如下结果:
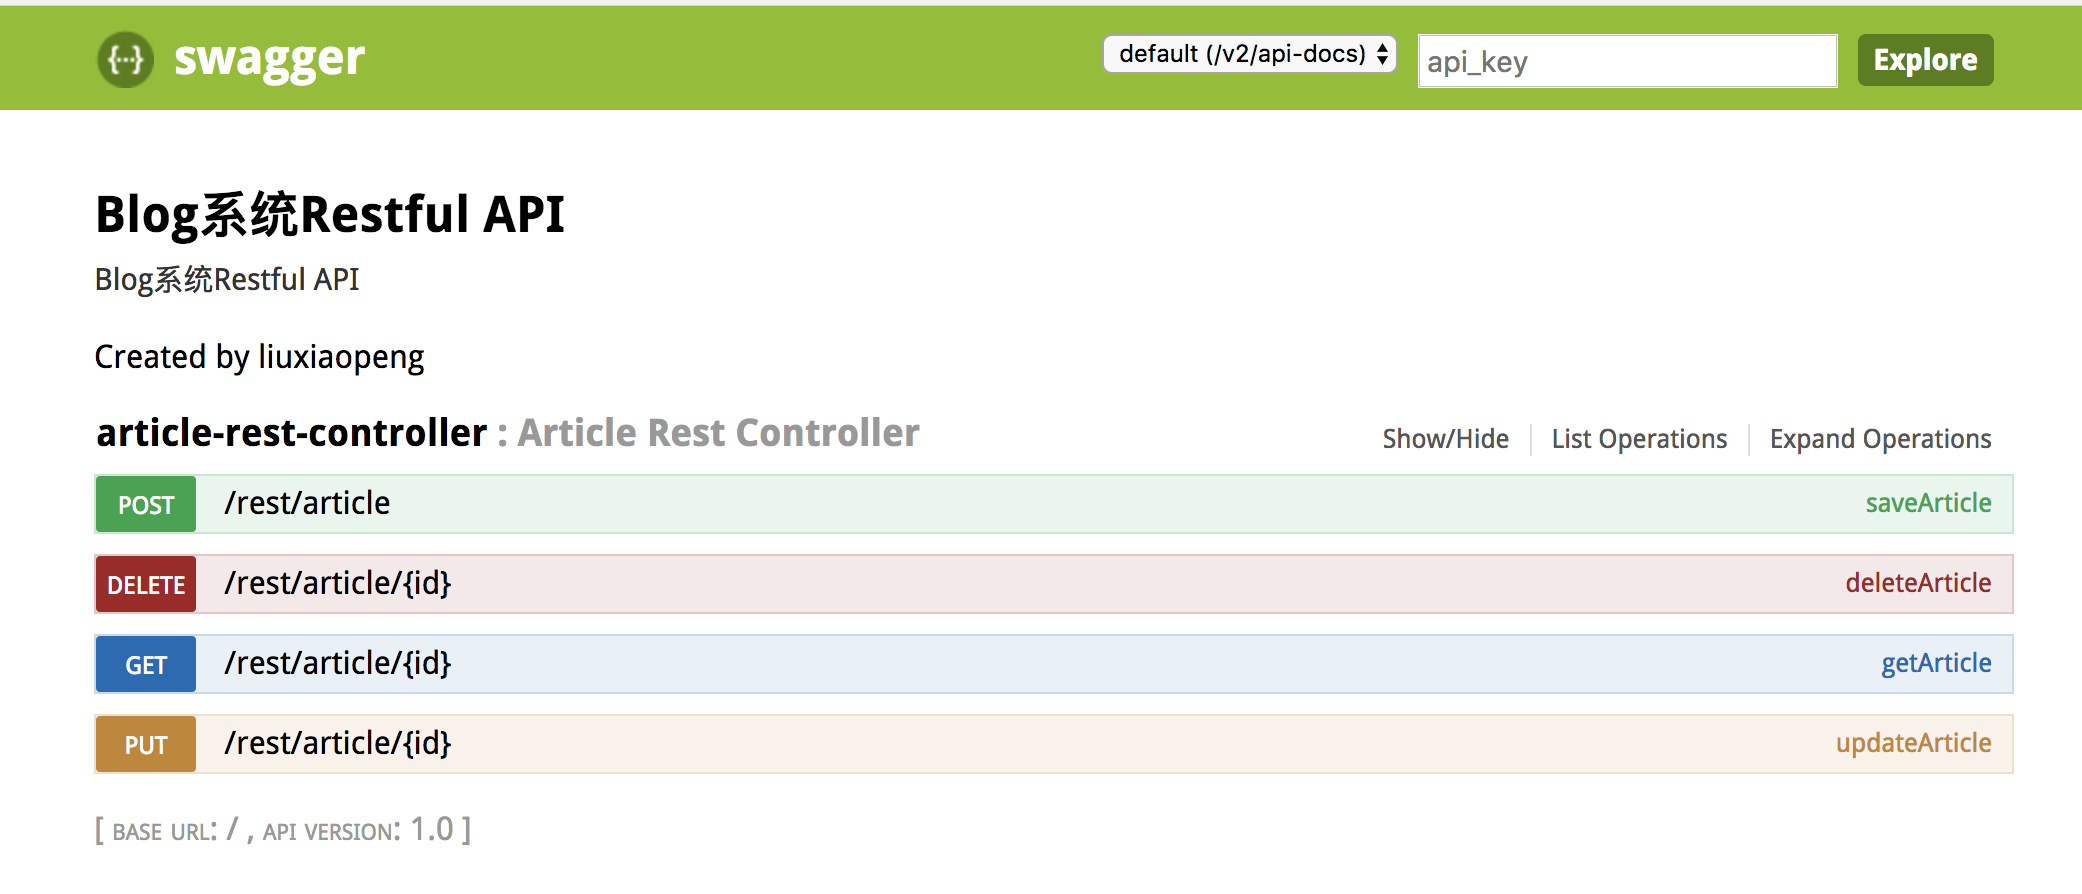
这个页面上可以看到,除了最后一个接口/test/{id}外,其他接口都生成对应的文档,最后一个接口因为不满足我们配置的路径——“/rest/.*”,所以没有生成文档。
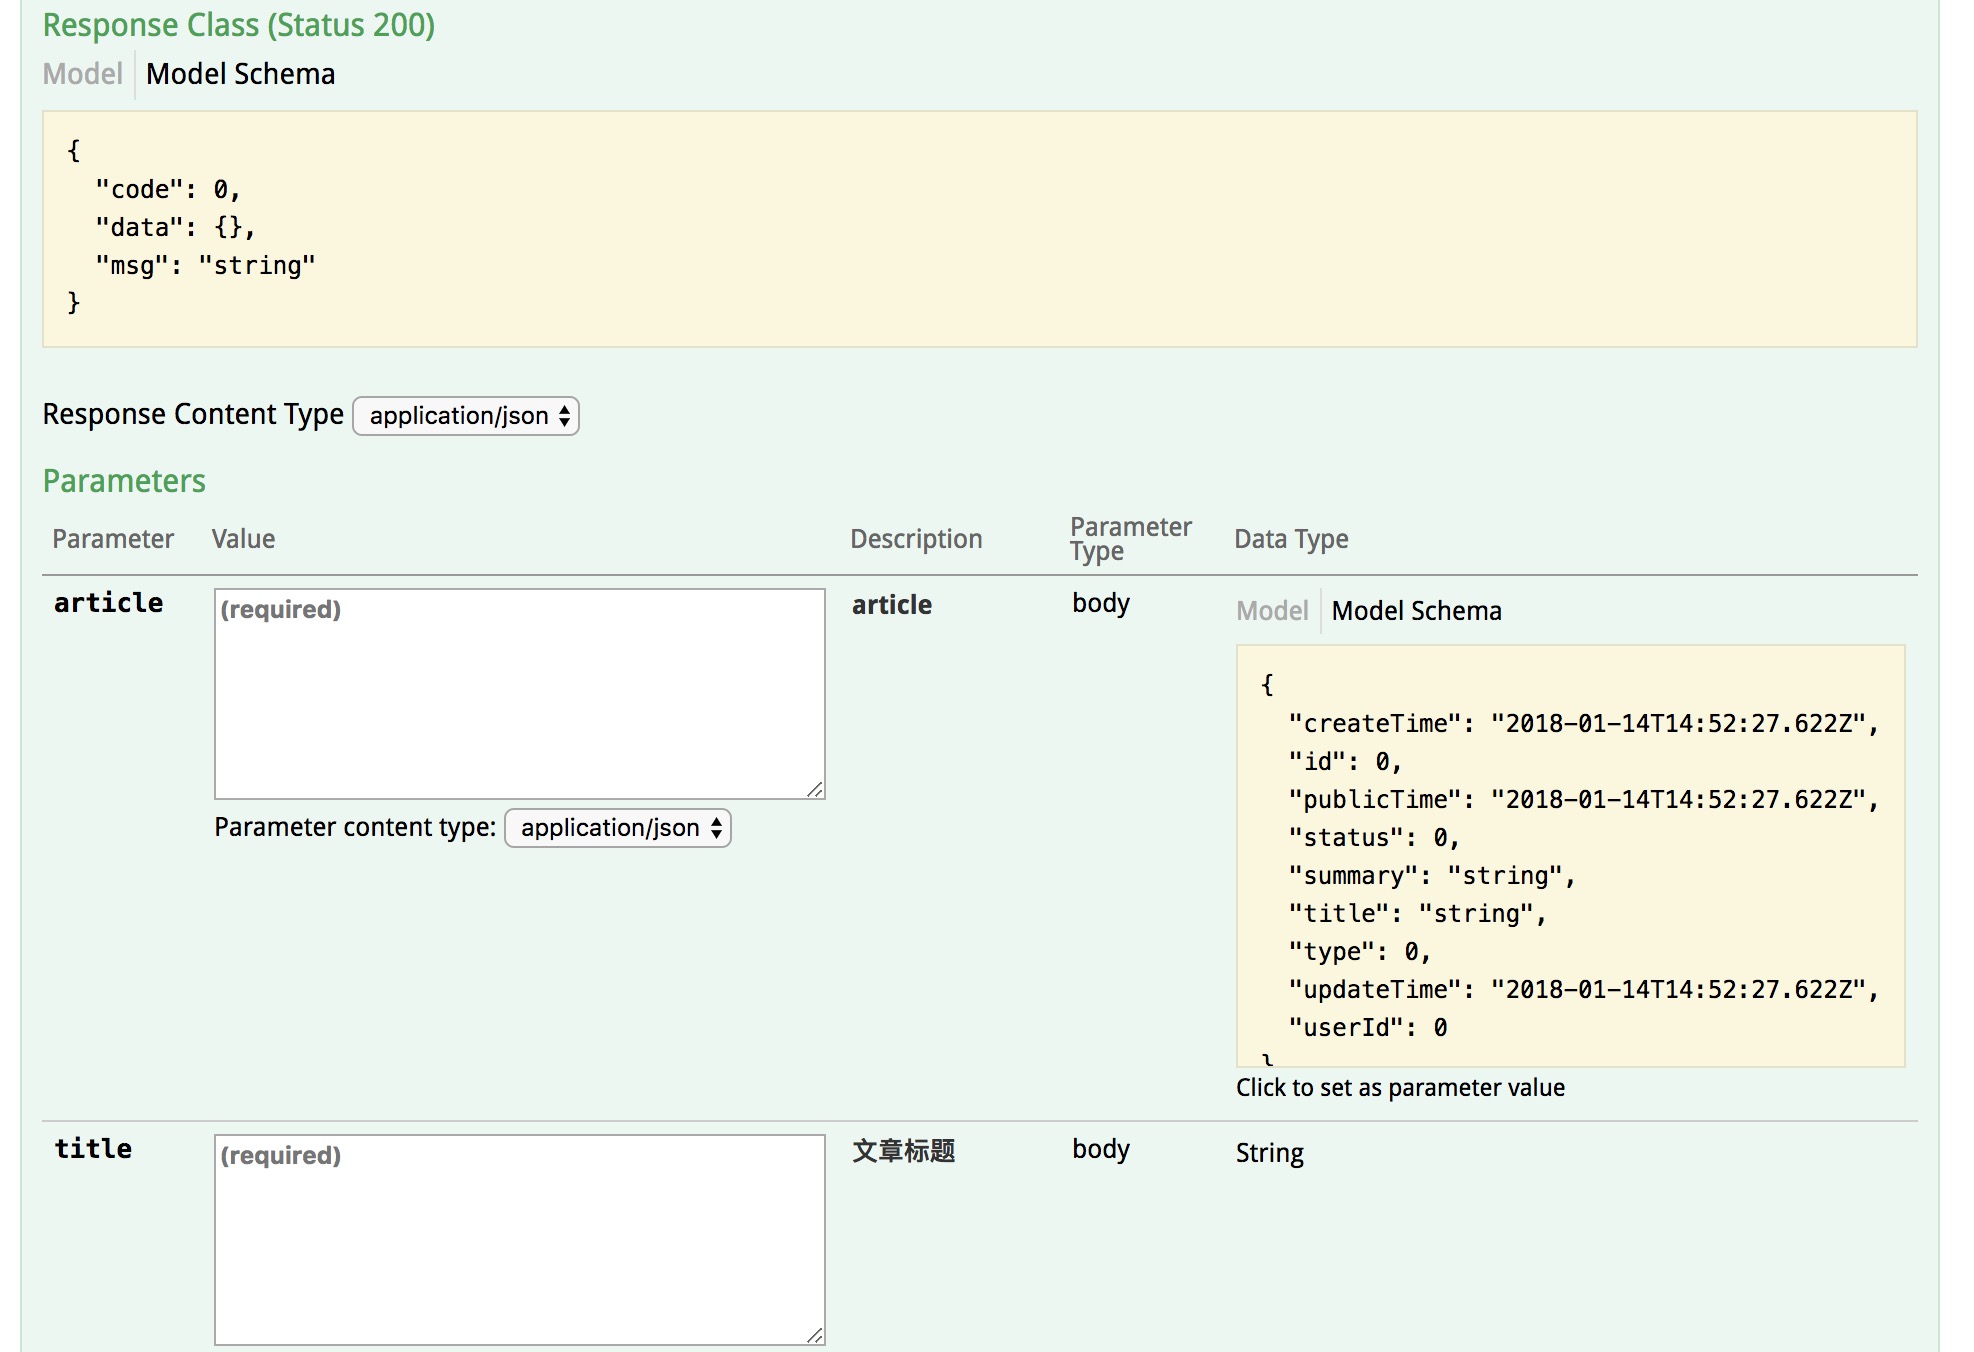
我们还可以点进去看一下每一个具体的接口,我们这里以“POST /rest/article”这个接口为例:

可以看到,Swagger为每一个接口都生成了返回结果和请求参数的示例,并且能直接通过下面的"try it out"进行接口访问,方面大家对接口进行测试。整体上感觉Swagger还是很强大的,配置也比较简单。
三、Swagger API详细配置
不过大家看到这里肯定会有点疑问:
第一个问题:这个返回结果和请求参数都没有文字性的描述,这个可不可以配置?
第二个问题:这个请求参应该是直接根据对象反射出来的结果,但是不是对象的每个属性都是必传的,另外参数的值也不一定满足我们的需求,这个能否配置?
答案肯定是可以的,现在我们就来解决这两个问题,直接看配置的代码:
package com.pandy.blog.rest;

import com.pandy.blog.dto.WebResponse;

import com.pandy.blog.po.Article;

import com.pandy.blog.service.ArticleService;

import io.swagger.annotations.ApiImplicitParam;

import io.swagger.annotations.ApiImplicitParams;

import io.swagger.annotations.ApiOperation;

import io.swagger.annotations.ApiResponse;

import io.swagger.annotations.ApiResponses;

import org.springframework.beans.factory.annotation.Autowired;

import org.springframework.context.annotation.Profile;

import org.springframework.web.bind.annotation.PathVariable;

import org.springframework.web.bind.annotation.RequestBody;

import org.springframework.web.bind.annotation.RequestMapping;

import org.springframework.web.bind.annotation.RestController;

import java.util.HashMap;

import java.util.List;

import java.util.Map;

import static org.springframework.web.bind.annotation.RequestMethod.DELETE;

import static org.springframework.web.bind.annotation.RequestMethod.GET;

import static org.springframework.web.bind.annotation.RequestMethod.POST;

import static org.springframework.web.bind.annotation.RequestMethod.PUT;

@RestController

@RequestMapping("/rest")

public class ArticleRestController {

    @Autowired

    private ArticleService articleService;

    @RequestMapping(value = "/article", method = POST, produces = "application/json")

    @ApiOperation(value = "添加文章", notes = "添加新的文章", tags = "Article",httpMethod = "POST")

    @ApiImplicitParams({

            @ApiImplicitParam(name = "title", value = "文章标题", required = true, dataType = "String"),

            @ApiImplicitParam(name = "summary", value = "文章摘要", required = true, dataType = "String"),

            @ApiImplicitParam(name = "status", value = "发布状态", required = true, dataType = "Integer")

    })

    @ApiResponses({

            @ApiResponse(code=200,message="成功",response=WebResponse.class),

    })

    public WebResponse<Map<String,Object>> saveArticle(@RequestBody Article article){

        articleService.saveArticle(article);

        Map<String,Object> ret = new HashMap<>();

        ret.put("id",article.getId());

        WebResponse<Map<String,Object>> response = WebResponse.getSuccessResponse(ret);

        return response;

    }

    @ApiOperation(value = "删除文章", notes = "根据ID删除文章", tags = "Article",httpMethod = "DELETE")

    @ApiImplicitParams({

            @ApiImplicitParam(name = "id", value = "文章ID", required = true, dataType = "Long")

    })

    @RequestMapping(value = "/{id}",method = DELETE,produces = "application/json")

    public WebResponse<?>  deleteArticle(@PathVariable Long id){

        Article article = articleService.getById(id);

        article.setStatus(-1);

        articleService.saveArticle(article);

        return WebResponse.getSuccessResponse(new HashMap<>());

    }

    @ApiOperation(value = "获取文章列表", notes = "可以根据标题进行模糊查询", tags = "Article",httpMethod = "GET")

    @ApiImplicitParams({

            @ApiImplicitParam(name = "title", value = "文章标题", required = false, dataType = "String"),

            @ApiImplicitParam(name = "pageSize", value = "每页文章数量", required = false, dataType = "Integer"),

            @ApiImplicitParam(name = "pageNum", value = "分页的页码", required = false, dataType = "Integer")

    })

    @RequestMapping(value = "/article/list", method = GET, produces = "application/json")

    public WebResponse<?> listArticles(String title, Integer pageSize, Integer pageNum) {

        if (pageSize == null) {

            pageSize = 10;

        }

        if (pageNum == null) {

            pageNum = 1;

        }

        int offset = (pageNum - 1) * pageSize;

        List<Article> articles =  articleService.getArticles(title, 1L, offset, pageSize);

        return WebResponse.getSuccessResponse(articles);

    }

    @ApiOperation(value = "更新文章", notes = "更新文章内容", tags = "Article",httpMethod = "PUT")

    @ApiImplicitParams({

            @ApiImplicitParam(name = "id", value = "文章ID", required = true, dataType = "Long"),

            @ApiImplicitParam(name = "title", value = "文章标题", required = false, dataType = "String"),

            @ApiImplicitParam(name = "summary", value = "文章摘要", required = false, dataType = "String"),

            @ApiImplicitParam(name = "status", value = "发布状态", required = false, dataType = "Integer")

    })

    @RequestMapping(value = "/article/{id}", method = PUT, produces = "application/json")

    public WebResponse<?> updateArticle(@PathVariable Long id,@RequestBody Article article){

        article.setId(id);

        articleService.updateArticle(article);

        return WebResponse.getSuccessResponse(new HashMap<>());

    }

}
我们解释一下代码中几个注解及相关属性的具体作用:
@ApiOperation,整个接口属性配置:
value:接口说明,展示在接口列表。
notes:接口详细说明,展示在接口的详情页。
tags:接口的标签,相同标签的接口会在一个标签页下展示。
httpMethod:支持的HTTP的方法。
@ApiImplicitParams,@ApiImplicitParam的容器,可包含多个@ApiImplicitParam注解
@ApiImplicitParam,请求参数属性配置:
name:参数名称
value:参数说明
required:是否必须
dataType:数据类型
@ApiResponses,@ApiResponse容器,可以包含多个@ApiResponse注解
@ApiResponse,返回结果属性配置:
code:返回结果的编码。
message:返回结果的说明。
response:返回结果对应的类。
完成以上配置后,我们再看下页面效果:
列表页:
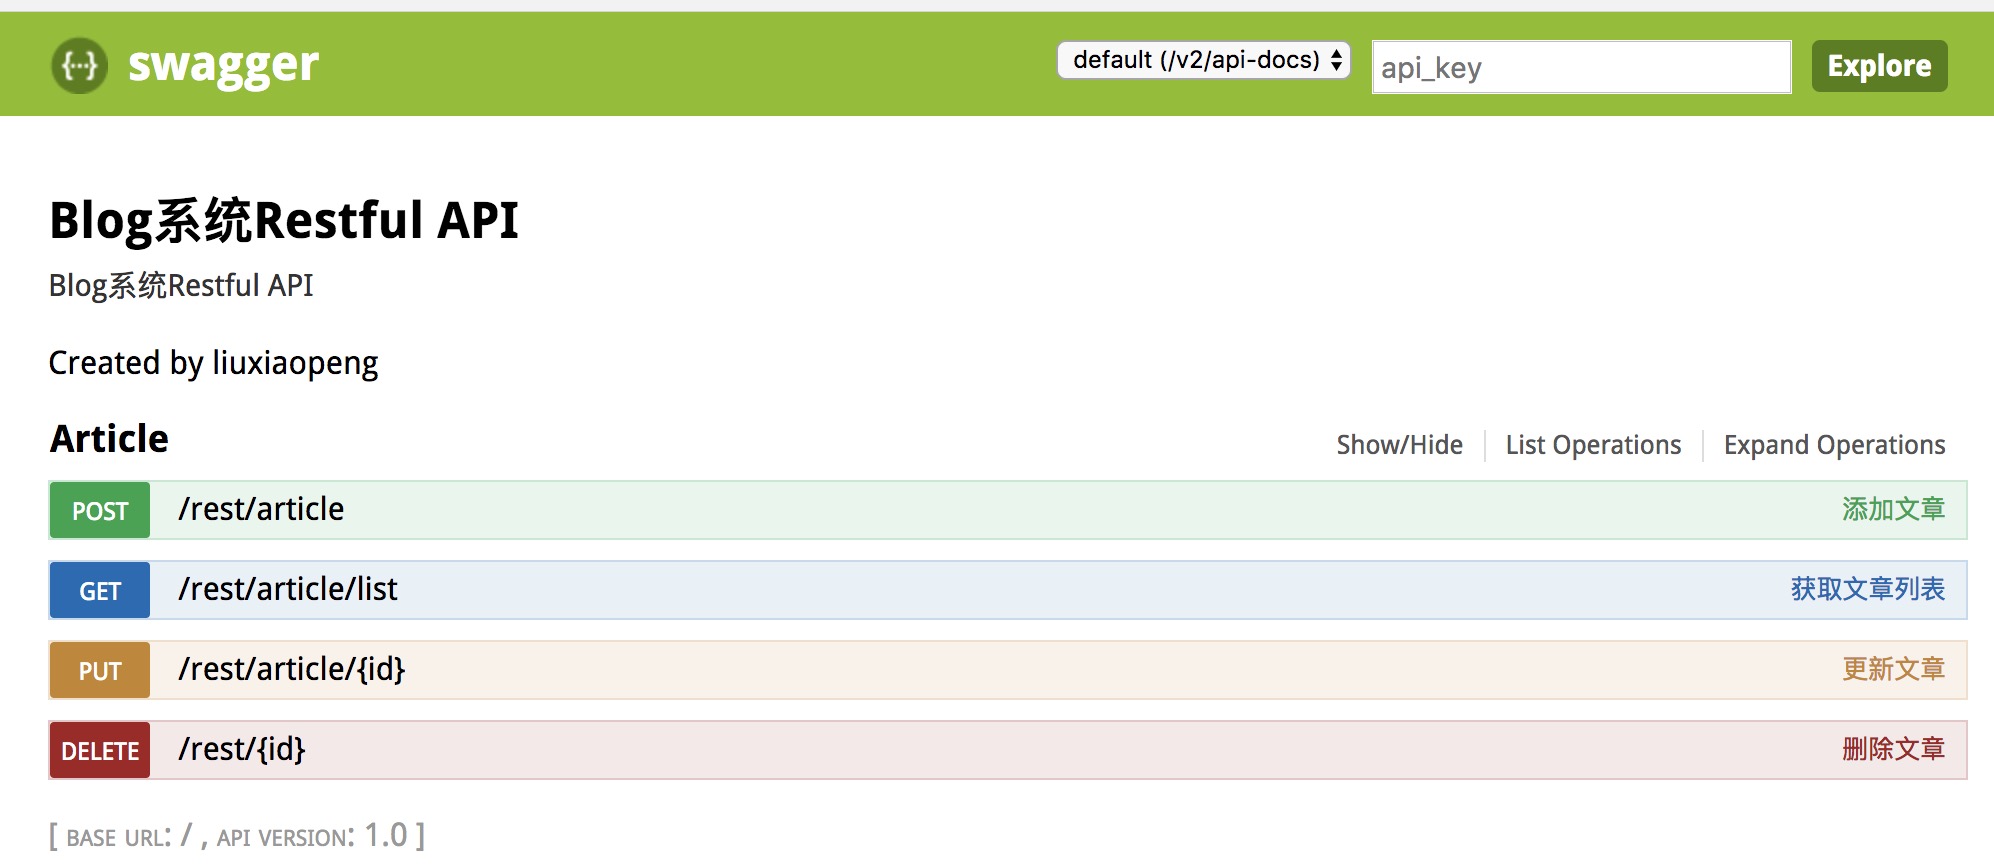
可以看到,现在接口都位于Article这个tag下,并且接口后面也有了我们配置好的说明。我们再看下”POST /rest/article“这个接口的详情页:
图片太大,只截取了title属性的展示,其他几个参数的类似。我们可以从页面上看到请求参数的说明是有的,不过这不是我们预期的效果,如果我们的参数仅仅是简单类型,这种方式应该没问题,但现在的问题是我们的请求参数是一个对象,那如何配置呢?这就涉及到另外两个注解:@ApiModel和@ApiModelProperty,我们还是先看代码,然后再解释,这样更容易理解:
@ApiModel(value="article对象",description="新增&更新文章对象说明")

public class Article {

    @Id

    @GeneratedValue

    @ApiModelProperty(name = "id",value = "文章ID",required = false,example = "1")

    private Long id;

    @ApiModelProperty(name = "title",value = "文章标题",required = true,example = "测试文章标题")

    private String title;

    @ApiModelProperty(name = "summary",value = "文章摘要",required = true,example = "测试文章摘要")

    private String summary;

    @ApiModelProperty(hidden = true)

    private Date createTime;

    @ApiModelProperty(hidden = true)

    private Date publicTime;

    @ApiModelProperty(hidden = true)

    private Date updateTime;

    @ApiModelProperty(hidden = true)

    private Long userId;

    @ApiModelProperty(name = "status",value = "文章发布状态",required = true,example = "1")

    private Integer status;

    @ApiModelProperty(name = "type",value = "文章分类",required = true,example = "1")

    private Integer type;

}
@ApiModel是对整个类的属性的配置:
value:类的说明
description:详细描述
@ApiModelProperty是对具体每个字段的属性配置:
name:字段名称
value:字段的说明
required:是否必须
example:示例值
hidden:是否显示
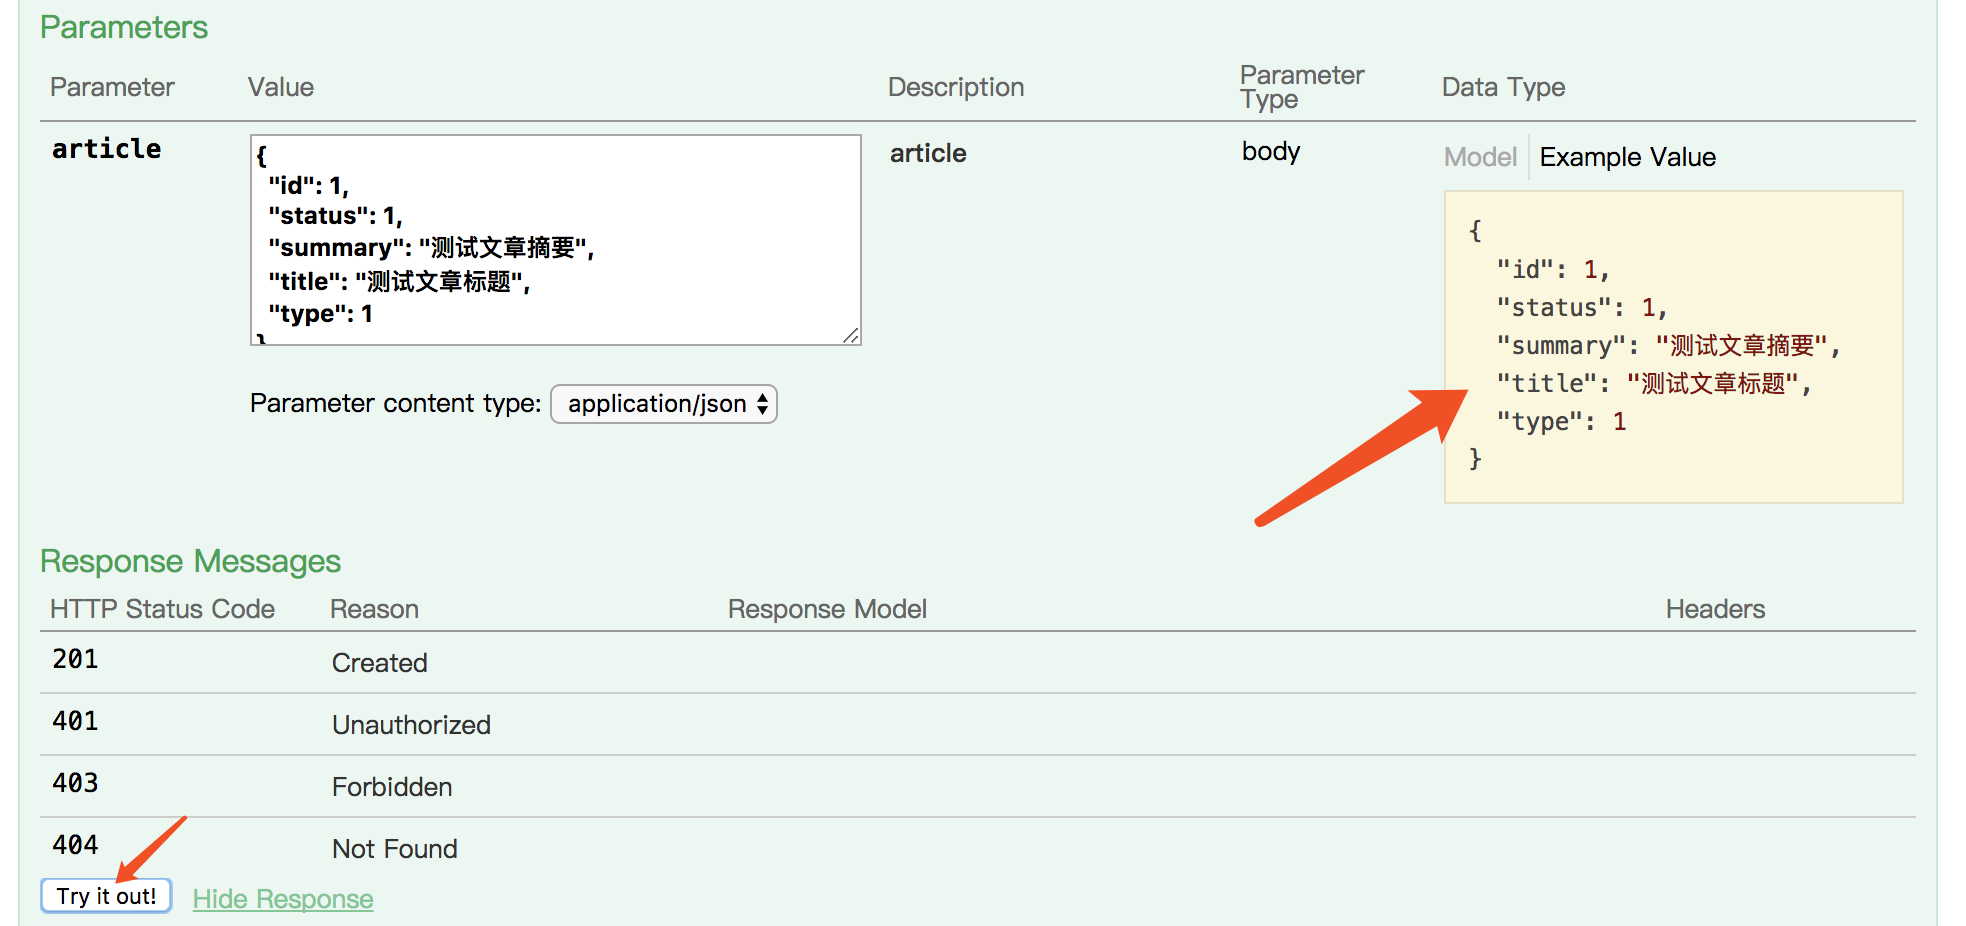
完成上面的配置后,我们再来看效果:
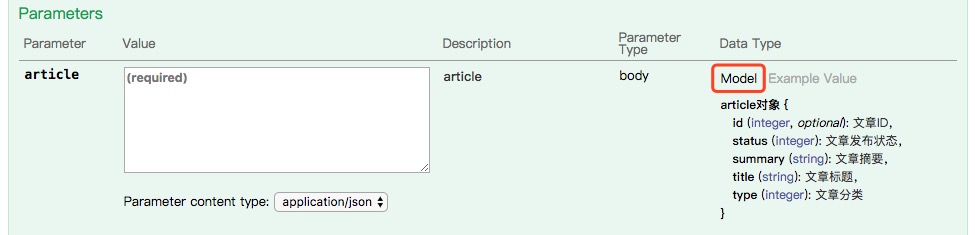
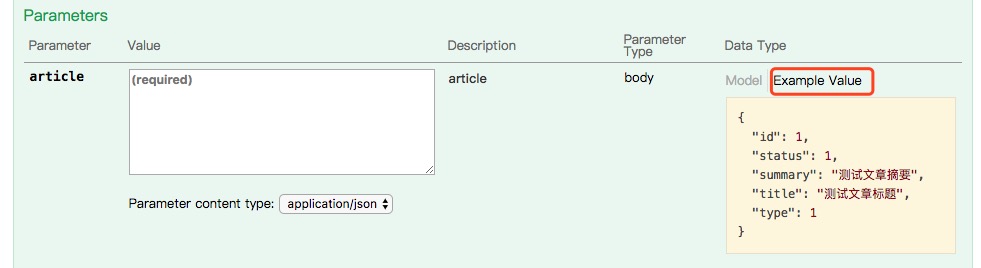
现在我们可以看到,字段的说明都已经展示出来,并且,示例中字段的值也变成了我们配置的example属性对应的值了。这样,一份完整的API文档就生成了,并且该文档与代码紧密的联系在一起,而不是隔离的两个部分。除此之外,我们还可以直接通过该文档很方便的进行测试,我们只需要点击Example Value下黄色的框,里面的内容就会自动复制到article对应的value框中,然后在点击“Try it out”就可以发起http请求了。
点击Try it out后,我们就可以看到返回的结果:
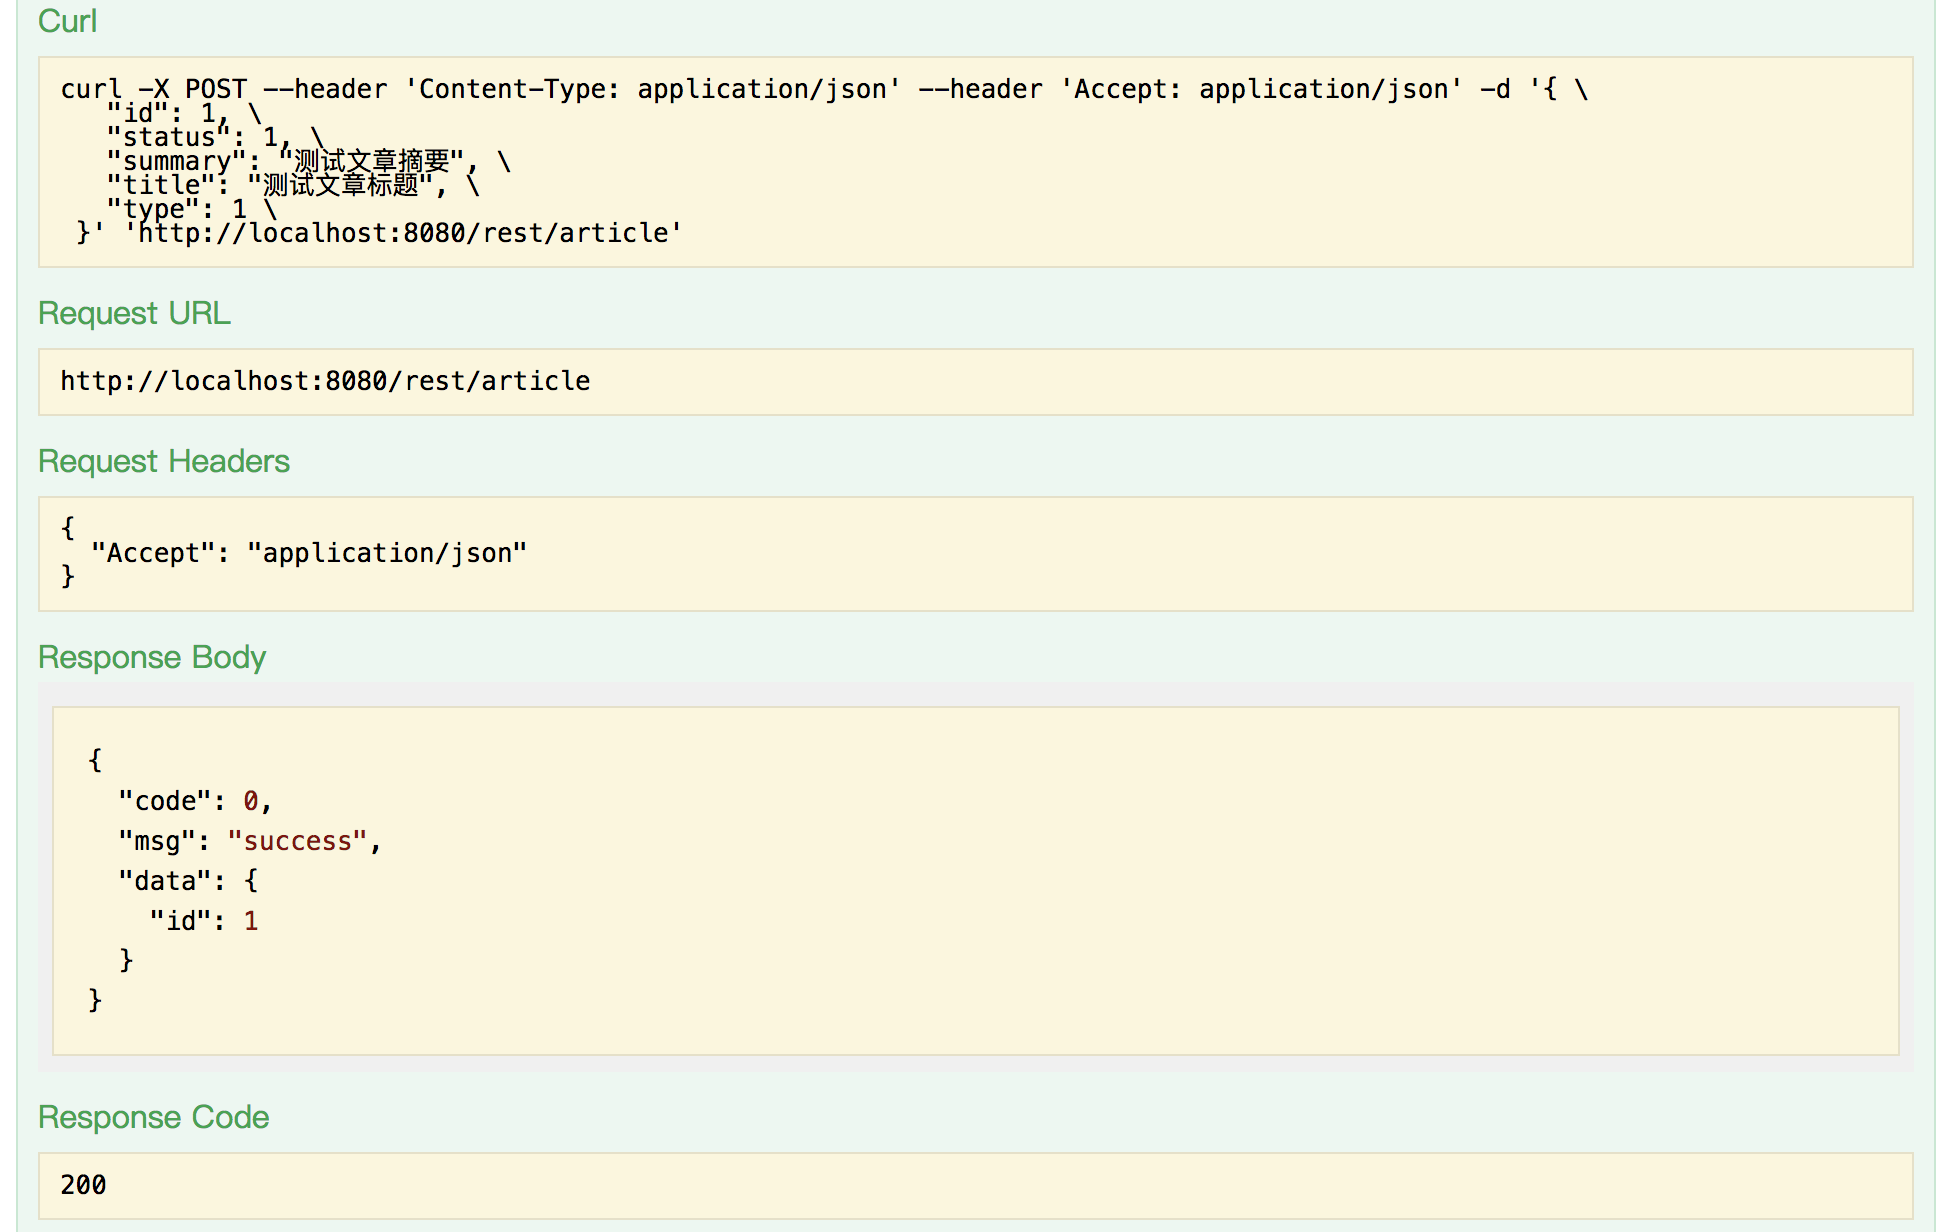
操作还是很方便的,相比Junit和postman,通过Swagger来测试会更加便捷,当然,Swagger的测试并不能代替单元测试,不过,在联调的时候还是有非常大的作用的。
四、总结
总体上来说,Swagger的配置还是比较简单的,并且Swagger能够自动帮我们生成文档确实为我们节省了不少工作,对后续的维护也提供了很大的帮助。除此之外,Swagger还能根据配置自动为我们生成测试的数据,并且提供对应的HTTP方法,这对我们的自测和联调工作也有不少的帮助,所以我还是推荐大家在日常的开发中去使用Swagger,应该可以帮助大家在一定程度上提高工作效率的。最后,留一个问题给大家思考吧,就是该文档是可以直接通过页面来访问的,那我们总不能把接口直接暴露在生产环境吧,尤其是要对外提供服务的系统,那我们怎么才能在生产环节中关闭这个功能呢?方法有很多,大家可以自己尝试一下。
Spring Boot实战:集成Swagger2的更多相关文章
- Spring Boot实战系列(7)集成Consul配置中心
本篇主要介绍了 Spring Boot 如何与 Consul 进行集成,Consul 只是服务注册的一种实现,还有其它的例如 Zookeeper.Etcd 等,服务注册发现在微服务架构中扮演这一个重要 ...
- Spring Boot中使用Swagger2构建RESTful APIs
关于 Swagger Swagger能成为最受欢迎的REST APIs文档生成工具之一,有以下几个原因: Swagger 可以生成一个具有互动性的API控制台,开发者可以用来快速学习和尝试API. S ...
- Spring Boot实战
Spring在java EE开发中是实际意义上的标准,但我们在开发Spring的时候可能会遇到以下令人头疼的问题: 1.大量配置文件的定义.2.与第三方软件整合的技术问题. Spring每个版本的退出 ...
- spring boot实战(第一篇)第一个案例
版权声明:本文为博主原创文章,未经博主允许不得转载. 目录(?)[+] spring boot实战(第一篇)第一个案例 前言 写在前面的话 一直想将spring boot相关内容写成一个系列的 ...
- 《Spring Boot实战》笔记(目录)
目录 目 录第一部分 点睛Spring 4.x第1 章 Spring 基础 .............................................................. ...
- spring boot 实战教程
二八法则 - get more with less Java.spring经过多年的发展,各种技术纷繁芜杂,初学者往往不知道该从何下手.其实开发技术的世界也符合二八法则,80%的场景中只有20%的技术 ...
- Spring Boot项目使用Swagger2文档教程
[本文版权归微信公众号"代码艺术"(ID:onblog)所有,若是转载请务必保留本段原创声明,违者必究.若是文章有不足之处,欢迎关注微信公众号私信与我进行交流!] 前言 Sprin ...
- Spring Boot中使用Swagger2构建强大的RESTful API文档
由于Spring Boot能够快速开发.便捷部署等特性,相信有很大一部分Spring Boot的用户会用来构建RESTful API.而我们构建RESTful API的目的通常都是由于多终端的原因,这 ...
- spring boot实战(第十三篇)自动配置原理分析
前言 spring Boot中引入了自动配置,让开发者利用起来更加的简便.快捷,本篇讲利用RabbitMQ的自动配置为例讲分析下Spring Boot中的自动配置原理. 在上一篇末尾讲述了Spring ...
- spring boot实战(第十二篇)整合RabbitMQ
前言 最近几篇文章将围绕消息中间件RabbitMQ展开,对于RabbitMQ基本概念这里不阐述,主要讲解RabbitMQ的基本用法.Java客户端API介绍.spring Boot与RabbitMQ整 ...
随机推荐
- Orchard Core Framework:ASP.NET Core 模块化,多租户框架
Orchard Core Framework:ASP.NET Core 模块化,多租户框架 上一篇编写Orchard Core一分钟搭建ASP.NET Core CMS ,介绍ASP.NET Core ...
- CentOS 7下Samba服务器的安装与配置
文基于<CentOS 6.3下Samba服务器的安装与配置>,参照原博文,自己在CentOS7环境上实现,并按照自己的环境修改博文内容 一.简介 Samba是一个能让Linux系统应用Mi ...
- Tencent社会招聘scrapy爬虫 --- 已经解决
1.用 scrapy 新建一个 tencent 项目 2.在 items.py 中确定要爬去的内容 # -*- coding: utf- -*- # Define here the models fo ...
- 分布式:2PC,3PC,Paxos,Raft,ISR [转]
本文主要讲述2PC及3PC,以及Paxos以及Raft协议. 两类一致性(操作原子性与副本一致性) 2PC协议用于保证属于多个数据分片上的操作的原子性.这些数据分片可能分布在不同的服务器上,2PC协议 ...
- 此地址使用了一个通常用于网络浏览以外目的的端口。出于安全原因,Firefox 取消了该请求。
火狐无法访问本机IIS部署的网站,弹出:此地址使用了一个通常用于网络浏览以外目的的端口.出于安全原因,Firefox 取消了该请求 的解决办法 关于火狐浏览器访问本机IIS部署的网站弹出"此 ...
- java.net.BindException: Cannot assign requested address: bind
异常信息 时间:2017-03-16 10:21:05,644 - 级别:[ERROR] - 消息: [other] Failed to start end point associated with ...
- C C语言中关键词,以及知识点复习
C语言学习 C语言练习知识点 auto 局部变量(自动储存) break 无条件退出程序最内层循环 case switch语句中选择项 char ...
- [转]winform 自动伸缩控件xpandercontrols 使用说明
链接地址:http://blog.sina.com.cn/s/blog_b5b004920101f5h3.html
- HTML5 给图形绘制阴影(绘制五角星示例)
几个属性 shadowOffsetX:阴影的横向位移量. shadowOffsetY:阴影的纵向位移量. shadowColor:阴影的颜色. shadowBlur:阴影的模糊范围. 属性说明 sha ...
- ProjectA: 多元非线性回归
https://www.youtube.com/watch?v=n9XycstdPYs&t=907s