jmeter添加自定义扩展函数之图片base64
原文连接:---------https://www.cnblogs.com/qiaoyeye/p/7218770.html-----------
打开eclipse,新建maven工程,在pom中引用jmeter核心jar包:
<!-- https://mvnrepository.com/artifact/org.apache.jmeter/ApacheJMeter_core -->

<dependency>

    <groupId>org.apache.jmeter</groupId>

    <artifactId>ApacheJMeter_core</artifactId>

    <version>3.2</version>

</dependency>

<!-- https://mvnrepository.com/artifact/org.apache.jmeter/ApacheJMeter_functions -->

<dependency>

    <groupId>org.apache.jmeter</groupId>

    <artifactId>ApacheJMeter_functions</artifactId>

    <version>3.2</version>

</dependency>
1,新建一个包com.mytest.functions,包名要包含functions,因为jmeter.properties对这块有配置,可见该文件的classfinder.functions.contain=.functions
2,在该包下新建一个类并继承AbstractFunction,重写该类的所有方法,具体如下:
package com.mytest.functions;

import java.io.FileInputStream;

import java.io.InputStream;

import java.util.Collection;

import java.util.LinkedList;

import java.util.List;

import org.apache.jmeter.engine.util.CompoundVariable;

import org.apache.jmeter.functions.AbstractFunction;

import org.apache.jmeter.functions.InvalidVariableException;

import org.apache.jmeter.samplers.SampleResult;

import org.apache.jmeter.samplers.Sampler;

import org.apache.jmeter.threads.JMeterVariables;

import sun.misc.BASE64Encoder;

public class MyBase64 extends AbstractFunction{

    //自定义function的描述

    private static final List<String> desc = new LinkedList<String>();

    static {

        desc.add("图片路径");

    }

    static {

        desc.add("图片base64后存放变量");

    }

    private static final String KEY = "__MyBase64";

    //存放传入参数的值的变量

    private Object[] values;

    //描述参数

    public List<String> getArgumentDesc() {

        // TODO Auto-generated method stub

        return desc;

    }

    @Override

    //函数的执行

    public synchronized String execute(SampleResult arg0, Sampler arg1) throws InvalidVariableException {

        // TODO Auto-generated method stub

        JMeterVariables localJMeterVariables = getVariables();

        String str1 = ((CompoundVariable)this.values[]).execute();

        String str2 = getImgBase64(str1);

        if ((localJMeterVariables != null) && (this.values.length > )) {

          String str3 = ((CompoundVariable)this.values[]).execute().trim();

          localJMeterVariables.put(str3, str2);

        }

        return str2;

    }

    @Override

    public String getReferenceKey() {

        // TODO Auto-generated method stub

        //提供jmeter函数助手显示的名称

        return KEY;

    }

    @Override

    public synchronized void setParameters(Collection<CompoundVariable> arg0) throws InvalidVariableException {

        // TODO Auto-generated method stub

        //检查参数的个数,支持的方法有2个,具体用法参加api:

        /**

         * protected void checkParameterCount(Collection<CompoundVariable> parameters,

                                   int count)

                            throws InvalidVariableException

            Utility method to check parameter counts.

            Parameters:

            parameters - collection of parameters

            count - number of parameters expected

         * */

        //-----------------

        /**

         *

         * protected void checkParameterCount(Collection<CompoundVariable> parameters,

                                   int min,

                                   int max)

                            throws InvalidVariableException

            Utility method to check parameter counts.

            Parameters:

            parameters - collection of parameters

            min - minimum number of parameters allowed

            max - maximum number of parameters allowed

         * */

        //checkParameterCount(arg0, 1);

        checkParameterCount(arg0, , );

        //将参数值存入变量中

        this.values = arg0.toArray();

    }

    public String getImgBase64(String filePath) {

        InputStream in = null;

        byte[] data = null;

        String result = null;

        try {

            in = new FileInputStream(filePath);

            data = new byte[in.available()];

            in.read(data);

            in.close();

            BASE64Encoder encoder = new BASE64Encoder();

            result = encoder.encode(data);

        } catch (Exception e) {

            // TODO Auto-generated catch block

            e.printStackTrace();

        }

        return result;

    }

}
3,由于我写的类没有依赖第三方jar包,引入的jmeter核心包都是jmeter自带的,所以直接导出上面的类为一个jar包,
并把这个jar放在jmeter安装目录的apache-jmeter-3.2\lib\ext下面

4,
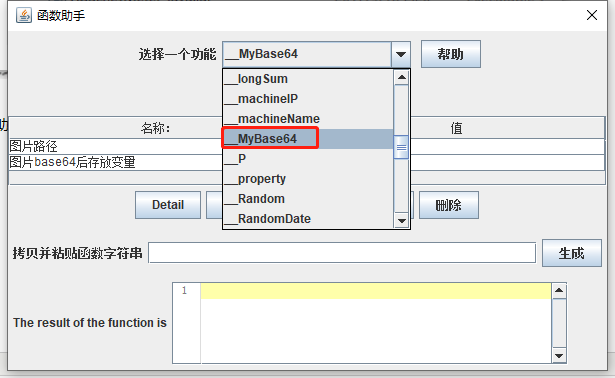
重启jmeter,打开函数助手,可看见如下图:
5,下面我们测试一下这个函数是否能使用,新建一个用户定义的变量分别添加${__MyBase64(C:\\Users\\test\\Desktop\\20190416173622.jpg,imgresult)}<实际应用中使用第一个就可以>和${imgresult}如下图,注意${__MyBase64(C:\\Users\\test\\Desktop\\20190416173622.jpg,imgresult)}一定要在上面
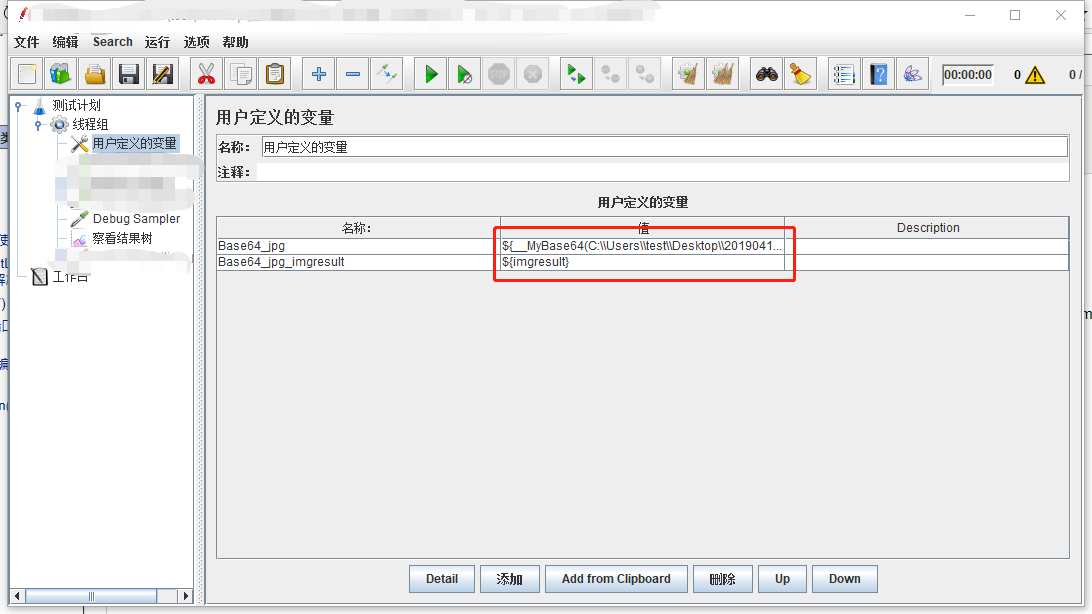
6,运行后可以看到已经成功

7,接口报错分析:
发送接口时,提示500,使用网络生成的base64与之对比,发现得到的字符串有空格问题,<java制动换行引起>,因此要使用jmeter中的BeanShell Sampler对得到的结果进行处理,删除空格。
String Base64_get = vars.get("Base64_jpg");  // 获取用户定义的变量的值

String Base64_get = Base64_get.replaceAll("\\s","");  // /s去除空格

log.info("name:"+Base64_get);  //log打印

vars.put("Base64_get",Base64_get.toString()); //输出Base64_get,用来调用
如果自己无法生成jar,请留言留下联系方式,
同时感谢:作者乔叶叶的代码分享,博主地址:http://www.cnblogs.com/qiaoyeye/
jmeter添加自定义扩展函数之图片base64的更多相关文章
- jmeter添加自定义扩展函数之图片base64编码
打开eclipse,新建maven工程,在pom中引入jmeter核心jar包: <!-- https://mvnrepository.com/artifact/org.apache.jmete ...
- jmeter添加自定义扩展函数之Strng---base64解密
1,打开eclipse,新建maven工程,在pom中引用jmeter核心jar包,具体请看---https://www.cnblogs.com/guanyf/p/10863033.html---,这 ...
- jmeter添加自定义扩展函数之String---base64加密
1,打开eclipse,新建maven工程,在pom中引用jmeter核心jar包,具体请看---https://www.cnblogs.com/guanyf/p/10863033.html---,这 ...
- jmeter添加自定义扩展函数之DoubleSum
1,打开eclipse,新建maven工程,在pom中引用jmeter核心jar包,具体请看---https://www.cnblogs.com/guanyf/p/10863033.html---,这 ...
- jmeter添加自定义扩展函数之if判断
1,打开eclipse,新建maven工程,在pom中引用jmeter核心jar包,具体请看---https://www.cnblogs.com/guanyf/p/10863033.html---,这 ...
- jmeter添加自定义扩展函数之小写转换大写
1,打开eclipse,新建maven工程,在pom中引用jmeter核心jar包,具体请看---https://www.cnblogs.com/guanyf/p/10863033.html---,这 ...
- jmeter添加自定义扩展函数之大写转换小写
1,打开eclipse,新建maven工程,在pom中引用jmeter核心jar包,具体请看---https://www.cnblogs.com/guanyf/p/10863033.html---,这 ...
- jmeter添加自定义扩展函数之MD5加密
1,打开eclipse,新建maven工程,在pom中引用jmeter核心jar包,具体请看---https://www.cnblogs.com/guanyf/p/10863033.html---,这 ...
- js压缩图片base64长度
var myCanvas=$('.img-container > img').cropper('getCroppedCanvas'); (function (base64){ var image ...
随机推荐
- JS获取当前时间并格式化
1.获取当前的日期时间 格式“yyyy-MM-dd HH:MM:SS” function p(s) { return s < 10 ? '0' + s : s; ...
- spring-第一篇之spring核心机制依赖注入(DI)/控制翻转(IoC)
1.spring的核心机制:依赖注入(DI)/控制翻转(IoC) 什么是依赖:A对象需要调用B对象,所以A依赖于B. 什么是注入:A对象注入一个属性B对象. 什么是依赖注入(DI):A对象依赖于B对象 ...
- 使用requests_html抓取数据
from requests_html import HTMLSession import json class YejiCollege: def __init__(self, url): self.u ...
- Python入门习题2.蟒蛇绘制(turtle库)
例2.调用turtle库中的若干函数来绘制蟒蛇,要求:(1)主体窗口宽650像素,高度350像素,窗口左侧与屏幕左侧像素距离200,窗口顶部与屏幕顶部像素距离200:(2)画笔落点在原点反向前进250 ...
- LeetCode #657. Robot Return to Origin 机器人能否返回原点
https://leetcode-cn.com/problems/robot-return-to-origin/ 设置 flagUD 记录机器人相对于原点在纵向上的最终位置 flagRL 记录机器人相 ...
- [BZOJ 2653] middle(可持久化线段树+二分答案)
[BZOJ 2653] middle(可持久化线段树+二分答案) 题面 一个长度为n的序列a,设其排过序之后为b,其中位数定义为b[n/2],其中a,b从0开始标号,除法取下整. 给你一个长度为n的序 ...
- luoguP3384 [模板]树链剖分
luogu P3384 [模板]树链剖分 题目 #include<iostream> #include<cstdlib> #include<cstdio> #inc ...
- 【JAVA】 04-Java中的多线程
链接: 笔记目录:毕向东Java基础视频教程-笔记 GitHub库:JavaBXD33 目录: <> <> 内容待整理: 多线程引入 概述 多线程: 进程:正在执行中的程序,其 ...
- elasticsearch 深入 —— 结构化搜索
结构化搜索 结构化搜索(Structured search) 是指有关探询那些具有内在结构数据的过程.比如日期.时间和数字都是结构化的:它们有精确的格式,我们可以对这些格式进行逻辑操作.比较常见的操作 ...
- 苹果正制造一款疯狂的“16K”VR耳机,效果到底有多牛?
苹果一直以来都有传闻称正在研发一副增强现实眼镜,但今天的一份报告显示,他们希望在虚拟现实领域与Google,微软和Facebook竞争. 据CNET报道,苹果公司着眼于2020年发布的将AR和VR技术 ...